BPMN_RPA
Robotic Process Automation in Windows and Linux by using BPMN diagrams. Create flows in BPMN notation and execute them in Windows and Linux. This package contains 2 types of flow-engines:
- The Workflow Engine: runs a flow from beginning to end.
- The CheckList Engine: runs a flow step by step and saves the state of the flow after each step. This allows you to resume the flow at any time!
With this Framework you can draw Business Process Model Notation based Diagrams and run those diagrams with a WorkflowEngine. You can run flows that were made with one of the following programs:
- BPMN-RPA Studio (Freeware). Watch: https://youtu.be/RJ75ASpemgE
- DrawIO (Freeware based on the mxGraph model notation of https://app.diagrams.net/). You can download the DrawIO desktop version here.
- Microsoft Visio
There is no need for installing BPMN-RPA Studio, DrawIO or Visio to run the flows. Installing one of these applications is only needed for creating the flows.
Content:
- Quick Start
- First start
- Recognized Shapes
- Variables
- Loops
- Instantiate a Class and use in Flow
- Passing input to the WorkflowEngine
- Logging
- End a flow
- Step by step flow execution
- PlugIn
- Example
- Databases
- The CheckList Engine
Quick start
- Open the application for creating the flow (BPMN-RPA Studio is preferred, but you can also use diagram.net, DrawIO desktop app or Ms Visio)
- For Draw.io only: Import the BPMN RPA Shape library ( file -> open library, which you can download for DrawIO here and for MsVisio here).
If you want to generate your own DrawIO shape librar from your Python modules, then use the generator provided here. To use this generator from the commandline you must provide both the path to the python module as the first parameter and the folder in which to generate the DrawIO library as second parameter:
python Generate_drawIO_library.py "\MyPythonModule.py" "\tmp\MyDrawIOShapesFolder"Make sure you have documented your Python code with docstrings in the reStructuredText (reST) format, so the comments will be used as the description of the shape in the DrawIO library. When generating shapes from a module, the generator will look for all classes and functions in the module and generate a shape for each of them. A shape is also generated for the init function of a class. The shape will have the name "create
object" and will have an output variable "% %". This class variable is used in all the generated shapes of that class. The generator will also look for all the input parameters of the function and generate an input field for each of them. The input field will have the same name as the input parameter of the function. The generator will also look for all the output parameters of the function and generate an output field for each of them. The output field will have the same name as the output parameter of the function. The generator will also look for all the attributes of the class and generate an input field for each of them. The input field will have the same name as the attribute of the class. The generator will also look for all the methods of the class and generate a shape for each of them. The shape will have the name of the method and will have an output variable "% . %". This method variable is used in all the generated shapes of that method. The generator will also look for all the input parameters of the method and generate an input field for each of them. The input field will have the same name as the input parameter of the method. The generator will also look for all the output parameters of the method and generate an output field for each of them. The output field will have the same name as the output parameter of the method. The generator will also look for all the attributes of the method and generate an input field for each of them. The input field will have the same name as the attribute of the method. The generator will also look for all the input parameters of the init function and generate an input field for each of them. The input field will have the same name as the input parameter of the init function. The generator will also look for all the output parameters of the init function and generate an output field for each of them. The output field will have the same name as the output parameter of the init function. The generator will also look for all the attributes of the class and generate an input field for each of them. The input field will have the same name as the attribute of the class. The generator will also look for all the methods of the class and generate a shape for each of them. The shape will have the name of the method and will have an output variable "% . %". This method variable is used in all the generated shapes of that method. The generator will also look for all the input parameters of the method and generate an input field for each of them.
Please notice that only BPMN-RPA Studio contains all the Shapes for all the shipped functions in the Scripts folder of the BPMN_RPA Python package.
- For Draw.io only: Import the BPMN RPA Shape library ( file -> open library, which you can download for DrawIO here and for MsVisio here).
- Create your Diagram in BPMN-RPA Studio, in https://app.diagrams.net/ or in the Desktop application (DrawIO or Ms Visio) by using the appropriate BPMN_RPA Shape-set
- Save your diagram (as .flw for BPMN-RPA Studio, .drawio or .xml for DrawIO or as vsdx for Visio)
- You have several options to run your workflow:
- by generating a single Python script in BPMN-RPA Studio that can contains both the code to start the WorkflowEngine as the flow steps itself
- by using the BPMN_RPA_Starter.py
- start the flow with the WorkflowEngine in code
First start
The first time you will try to run a Flow, you will be asked to enter the path of your install directory. If you are using Windows, the path of the installation directory will be saved in the registry (path saved in registry key 'HKEY_CURRENT_USER\Software\BPMN_RPA\dbPath') and is used to create a SQLite database for logging purposes, called 'Orchestrator.db'. The WorkflowEngine must also know where your python.exe is located. You will be asked to enter the full path to the python.exe file (including the '.exe' extension). Again, if you are using Windows this path will be saved in registry key 'HKEY_CURRENT_USER\Software\BPMN_RPA\PythonPath'.
For Linux users a "settings" file together with the orchestrator database will be created (the settings file will be created in /etc/BPMN_RPA_settings).
When you want to use MsSql server with a trusted connection instead of the automatically available SQLite database, then install MsSqlServer on the local machine and manually create a database called "Orchestrator". When running your first flow, all tables will be created.
Recognized Shapes
For the Workflow engine to recognize the flow, you must use the recommended shape attributes with the following Shapes:
Tasks
You can use Tasks to call Python scripts. For the WorkflowEngine to recognize the Tasks, each Task has to contain certain attributes to make this possible.
-
Recommended attributes:
- Module: This is the full path to the Python file that contains your Class and/or function.
- From file: specify the full path (including extension .py) if you want to load you module from a specific file location.
- From file in Script directory: specify only the module name (including extension .py) of the module you want to use.
- From installed package: specify only the module name (without extension .py).
- No Module field: you can delete the Module field to call a function in the WorkflowEngine class directly.
- Class: for reference to the Class to use in the Module. You can delete this field if the called module has only functions and no class.
- Function: The name of the Function to Call. This field is mandatory.
- Output_variable: The name of the variable that must store the output of the current action. If you don't use this field (or delete it), the current Task will have no output that can be used by other Tasks.
- Module: This is the full path to the Python file that contains your Class and/or function.
-
Optional attributes:
-
You can specify any input value for the called function directly by adding an extra attribute to the shape with exactly the same name as the expected input parameter(s) of the function.
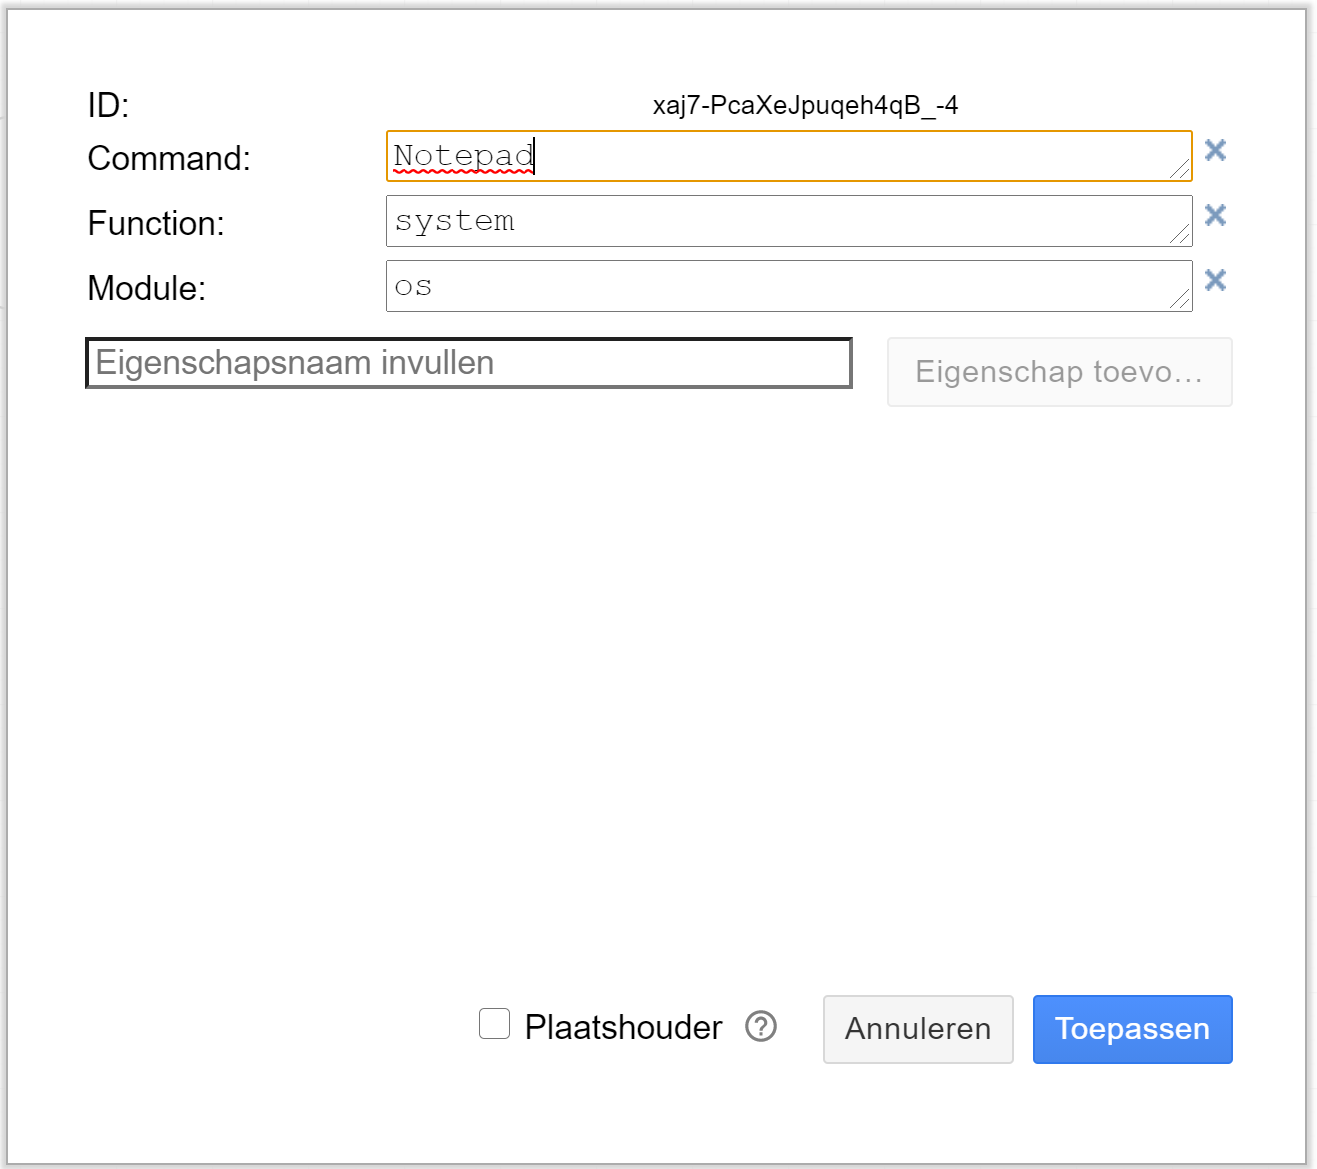
P.e.: to call
os.system('Notepad')You look up the name of the input parameter(s) in the official documentation (or in the code). In this example, the input parameter is called 'command'. You then set the following attributes:
-
GateWays
- For now, you can only use the Exclusive Gateway and the Parallel Gateway. These Gateways must have a Data attribute named 'Type' with the value 'Exclusive Gateway' or 'Parallel Gateway' respectively. The use of the Parallel Gateway is momentarely restricted to transform multiple inputs into one output. At this moment multiple outputs are not yet allowed.
Sequence flow arrow
- If the Sequence flow arrow is originating from an Exclusive Gateway, the Sequence flow arrow must have a value of 'True' or 'False' ('Yes' or 'No' is also accepted).
Variables
The % sign is used as brackets around a Variable. For example, "%name%" is the Variable 'name'. When you use %name% as an input, the Action will use the value that has previously been stored in that Variable, so you should have an earlier Action that assigned a value to %name% as an output. By assigning output values to Variables, and then using them as input in later steps, you can pass information through a Workflow.
You can store any type of information into a variable, like:
- Texts
- Numbers
- Booleans
- Lists
- Dictionary
- Class objects
etc. etc.
System variables
System variables are pre-defined variables that provide information that can be used in flow attributes. The System variables content is set by the WorkflowEngine automatically and cannot be changed. All system variables begin with a double underscore between precent signs. Available variables:
- %__folderdesktop_\%: returns the desktop folder of the current user
- %__folderdownloads_\%: returns the downloads folder of the current user
- %__foldersystem_\%: returns the windows system folder
- %__month__%: returns the current month
- %__now__%: returns the datetime now() object
- %__nowformatted_\%: returns today with time in the format 'dd-mm-yyyy_hhmmss'
- %__time__%: returns the current time
- %__timeformatted_\%: returns the current time in 'hh:mm:ss' format
- %__today__%: returns the current date
- %__todayformatted_\%: returns the current date in 'dd-mm-yyyy' format
- %__tomorrow__%: returns the date of tomorrow
- %__tomorrowformatted_\%: returns the date of tomorrow in 'dd-mm-yyyy' format
- %__username_\%: returns the account name of the user that is currently logged in
- %__weeknumber__%: returns the current weeknumber
- %__year__%: returns the current year number
- %__yesterday__%: returns the date of yesterday
- %__yesterdayformatted_\%: returns the date of yesterday in 'dd-mm-yyyy' format
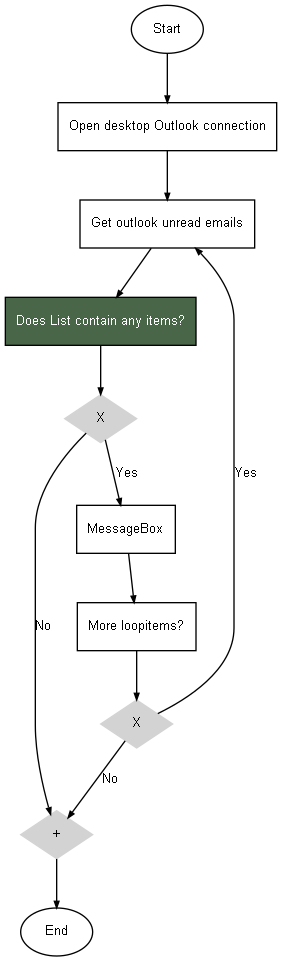
Loops
You can create loops by using exclusive gateways. An exclusive gateway should always have two sequence flow arrows: one with the label "True" and the other with the label "False". The actual true/false decision isn't made in the exclusive gateway itself, but in the last Task before the exclusive gateway. A loop is started by a Task that is calling a Python script that returns a list. The task is recognized as the start of the loop by adding/using the attribute 'Loopcounter'. The loopcounter number is the starting point for the loop (for returning the n-th element of the list). The task before the Exclusive Gateway should be the 'More loop items?' Task. You can find this Task in the predefined Shapes. This Task should have two attributes: 'Function' with value 'loop_items_check' will call the loop_items_check() function in the WorkflowEngine object, and 'Loop_variable' with the variable name to loop as value. The loop_items_check() function will return True or False, which will be used by the WorkflowEngine to decide which Sequence Flow Arrow to follow.
Special loop variable options
You can get the value of the loopvariable counter by using the '.counter' attribute of the loopvariable (p.e.: %test.counter%). To get the whole list that is looped, use the '.object' attribute of the loopvariable (p.e.: '%test.object%') or just the variable name (like '%test%').
An example:
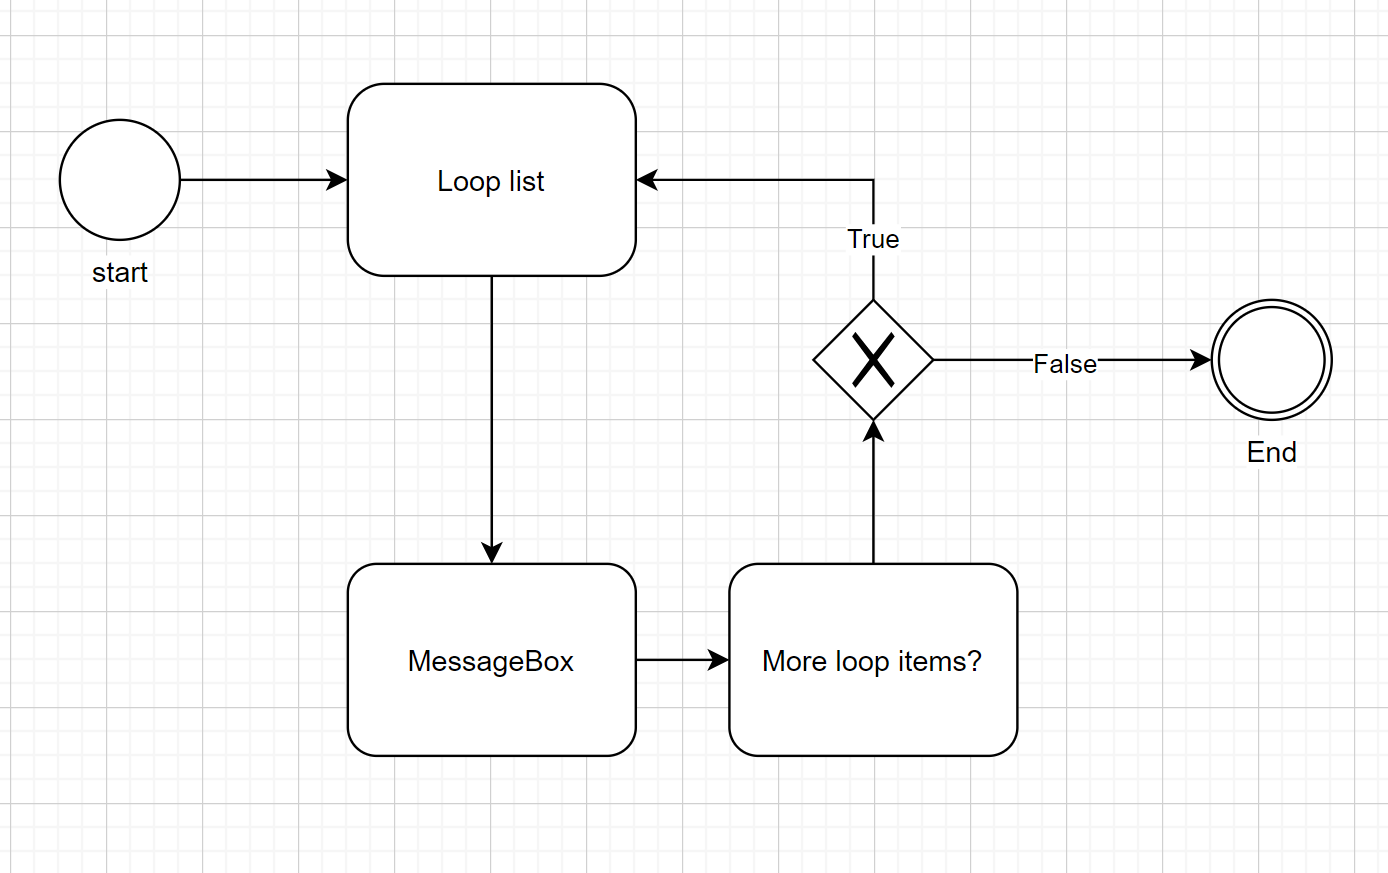
Explanation:
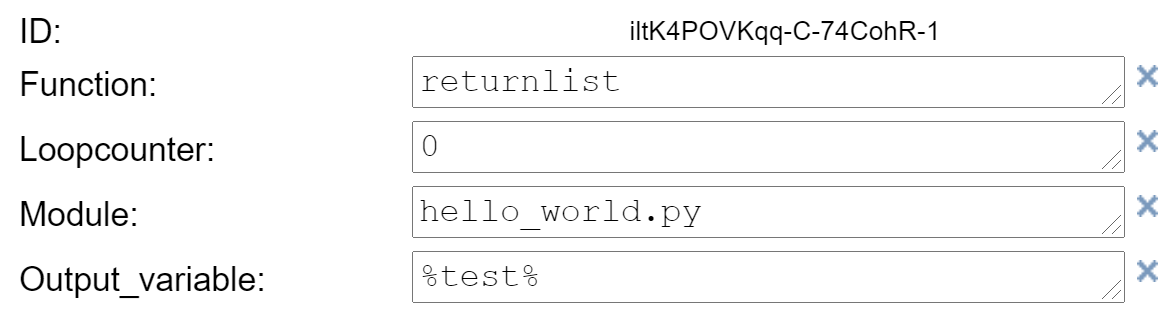
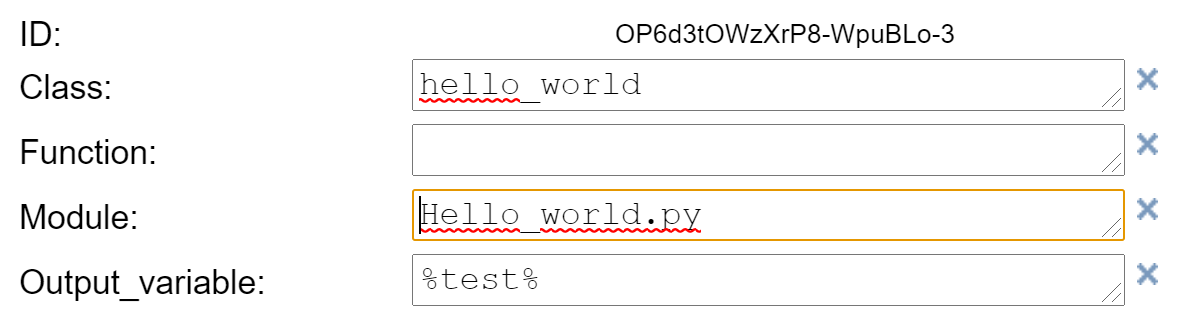
- The loop starts with the 'Loop list' Task. This The function 'returnlist' is called in the module 'hello_world.py'. There is no path specified for the module and the module name ends with '.py', so the path to the module will be 'current directory\Scripts\hello_world.py'. This script returns a List with the elements ["this", "is", "a", "test"] and stores it in the variable named '%test%'. The attribute 'Loopcounter' is the important indication that this Task will be the start of a loop. The number in this field will be the start for the loop (p.e.: setting 'Loopcounter' to 1 results in loping the list from the second element in the list).
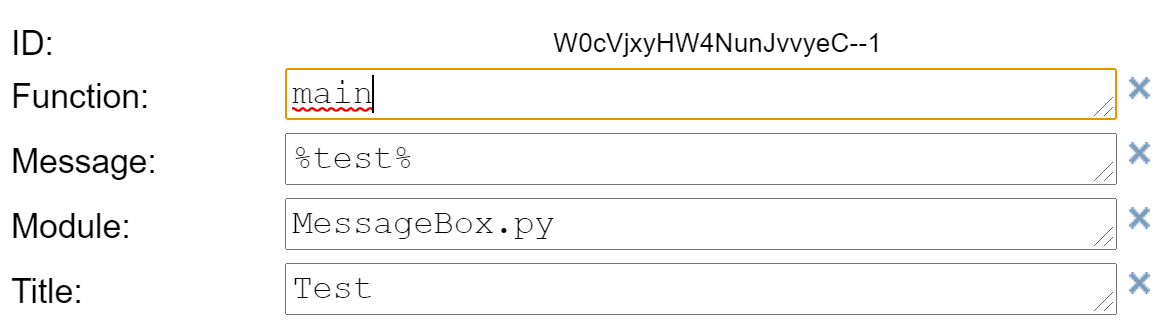
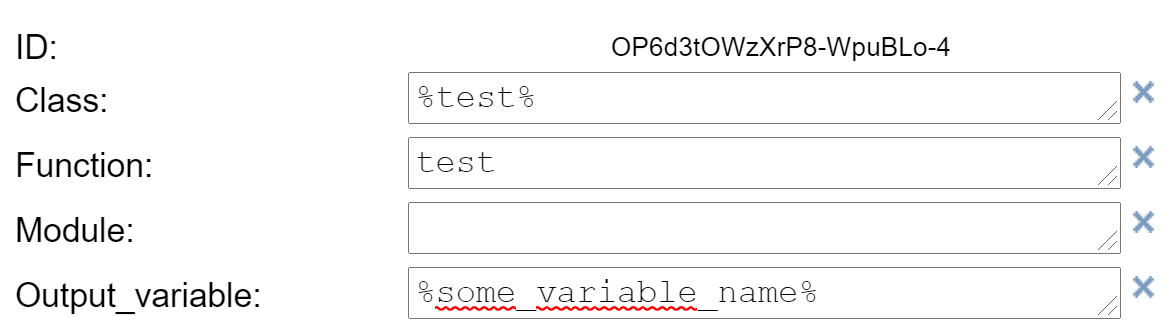
- The MessageBox function is called ('current directory\Scripts\MessageBox.py'). The title will be "test", and the message will be a word from the list in confirmity with the 'Loopcounter' number ('%test%').
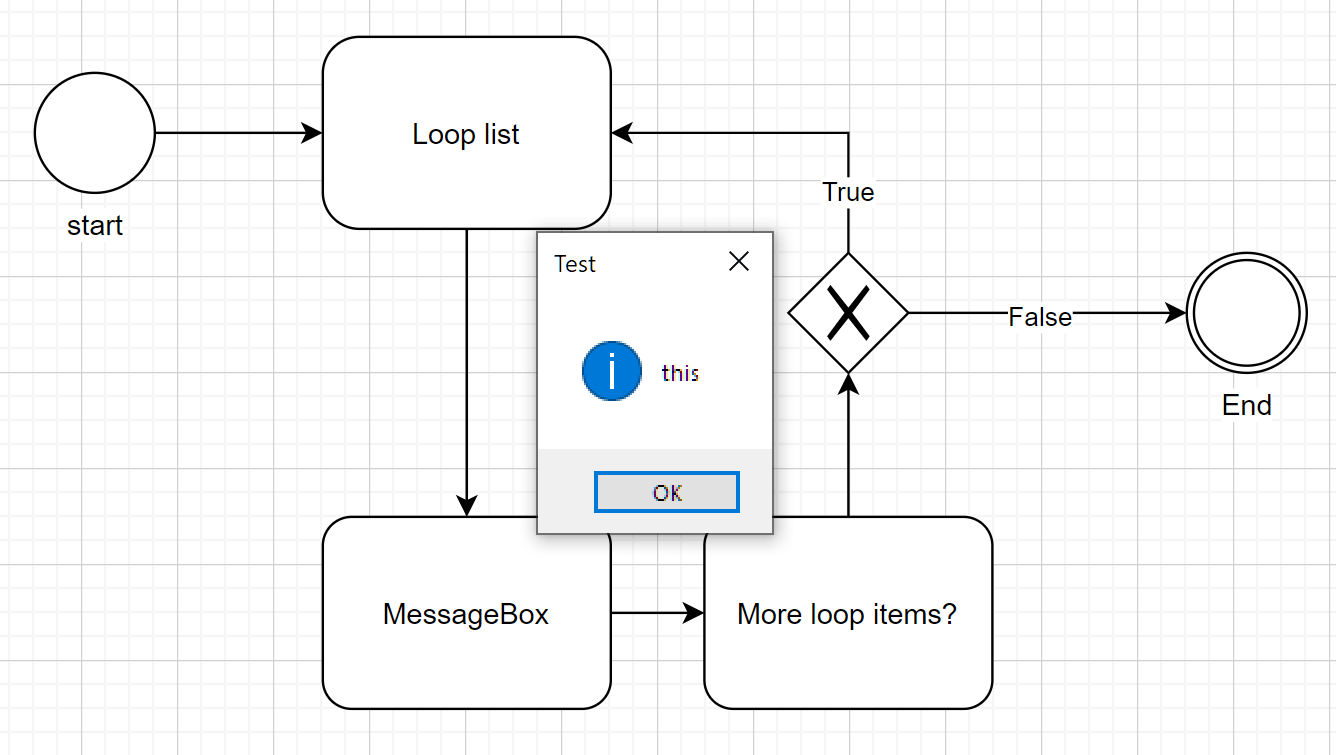
- The 'More loop items?' Task checks if the List in the variable '%test%' has any items left to loop. If so, then it returns True, otherwise it will return False. If it returns True, the 'Loopcounter' is raised by 1. The function is called within the WorkflowEngine class (no 'Module'or 'Class' specified).

- The Exclusive Gateway is deciding which Sequence Flow Arrow to follow. If the loop is still ongoing, the 'Loop List' Task will be called again and the next element in the list will be returned.
Retrieving information
In order to retrieve a specific item of a list, you must use the following format (notation): %VariableName[ItemNumber]%. The “ItemNumber” should be 0 for the first item of the list, 1 for the second and so on. For example, if you have a list that is stored in the variable %MyList% and contains 10 items, you can retrieve the first item with: %MyList[0]% and the last item with %MyList[9]%. For data tables, you must use the following notation: %VariableName[RowNumber][ColumnNumber]%.
If you would like to retrieve an attribute of a stored object or dictionary in a variable, then you must use the %VariableName.attributeName% notation. Just use the %VariableName% notation to retreive the full object or dictionary.
Instantiate a Class and use in Flow
You can instantiate a Python class by using ony these attributes (leave the 'Function' attribute blank or delete it):
This instantiates the class and saves the instance in the variable %test%.
You can call any function of the class object by use of these attributes in Tasks following the instantiation Task (leave the 'Module' attribute blank or delete it):
Passing input to the WorkflowEngine
You can pass input to the WorkflowEngine by using the 'input_parameter' argument. Please note that it is only possible to pass a single object to the WorkflowEngine. Wrap all your inputs into a single object (like: dictionary or custom object) to pass multiple values to the WorkflowEngine.
myObject = ['this could be', 'any', 'type', 'of', 'object']
engine = WorkflowEngine(input_parameter=myObject)
Call the internal 'get_input_parameter' function to retrieve this input value and assign it to a variable name for later use in your flow:

When starting a Workflow from the commandline, you may use the 'As_dictionary' option in the 'Get input parameter' Shape of your Flow with the value 'True' to convert the string input to a dictionary object. P.e.:
c:\> python BPMN_RPA_Starter.py test.xml "{\"key1\": \"value1\",\"key2\": \"value2\"}"Logging
The WorkflowEngine logs all executed steps in a SQLite database, called 'Orchestrator.db'. This database is located in the install directory. If the install directory is unknown when starting the WorkflowEngine, the WorkflowEngine will ask you for the folder. This path then will be saved in the registry and the Orchestrator database will be created in that folder.
End a flow
The ending of a flow will also be logged in the Orchestrator database. When ending a flow, the output of the last executed step will also be the output of the entire flow, unless the flow is ended with an exitcode.
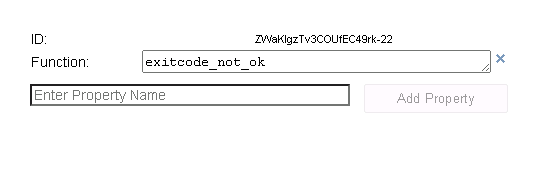
End flow with exitcode
If you wish to end your flow with an exitcode (0 for OK and -1 for not OK) then you can call one of the internal functions of the WorkflowEngine:
- exitcode_ok
- exitcode_not_ok
Just call one of the above functions by only passing the 'function' parameter (thus not passing the 'Module' and 'Class' parameter):
Step by step flow execution
As from BPMN-RPA version 4.x.x and above, you can perform step-by-step flow execution in your code. An example:
from BPMN_RPA.WorkflowEngine import WorkflowEngine
engine = WorkflowEngine()
doc = engine.open("c:\\test.flw")
steps = engine.get_flow(doc)
nextstep = steps[0]
while nextstep is not None:
    q = input("Execute next step? (y/n)")
    if q.lower()!="y":
        break
    print("\n")
    result =  engine.run_flow(nextstep,True )
    nextstep = engine.get_next_step(nextstep, steps, result)
    print(f"Output of this step: {result}")
PlugIn
BPMN-RPA has a Drawio plugin for checking your flows. You can download it here: PlugIn
Example
Start a flow from the commandline:
- Open a command prompt
- Enter:
c:\> python BPMN_RPA_Starter.py test.xml
Start a flow in code:
from BPMN_RPA.WorkflowEngine import WorkflowEngine
engine = WorkflowEngine()
doc = engine.open("test.xml")
steps = engine.get_flow(doc)
engine.run_flow(steps)
Databases
BPMN-RPA uses a SQLite database by default that is automatically generated. If you want to use MsSql server or PostgreSQL server instead, then install MsSqlServer or PostgreSQL on the host machine and manually create a database called "Orchestrator". The WorkflowEngine has a 'use_sql_server' and 'use_postgresql' parameter in the constructor. Set the parameter to True to use MsSql server or PostgreSQL server instead of the default SQLite database. When using either use_sql_server or use_postgresql, you can also specify the 'connection_string' parameter:
engine = WorkflowEngine(use_postgresql=True, connection_string="dbname=orchestrator host=my.postgres.server user=myusername password=mypassword")Default the following connection strings are used:
- for MsSql server: "Driver={ODBC Driver 17 for SQL Server};Server=localhost;Database=orchestrator;Trusted_Connection=yes;"
- for Postgres: "dbname=orchestrator host=localhost user=postgres password=postgres"
If you want to use a different connection string, then you must specify the 'connection_string' parameter. The 'connection_string' parameter doesn't need to be specified when using SQLite. When running your first flow, all tables will be created in the 'orchestrator' database.
The CheckList Engine
The CheckListEngine runs any flow like the WorkflowEngine. The only difference is that the CheckListEngine will save the entire state of the whole flow in a separate file after each step. This allows you to resume the flow from the last saved state. This is very useful when you have a long-running flow with waiting periods between steps (like p.e. an onboarding flow for new employees). It is likely that you want to create several CheckList instances of the original flow, so that you can run several flows in parallel. This is possible by using the 'full_path_save_as' parameter in the CheckListEngine constructor. This parameter is optional and will default to the name of the original flow (without the .flw extension). If you want to run several flows in parallel, then you must use different instance names (i.e. 'full_path_save_as') for each flow. The CheckListEngine will create a separate file for each flow instance.
To start a new instance of a flow, just use the CheckListEngine constructor:
from BPMN_RPA.CheckListEngine import CheckListEngine

# Start a new instance of the flow 'example.flow' and create an instance file called 'example_instance1'
chkLst = ChecklistEngine(flow_name="\\my_flows\\example.flw", full_path_save_as="\\instances\\example_instance_1")
# This will load the flow and start the first step. The state of the flow will be saved in the file '\instances\example_instance1'.

# You can run the flow instance by calling the 'run_flow' function. This function has 2 optional parameters:
# 1. ask_permission: if set to True, the user will be asked for permission to execute the next step. Default is False.
# 2. msgbox: only applicable if ask_permission is set to True. If msgbox is True, a messagebox will be shown to the user. If False, the user will be asked to enter Yes (y) or No (n) in the console. Default is True.
# When the user answers 'No' to the question, the flow will be ended and the state of the flow will be saved.

chkLst.run_flow(ask_permission=True, msgbox=True)
When you want to pause the flow, just click 'No' in the MessageBox or press 'n' in the console. The state of the flow will be saved in the instance file, together with a flow diagram (.png file with the same name as the instance file). The current step will be highlighted in green in the flow diagram. Example:
To resume a flow at any time you like from a saved state, use the CheckListEngine constructor and call the 'resume_flow' function:
from BPMN_RPA.CheckListEngine import CheckListEngine

# Resume the flow instance 'example_instance1'
chkLst = ChecklistEngine()
chkLst.resume_flow("\\instances\\example_instance_1", ask_permission=True, msgbox=True)