RabbitMQ Extension for Azure Functions

Azure Functions Serverless Compute is a platform that allows you to run functions that are triggered by events. Event Source can be anything like Http Endpoint, Message Queue, etc... There are many events supported by Azure Functions.
Microsoft provides many tools and libraries to make the development of functions that run in Azure convenient and easy. Microsoft has contributed the Azure Functions Runtime to the open-source community. Azure Functions Runtime/Host is a set of libraries for Azure WebJobs SDK. Azure WebJobs SDK is a framework to write background processing jobs that run on Azure. Azure WebJobs SDK provides system to declare Triggers and Bindings.
A Trigger invokes a function. Using WebJobs SDK provides a machanism to declare triggers. In most of the cases a Trigger is associated with data. This data is passed to the function as a paramter. The WebJobs SDK provide many build-in triggers. The SDK also gives us the framework to define custom triggers. A functon should have exactly one trigger.
Binding is a method to connect other resources to the function. Bindings are optional. A binding can be input or outpu binding. A function receives data from external resources using input bindings. Function send data to external resources using output bindings.
This article describes how to use the open-source RabbitMQ extension provided by Microsoft. Please note that the RabbitMQ Extension is in the Beta stage. Using it in production environment is not recommeded.
The example we are going to develop is a simple function to receive a JSON payload from a RabbitMQ Queue and conditionally output to another RabbitMQ Queue. The function execution starts when a producer sends JSON payload to a RabbitMQ Queue. In this example, we are considering an IoT scenario where different temperature sensors send temperature reading in a particular interval. An Edge Processing device route this message to a RabbitMQ Queue. The RabbitMQ extension triggers our function when a message is received. Out function checks whether the temperature is below a minimum or above a maximum limit. If it is out or range, then send a message to another queue. Another function process this message. For the sake of simplicity, let's use a simple JSON document like one below.
{
    "device_id": "xxxxx",
    "temperature": "xx.xx"
}
We will use Visual Studio for the develoment. I am using Microsoft Windows but steps describes here is applicable to other platforms also.
Let's get started
Open Visual Studio and create a new project. In the New Project wizard, search for the Azure Function template and select it and click Next. Name the project as rmqfn (or whatever you like) and click Next. Select Empty from the Azure Function Application page.
Next, we need to install the RabbitMQ Extension using the NuGet Package Manager. Open NuGet Package Manager Console and run the following command.
Install-Package Microsoft.Azure.WebJobs.Extensions.RabbitMQ -Version0.2.2029-betaThis command will install the RabbitMQ extension.
Let's add a new function to the project. To add a new Function, right-click the project and select Add and select New Azure Function from the popup. Since RabbitMQ Extension is not available by default, let's choose HttpTrigger and create a function. We can change the trigger in the next step.

Now we will change the function and add the RabbitMQ Trigger. We will add a binding also to publish notification message. Given below is our new function.
using Microsoft.Azure.WebJobs;
using Microsoft.Extensions.Logging;
using Newtonsoft.Json;
using RabbitMQ.Client;
using System;
using System.Text;

namespace rmqfn
{
    public static class fn
    {
        [FunctionName("fn")]
        public static void Run(
            [RabbitMQTrigger("%InputQueueName%", ConnectionStringSetting = "RabbitMqConnection")] string inputMessage,
            [RabbitMQ(ConnectionStringSetting = "RabbitMqConnection")] IModel client,
            ILogger log)
        {
            RMQMessage message = JsonConvert.DeserializeObject<RMQMessage>(inputMessage);

            log.LogInformation($"Message received {inputMessage}.");
            log.LogInformation($"DeviceID {message.deviceid}.");
            log.LogInformation($"Temperature {message.temperature}.");

            if(message.temperature < 20.0f)
            {
                string notificationMessage = inputMessage;
                var body = Encoding.UTF8.GetBytes(notificationMessage);
                var queuename = Environment.GetEnvironmentVariable("OutputQueueName");

                QueueDeclareOk queue = client.QueueDeclare(queuename, true, false, false, null);

                client.BasicPublish(exchange: "", routingKey: queuename, basicProperties: null, body: body);
            }
        }
    }
}
Take a look at how we declare our Trigger.
[RabbitMQTrigger("%InputQueueName%", ConnectionStringSetting = "RabbitMqConnection")] string inputMessageThe RabbitMQTrigger takes two parameters, a Queue Name and a ConnectionStringSetting. The Queue name defiens from which queue to use. A message received in that queue causes the function to run. The ConnectionStringSetting parameter refers to an application setting name. The SDK reads the connection string from this application setting. We ca declare connection string in the following format.
amqp://<username>:<password>@host:portFor testing locally, we can specify this settings in the local.setting.json file. In the production environment, we should use environment variables to specify application settings.
In our example, the local.settings.json file looks like this:
{
    "IsEncrypted": false,
    "Values": {
        "AzureWebJobsStorage": "UseDevelopmentStorage=false",
        "FUNCTIONS_WORKER_RUNTIME": "dotnet",
        "RabbitMqConnection": "amqp://<username:password>@<server>",
        "InputQueueName": "TemperatureReading",
        "OutputQueueName: "TemperatureNotification"
    }
}
RabbitMqConnection setting declares the RabbitMQ connection string, InputQueueName declares the input queue name and OutputQueueName declares the output queue name. You should replace the placeholder values.
Before we start testing our function, we need to set up a RabbitMQ server. I am using the following Dockerfile and docker-compose.yml file to run the RabbitMQ server.
Dockerfile
FROM rabbitmq:management-alpine
RUN rabbitmq-plugins enable --offline rabbitmq_mqtt rabbitmq_federation_management

ENV RABBITMQ_ERLANG_COOKIE <Your Erlang Cookie, this can be any hex string>
ENV RABBITMQ_DEFAULT_USER <Desired username>
ENV RABBITMQ_DEFAULT_PASS <Desired password>

EXPOSE 4369 5671 5672 25672
EXPOSE 15671
EXPOSE 15672
docker-compose file
version: "3"

services:
    dvicemq:
        build:
            context: .
            dockerfile: Dockerfile
        ports:
            - "15672:15672"
            - "5672:5672"
To start the RabbitMQ docker container, run the following command.
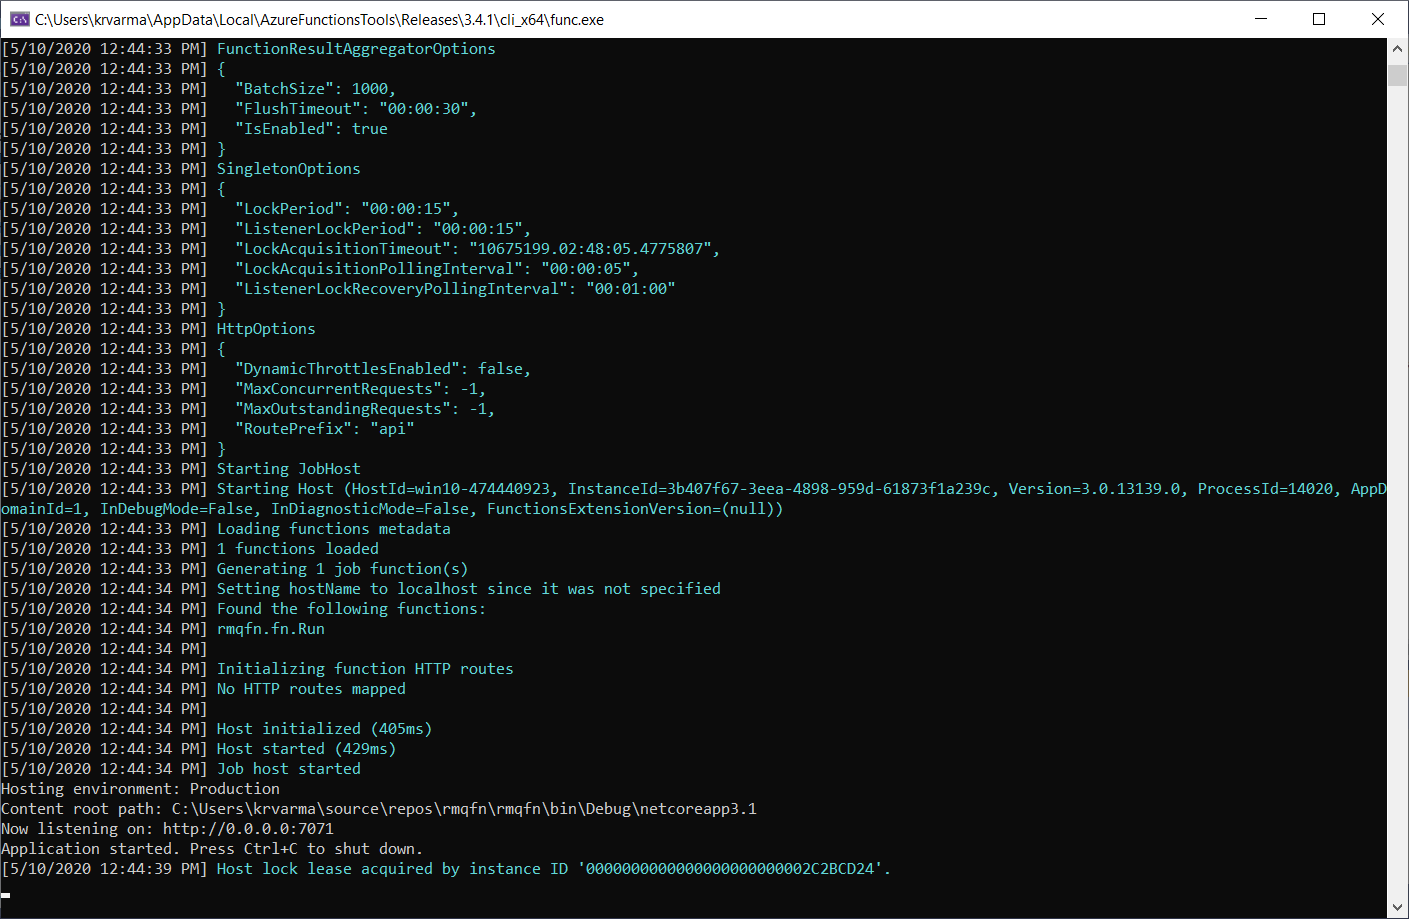
docker-compose up -dTo run the project, click the Run toolbar button or press the hot-key Ctrl+F5. If everything goes well you can see the application running and waiting for the event.
To test our function, we need a program to send messages to the RabbitMQ queue TemperatureReading. I wrote the following two sample applications in Node.js to send and receive messages.
send.js
var amqp = require('amqplib');
var args = process.argv.slice(2)
var queuename = args[0]
var temperature = args[1]

amqp.connect('amqp://<username>:<password>@host:port').then(function(conn) {
  return conn.createChannel().then(function(ch) {
    var msg = 'Hello World, from RabbitMQ';

    var ok = ch.assertQueue(queuename, {durable: false});

    return ok.then(function(_qok) {
      var maxMessages = 1;

      for(i=0; i<maxMessages; ++i){
        msg = {
          deviceid: "123456789",
          temperature: temperature
        }

        ch.sendToQueue(queuename, Buffer.from(JSON.stringify(msg)));
      }

      console.log(" [x] Sent '%s'", msg);
      return ch.close();
    });
  }).finally(function() { conn.close(); });
}).catch(console.warn)
receive.js
var args = process.argv.slice(2)
var queuename = args[0]

var open = require('amqplib').connect('amqp://<username>:<password>@host:port');

// Consumer
open.then(function(conn) {
    return conn.createChannel();
  }).then(function(ch) {
    return ch.assertQueue(queuename).then(function(ok) {
      return ch.consume(queuename, function(msg) {
        if (msg !== null) {
          console.log(msg.content.toString());
          ch.ack(msg);
        }
      });
    });
  }).catch(console.warn);
To send the message to the queue run the following command in a terminal window:
node send.js TemperatureReading 19.2To receive the output message from the notification queue, run the following command in another terminal window:
node receive.js TemperatureNotificationIf everything goes well, you can see the logs from the terminal window that indicates successful running. You also see the message from the output queue if the temperature is below 20.
We have successfully created a function that gets triggered by RabbitMQ. To run that in a production environment we need to package it into Docker container. We can create Dockerfile using the Azure Function Core tools.
Creating Dockerfile
In order to create Dockerfile, we need to install the Azure Functions Core Tool. You can install it using the npm install command.
pm i -g azure-functions-core-tools@3 --unsafe-perm trueOnce it is installed, you can run the following command to generate Dockerfile from the exiting project. Go to the project folder and run the following command to generate Dockerfile.
func init --docker-onlyPlease note the --docker-only parameter, this will ensure that only Dockerfile is created from the existing project and the tool will not initialize the project. The Dockerfile looks like this.
FROM mcr.microsoft.com/dotnet/core/sdk:3.0 AS installer-env

COPY . /src/dotnet-function-app
RUN cd /src/dotnet-function-app && \
    mkdir -p /home/site/wwwroot && \
    dotnet publish *.csproj --output /home/site/wwwroot

# To enable ssh & remote debugging on app service change the base image to the one below
# FROM mcr.microsoft.com/azure-functions/dotnet:3.0-appservice
FROM mcr.microsoft.com/azure-functions/dotnet:3.0

ENV AzureWebJobsScriptRoot=/home/site/wwwroot \
    AzureFunctionsJobHost__Logging__Console__IsEnabled=true

COPY --from=installer-env ["/home/site/wwwroot", "/home/site/wwwroot"]
Notice that our 3 environment variables are not properly included in the Dockerfile. I am not sure whether this is intentional or a bug. Anyway, we include this in the Dockerfile. Dockerfile looks like this.
FROM mcr.microsoft.com/dotnet/core/sdk:3.1 AS installer-env

COPY . /src/dotnet-function-app
RUN cd /src/dotnet-function-app && \
    mkdir -p /home/site/wwwroot && \
    dotnet publish *.csproj --output /home/site/wwwroot

# To enable ssh & remote debugging on app service change the base image to the one below
# FROM mcr.microsoft.com/azure-functions/dotnet:3.0-appservice
FROM mcr.microsoft.com/azure-functions/dotnet:3.0

ENV AzureWebJobsScriptRoot=/home/site/wwwroot \
    AzureFunctionsJobHost__Logging__Console__IsEnable=true
    RabbitMqConnection="amqp://<username>:<password>@host:port" \
    InputQueueName="TemperatureReading" \
    OutputQueueName="TemperatureNotification"

COPY --from=installer-env ["/home/site/wwwroot", "/home/site/wwwroot"]
Once the Dockerfile is modified, you can build the image using the following Docker command.
docker build . -t rmqfnThis command will build the image and tag it as rmqfn. To run the image run the following command.
docker run rmqfn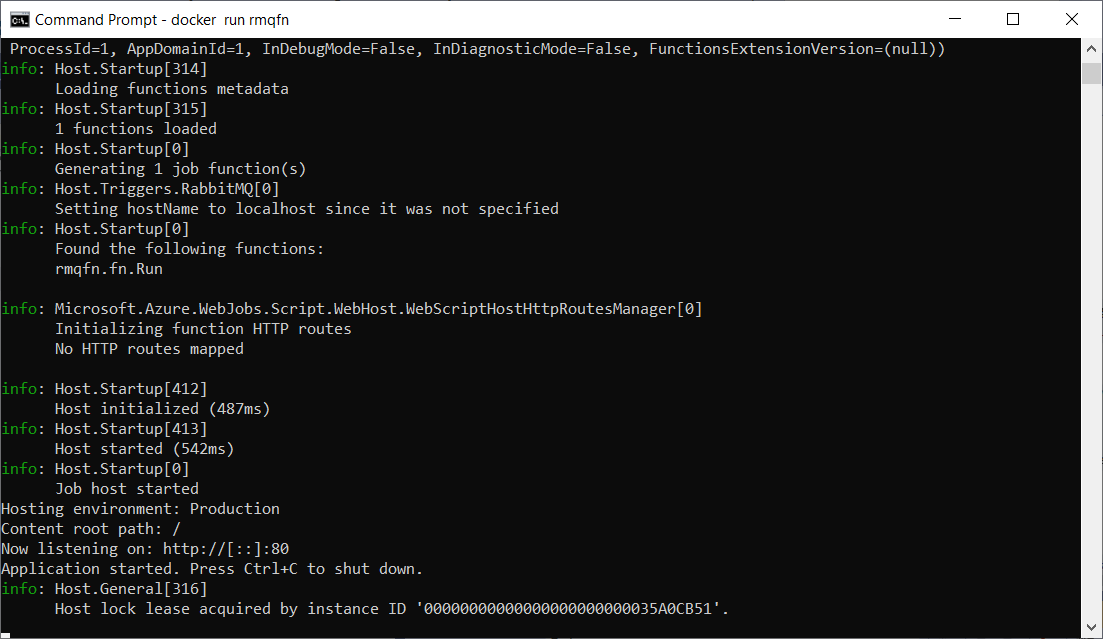
Now you have an Azure Function using RabbitMQ trigger ready to run on production environments.
In the next article, we will explore how to run the container on Kubernetes and scale it using KEDA.
Till then, Happy coding! :)