Not1MM

The worlds #1 unfinished contest logger *According to my daughter Corinna.

![]()
![]()


- Not1MM
- What and why is Not1MM
- The elephant in the room
- The What
- Target Environment
- The Why
- General logging
- Current state
- Code maturity
- Data and RTTY
- Other not so supported contests
- Our Code Contributors ✨
- List of should be working contests
- Recent Changes (Polishing the Turd)
- Flatpak
- Installation
- Prerequisites
- Common installation recipes for Ubuntu and Fedora
- Python, PyPI, pip and pipx
- Installing from GitHub source
- After the install
- You may or may not get a warning message like
- Or this fan favorite
- Update your CTY and SCP files
- Various data file locations
- Data
- Config
- The Database
- Why
- The first one is free
- Why limit yourself
- Revisiting an old friend
- Station Settings dialog (It's REQUIRED Russ)
- Changing station information
- Selecting a contest (It's REQUIRED Russ)
- Selecting a new contest
- Selecting an existing contest as the current contest
- Editing existing contest parameters
- Configuration Settings
- Lookup
- Soundcard
- CAT Control
- CW Keyer interface
- Cluster
- N1MM Packets
- Bands
- Options
- Logging WSJT-X FT8/FT4/ETC and FLDIGI RTTY contacts
- Sending CW
- Editing macro keys
- Macro substitutions
- Macro use with voice
- cty.dat and QRZ lookups for distance and bearing
- Other uses for the call field
- The Windows
- The Main Window
- The Log Window
- The Bandmap Window
- The Check Window
- The Remote VFO Window
- Cabrillo
- ADIF
- Recalulate Mults
- ESM
- Run States
- S\&P States
- Call History Files
- Contest specific notes
- ARRL Sweekstakes
- RAEM
What and why is Not1MM
The elephant in the room
Not1MM's interface is a blatant ripoff of N1MM. It is NOT N1MM and any problem you have with this software should in no way reflect on their software.
The What
Not1MM attempts to be a useable amateur radio, or HAM, contest logger. It's written in Python, 3.9+, and uses Qt6 framework for the graphical interface and SQLite for the database.
Target Environment
The primary target for this application is Linux. It may be able to run on other platforms, BSD, Mac and Windows. But I don't have a way, or desire, to directly support them.
The Why
Currently this exists for my own personal amusement. I've recently retired after 35+ years working for 'The Phone Company', GTE -> Verizon -> Frontier. And being a Gentleman of Leisure, needed something to do in my free time. I'm a casual contester and could not find any contesting software for Linux that I wanted to use. There is Tucnak which is very robust and mature. It just wasn't for me.
General logging
In short... Don't. There are much better general purpose QSO logging programs. Try QLog or CQRLog.
Current state
Code maturity
The current state is "BETA".
I've used it for quite a few contests, and was able to work contacts and submit cabrillos at the end. There are still quite a few features I'd like to implement. And "BETA" is a sort of get out of jail free badge for coders. A safety net for when the program craps the bed. I'm only one guy, so if you see a bug let me know.
Data and RTTY
I've recently added portions of code to watch for WSTJ-X and fldigi QSOs. I've added the Weekly RTTY Test, So RTTY could be tested. Also added FT8/4 and RTTY to ARRL Field Day and ARRL VHF. Found it works better if you don't use FlDigi for making the QSO at all. Rather just using it as a RTTY modem and sending the text for it to send from Not1MM using the function keys or ESM.
Other not so supported contests
Of note, state QSO parties. I haven't worked any yet. And no one has submitted a PR adding one... So there you go. In the near future I'll probably add California, guess where I live, and the 4 states QSO party.
Our Code Contributors ✨
I wish to thank those who've contributed to the project. Below is an automatically generated, 'cause I'm lazy, list of those who've submitted PR's.
List of should be working contests
- General Logging (There are better general loggers like QLog, KLog, CQRLog)
- 10 10 Fall CW
- 10 10 Spring CW
- 10 10 Summer Phone
- 10 10 Winter Phone
- ARRL 10M
- ARRL DX CW, SSB
- ARRL Field Day
- ARRL Sweepstakes CW, SSB
- ARRL VHF January, June, September
- CQ 160 CW, SSB
- CQ WPX CW, RTTY, SSB
- CQ World Wide CW, RTTY, SSB
- CWOps CWT
- DARC Xmas
- Helvetia
- IARU Fieldday R1 CW, SSB
- IARU HF
- ICWC MST
- Japan International DX CW, SSB
- K1USN Slow Speed Test
- LZ DX
- NAQP CW, RTTY, SSB
- Phone Weekly Test
- RAEM
- RAC Canada Day
- REF CW, SSB
- Stew Perry Topband
- Weekly RTTY
- Winter Field Day
Recent Changes (Polishing the Turd)
- [24-11-15] Fix CQWW points, fix mode showing as RPRT.
- [24-11-24-1] Add ESM to CQ160, ARRL VHF, ARRL 10M, 10 10 contests.
- [24-11-24] Added ESM to IARU HF and FieldDay.
- [24-11-23] Made macros per contest.
- [24-11-21] Merged PR from alduhoo setting CW Speed via rigctld, Added ESM and call history support for General Logging.
- [24-11-19] Added ESM to Stew Perry, Phone Weekly, Medium Speed Test and JIDX.
- [24-11-18] Accepted PR from dg9vh for the DARC XMAS Contest.
- [24-11-17] Accepted PR from dg9vh for the LZ DX contest.
- [24-11-15] Made checkwindow font bigger and match a little more contrasted.
- [24-11-12] add check for ipv4 address for CAT.
- [24-11-10] ReJiggered CAT/flrig interface to hopefull make it more workable.
- [24-11-6] Added Call history to ARRL VHF, CQ160, CQWW, StewPerry, Weekly RTTY
- [24-11-5] Fix crash with bad qrz credentials.
- [24-11-3-1] Fixed CWT ESM, Add Call History to CWT, Helvetia, WFD, NAQP, K1USN. Add ESM Helvetia.
- [24-11-3] Added RAEM contest
- [24-11-2] Add beginning of call history files. Add command buttons.
See CHANGELOG.md for prior changes.
Flatpak
I've tried for a couple days to get not1mm to build as a flatpak. I've failed. It keeps failing at building numpy. If you happen to be a flatpak savant, please feel free to look at com.github.mbridak.not1mm.yaml and python3-modules.yaml and clue me into the black magic needed to get it to work.
Installation
Prerequisites
not1mm requires:
- Python 3.9+
- PyQt6
- libportaudio2
- libxcb-cursor0 (maybe... Depends on the distro)
You should install these through your distribution's package manager before continuing.
Common installation recipes for Ubuntu and Fedora
I've taken the time to install some common Linux distributions into a VM and noted the minimum steps needed to install not1mm.
Ubuntu 22.04 LTS, 23.04 and 24.04 LTS
#### Ubuntu 22.04 LTS ```bash sudo apt update sudo apt upgrade sudo apt install -y python3-pip python3-numpy libxcb-cursor0 libportaudio2 python3 -m pip install -U pip # Logout and back in pip3 install PyQt6 pip3 install not1mm ``` #### Ubuntu 23.04 ```bash sudo apt update sudo apt upgrade sudo apt install -y libportaudio2 pipx libxcb-cursor0 pipx install not1mm pipx ensurepath ``` #### Ubuntu 24.04 LTS ```bash sudo apt update sudo apt upgrade sudo apt install -y libportaudio2 pyqt6-dev-tools python3-pip pip install --break-system-packages not1mm source .profile ```Fedora 38, 39 and 40
#### Fedora 38 & 39 ```bash sudo dnf upgrade --refresh sudo dnf install python3-pip pipx portaudio pipx install not1mm pipx ensurepath ``` #### Fedora 40 ```bash sudo dnf upgrade --refresh sudo dnf install python3-pip pipx python3-pyqt6 portaudio pipx install not1mm pipx ensurepath ```Manjaro
#### Manjaro ```bash pamac build not1mm-git ```Mint 22
#### Mint ```bash sudo apt install python3-pip pipx libxcb-cursor0 pipx install not1mm pipx ensurepath ```Python, PyPI, pip and pipx
This software is a Python package hosted on PyPI, and installable with the pip or pipx command. If this is your first exposure to Python packaging you can get all the details from:
- The PyPA
- Install packages in a virtual environment using pip and venv
- Installing stand alone command line tools
In short, You should install stuff into a Python virtual environment. Newer Linux distros will make you do this unless you include a command line argument akin to '--break-my-system' when using pip. I'm not telling you to use pipx. But... Use pipx.
Bootstrapping pipx
Assuming you have only Python installed, your path to pipx is:
# First get pip installed. Either with apt or dnf, or the ensurepip command.
python3 -m ensurepip

# Update the pip that was just installed.
python3 -m pip install --upgrade pip

# Install pipx
python3 -m pip install --user pipx
python3 -m pipx ensurepath
Installing with pipx
Then installing not1mm is as simple as:
# Install not1mm
pipx install not1mm
If you need to later update not1mm, you can do so with:
# Update not1mm
pipx upgrade not1mm
Installing from GitHub source.
### Installing from GitHub source Since this is packaged for PyPI, if you want to work on your own source branch, after cloning from github you would: ```bash pip install --upgrade pip pip install setuptools pip install build source rebuild.sh ``` from the root directory. This installs a build chain and a local editable copy of not1mm. There's two ways to launch the program from the local editable copy. You can either be in the root of the source directory and type: ```bash python not1mm ``` or be in some other directory and just type: ```bash not1mm ```After the install
You can now open a new terminal and type not1mm. On it's first run, it may or
may not install a lovely non AI generated icon, which you can later click on to
launch the application.
You may or may not get a warning message like
WARNING: The script not1mm is installed in '/home/mbridak/.local/bin' which is not on PATH.
Consider adding this directory to PATH or, if you prefer to suppress this warning, use --no-warn-script-location.
If you do, just logout and back in, or reboot.
Or this fan favorite
Warning: Ignoring XDG_SESSION_TYPE=wayland on Gnome. Use QT_QPA_PLATFORM=wayland to run on Wayland anyway.
qt.qpa.plugin: Could not load the Qt platform plugin "xcb" in "" even though it was found.
This application failed to start because no Qt platform plugin could be initialized. Reinstalling the application may fix this problem.
You can use your package manager to load libxcb-cursor0.
If that's not an option, you can export an environment variable and launch the app like this:
mbridak@vm:~$ export QT_QPA_PLATFORM=wayland; not1mm
For a more permanent solution you can place the line
export QT_QPA_PLATFORM=wayland in your home directories .bashrc file. Then
after logging out and back in you should be able to launch it normally.
Update your CTY and SCP files
After all the configuration stuff below and before operating in a contest, you might want to update the CTY and SCP files. You can do this by choosing FILE->Update CTY and FILE->Update MASTER.SCP
Various data file locations
Data
If your system has an XDG_DATA_HOME environment variable set, the database and
CW macro files can be found there. Otherwise they will be found at
yourhome/.local/share/not1mm
Config
Configuration file(s) can be found at the location defined by XDG_CONFIG_HOME.
Otherwise they will be found at yourhome/.config/not1mm
The Database
Why
The database holds... wait for it... data... I know shocker right. A database can hold one or many contest logs. It also holds the station information, everything shown in the Station Settings dialog. You can have one database for the rest of your life. Filled with hundreds of contests you've logged. Or, you can create a new database to hold just one contest. You do You Boo.
The first one is free
On the initial running, a database is created for you called ham.db. This, and
all future databases, are located in the data directory mentioned above.
Why limit yourself
You can create a new database by selecting File > New Database from the main
window, and give it a snazzy name. Why limit yourself. Hell, create one every
day for all I care. You can manage your own digital disaster.
Revisiting an old friend
You can select a previously created databases for use by selecting
File > Open Database.
Station Settings dialog (It's REQUIRED Russ)
After initial run of the program or creating a new database you will need to fill out the Station Settings dialog that will pop up.

You can fill it out if you want to. You can leave our friends behind. 'Cause your friends don't fill, and if they don't fill. Well, they're no friends of mine.
You can fill. You can fill. Everyone look at your keys.
Changing station information
Station information can be changed any time by going toawandahl
File > Station Settings and editing the information.
Selecting a contest (It's REQUIRED Russ)
Selecting a new contest
Select File > New Contest

Selecting an existing contest as the current contest
Select File > Open Contest

Editing existing contest parameters
You can edit the parameters of a previously defined contest by selecting it as
the current contest. Then select File > Edit Current Contest. Click OK to
save the new values and reload the contest. Cancel to keep the existing
parameters.
Configuration Settings
To setup your CAT control, CW keyer, Callsign lookups, select
File > Configuration Settings
The tabs for groups and n1mm are disabled and are for future expansion.

Lookup
For callsign lookup, Two services are supported. QRZ and HamQTH. They require a username and password, Enter it here.
Soundcard
Choose the sound output device for the voice keyer.
CAT Control
Under the CAT TAB, you can choose either rigctld normally with an IP of
127.0.0.1 and a port of 4532. Or flrig, IP normally of 127.0.0.1 and a
port of 12345. None is always an option, but is it really? There's an
onscreen icon for CAT status. Green good, Red bad, Grey neither.
CW Keyer interface
Under the CW TAB, There are three options. cwdaemon, which normally uses IP
127.0.0.1port 6789. pywinkeyer which normally uses IP 127.0.0.1 port 8000 and
CAT which if your radio supports it, sends Morse characters via rigctld. As far
as I can tell rigctld does not support setting the radios internal keyer speed. So
the CW speed control widget will not be functional and you'd need to control the
keyer speed thru the radios interface.
Cluster

Under the Cluster TAB you can change the default AR Cluster server, port and
filter settings used for the bandmap window.
N1MM Packets
Work has started on N1MM udp packets. So far just RadioInfo, contactinfo, contactreplace and contactdelete.
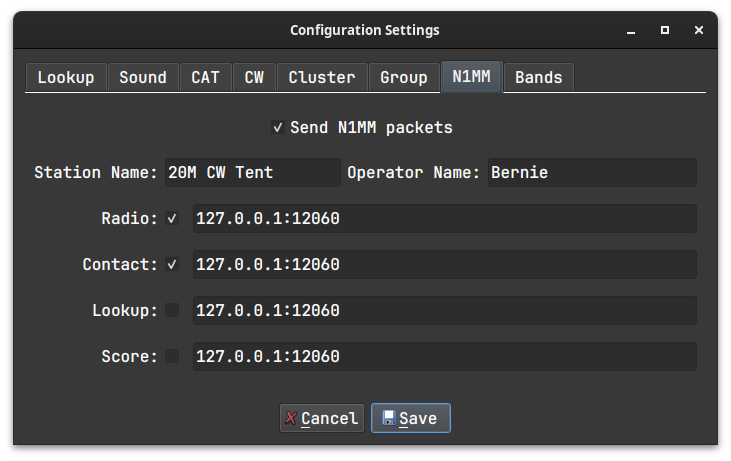
When entering IP and Ports, enter them with a colon ':' between them. You can enter multiple pairs on the same line if separated by a space ' '.
Bands
You can define which bands appear in the main window. Those with checkmarks will appear. Those without will not.

Options
On the Options TAB you can select to use Enter Sends Message (ESM), configure its function keys. Select whether or not to use Call History info.

Logging WSJT-X FT8/FT4/ETC and FLDIGI RTTY contacts
Digital modes only working for:
- ARRL Field Day
- ARRL VHF
- Weekly RTTY
- CQ WW DX RTTY
- CQ WPX RTTY
not1mm listens for WSJT-X UDP traffic on the Multicast address 224.0.0.1:2237. No setup is needed to be done on not1mm's side. That's good because I'm lazy.
not1mm polls for fldigi QSOs via it's XMLRPC interface. It does this in a rather stupid way. It just keeps asking what was the last QSO and compares it to the previous response. If it's different, it's new. I've added the Weekly RTTY Test so this can be tested.
The F1-F12 function keys be sent to fldigi via XMLRPC. Fldigi will be placed into TX mode, the message will be sent and a ^r will be tacked onto the end to place it back into RX mode.
Unlike WSJT, fldigi needs to be setup for this to work. The XMLRPC interface needs to be active. And in fldigi's config dialog go to CONTESTS -> General -> CONTEST and select Generic Contest. Make sure the Text Capture Order field says CALL EXCHANGE.
Sending CW
Other than sending CW by hand, you can also send predefined CW text messages by pressing F1 - F12. See next section on Editing macro keys. If you need to send something freeform, you can press CTRL-SHIFT-K, this will expose an entry field at the bottom of the window which you can type directly into. When you're done you can either press CTRL-SHIFT-K again, or press the Enter Key to close the field.
Editing macro keys
To edit the macros, choose File > Edit Macros. This will open your systems
registered text editor with current macros loaded. When your done just save the
file and close the editor. The file loaded to edit, CW, SSB or RTTY, will be
determined by your current operating mode.
After editing and saving the macro file. You can force the logger to reload the
macro file by toggeling between Run and S&P states.
Macro substitutions
You can include a limited set of substitution instructions.
| Macro | Substitution |
|---|---|
| {MYCALL} | Sends the station call. |
| {HISCALL} | Send what's in the callsign field. |
| {SNT} | Sends 5nn (cw) or 599 (ssb) |
| {SENTNR} | Sends whats in the SentNR field. |
| {EXCH} | Sends what's in the Sent Exchange field when contest is defined. |
| '#' | Sends serial number. |
Macro use with voice
The macros when used with voice, will also accept filenames of WAV files to
play, excluding the file extension. The filename must be enclosed by brackets.
For example [CQ] will play cq.wav, [again] will play again.wav. The wav
files are stored in the operators personal data directory. The filenames must be
in lowercase. See Various data file locations
above for the location of your data files. For me, the macro [cq] will play
/home/mbridak/.local/share/not1mm/K6GTE/cq.wav
The current wav files in place are not the ones you will want to use. They sound like an idiot. You can use something like Audacity to record new wav files in your own voice.
Aside from the [filename] wav files, there are also NATO phonetic wav files
for each letter and number. So if your macro key holds
{HISCALL} {SNT} {SENTNR} and you have entered K5TUX in callsign field during
CQ WW SSB while in CQ Zone 3. You'll here Kilo 5 Tango Uniform X-ray, 5 9 9, 3.
Hopefully not in an idiots voice.
cty.dat and QRZ lookups for distance and bearing
When a callsign is entered, a look up is first done in a cty.dat file to determin the country of origin, geographic center, cq zone and ITU region. Great circle calculations are done to determin the heading and distance from your gridsquare to the grographic center. This information then displayed at the bottom left.

After this, a request is made to QRZ for the gridsquare of the callsign. If there is a response the information is recalculated and displayed. You'll know is this has happened, since the gridsquare will replace the word "Regional".

Other uses for the call field
- [A Frequency] You can enter a frequency in kilohertz. This will change the band you're logging on. If you have CAT control, this will change the frequency of the radio as well.
- [CW, SSB, RTTY] You can set the mode logged. If you have CAT control this will also change the mode on the radio.
- [OPON] Change the operator currently logging.
You must press the SPACE bar after entering any of the above.
The Windows
The Main Window

Keyboard commands
| Key | Result |
|---|---|
| [Esc] | Clears the input fields of any text. |
| [CTRL-Esc] | Stops cwdaemon from sending Morse. |
| [PgUp] | Increases the cw sending speed. |
| [PgDown] | Decreases the cw sending speed. |
| [Arrow-Up] | Jump to the next spot above the current VFO cursor in the bandmap window (CAT Required). |
| [Arrow-Down] | Jump to the next spot below the current VFO cursor in the bandmap window (CAT Required). |
| [TAB] | Move cursor to the right one field. |
| [Shift-Tab] | Move cursor left One field. |
| [SPACE] | When in the callsign field, will move the input to the first field needed for the exchange. |
| [Enter] | Submits the fields to the log. Unless ESM is enabled. |
| [F1-F12] | Send (CW/RTTY/Voice) macros. |
| [CTRL-S] | Spot Callsign to the cluster. |
| [CTRL-M] | Mark Callsign to the bandmap window to work later. |
| [CTRL-G] | Tune to a spot matching partial text in the callsign entry field (CAT Required). |
| [CTRL-SHIFT-K] | Open CW text input field. |
| [CTRL-=] | Log the contact without sending the ESM macros. |
The Log Window
Window>Log Window
The Log display gets updated automatically when a contact is entered. The top half is a list of all contacts.

The bottom half of the log displays contacts sorted by what's currently in the call entry field. The columns displayed in the log window are dependant on what contests is currently active.
Editing a contact

You can double click a cell in the log window and edit its contents.
You can also Right-Click on a cell to bring up the edit dialog.

You can not directly edit the multiplier status of a contact. Instead see the
next section on recalculating mults. If you change the callsign make sure the
WPX field is still valid.
The Bandmap Window
Window>Bandmap
Put your callsign in the top and press the connect button.
The bandmap window is, as with everything, a work in progress. The bandmap now follows the VFO.

VFO indicator now displays as small triangle in the frequency tickmarks. A small blue rectangle shows the receivers bandwidth if one is reported.

Clicked on spots now tune the radio and set the callsign field. Previously worked calls are displayed in red.
The Check Window
Window>Check Window
As you enter a callsign, the Check Window will show probable matches to calls either in the MASTER.SCP file, your local log or the recent telnet spots. The MASTER.SCP column will show results for strings of 3 or more matching characters from the start of the call string. The local log and telnet columns will show matches of any length appearing anywhere in the string.
Clicking on any of these items will change the callsign field.

The Remote VFO Window
You can control the VFO on a remote rig by following the directions listed in the link below. It's a small hardware project with a BOM of under $20, and consisting of two parts.
- Making the VFO...
- Then...
Window>VFO

Cabrillo
Click on File > Generate Cabrillo
The file will be placed in your home directory. The name will be in the format of:
StationCall_ContestName_CurrentDate_CurrentTime.log
So for me it would look like:
K6GTE_CANADA-DAY_2023-09-04_07-47-05.log
Look, a log eh?
This outlines some differences between ARRL Field Day and Canada Day.
ADIF
File > Generate ADIF
Boom... ADIF
StationCall_ContestName_Date_Time.adi
Recalulate Mults
After editing a contact and before generating a Cabrillo file. There is a Misc menu option that will recalculate the multipliers incase an edit had caused a change.
ESM
I caved and started working on ESM or Enter Sends Message. To test it out you can
go to FILE -> Configuration Settings

Check the mark to Enable ESM and tell it which function keys do what. The keys will need to have the same function in both Run and S&P modes. The function keys will highlight green depending on the state of the input fields. The green keys will be sent if you press the Enter key. You should use the Space bar to move to another field.
The contact will be automatically logged once all the needed info is collected and the QRZ (for Run) or Exchange (for S&P) is sent.
Run States
CQ

Call Entered send His Call and the Exchange

Empty exchange field send AGN till you get it

Exchange field filled, send TU QRZ and logs it

S&P States
With his call entered, Send your call

If no exchange entered send AGN

With exchange entered, send your exchange and log it

Call History Files
I've started work on using 'call history files'. To test it, you can
go to FILE -> Configuration Settings
Place a check in the Use Call History box. Call history files are very specific to the contest you are working. Example files can be obtained from n1mm's website. They have a searchbox so you can find the contest you are looking for. If you are feeling masocistic, you can craft your own. The general makeup of the file is a header defining the fields to be used, followed by by lines of comma separated data.
An example file excerpt looks like:
!!Order!!,Call,Name,State,UserText,
#
# 0-This is helping file, LOG what is sent.
# 1-Last Edit,2024-08-18
# 2-Send any corrections direct to ve2fk@arrl.net
# 3-Updated from the log of Marsh/KA5M
# 4-Thanks Bjorn SM7IUN for his help.
# 5-Thanks
# NAQPCW
# NAQPRTTY
# NAQPSSB
# SPRINTCW
# SPRINTLADD
# SPRINTNS
# SPRINTRTTY
# SPRINTSSB
AA0AC,DAVE,MN,Example UserText
AA0AI,STEVE,IA,
AA0AO,TOM,MN,
AA0AW,DOUG,MN,
AA0BA,,TN,
AA0BR,,CO,
AA0BW,,MO,
The first line is the field definition header. The lines starting with a # are comments. Some of the comments are other contests that this file also works with.
This is followed by the actual data. If the matched call has UserText information, that user text is populated to the bottom left of the logging window.
So if one were to go to FILE -> LOAD CALL HISTORY FILE and choose a downloaded call history file for NAQP and typed in the call AA0AC while operating in the NAQP, after pressing space, one would see:

Where the Name and State would auto-populate and the UserText info apprears in the bottom left.
Contest specific notes
I found it might be beneficial to have a section devoted to wierd quirky things about operating a specific contests.
ARRL Sweekstakes
The exchange parser
This was a pain in the tukus. There are so many elements to the exchange, and
one input field aside from the callsign field. So I had to write sort of a
'parser'. The parser moves over your input string following some basic rules and
is re-evaluated with each keypress and the parsed result will be displayed in
the label over the field. The exchange looks like 124 A K6GTE 17 ORG, a Serial
number, Precidence, Callsign, Year Licenced and Section. even though the
callsign is given as part of the exchange, the callsign does not have to be
entered and is pulled from the callsign field. If the exchange was entered as
124 A 17 ORG you would see:

You can enter the serial number and precidence, or the year and section as
pairs. For instance 124A 17ORG. This would ensure the values get parsed
correctly.
You do not have to go back to correct typing. You can just tack the correct
items to the end of the field and the older values will get overwritten. So if
you entered 124A 17ORG Q, the precidence will change from A to Q. If you need
to change the serial number you must append the precidence to it, 125A.
If the callsign was entered wrong in the callsign field, you can put the correct callsign some where in the exchange. As long as it shows up in the parsed label above correctly your good.
The best thing you can do is play around with it to see how it behaves.
The exchange
In the Sent Exchange field of the New Contest dialog put in the Precidence,
Call, Check and Section. Example: A K6GTE 17 ORG.
For the Run Exchange macro I'd put {HISCALL} {SENTNR} {EXCH}.
RAEM
In the New/Edit Contest dialog, in the exchange field put just your Lat and Lon.
for me 33N117W. And in the exchange macro put # {EXCH}.