FOTA Update Version - Requires NONOS-SDK 3.0.6 AND 1MB flash minimum.
-- To compile, you will need to install the ESP8266 dev toolchain as described here:
Or you can use the precompiled firmware in ./firmware directory which should match the HEAD of this branch.
--
So you want OTA on your 3-CH relay board, huh ? Bad news is you need 1Mb flash and to my knowledge, all of the 3-CH boards came with 512Kb.
Two choices: 1) Desolder and solder a new flash chip (not too hard, but great care required) https://www.youtube.com/watch?v=7Q6ABad7U6o 2) Desolder and solder a new ESP-03 module (most new one come with 1MB flash) Again, great care required not to damage the PCB tracks
Personlly, I think it's easier to desolder the flash chip and replace. It looks daunting, and if you fail you'll have a dead ESP-03. At this stage, your option is then to replace the ESP-03 itself with a 1MB variant (ebay is full of them).
To build, you'll need to use the command line Makefile and have all the toolchains installed (make, XTENSA, SDK, python, esptool.py etc). Use command line make to build, PlatformIO does not have this capability or up to date libraries at present. The build works for me on a Macbook (intel) running Catalina (10.15.7). I assume it will run fine on Linux also.
1) Edit the Makefile and set the paths to the SDK and XTENSA compiler; set the FLASH_SIZE for your board 2) Edit burn_boot.sh and burn_webpages.sh and set the path to ESPTOOL for your environment 3) make clean 4) make 5) ./burn_boot.sh
Note, as per standard approach, only boot.bin and user1.bin are burnt to flash. user2.bin is burnt as a OTA upgrade.
Uses the new SDK partition_table_t struct and should autoconfigure as per the Makefile. Only tested on 1Mb flash; will not work on 512Kb for sure, however larger flash size should work (as supported by ESP8266 chip itself)
To upgrade firmware, visit the About page of the web interface and follow the instructions. You will need to upload either user1.bin or user2.bin (found in the firmware directory after compilation) as directed.
Alternatively, wiflash (thanks esp-link project) is included to allow command line firmware push as follows:
sh wiflash
Huge thanks to the https://github.com/jeelabs/esp-link project without whom, I would have never figure out how to do this.
Three Channel WiFi Relay/Thermostat Board
The Three Channel WiFi Relay/Thermostat Board is a WiFi connected multi-purpose relay board based on the ESP8266 SoC, original designed by Martin Harizanov and sold by Open Energy Monitor Store in the UK
This fork of the code is actively maintained (2023), builds cleanly and has been rebased against NONOS-SDK 3.0.6. Note, this does NOT build in platformIO (PIO does not create user1.bin/user2.bin, and the NONOS-SDK and xtensa frameworks are very outdated). You can still use visual studio code, and tell it's build configurations to use native make - this allows build & FOTA from within Visual Code at the press of a button (apple shift B on my mac -chose the build option and watch it build as you would with PIO) See the file .vscode/tasks.json for how to do this. You will need the NONOS-SDK 8266 build framework installed to build and xtensa as described above under installing the build toolchains.
Various enhancements have been made:
Enhancements to Martin's code
- Full support for MQTT thermostat source
- Enhanced MQTT reporting (state, DS18B20 JSON)
- Avoid thermostat cycling
- New Config items for MQTT thermostat timeout & thermostat cycling
- Display of a bad or stale temperature readings highlighted in thermostat UI
- Fix bug where thermostat relay off time is updated if it is already off
- Change thermostat to work in tenths of a degree, not hundredths (direct compatibility with emonTh + emonGLCD)
- Publish all ds18b20 sensors to MQTT by device-id
- Choose which relays associate to each thermostat
- FOTA Upgrade via webpage upload (thank you ESP-LINK project for the code)
- Thermostat timeout for all sources implemented
- Move all thermostat config to its own page in the Web GUI
- ESPFS webpage upload now available through the Web GUI
- Tidy up about.tpl page and only show firmware upgrade options when flash_map > 2 (over 512Kb)
- Disable URLs for flashing firmware if flash_map < 2 (512Kb board)
- Supports DST for Europe and North America (thanks Martin Harizanov for the code template)
- Correct relay active for thermostat indicated in MQTT and JSON feeds (instead of relay1 default).
- CurrentSetPoint published in state JSONs
- Number of relays is now configurable via UI - if relay is not configured, it cannot be actuated via any means. This means code should work on 1-Relay boards and have correct UI and logic
- Relays configured as thermostat controlled cannot be actuated via any other means (webpages, IO calls, MQTT)
- Main menu updated
- UI overview page completed to show most things and available on main menu (need to do ds18B20 sensors)
- Thermostat colour map gradients configurable from web UI
- Display all DS18B20 & DHT22 sensor values on new UI overview page
- Tidy up serial interface - add help and validation of inputs
- Add serial userJSON input - JSON can be submitted via serial, is published to MQTT and thermostat.cgi?state to allow easy customisation of webpages to support random serial devices
- Add manual override mode to thermostat, if setpoint is adjusted while in scheduled mode, go into override mode; setpoint will reset to the next schedule temperature when it comes around
- Add syslog logging feature for thermostat events
- Thermostat Zone name configurable and thermostat.html page title reflects zone name (useful for multiple thermostats)
- Able to download full week thermostat schedule in JSON format, upload one day at a time
.
Firmware update
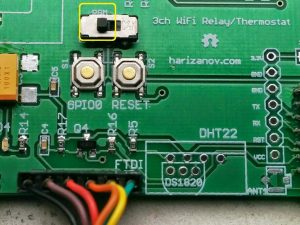
To change firmware, set the programming switch to “PGM” position and attach 3.3V FTDI cable with GND (black wire) towards the USB plug. I find any of the cheap ESP programming USB plugs work well. JeeLabs USBBUB-II was not reliable. YMMV. Also see the (https://github.com/esp8266/esp8266-wiki/wiki/Uploading) ESP8266 WiKi for more details on uploading code.
[ ]
]
Do not forget to flip back the PGM switch to the right side when done, or the code won’t start and the module will be stuck on bootloader mode.
You will need esptool.py installed. Precompiled firmware images are in the firmware directory. Use the burn_all.sh and burn_webpages.sh scripts to write firmware to the device. Modify the burn*.sh files appropriately to set paths for you USB port and path to esptool.py.
Note, the first time you do this all config will be LOST and you need to set the device up again from scratch (you need to join the devices WIFI AP and connect 192.168.4.1 in a browser).
If you are building and flashing using PIO, you still need to run the burn_webpages.sh script to deploy the webpages to the device.
--Original Readme.MD follows--
Highlights
- Option for on-board power supply
- Up to three high quality 10A relays
- Powered by the WiFi ESP8266 SoC module
- HTTP API to control the relays
- MQTT support
- NTP for network time
- HTTP daemon settings, including security/authentication setup
- HTTP UI for configuration and control
- Thermostat function with weekly scheduling
- Manual relay control
- Broadcast using HTTP GET to services like ThingSpeak and emonCMS
- Integration with ThingSpeak for charting/analytics visualization
- Temperature sensor support
- DS18B20
- DHT22
NOTE: The board connects to and controls high voltage, knowledge and care is required to handle it See more at the Three Channel WiFi Relay/Thermostat Board WiKi
Author
License
This project is licensed under Creative Commons Attribution-NonCommercial-ShareAlike 3.0 Unported License.

THE SOFTWARE IS PROVIDED "AS IS", WITHOUT WARRANTY OF ANY KIND, EXPRESS OR IMPLIED, INCLUDING BUT NOT LIMITED TO THE WARRANTIES OF MERCHANTABILITY, FITNESS FOR A PARTICULAR PURPOSE AND NONINFRINGEMENT. IN NO EVENT SHALL THE AUTHORS OR COPYRIGHT HOLDERS BE LIABLE FOR ANY CLAIM, DAMAGES OR OTHER LIABILITY, WHETHER IN AN ACTION OF CONTRACT, TORT OR OTHERWISE, ARISING FROM, OUT OF OR IN CONNECTION WITH THE SOFTWARE OR THE USE OR OTHER DEALINGS IN THE SOFTWARE.