micro-ROS Crazyflie demo
This demos aims to show the benefits of micro-ROS regarding its low resource consumption and its extensible and modular communication system. In particular, it is focused on the micro-ROS's middleware layer where eProsima Micro XRCE-DDS is the default implementation. This software, base on the DDS-XRCE wire protocol, offers to micro-ROS client-server communication with the following characteristics:
- Multi-transport protocol support (UDP, TCP and Serial).
- Peer-to-peer communication.
- Server discovery.
- Best-effort and reliable communication.
- Message fragmentation.
Each one of the aforementioned characteristics will be used around this demo.
Scenario
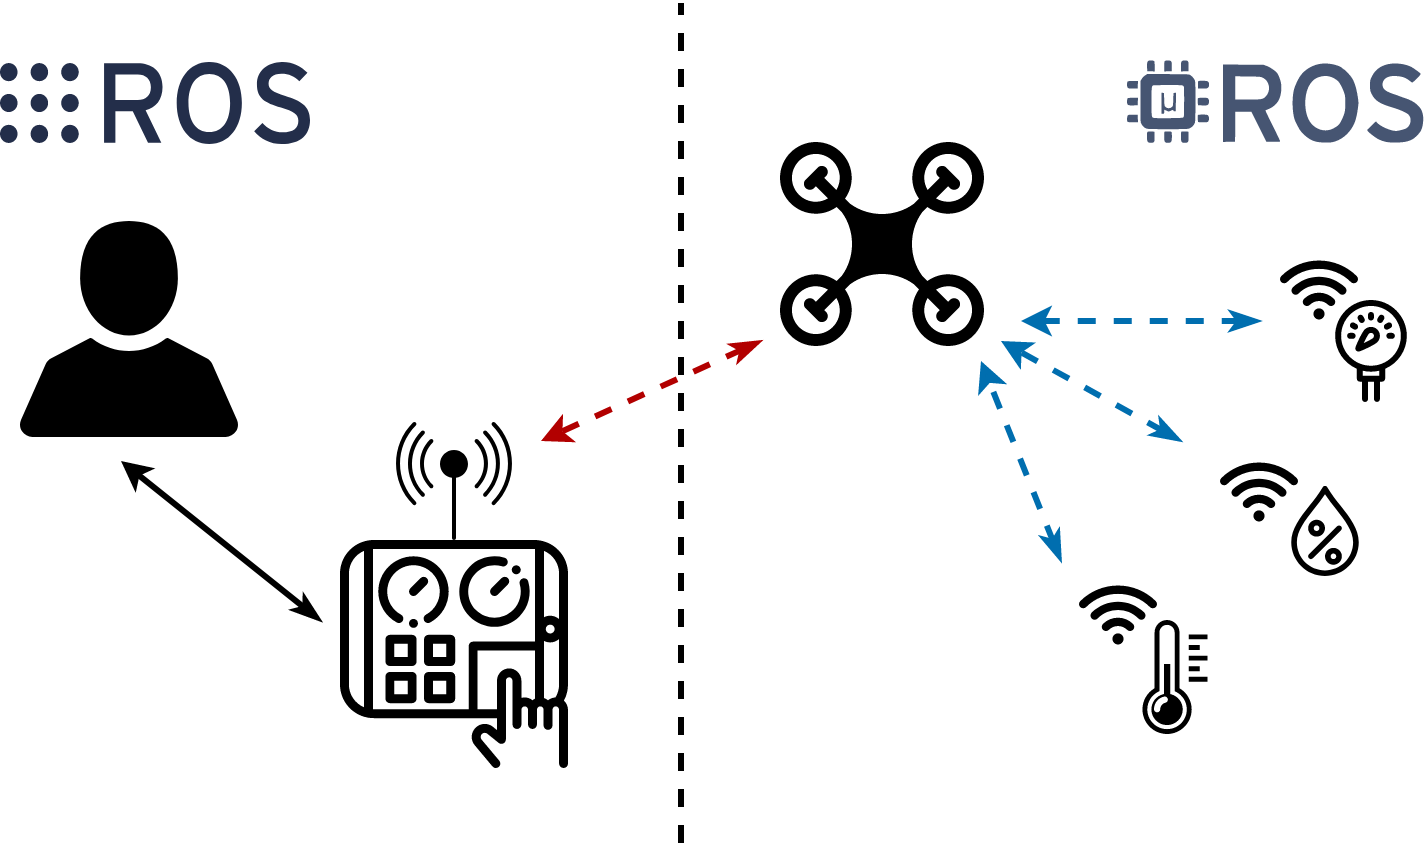
An MAV (Micro Aerial Vehicle) overflies a given area commanded by a Flight Operator through a GCS (Ground Control Station). Remote Sensors, distributed over the area, takes environmental measures (temperature, pressure and humidity). The Flight Operator shall command the MAV toward the Remote Sensors and once positioned near them, the MAV shall establish a connection with the Remote Sensors in order to gather its data. Finally, the Fligh Operator shall command the MAV toward the home position.
Actors & Topics
In this demo there are three different micro-ROS actors (MAV, GCS and Remote Sensors) which publish/subscribe to/from four topics:
/drone/pose: MAV's actual pose./drone/tf: MAV's transform (tf2)./sensor/temperature: Remote Sensors' temperature./sensor/humidity: Remote Sensors' humidity.
MAV
A Crazyflie 2.1 running a micro-ROS-Client application which is in charge of publishing its position and orientation. It will also work as a bridge for Remote Sensor' data.
GCS
A general-purpose computer running a micro-ROS-Agent application which is in charge of controlling the MAV's flight and receive all published data.
Remote Sensors
A SparkFun Wheather Station connecting to a Raspberry Pi 3A+ which is running a micro-ROS-Agent and a micro-ROS-Client application in charge of publishing the Remote Sensors' data.
The figure below shows the current status of this demo.
Communications
In this demo there are two different kind of communication between its actors.
On the one hand, the link between the GCS and the MAV follows a client-server communication pattern. The GCS works as a server using a micro-ROS-Agent application, while the MAV works as a client through a micro-ROS-Client application.
On the other hand, the link between the MAV and the Remote Sensors follows a peer-to-peer pattern. Both actors works as clients communicating through a micro-ROS-Agent application running on the Remote Sensors side. In that case, the micro-ROS-Agent application works as a centralized broker where the MAV and the Remote Sensors exchange its topics without ROS 2 output. This application also allows the MAV to discover the Remote Sensors dynamically.
Hardware
The following is a list of the hardware needed to reproduce this demo:
- 1 x Crazyflie 2.1,
- 1 x Crazyradio PA,
- 1 x Flow deck v2,
- 1 x Crazyflie-compatible remote controller.
How to build and flash the firmware?
NOTE: Take into account that Crazyflie firmware of NRF51 radio device should be updated to this commit
-
Run the builder Docker:
docker-compose run --rm cf_builder -
Build the micro-ROS firmware inside the Docker:
ros2 run micro_ros_setup configure_firmware.sh crazyflie_demo ros2 run micro_ros_setup build_firmware.sh -
Put the Crazyflie in DFU mode following the official instructions.
-
Flash the micro-ROS firmware:
ros2 run micro_ros_setup flash_firmware.sh
How to prepare the Raspberry Pi applications?
To compile the required applications, so to say the specific Micro-ROS agent and client applications to publish the sensors data:
-
Launch an instance of the micro-ROS/base docker container and update the repositories:
docker run -ti --rm microros/base:galactic apt update -
Create a raspbian workspace inside the container:
ros2 run micro_ros_setup create_firmware_ws.sh raspbian buster_v8 -
On a first stage, build the
weather_agentexecutable:ros2 run micro_ros_setup configure_firmware.sh weather_agent ros2 run micro_ros_setup build_firmware.sh -
The resulting binary file is located under
/uros_ws/firmware/bin. Copy it to the RPi via ssh'sscp. -
Perform steps 3 and 4, but replacing weather_agent application for weather_publisher.
-
Copy the Python 3 script
uros_cf_bridge.pyinto the RPi, located in this repository underdockerfile/clientfolder. -
If your Raspberry Pi does not have the I2C port enabled, you will need to do it before connecting the Sparkfun weather station. This can be easily achieved executing
sudo raspi-configand opening up the I2C port. After that, connect the weather station board, taking into consideration the pin layout:
        3.3Vcc  [1][2]
        I2C SDA [3][4]
        I2C SCL [5][6] GND
How to use?
To start the application just three steps are needed:
-
Install and connect the Crazyradio PA (it require setting udev permissions).
-
Connect a Crazyradio antenna to the RPi. On three different ssh terminals attached to the Raspberry Pi, execute the following commands in order:
python3 uros_cf_bridge.py --channel 30 --port 10
./weather_agent
./weather_publisher- Up the Docker Compose. Remember to give permissions to Docker to access the X display server:
xhost +
docker-compose up -d- Connect to the Crazyflie.
To stop the application just down the Docker Compose:
docker-compose downCommunication with micro-ROS agent
-
To communicate a custom crazyflie app with a micro-ROS Agent, use the provided bridge script:
python3 uros_cf_bridge.py --channel 65 --port 9 --controllerIf needed, modify the channel and port arguments acordingly to the configured transport arguments, example: link
-
To start the agent:
-
Using ros2 run:
ros2 run micro_ros_agent micro_ros_agent serial -f /tmp/uros/port.log -v6 -
Using dockerized agent:
docker run -it --rm -v /dev:/dev -v /tmp/uros/port.log:/tmp/uros/port.log --privileged microros/micro-ros-agent:galactic serial -f /tmp/uros/port.log -v6
Purpose of the Project
This software is not ready for production use. It has neither been developed nor tested for a specific use case. However, the license conditions of the applicable Open Source licenses allow you to adapt the software to your needs. Before using it in a safety relevant setting, make sure that the software fulfills your requirements and adjust it according to any applicable safety standards, e.g., ISO 26262.
License
This repository is open-sourced under the Apache-2.0 license. See the LICENSE file for details.
For a list of other open-source components included in this repository, see the file 3rd-party-licenses.txt.
Known Issues/Limitations
There are no known limitations.