![]()
![]()


📦 Osclass by Mindstellar
💻 A free and open-source script to create your own classifieds site.
🤔 What is Osclass?
Osclass is a powerful script that allows you to create and manage your own online classifieds website.
With features like customizable themes and plugins, powerful search and filtering options, user registration and management, and free plugins for integration with popular payment gateways.
Osclass is the perfect solution for anyone looking to build a successful online marketplace.
🔥 Features
Some of the amazing features of Osclass include:
- 🎨 Customizable themes and plugins
- 🔍 Powerful search and filtering options
- 👥 User registration and management
- 💰 Integration with popular payment gateways
- 🌎 Multi-language support
- 🔒 CAPTCHA and other security measures
- 💻 Responsive design for mobile and desktop
🤝 Contributing
We welcome contributions of all kinds, from bug fixes to new features. If you're interested in contributing to Osclass, please follow these steps:
- Fork the repository and clone it to your local machine.
- Install the required dependencies using
npm install. - Create a new branch for your changes.
- Make your changes and test them thoroughly.
- Commit your changes and push them to your forked repository.
- Submit a pull request to the main repository.
📜 License
Osclass is released under the GPLv3 license. See LICENSE for more information.
🚀 Getting Started
To get started with Osclass, follow these easy steps:
- Download the latest zip package of Osclass from GitHub Release and
unpack it in your web-server root, i.e.
public_htmldirectory. - Execute the Osclass installation script by accessing index.php
oc-includes/osclass/install.phpfrom your browser:- If you’ve installed it in the domain’s root directory, you’ll have to go to:
http://example.com/index.phpor directly to http://example.com/oc-includes/osclass/install.php - If you’ve installed it in a subdirectory inside the domain, classifieds, for example, go to:
http://example.com/classifieds/index.phpor directly tohttp://example.com/classifieds/oc-includes/osclass/install.php
This will lead you to osclass inbuilt installer.
- If you’ve installed it in the domain’s root directory, you’ll have to go to:
- Follow Osclass installer instructions:
-
Step 3.1
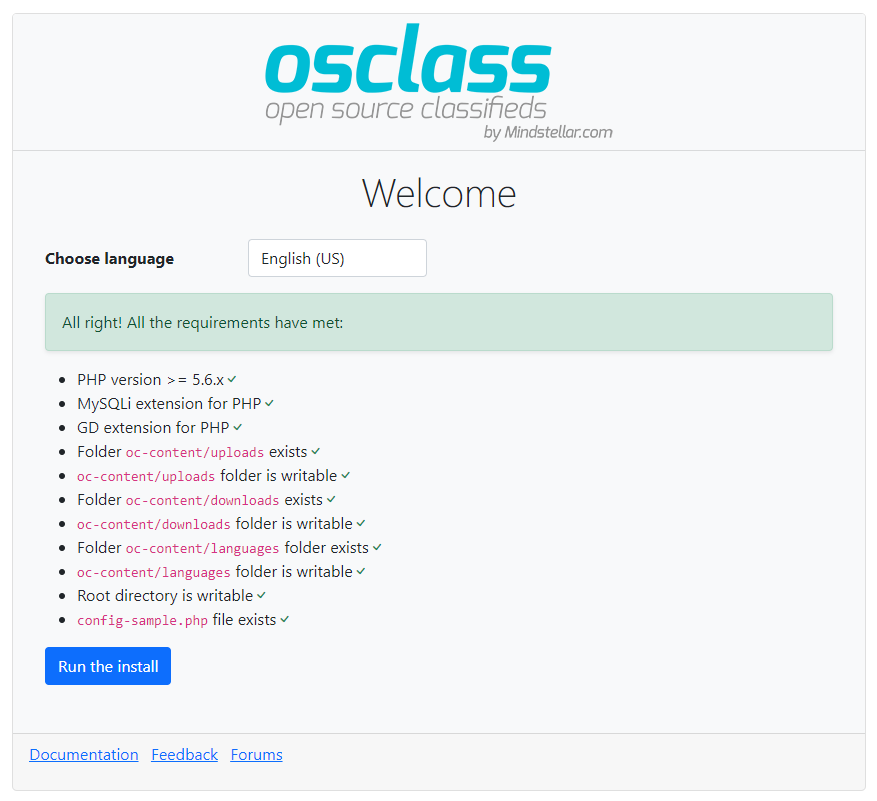
Make sure the server has the required permissions to write in the files and directories specified. This will allow you to create a basic configuration file as well as upload images, documents, etc. -
Step 3.2
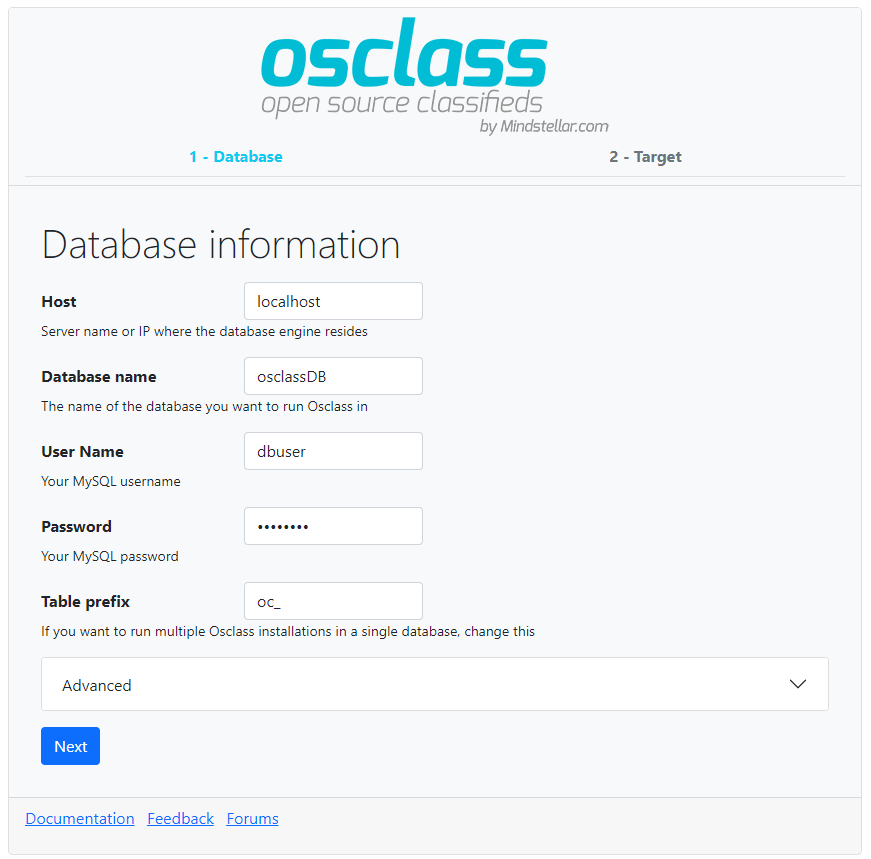
Add your access details to the database. If you haven’t created it yet, the installer will ask for another account with permissions that will allow to do it for you. -
Step 3.3
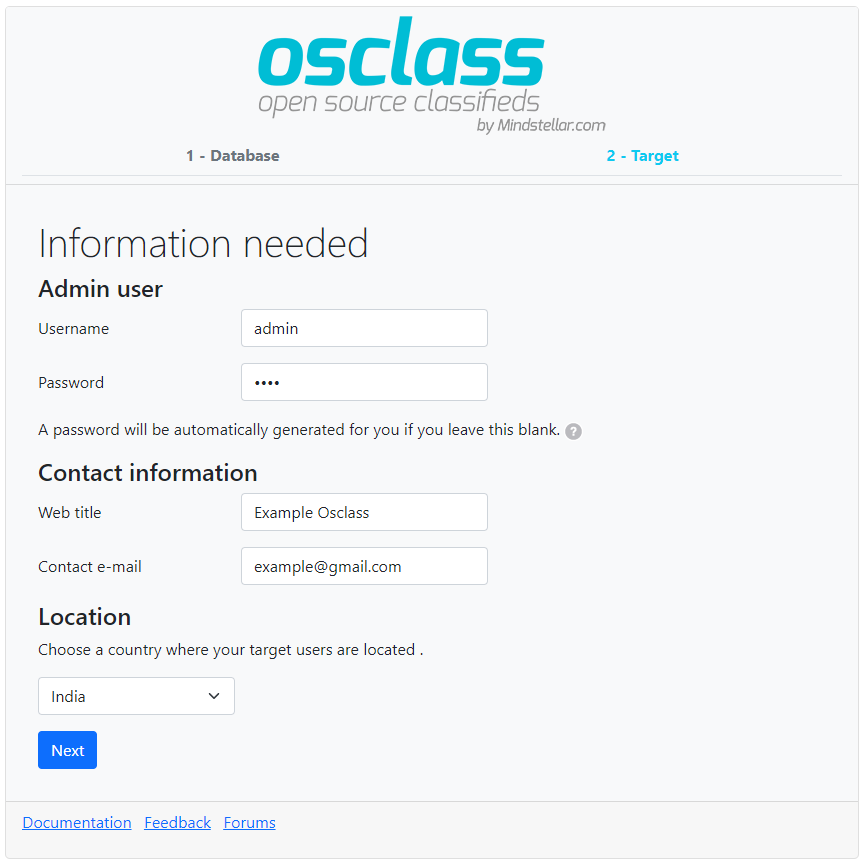
Add the basic installation details and select your classifieds site’s country. -
Step 3.4
Installation finished. Use the automatically-generated password to access your admin panel (example.com/oc-admin).
-
📚 How to get latest version of Osclass
Checkout our GitHub Release section to get latest version of osclass.
Do not use master branch for your deployment, it may include untested code. Only use zip file provided in our release section.
Run osclass locally using Docker
First Clone the repository and the submodules.
$> git clone --recursive git@github.com:mindstellar/Osclass.gitDependencies:
- Docker engine v1.13 or higher. Your OS provided package might be a little old, if you encounter problems, do upgrade. See https://docs.docker.com/engine/installation
Once you're done, simply cd to Osclass directory and run docker-compose up -d. This will initialise and start all the containers, then leave them running in the background.
-
Services exposed outside your environment
You can access your application via
localhost, if you're running the containers directly. nginx and mailhog both respond to any hostname, in case you want to add your own hostname on your/etc/hostsService Address outside containers Webserver localhost:5080 PhpMyAdmin web interface localhost:5800 MySQL host: localhost; port:5306Mailhog web interface localhost:5025 -
Hosts for osclass docker environment
You'll need to configure osclass to use enabled services:
Service Hostname Port number php-fpm php-fpm 9000 MySQL mysql 3306 (default) Memcached memcached 11211 (default) SMTP (Mailhog) mailhog 1025 (default) -
Docker compose cheatsheet
Note: you need to cd first to where your docker-compose.yml file lives.
- Start containers in the background:
docker-compose up -d - Start containers on the foreground:
docker-compose up. You will see a stream of logs for every container running. - Stop containers:
docker-compose stop - Kill containers:
docker-compose kill - View container logs:
docker-compose logs - Execute command inside of container:
docker-compose exec SERVICE_NAME COMMANDwhereCOMMANDis whatever you want to run. Examples: - Shell into the PHP container,
docker-compose exec php-fpm bash - Open a mysql shell,
docker-compose exec mysql mysql -uroot -pCHOSEN_ROOT_PASSWORD
- Start containers in the background:
Pull Request
Want to help create a pull request from you clone, just make sure of few things
- Never target master-branch
- Target develop branch if you want to merge your fixes.
- Request a feature branch if your pull request make major changes in our project or if you really need one.
- Create a new issue before making any pull request.
Support
For any support related query, please visit our official support forum.
Installation Guide
- Visit our documentation : https://docs.mindstellar.com/osclass-docs/beginners/install