Blood Glucose Prediction-Kit

![]()
![]()
![]()
This Blood Glucose (BG) Prediction Framework streamlines the process of data handling, training, and evaluating blood glucose prediction models in Python. Access all features via the integrated Command Line Interface (CLI), or download the repository via PyPi.
The figure below illustrates an overview over the pipeline including all the stages of this blood glucose prediction framework.
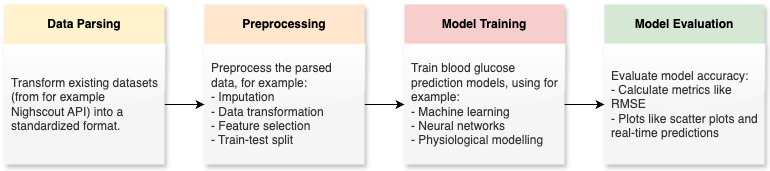
Table of Contents
- Setup and Installation
- Usage of Command Line Interface
- Contributing with Code
- Testing
- Disclaimers and Limitations
- License
Setup and Installation
To setup and install this platform, there are two options depending on whether you are a regular user or a developer: 1) Install using pip (regular users): If you want to access the command line interface (CLI) without reading or modifying the code, choose this option.
2) Install using the cloned repository (developers): This is the choice if you want to use the repository and have the code visible, and to potentially edit the code.
Choose which one is relevant for you, and follow the instructions below.
Regular users: Install using pip
Open your terminal and go to an empty folder in your command line. Note that all the data storage, trained models and results will be stored in this folder.
Creating a virtual environment is optional, but recommended. We recommend using Python version 3.9 if relying on Tensorflow. A virtual environment for Python 3.9 can for example be created with the following command: python3.9 -m venv glupredkit_venv. Activate it with source glupredkit_venv/bin/activate (Mac)
or .glupredkit_venv\Scripts\activate (Windows).
To set up the CLI, simply run the following command:
pip install glupredkitIf you need the optional heavy dependencies (listed in setup.py), run:
pip install glupredkit[heavy]Note for Zsh Users: If you are using Zsh and encounter issues due to its interpretation of square brackets, use the following command instead:
noglob pip install glupredkit[heavy]The noglob command prevents Zsh from treating the square brackets as globbing characters.
System-Wide Dependencies for MPI
The mpi4py dependency requires system-wide Message Passing Interface libraries. If you encounter issues with installing mpi4py, make sure you have the necessary system packages installed:
- On macOS: Install mpich using Homebrew:
brew install mpich- On Debian/Ubuntu Linux: Install libopenmpi-dev using apt-get:
sudo apt-get update
sudo apt-get install -y libopenmpi-dev
Developers: Install using the cloned repository
First, clone the repository and make sure you are located in the root of the directory in your command line. To set up the repository with all requirements, simply run the following command:
./install.shMake sure that the virtual environment glupredkit_venv is activated before you proceed. If not, call source glupredkit_venv/bin/activate.
Usage of Command Line Interface
The command-line tool is designed to streamline the end-to-end process of data handling, preprocessing, model training, evaluation, and configuration for blood glucose prediction. The following is a guide to using this script.
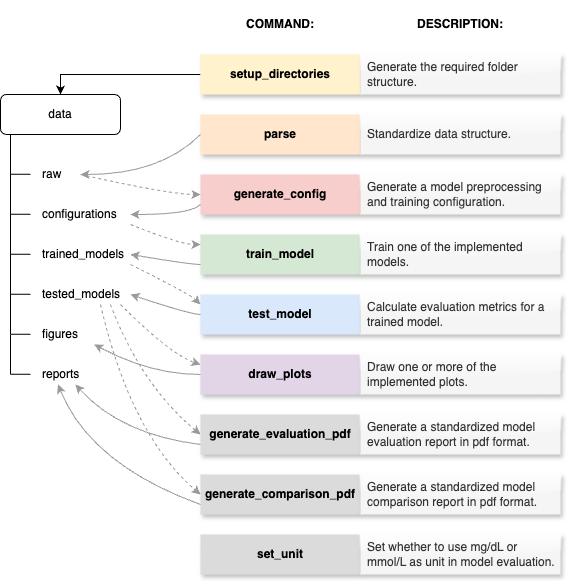
The following figure is an overview over all the CLI commands and how they interact with the files in the folders.
Getting started
1) First, follow the instructions above in "Setup and Installation". 2) Then, navigate to a desired folder in your command line. This is the folder where the datasets, models and results will be stored. 3) Set up the necessary directories for the GluPredKit CLI by running the following command:
- For regular users:
glupredkit setup_directories - For developers:
python -m glupredkit.cli setup_directories
You should now have the following file structure in your desired folder:
   data/
   │
   ├── raw/
   │
   ├── configurations/
   │
   ├── trained_models/
   │
   ├── tested_models/
   │
   ├── figures/
   │
   └── reports/
Now, you're ready to use the Command Line Interface (CLI) for processing and predicting blood glucose levels.
Note that the prefix for all the commands will be either glupredkit for regular users, or python -m glupredkit.cli for developers.
The glupredkit prefix will also work while developing, but changes made to the code will only be directly reflected when
using the python -m glupredkit.cli prefix.
In the examples below we will use glupredkit.
Parsing Data
Synthetic Data: If you want to test the software with a synthetic dataset, you can skip to the next step.
Description: Parse data from a chosen source and store it as CSV in data/raw using the selected parser. If you provide your own dataset, store it in data/raw, and make sure that the dataset adheres to the format defined in the output format of Parsers.
glupredkit parse --parser [tidepool|nightscout|apple_health|ohio_t1dm] [--username USERNAME] [--password PASSWORD] [--file-path FILE_PATH] [--start-date START_DATE] [--end-date END_DATE] [--test-size TEST_SIZE]--parser: Choose a parser betweentidepool,nightscout,apple_health, orohio_t1dm.--username(Optional): Your username for the data source (for nightscout, use url).--password(Optional): Your password for the data source (for nightscout, use API-KEY).--file-path: (Optional): The file path to the raw data file that shall be parsed (required for the apple_health parser).- For the Ohio T1DM parser, the file path is the folder where the
testandtrainfolder are located. Example:data/raw/.
- For the Ohio T1DM parser, the file path is the folder where the
--start-date(Optional): Start date for data retrieval, default is two weeks ago. Format "dd-mm-yyyy".--end-date(Optional): End date for data retrieval, default is now. Format "dd-mm-yyyy".--output-file-name(Optional): The filename for the output file after parsing, without file extension.--test-size(Optional): Test size is a number between 0 and 1, that defines the fraction of the data used for testing. The default is 0.25.- Note that for the Ohio T1DM dataset the test-size is automatically going to use the original separation between train and test data.
Example Tidepool Parser
glupredkit parse --parser tidepool --username johndoe@example.com --password mypassword --start-date 01-09-2023 --end-date 30-09-2023 --test-size 0.5Example Nightscout Parser
glupredkit parse --parser nightscout --username https://my_nightscout.net/ --password API_KEY --start-date 01-09-2023 --end-date 30-09-2023Example Apple Health Parser
glupredkit parse --parser apple_health --file-path data/raw/export.xml --start-date 01-01-2023 --test-size 0.3Example Ohio T1DM Parser
- The Ohio T1DM parser is parsing the data from each individual into separate dataframes.
--file-pathshall be the path to where theOhioT1DMroot folder is stored.glupredkit parse --parser ohio_t1dm --file-path data/raw/
Generate Model Training Configuration
Description: This command generates a configuration with a given raw dataset, and various settings for training blood glucose predictions. These configurations will be stored in data/configurations/, enabling their reuse for different model approaches and evaluations.
Example data: If you write synthetic_data.csv in the --data argument, the synthetic dataset will be copied into your data/raw/ folder, and you can use it for experimentation of the software.
glupredkit generate_config --file-name: Give a file name to the configuration (without file extension).--data: Name of the input CSV file containing the data. Note that this file needs to be located indata/raw/.--subject-ids(optional): List of subject ids from the dataset that shall be used in model training and testing. Default is None, which will include the whole dataset.--preprocessor(optional): The name of the preprocessor that shall be used. The preprocessor must be implemented inglupredkit/preprocessors/. The available preprocessors are:- basic (default): Linear interpolation of missing samples, and one-hot-encoding of categorical features.
- standardscaler: Akima interpolation of missing samples, standard scaling of numerical features and one-hot-encoding of categorical features.
--prediction-horizon: The prediction horizon for the predictions (integer, in minutes). Must be at least 10, and should be dividable by 5.--num-lagged-features: The number of samples to use as time-lagged features. CGM values are sampled in 5-minute intervals, so 12 samples equals one hour.--num-features(optional): List of numerical features, separated by comma. Note that the feature names must be identical to column names in the input file. Default is "CGM".--cat-features(optional): List of categorical features, separated by comma. Note that the feature names must be identical to column names in the input file. Default is empty.--what-if-features(optional): List of what-if features, separated by comma. What-if events are scenarios where we have prior knowledge of future information. Note that the feature names must be identical to column names in the input file. Default is empty.
Examples
Example using the synthetic dataset:
glupredkit generate_config --file-name my_config_1 --data synthetic_data.csv --prediction-horizon 60 --num-lagged-features 12 --num-features CGM,insulin,carbs --cat-features hourExample using only the required inputs:
glupredkit generate_config --file-name my_config_2 --data df.csv --prediction-horizon 60 --num-lagged-features 12 --num-features CGM,insulin,carbsExample using all inputs:
glupredkit generate_config --file-name my_config_3 --data df.csv --subject-ids 540,544 --preprocessor standardscaler --prediction-horizon 180 --num-lagged-features 18 --num-features CGM,insulin,carbs --cat-features hour --what-if-features insulin,carbsTrain a Model
Description: Train a model using the specified training data.
glupredkit train_model MODEL_NAME CONFIG_FILE_NAMEmodel: Name of the model file (without .py) to be trained. The file name must exist inglupredkit/models/. The available models are:- double_lstm: A double long short-term memory recurrent neural network (LSTMs and Neural Attention Models for Blood Glucose Prediction: Comparative Experiments on Real and Synthetic Data ).
- loop: The model used in Tidepool Loop (PyLoopKit). This is a physiological model that requires CGM, carbohydrates, bolus and basal as features.
- lstm: An off-the-shelf implementation of a long short-term memory recurrent neural network.
- mtl: Multitask learning, convolutional recurrent neural network (ECAI).
- naive_linear_regressor: A naive model using only the three last CGM inputs for prediction (used for benchmark).
- random_forest: An off-the-shelf implementation of a random forest regressor.
- ridge: An off-the-shelf implementation of a linear regressor with ridge regularization.
- stacked_plsr: Stacking of three base regressions (MLP, LSTM and PLSR) (Data Fusion Stacking).
- stl: Single-task learning, convolutional recurrent neural network (ECAI).
- svr: An off-the-shelf implementation of a support vector regressor with rbf kernel.
- tcn: TCN.
- uva_padova: A physiological model based on the UvA/Padova simulator, with Markov Chain Monte Carlo (MCMC) parameter estimation (py_replay_bg), and particle filter for prediction (phy-predict). This model requires CGM, carbohydrates, bolus and basal as features.
- zero_order: A naive model assuming that the value of the series will remain constant and equal to the last observed value (used for benchmark).
config-file-name: Name of the configuration to train the model (without .json). The file name must exist indata/configurations/.--epochs(optional): The number of epochs used for training deep learning models (bLSTM, LSTM, MTL, STL and TCN).--n-cross-val-samples(optional): Number of samples to use in tuning therapy settings for the Loop model--n-steps(optional): The number of steps that will be used for identification in the UvA/Padova model. It should be at least 100k.--training-samples-per-subject(optional): The number of training samples that will be included for identification in the UvA/Padova model. Default is 4320, corresponding to two weeks of data.
Examples
glupredkit train_model ridge my_configglupredkit train_model lstm my_config --epochs 10glupredkit train_model loop my_config --n-cross-val-samples 100glupredkit train_model uva_padova my_config --n-steps 1000 --training-samples-per-subject 8640Test a Model
Description: Test a model using a trained model. An excel report will be stored with all the calculated metrics and relevant data about the model and its configuration.
All the implemented metrics are the following:
- clarke_error_grid: Zones in Clarke error grid
- glycemia_detection: Confusion matrix for glycemia detection
- grmse: Glucose-specific root mean squared error (https://pubmed.ncbi.nlm.nih.gov/22275716/)
- mae: Mean absolute error
- mare: Mean absolute relative difference
- mcc_hyper: Matthews correlation coefficient for hyperglycemia detection
- mcc_hypo: Matthews correlation coefficient for hypoglycemia detection
- me: Mean error
- mre: Mean relative error
- parkes_error_grid: Zones in Parkes error grid
- parkes_error_grid_exp: Zones in Parkes error grid calculated into a single metric with exponential cost function
- pcc: Pearson correlation coefficient
- rmse: Root mean squared error
glupredkit evaluate_model MODEL_FILE model-file: Name of the model file (with .pkl) to be tested. The file name must exist indata/trained_models/.--max-samples(optional): Set an upper limit for the number of test samples to reduce the run time. Default is all the test samples in the dataset.
Examples
glupredkit evaluate_model ridge__my_config__180.pklglupredkit evaluate_model ridge__my_config__180.pkl --max-samples 1000Generate Evaluation Reports
Description: There are two alternative commands for generating pdfs of standardized evaluation reports. The first one evaluates one model in detail, while the second one compares several models with each other.
Single Model Evaluation
glupredkit generate_evaluation_pdf --results-file: A file name fromdata/tested_models/of the model that you want to evaluate.
Example
glupredkit generate_evaluation_pdf --results-file ridge__my_config__180.csvModel Comparison
glupredkit generate_comparison_pdf --results-files(optional): File names fromdata/tested_models/of the models that you want to evaluate, comma separated without space. If none, all models will be tested.
Example
glupredkit generate_comparison_pdf --results-files ridge__my_config__180.csv,lstm__my_config__180.csvDraw Plots
Description: This command allows users to visualize model predictions using different types of plots. It supports visualization of multiple models and can restrict the plots to certain date ranges or use artificial carbohydrate and insulin inputs for specific visualizations.
glupredkit draw_plots--results-files: File names fromdata/tested_models/of the models that you want to plot, comma separated without space.--plots(optional): Define the type of plots to be generated. Input the names of the plots separated by commas. If not specified, a scatter plot will be the default. The available plots are:- scatter_plot
- trajectories (providing start- and end- date for up to 48 hours is recommended for readability)
--start-date(optional): The start date for the predictions. If not set, the first sample from the test data will be used. Input the date in the format "dd-mm-yyyy/hh:mm".--end-date(optional): This serves as either the end date for your range or the specific prediction date for one prediction plots. If left unspecified, the command defaults to using the last sample from the test data. The date format is "dd-mm-yyyy/hh:mm".--prediction-horizons(optional): Integer for prediction horizons in minutes. Comma-separated without space. Required for scatter plot.
Example
glupredkit draw_plots --results-files ridge__my_config__180.csv,lstm__my_config__180.csv --plots scatter_plot --start-date 25-10-2023/14:30 --end-date 30-10-2023/16:45 --prediction-horizons 30,60Setting Unit of Evaluations
Description: Set whether to use mg/dL or mmol/L for units. You can change this after models are trained,
without retraining the models. This only has an impact on the model evaluation (calculate_metrics or draw_plots).
glupredkit set_unit --use-mgdl [True|False]Example
glupredkit set_unit --use-mgdl FalseThat's it! You can now run the desired command with the mentioned arguments. Always refer back to this guide for the correct usage.
Contributing with code
Thank you for your interest in contributing to GluPredKit! Whether you're fixing bugs, adding new features, or improving documentation, your contributions are greatly appreciated. This section explains how to contribute to various components within the project.
Before contributing, make sure to perform the following steps:
- Fork and Clone: Begin by forking the repo and cloning your fork to your local machine. This setup allows you to work freely without affecting the main project.
- Set Up Your Environment: Ensure you have the necessary development environment and dependencies installed, as described in chapter 1.
Making Contributions
In this section we will explain how you can contribute with new components in the modules:
- Parsers
- Preprocessors
- Models
- Evaluation metrics
- Plots
Regardless of the component type you're contributing, follow these general steps:
- Navigate to the corresponding directory in
glupredkit/. - Create a new Python file for your component.
- Implement your component class, inheriting from the appropriate base class.
- Add necessary tests and update the documentation.
Here are specifics for various component types:
Parsers
Refers to the fetching of data from data sources (for example Nighscout, Tidepool or Apple Health), and to process the data into a standardized format.
- Directory:
glupredkit/parsers - Base Class:
BaseParser
All the parsers should give an output of the same format. Some essential details are:
- We use pandas DataFrames as output.
- All datatypes are resampled into 5-minute intervals. If the sample rate is more frequent, the data should be aggregated with for example sum or mean values. If less frequent, NaN values should be used. Interpolation is handled in the preprocessor.
- The index-column of the dataframe should be the datetime of the sample.
- Blood glucose values must have the column name "CGM", and in the unit mg/dL.
- Carbohydrate intake values must have the column name "carbs".
- Insulin infusion values must have the column name "insulin".
- Additional columns and column names are optional.
Preprocessors
Refers to the preprocessing of the raw datasets from the parsing-stage. This includes imputation, feature transformation, splitting data etc.
- Directory:
glupredkit/preprocessors - Base Class:
BasePreprocessor
Note that time-lagged features and other library-specific data-processing is handled in the model implementations, in the method process_data in base_model.py.
That is because different libraries like scikit-learn, Keras or PyTorch, or model approaches might expect different data-input formats.
For example, time-lagged features might be stored in different ways as in separate columns or as lists in a single column.
Machine Learning Prediction Models
Refers to using preprocessed data to train a blood glucose prediction model.
- Directory:
glupredkit/models - Base Class:
BaseModel
Some essential details are:
- The model class must have the name "Model".
- The model training must handle predicting trajectories up to the defined prediction horizon.
- The predict method must output a list of lists of predicted trajectories with 5-minute interval outputs. If the model only predicts one value, the model must implement for example linear interpolation to return the predicted trajectories.
The method process_data in base_model.py handles addition of time-lagged features, removal of NaN values and other
library- or model-specific configurations for the model data input format.
Evaluation Metrics
Refers to different 'scores' to describing the accuracy of the predictions of a blood glucose prediction model.
- Directory:
glupredkit/metrics - Base Class:
BaseMetric
Some essential details are:
- The metric class must have the name "Metric".
- The metric must return a value regardless if there are NaN values in the input.
- The metric must return a value regardless if there are zero or negative values in the predicted input.
Evaluation Plots
Different types of plots that can illustrate blood glucose predictions together with actual measured values.
- Directory:
glupredkit/plots - Base Class:
BasePlot
Remember to adhere to our coding and documentation standards when contributing!
Reporting Issues
If you encounter any bugs or issues, please report them using the following steps:
- Check Existing Issues: Browse through the existing issues to ensure the bug has not been reported or resolved.
- Create a New Issue: Include as much detail as possible to help us understand the problem. Here are some general guidelines:
- Describe the bug/issue:
- Expected behaviour
- Actual behaviour
- List the steps to reproduce the behaviours
- Environment details:
- Operating system
- Python version
GluPredKitversion- Dependency versions
- Possible solution
- Logs, error outputs, or additional information that could be helpful in diagnosing the problem
- Describe the bug/issue:
Seeking Support
If you need help with setup, understanding the codebase, or have other questions:
- Read the Docs: Make sure to read through the documentation.
- Direct Contact: If your issue is sensitive or urgent, feel free to contact the maintainers directly via the
GluPredKitchannel on discord (https://discord.gg/M2T5Kx6s) or miriamkwolff@outlook.com.
Testing
To run the tests:
1. Clone the Repository:
git clone https://github.com/miriamkw/glupredkit.git
cd glupredkit
2. Set Up Environment:
python -m venv glupredkit_venv
source glupredkit_venv/bin/activate  # On Windows use `glupredkit_venv\Scripts\activate`
pip install -r requirements.txt
pip install .[test]
3. Run Tests:
pytestNote: Tests are only included in the source distributions, not in the PyPI installations.
For issues, visit our GitHub Issues page.
Disclaimers and limitations
- Datetimes that are fetched from Tidepool API are received converted to timezone offset +00:00. There is no way to get information about the original timezone offset from this data source.
License
This project is licensed under the MIT License - see the LICENSE file for details