mpogue2 / ladybug-mixer

Portable, low-cost audio mixer for square dance callers
Other
1 stars 0 forks source link

Feature: aluminum box with wood sides #5

Open mpogue2 opened 4 months ago

mpogue2 commented 4 months ago

Like these, but perhaps powder coat in red, with silk screen or engraved labels, and use ebonized ash for the sides. This should be fairly cheap, if we use one of the online CNC sheet metal houses (e.g. eMachineShop, fab works, SendCutSend, OSHcut, et.al.). Engraving could be done by me via CNC mill or via laser engraver (MaxerNexus, maybe?).

IMG_1415 IMG_1414

mpogue2 commented 4 months ago

Hammond has some nice looking ones, but they are pricey (about $100 for this one, that is only 7"x5"x2")! This might be nice for the next prototype, OR I could CNC mill + use Rubio Monocoat on the walnut sides, and have the sheet metal fabricated by one of the above service bureaus.
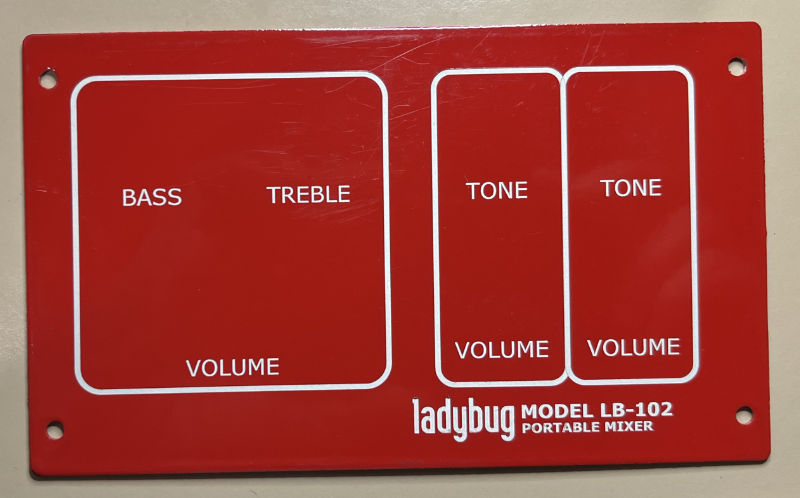
HammondWalnut

mpogue2 commented 4 months ago

I kinda like powder-coated red for the aluminum, rather than the natural aluminum finish, and perhaps ebonized ash for the sides....lettering would need to be engraved, though, perhaps by laser (unless one of the bureaus can do it)?

Current prototype is about 6" x 3.5" x 2".

mpogue2 commented 4 months ago

Fabworks: Ventura, CA, does laser cutting (down to 0.040" 5052 Al), bending, powder coating, PEM insertion; prefers OnShape, but will take Fusion files too

SendCutSend: Nevada, laser cutting, bending, powder coating, PEM insertion; prefers SolidWorks, has excellent blog with lots of hints and tips articles, requires 0.063" thickness for powder coating (!)

OSHcut: Utah, laser cutting, bending, powder coating, NO PEM INSERTION;

NOTE: Hammond uses 0.040" = 18 gauge Al for their enclosures.

Most of these take DXF (unfolded) or STEP (FabWorks takes it folded, I think).

mpogue2 commented 4 months ago

Did a quick sheet metal mockup in Fusion 360, with holes in approximately the right places. Quotes do not include wood or 3D-printed side panels, or a bottom aluminum panel. These are NOT powder-coated, nor do they contain PEM hardware, so these are just cut and bend.

FabWorks (STEP format file): $17.12 ea Q2, $15.11 Q10, including shipping, ships in about 5 days. Can't anodize. SendCutSend (STEP format file): Can't deburr, anodize, or powder-coat the part. Adding PEM is expensive (~$3 ea.) $26.02 Q2, $16.82 Q10, and includes shipping. No tax. OSHcut (STEP format file): Can't make the part. Rear panel is not tall enough, so bending collides with the press brake. They have a wonderful animation that shows exactly how this collision happens (very cool!). No workaround near as I can tell. Would have to design out the two bottom flanges, and use the side panels to support the bottom (which is possible, I think). Fictiv (STEP format file): Can't instant quote. Submitted for manual quote. Xometry (STEP format file): $111 ea Q2. Forget about it! Ponoko (tried STEP format file and DXF): Looks like STEP file didn't work, bends were not detected. DXF had to be hand edited to change colors of bend lines and bend region lines. New quote is $43 ea Q2, $20.20 Q5, $14.10 Q10. Powder coating not available. Unclear whether any deburring is done. Assuming that they can't deburr, anodize, or powder-coat the part. Price includes shipping.

mpogue2 commented 4 months ago

Simplified design, without the two extra flanges for the bottom

FabWorks: $12.09 ea Q2 deburred, $21.13 ea Q2 red $18.76 ea Q10 powder-coated FREE SHIPPING OSHcut: $41 ea Q2 deburred, $93 ea Q2 red $38 ea Q10 powder-coated Ponoko: $47.42 ea Q2 NOT deburred, $18.21 ea Q10 NOT deburred SendCutSend: $35.81 ea Q2 $23.00 ea Q10 gloss red powder-coated, $40.07 ea Q2 $25.74 ea Q10 red anodized FREE SHIPPING (ALSO NOTE: these are 0.063" aluminum, because 0.040" Al is not anodizable)

mpogue2 commented 4 months ago

FabWorks seems like the clear winner here, in terms of price, both for deburred and for red powder-coated aluminum parts.

SendCutSend seems like the clear winner here for Anodized Aluminum, since it's the only service bureau that does it. There's a $7 adder Q10 for red anodizing over red powder-coating.

Fiber laser seems like a good idea for making the markings on each side. See here. They use black in this video, but other sources suggested that red works as well. Will need to test this.

mpogue2 commented 4 months ago

XY Laser Cutters

Maker Nexus: $150/month -- 45W Epilog Helix, 100W Boss Laser LS2440, 100W "Red Laser bed" Hacker Dojo: $150/month -- 100W Thunder Laser

Rich has a 50W laser cutter that might work for marking/lettering.

mpogue2 commented 4 months ago

Here's a rendering of the V8 version of the simple (no bottom flanges) version of the V3 box design. Sides will be 3D printed and/or ebonized ash wood. This rendering is simulating a red anodized finish. I'm also looking at a red powder-coated finish to keep the cost down. Design and rendering done by Fusion 360 (super nice to use for sheet metal design!).

V3 Enclosure Simple v8

Note the addition of a slide switch for music 1 vs 2, suggested by Mickey B at Callerlab. This will prevent callers who are setting up from playing music when there is already a caller calling (yes, I have seen this happen, more than once!).

mpogue2 commented 3 months ago

Wood prices

Woodcraft (S2S, 1/2"x3"x24" makes 6 side panels):

Home Depot (S4S, 1"x4"x8' times 2 boards):

Finishes

Rubio Monocoat (Pure, 130ml): Amazon $36 (I don't know how much is used per side panel, though, probably not a lot)

mpogue2 commented 3 months ago

IMG_4219

Fabworks 5052 Al pieces arrived about an hour ago…This is what they look like, with components installed. These are unfinished, just deburred (checking for fit).

3 of each part, 5052 0.040” Aluminum, $43 and that included shipping. Order placed Tuesday 4/2 @ 1AM, package arrived Friday 4/5 @ 7PM. Can’t beat that price or that delivery time.

pkbott commented 3 months ago

This is looking really good

mpogue2 commented 3 months ago

I'm also working on 3D printed side panels, but I really want to make some walnut ones... :-)

mpogue2 commented 3 months ago

Today I also tested using brass threaded inserts into the PLA side panels, as a way to get a tighter screw connection from the front/top/rear/bottom panels into the side panels.

Notes:

Results:

Weller tip I used: Weller_tip_for_inserts

Amber's inserts from Amazon: ThreadedInserts

mpogue2 commented 3 months ago

TODO (next version of Aluminum front/top/rear bracket):

TODO (next version of Aluminum bottom panel):

TODO (both):

TODO (other):

pkbott commented 3 months ago

Unfortunately I’m retiring but had access to a laser cutter that would have been cool to use to engrave a design or customization in these pieces. 

mpogue2 commented 3 months ago

pcbway.com can do: powder coating, painting, bead blasting, anodizing, brushed aluminum, AND they can do laser engraving and silk screen (unknown price for those last two services).

They can do quantities as low as 1 or 2 parts.
Prices go down significantly when ordering 50 parts.
Non-bead blasted (but deburred) are about $17.50 Q10. Bead-blasted parts are in the $25 range for Q5, $20 ea for Q10.
Bead-blasted and red anodized are about $27 ea Q5, $23 ea Q10. Powder-coated red are about $25 ea Q10. (interesting that powder-coated is more expensive than bead-blasted and anodized...why?)

These prices do NOT include tax or shipping costs. In fact, I can't get a full quote online, I have to click Submit and then wait for a manual quote to be sent to me.

They can also do 3d-printed side panels in PLA for about $9 each (too much!). JLCPCB can also do side panels now too in PLA, for about $8 each Q10 (too much!).

OTOH, the Bottom panels are ridiculously expensive at PCBway. About $20 each (no finish), compared to FabWorks $3 ea (no finish)... Wow... but, Fabworks can't do anodizing or bead blasting, so there is that. I have no idea why a flat piece of Al with no finish would be so expensive at Pcbway.

So far, the lowest-cost approach would be to make them at Fabworks, then do some hand post-processing to get a nicer finish. For a nicer finish (bead-blasted and anodized), the top panel might be best done at pcbway .

mpogue2 commented 3 months ago

Results of experimenting with the 45W CO2 laser engraver (thanks to Rich!).

SUMMARY: I was not super happy with the quality of any of the results.

The closest to "acceptable" would be the hand-brushed aluminum, with CerMark engraving ("cut" mode @ 1mmps/100%). That gave the best contrast of the many tests we ran, but it still wasn't enough contrast for my taste, to make the lettering really easy to read under multiple different lighting conditions. The black engraved lettering was sharp, with clean edges, it just wasn't enough contrast to make the lettering very readable. And, just to do that one snippet of text took about 2.5 minutes @ 1mm/sec, so doing an entire panel would probably take an hour or two -- too slow.

The painted panels had uneven finishes, easily visible in good light. The lettering was OK, with good contrast of the black against the red. But, I really prefer the rasterized text to vectorized text, and the rasterized text just didn't look that great to me.

Photo 1: Brushed aluminum (green, then red scotchbrite with WD40 lubricant), then CerMark coated, then laser engraved ("cut" mode") at 1 mm/sec @ 100% power (~45W CO2 laser), time: about 2.5 minutes

Brushed_plus_CerMark_1mmps_power100

Photo 2: Deburred aluminum (direct from Fabworks), then CerMark coated, then laser engraved ("cut" mode") at 1, 2, and 4 mm/sec @ 100% power (~45W CO2 laser), time: about 2.5, 1.5, 0.75 minutes for 1, 2, 4mm/sec speeds

Deburred_plus_CerMark_124mmps_power100

Photo 3: Primed (2 coats) with Rustoleum self-etching primer, spray painted (2 coats) with Rustoleum 2X paint, then laser engraved ("cut" mode) at 3mm/sec @ 100% (~45W CO2 laser)

painted_cut_text_250

Photo 4: Primed (2 coats) with Rustoleum self-etching primer, spray painted (2 coats) with Rustoleum 2X paint, then laser engraved ("scan" mode = rasterized) at 3mm/sec @ 100% (~45W CO2 laser)

painted_rasterized_text_250

Higher speeds in "cut" mode, resulted in dark marks, but the black part easily washed out with water or isopropyl alcohol wash. Lowest speeds were crispest, and resulted in black marks that did not erase or smear, even with acetone wash. Acetone, alcohol, and just rubbing with a cloth resulted in noticeable dulling of the Rustoleum painted finish, which had been cured for about 24 hours.

Software turned out to be a limiting problem with this test. The laser cutter was probably 8 or 10 years old, and its software did not understand LightBurn files. And, LightBurn couldn't export any rasterized text that could be read by the laser cutter's software. So, for this test we just made up a simple test patter with a single piece of text, and we manually set the speed and power. That text was Arial, and the kerning was just not there as we can see between the "T" and the "e" of "Test". Newer laser cutter/engravers might not have these problems, although they are a way more expensive way to go!

Still to explore: anodized or powder-coated with the laser engraver

A Fiber 100W laser engraver might have worked better, especially since it can do multiple passes. But, I don't have access to one of those, even just to test.

mpogue2 commented 3 months ago

I am still investigating walnut side panels.

Amazon (Barrington Hardwoods) has some nice looking walnut board (two boards, each 3/4" x 2" x 24"). The side panels we have now could each be routed down from a blank that is 3/4" x 4" x 3", so each of these walnut boards would make 12 blanks, and the price is $34 with free shipping. So, cost of the blanks would be about $34/(2*12) = $1.40 each, which is pretty reasonable.

For comparison, the black 3D-printed side panels I'm using right now are about 30g of Bambu PLA Matte each, which is about $25 * (30g/1000g) = $0.75 each.

mpogue2 commented 3 months ago

For PCBWay, they told me via online chat (which was a somewhat unreliable connection, got disconnected 5 times):

mpogue2 commented 3 months ago

Fusion 360 exports the flat pattern incorrectly (rotated slightly). ERGH But, LightBurn can import DXF from Fusion 360, and can edit it, and output SVG, which is one of the formats supported by PCBWay. And, it retains the fill color. So, I could separate vector and raster by color.
Just have to figure out how to export the DXF from flattened/unfolded Fusion 360 model. Inkscape doesn't seem to be able to import the DXF for editing. But, Inkscape CAN edit the Lightburn-exported SVG. Affinity Designer 2 seems to miss the fact that the text is filled, and it just sees the outlines.

So, perhaps:

mpogue2 commented 3 months ago

In Fusion 360, can't always use a .otf font (like Grayson). Had to convert to TTF, and remove the OTF version. Then, I could extrude text in Grayson. Converted using https://convertio.co/font-converter/

mpogue2 commented 3 months ago

Making SOME progress on exporting to Lightburn, so I can make up a drawing for silk screen.

Problem: only Lightburn understand this DXF. Holes in glyphs are correct in Lightburn, incorrect in all other programs, which only see outlines. Lightburn does an exclusive OR to get rounded rectangles, generated via the Offset feature. But nobody else can see them.

Problem: Lightburn's AI output is not readable by anything I can find. Ends up being blank.

Lightburn can output in PDF, but for silk screen I think we need a high resolution raster image. I bet that the PDF isn't usable for laser engraving either.

Lightburn can output in SVG, but the fills are not exclusive OR'ed, so rounded rectanges show up as completely filled, instead of hollow like they should be.

DXF has line widths assignable on a layer-by-layer basis, but Lightburn does not appear to have the ability to set line weights (widths) on any lines.

mpogue2 commented 3 months ago

OK, here's a better approach, that I think might work (yes Inkscape is painful, but it's the only DXF/SVG editor I have access to):

mpogue2 commented 3 months ago

Inkscape:

To round corners of a rectangle, select the rectangle, then choose Path > Path Effects... and type "corners". Click Corners to start. Change radius units to mm, choose a value for Radius. Deselect the rect.

mpogue2 commented 3 months ago

Laser engraving and silk screen prices were way way too high (PCBWay: $130 per part for steel + silkscreen, $90 per part for aluminum + laser engraving), so I decided to proceed as follows:

In each of the above 3 cases, I'll be testing using both my cheap 5W diode laser engraver (supposedly this will work for both powder-coating and anodized surfaces, although it might be somewhat slow), and with Rich's 45W CO2 laser cutter/engraver (bringing in the big guns so this should run fast, but it is quite painful to setup the input files for the software that his laser cutter uses, it's not Lightburn...).

Price is about the same for powder-coated and anodized (with bead blasting), so if I had to choose, assuming engraving works OK with both, I'd go with anodized, which looks more modern and "high-end". Rich thinks that the weight of steel would be an asset, though. So, I'll make one of each and we can let users vote for their favorite. If engraving only works with one approach, I'll go with that one for now.

SIDE NOTE: I would have gone with SendCutSend for anodized 5052 (they have a 50% discount going on right now!), but they cannot do bead blasting, so the press brake marks due to the 2 bends in the part would not have been removable before anodizing, so they'd be visible in the final product. That was a show-stopper for me.

ALSO: I will also experiment with both a one-part and a two-part engraving approach:

Later on I'll look into cost reduction, doing just the bare metal at Fabworks, and doing tumbling/bead-blasting here, then farming it out for anodizing. For now, this bare metal approach is too complicated and will take too long to set up. I'm not sure it would save a lot of cost, either (depends on anodizing cost from local businesses, which don't always deal well with small lots).

mpogue2 commented 3 months ago

Hmmm....here's a surprise!

I submitted the anodized parts to PCBWay, and they were already quite expensive:

They reviewed it and bumped the price way up, saying "The structure of the parts is complicated, and it needs more working hours.; The surface finish is time-consuming, and cost increased."

Now the prices are:

It looks like PCBWay's estimator is WAY off (56% off, to be exact). AND, that doesn't include shipping or tax yet.

They are now off the table.

pkbott commented 3 months ago

I would tend to agree that steel might be an asset vs aluminum for weight. Was thinking all the cords being used might warrant something a little heavier. 

mpogue2 commented 3 months ago

Some progress in coming up with a simple and quick finish that I like for the Aluminum....

In this picture, the left 1/5 of the aluminum blank is unprocessed (that is, it's just a mill finish). The right 4/5 was processed in about 3 minutes, with a random orbital sander, some WD-40, and 4 grits of Scotchbrite non-woven pads (in order from coarse to fine: green, maroon, grey, white).

RandomOrbitalSander

mpogue2 commented 3 months ago

So, currently I'm still considering:

mpogue2 commented 3 months ago

At this point, I have just purchased a Fiber Laser Engraver. So, my primary choice here is now narrowed down to:

Should I consider Stainless Steel, too? The fiber laser can do some limited colors on Stainless. I ordered some sample Stainless Steel blanks to test out that approach. If that looks nice, I can order the part in SS. I don't know what the cost adder would be. If significant, perhaps next version.

UPDATE:

Fabworks has just shipped my two powder-coated prototypes (1 Aluminum and 1 Steel), so shortly I should be able to do some testing of labels on these two enclosure types using the new laser engraver (which should also arrive this week). I'm 90% sure that ONE of those methods above will work.

NOTE: I have not found a place that will do cheap surface prep and aluminum anodizing yet (PCBWay was way too expensive, SendCutSend doesn't do surface prep after bending). Would I consider doing the anodizing myself, given that it's dealing with battery acid and hot plates? I do already own the 30V 6A power supply...recommended voltage is 15 - 21V, and recommended current is 0.03A/sq inch. I'm at 5.5" x 7.25" x 2 sides = 2.4A, so my existing power supply should work fine....so, maybe... :-) :-)

mpogue2 commented 3 months ago

For optimal positioning of the fiber laser, I'll probably need a 3D printed fixture to hold the part precisely in position. The width of the part (140mm)is somewhat higher than the 110x110mm high-resolution field I get with the fiber laser. There is a 200x200mm field available with the second lens, but the resolution and available power are quite a bit lower (like about 4X lower). If I want a deep engraving, or dark Cermark lettering, I'll want as much power as I can get from this 20W ComMarker B4 laser.

The 3D-printed fixture should be pretty straightforward, and is just two thin, parallel grooves with stops at both ends. I can then:

mpogue2 commented 2 months ago

I got a 20 watt ComMarker B4 fiber laser yesterday, and I ran a couple of tests today. There's a clear winner!

In each case, these are the Ladybug logo (the word "ladybug" is 5.57mm tall), the Model Number (which is 2.5mm tall), the generic name ("PORTABLE MIXER" is 1.5mm tall), and the word "VOLUME" is 3.07mm tall. In all cases, the laser parameters were:

Here is that test pattern engraved on Brushed 5052 Aluminum. This is the best lighting I could do to make it readable. Many other positions of the light made the light gray color blend into the background, and so the lettering was not legible from all angles!

fiberLaserEngraved_Brushed5052Al

Here is the same engraved on Powder Coated 1018 Steel. The color of the lettering is grey, so the contrast is not great with the background. Better than the brushed aluminum, though!

fiberLaserEngraved_PowderCoated1018Steel

Here is same test engraved on Powder Coated 5052 Aluminum. This one came out nice! Crisp, clean edges, nice contrast between lettering and background, and readable at all angles. This is the winner!

fiberLaserEngraved_PowderCoated5052Al

By the way, in that last picture, if you look at the Material Test over to the left (5x5 matrix of squares), it has letters that are only about 0.5 mm tall! I can just barely read it without a magnifying glass....this fiber laser marker is pretty amazing!

I have one more test to run here, which is to use the CerMark spray on the Aluminum, and see if I can get dark black lettering. I could also consider mixing white lettering and black lettering (perhaps for the "bug" part of the logo?)

pkbott commented 2 months ago

Yes there is a clear winner here!

mpogue2 commented 2 months ago

Did a lot of trial and error with the fiber laser today. It really likes bolder fonts, and larger fonts. Thin parts of a glyph don't get really white. And, the centers of glyphs like "P" and "R" and "A" are often missing, when the font is small.

After a large number of tries of settings, fonts, and font sizes, I found some combinations that I think will work pretty well. Hopefully these are the final settings for the fiber laser for this version of the mixer, at least:

Material: 5052-H32 Al with red gloss powder coating, from Fabworks Settings: 1000/100%/30K/0.02/4 Passes

Font sizes:

Result:

mpogue2 commented 2 months ago

For the record, at least with the settings I tried, the CerMark test didn't come out all that much better than before with Rich's CO2 laser. Maybe it needs different settings, but for now, I think the "brushed aluminum" option is tabled.

mpogue2 commented 2 months ago

FYI -- It looks like I can specify a frequency << 20KHz in the Materials Test in Lightburn, and the labels on the resulting set of squares claims to do it. But, in actuality, this fiber laser can't go below 20KHz. That explains why all the tiny squares in the image above look about the same.

FYI: Lower KHz frequencies represent more aggressive cutting.

mpogue2 commented 2 months ago

The top of the enclosure is wide enough, that I have to engrave the lettering in 2 passes. I split into the Left half, and the Right half, and I have "Tool" layers (that don't engrave, they just mark the pot hole locations) to help line up each pass manually. I decided that I did not need a fancy fixture, just a horizontal plexiglass bar (included with the fiber laser), and a manual slide of the part to horizontally get it to the right position. I can do something fancier later.

This test plate was powder-coated, but not laser cut, so it has no holes. It's just for testing the engraving.

Here's how it came out:

mpogue2 commented 2 months ago

The bottom panel and side panels are 3D printed right now, using Bambu PLA Matte Black. Here's what fiber laser (ComMarker B4 w/110mm lens) engraving on the flat bottom panel looks like:

It's hard to see in this pic, but the bottom one (2 passes instead of one) has a darker outline, so it's more readable. However, I do see that this engraving is light-direction-sensitive, so it can be read way better at certain angles, and way worse at others. Despite that limitation, I think it will be fine for now.

Note: XH = Cross Hatch ON