:abc: English | :mahjong: 简体中文
How to set up Scrapyd cluster on Heroku
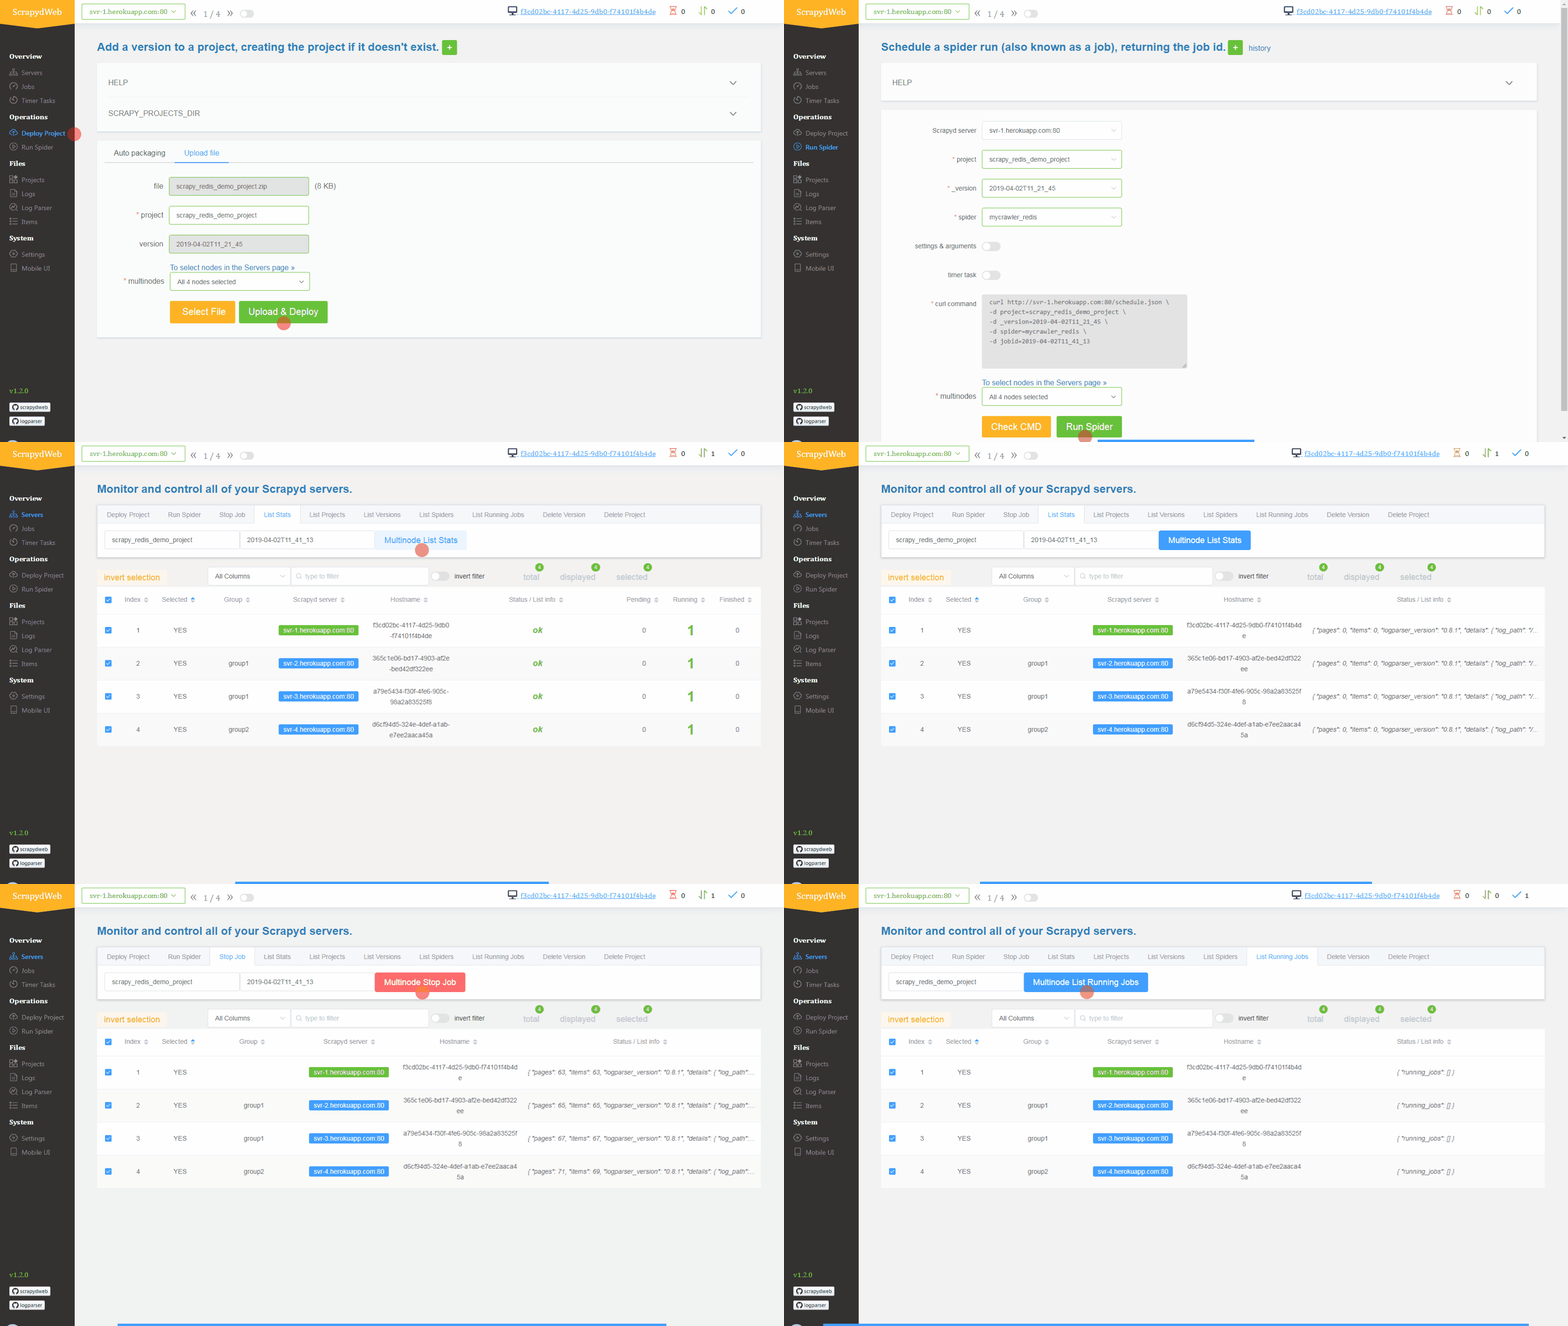
Demo
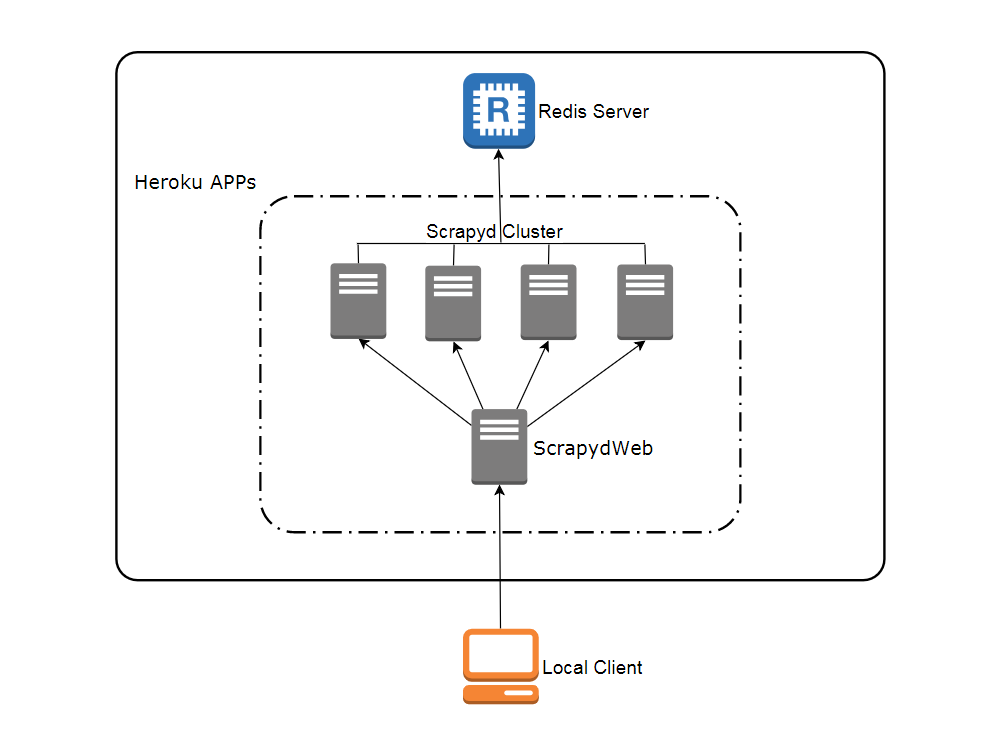
Network topology
Create accounts
View contents
1. Heroku Visit [heroku.com](https://signup.heroku.com) to create a free account, with which you can **create and run up to 5 apps**.  2. Redis Labs (optional) Visit [redislabs.com](https://redislabs.com) to create a free account, which provides **30MB storage** and can be used by [scrapy-redis](https://github.com/rmax/scrapy-redis) for **distributed crawling**. 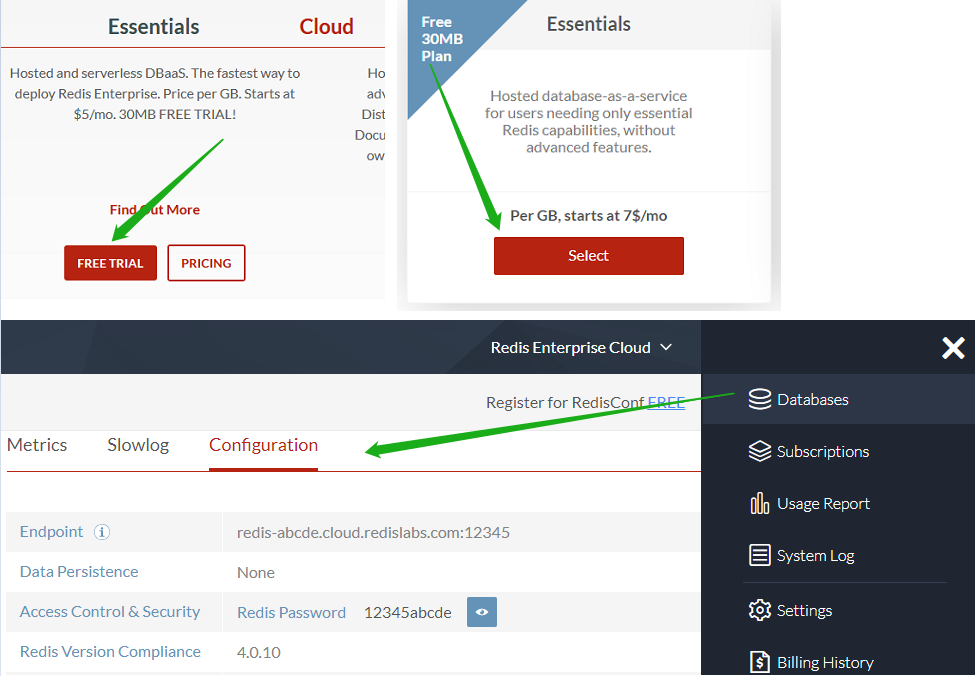Deploy Heroku apps in the browser
View contents
1. Visit [my8100/scrapyd-cluster-on-heroku-scrapyd-app](https://github.com/my8100/scrapyd-cluster-on-heroku-scrapyd-app) to deploy the Scrapyd app. (Don't forget to update the host, port and password of your Redis server in the form) 2. Repeat step 1 to deploy up to 4 Scrapyd apps, assuming theri names are `svr-1`, `svr-2`, `svr-3` and `svr-4` 3. Visit [my8100/scrapyd-cluster-on-heroku-scrapydweb-app-git](https://github.com/my8100/scrapyd-cluster-on-heroku-scrapydweb-app-git) to deploy the ScrapydWeb app named `myscrapydweb` 4. (optional) Click the **Reveal Config Vars** button on [dashboard.heroku.com/apps/myscrapydweb/settings](https://dashboard.heroku.com/apps/myscrapydweb/settings) to add more Scrapyd server accordingly, e.g. `SCRAPYD_SERVER_2` as the KEY and `svr-2.herokuapp.com:80#group2` as the VALUE. 5. Visit [myscrapydweb.herokuapp.com](https://myscrapydweb.herokuapp.com) 6. Jump to the [Deploy and run distributed spiders](#deploy-and-run-distributed-spiders) section below and move on.Custom deployment
View contents
### Install tools 1. [Git](https://git-scm.com/book/en/v2/Getting-Started-Installing-Git) 2. [Heroku CLI](https://devcenter.heroku.com/articles/heroku-cli) 3. [Python client for Redis](https://pypi.org/project/redis/): Simply run the `pip install redis` command. ### Download config files Open a new terminal: ``` git clone https://github.com/my8100/scrapyd-cluster-on-heroku cd scrapyd-cluster-on-heroku ``` ### Log in to Heroku ``` # Or run 'heroku login -i' to login with username/password heroku login # outputs: # heroku: Press any key to open up the browser to login or q to exit: # Opening browser to https://cli-auth.heroku.com/auth/browser/12345-abcde # Logging in... done # Logged in as username@gmail.com ``` ### Set up Scrapyd cluster 1. New Git repo ``` cd scrapyd git init # explore and update the files if needed git status git add . git commit -a -m "first commit" git status ``` 2. Deploy Scrapyd app ``` heroku apps:create svr-1 heroku git:remote -a svr-1 git remote -v git push heroku master heroku logs --tail # Press ctrl+c to stop logs outputting # Visit https://svr-1.herokuapp.com ``` 3. Add environment variables - Timezone ``` # python -c "import tzlocal; print(tzlocal.get_localzone())" heroku config:set TZ=US/Eastern # heroku config:get TZ ``` - Redis account (optional, see *settings.py* in the *scrapy_redis_demo_project.zip*) ``` heroku config:set REDIS_HOST=your-redis-host heroku config:set REDIS_PORT=your-redis-port heroku config:set REDIS_PASSWORD=your-redis-password ``` 4. Repeat step 2 and step 3 to get the rest Scrapyd apps ready: `svr-2`, `svr-3` and `svr-4` ### Set up ScrapydWeb app 1. New Git repo ``` cd .. cd scrapydweb git init # explore and update the files if needed git status git add . git commit -a -m "first commit" git status ``` 2. Deploy ScrapydWeb app ``` heroku apps:create myscrapydweb heroku git:remote -a myscrapydweb git remote -v git push heroku master ``` 3. Add environment variables - Timezone ``` heroku config:set TZ=US/Eastern ``` - Scrapyd servers (see *scrapydweb_settings_vN.py* in the *scrapydweb* directory) ``` heroku config:set SCRAPYD_SERVER_1=svr-1.herokuapp.com:80 heroku config:set SCRAPYD_SERVER_2=svr-2.herokuapp.com:80#group1 heroku config:set SCRAPYD_SERVER_3=svr-3.herokuapp.com:80#group1 heroku config:set SCRAPYD_SERVER_4=svr-4.herokuapp.com:80#group2 ```` 4. Visit [myscrapydweb.herokuapp.com](https://myscrapydweb.herokuapp.com) 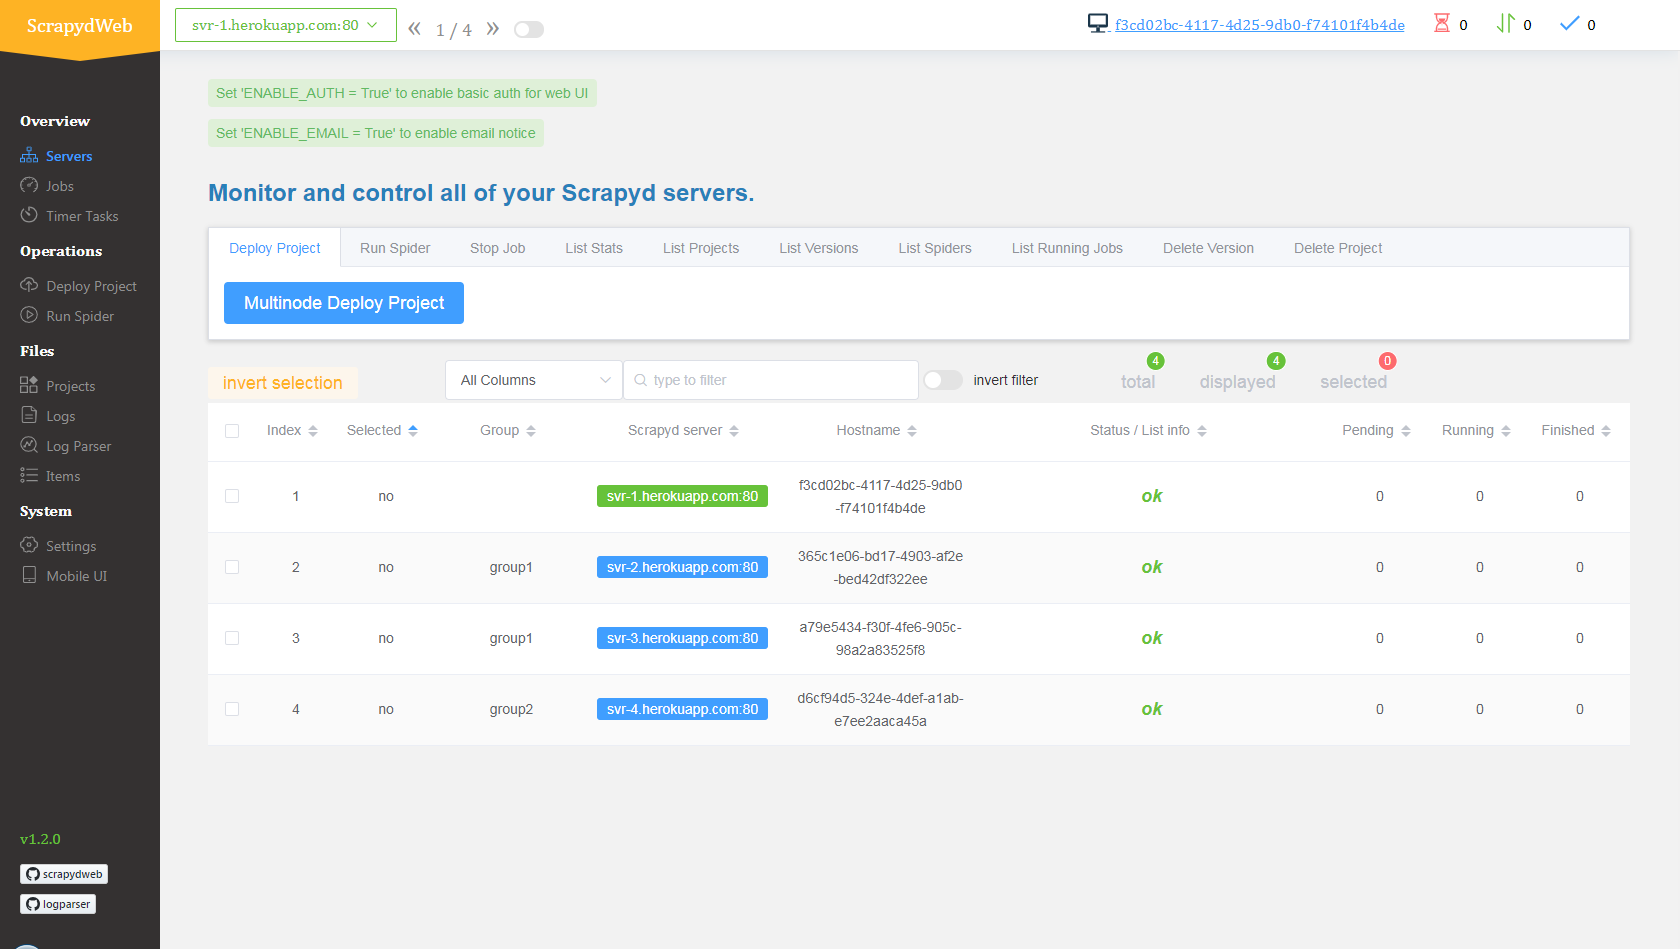Deploy and run distributed spiders
View contents
1. Simply upload the compressed file *scrapy_redis_demo_project.zip* which resides in the *scrapyd-cluster-on-heroku* directory 2. Push seed URLs into `mycrawler:start_urls` to fire crawling and check out the scraped items ``` In [1]: import redis # pip install redis In [2]: r = redis.Redis(host='your-redis-host', port=your-redis-port, password='your-redis-password') In [3]: r.delete('mycrawler_redis:requests', 'mycrawler_redis:dupefilter', 'mycrawler_redis:items') Out[3]: 0 In [4]: r.lpush('mycrawler:start_urls', 'http://books.toscrape.com', 'http://quotes.toscrape.com') Out[4]: 2 # wait for a minute In [5]: r.lrange('mycrawler_redis:items', 0, 1) Out[5]: [b'{"url": "http://quotes.toscrape.com/", "title": "Quotes to Scrape", "hostname": "d6cf94d5-324e-4def-a1ab-e7ee2aaca45a", "crawled": "2019-04-02 03:42:37", "spider": "mycrawler_redis"}', b'{"url": "http://books.toscrape.com/index.html", "title": "All products | Books to Scrape - Sandbox", "hostname": "d6cf94d5-324e-4def-a1ab-e7ee2aaca45a", "crawled": "2019-04-02 03:42:37", "spider": "mycrawler_redis"}'] ```