Vocal Call Locator
Installation
Pip:
- (Optional) Create a virtual environment:
python -m venv vcl_env && source vcl_env/bin/activate pip install vocalocator
Conda:
- Install Conda for your system with the instructions here
- Clone this repository:
git clone https://github.com/neurostatslab/vocalocator.git && cd vocalocator - Create an environment and install:
conda create -n vcl -f environment_conda.yml
Pipenv:
- Clone this repository:
git clone https://github.com/neurostatslab/vocalocator.git && cd vocalocator - Install Pipenv:
pip install pipenv - Install package:
pipenv install - Enter the pipenv shell to access the new virtual environment:
pipenv shell
Quick Start
This section will give you a brief intro on training a deep neural network from scratch and performing inference via a pretrained model with VCL. For this we will use a smaller public dataset we have released alongside this package.
Setup
- From our datasets website, download the GerbilEarbud-4M-E1 audio (1.3GB)
- Optionally, download and unzip the pretrained model (177MB) and the test-train split (20KB). Discard the config file that comes with this.
train_set.npyandval_set.npymay also be discarded, reservingtest_set.npy. - From this repository's
sample_configsdirectory, downloadxcorr_config_environment_1.json5(4KB) - For convenience, place these files in the same directory and make this your working directory
- At this point, the directory should contain the following files:
|-- gerbilearbud-4m-e1_audio.h5
|-- best_weights.pt (Optional, from the pretrained model zip file)
|-- test_set.npy (Optional, from the test-train split zip file)
|-- xcorr_config_environment_1.json
Training
- Working in the directory we created in Setup, open a terminal and activate your virtual environment (if one was created during the Installation step)
- Use the following command to initiate training:
python -m vocalocator --config xcorr_config_environment_1.json5 --data gerbilearbud-4m-e1_audio.h5 --save-path my_model. This will periodically print a log of the training process to your terminal. Through this you can see how the training loss decreases:TRAINING. Epoch 1 / 10 [32/6158] minibatch loss: 2.37226 TRAINING. Epoch 1 / 10 [416/6158] minibatch loss: 2.23515 TRAINING. Epoch 1 / 10 [800/6158] minibatch loss: 1.94896And at the end of each epoch, see if performance on the validation set, a subset of the dataset which remains unseen during training, has improved:
>> DONE TRAINING, STARTING TESTING. TESTING VALIDATION SET. Epoch 1 [416/770] >> FINISHED EPOCH IN: 56 secs >> MEAN VALIDATION LOSS, 14.967cm, IS BEST SO FAR, SAVING WEIGHTS TO my_model/best_weights.pt - Training a model in VCL generates a directory which stores several logs and files related to the training process:
- train_log.txt: Contains a copy of the text you see now in your terminal
- train_loss.txt: Contains the mean loss on each sample in the training set of each epoch. The unit is arbitrary
- val_loss.txt: Logs the mean error on the validation set at the end of every epoch, in centimeters
- val_calibration.txt: Logs the calibration curve of the model on the validation set at the end of each epoch
- config.json: A copy of the config used for training. Includes the
WEIGHTS_PATHfield which points toward the model's trained weights - init_weights.pt: The random weight vectors used to initialize the model. These are only stored for reproducibility.
- best_weights.pt: The weights associated with the model's best iteration
- final_weights.pt: The weights at the end of training. Due to overfitting, these weights may not perform as well as those stored in
best_weights.pt - indices: The test-train split used by the model during training.
Inference
- Now that we have trained weights, we can assess the model's performance on some unseen data. First, we need to ensure the config file we use for inference points toward the pretrained weights we'd like to use. For the model we just trained, this is already done for us, as indicated by the presence of the
WEIGHTS_PATHfield at the bottom of the new config file atmy_model/config.json. However, to use the pretrained weights from our website, this line needs to be added manually toxcorr_config_environment_1.json:... "MAX_SNR": 15, "PROB": 0.5 }, "MASK": { "PROB": 0.5, "MIN_LENGTH": 75, "MAX_LENGTH": 125 } ! }, <-- Add a comma here, too + "WEIGHTS_PATH": "best_weights.pt" } - Once this is done, running inference can be done with the following command:
- Using the model trained in the previous section:
python -m vocalocator.assess --config my_model/config.json --data gerbilearbud-4m-e1_audio.h5 --index my_model/indices/test_set.npy -o assessment.h5 - Using the pretrained model from our website:
python -m vocalocator.assess --config xcorr_config_environment_1.json --data gerbilearbud-4m-e1_audio.h5 --index test_set.npy -o assessment.h5
- Using the model trained in the previous section:
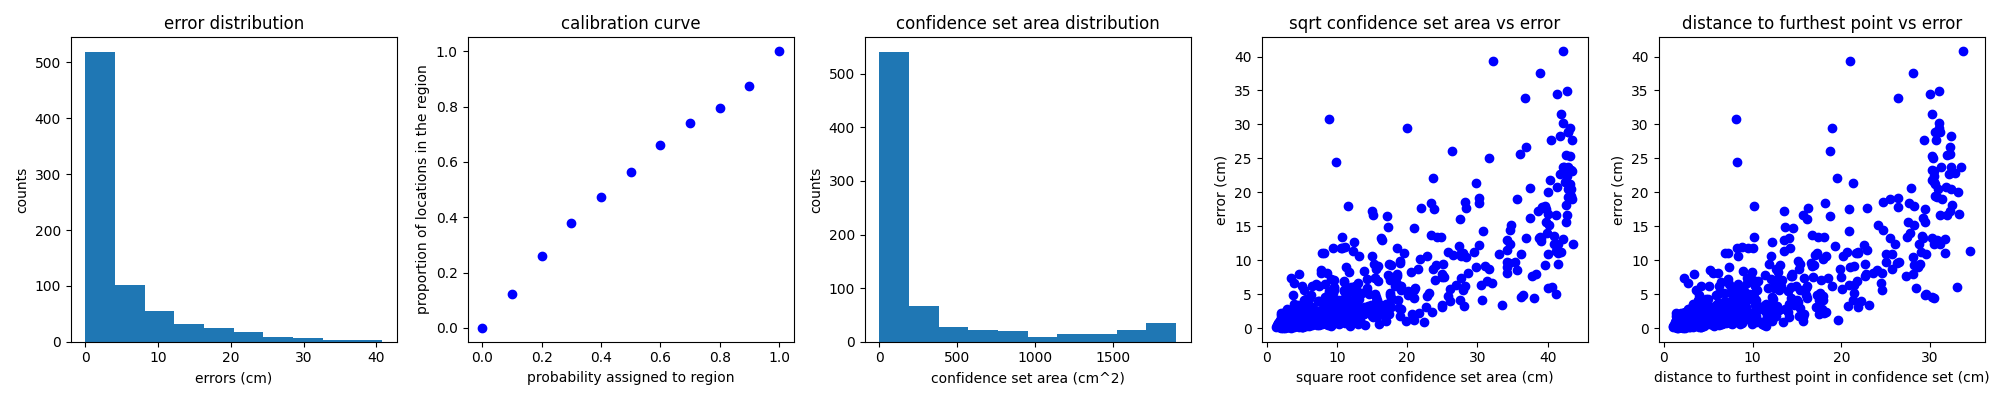
- This will create an image with several plots showing the model's performance on the held out data as well as an HDF5 file containing the model's predictions, which can be used to conduct a more detailed analysis.
Advanced Usage
- Create a dataset. This should be an HDF5 file with the following datasets:
| Dataset group/name | Shape | Data type | Description |
|---|---|---|---|
| /audio | (*, n_channels) | float | All sound events concatenated along axis 0 |
| /length_idx | (n + 1,) | int | Index into audio dataset. Sound event i should span the half open interval [length_idx[i], length_idx[i+1]) and the first element should be 0. |
| /locations | (n, 2) | float | Locations associated with each sound event. Only required for training. |
- Optionally, manually generate a train/val split. If none is provided, an 80/10/10 train/validation/test split will be generated automatically and saved in the model directory. Manually generated splits can be used by saving them to the same directory as 1-D numpy arrays with the names
train_set.npyandval_set.npy. This directory is passed to VCL through the--indicesoption.# Simple script to generate a test-train split import numpy as np dataset_size = <INSERT DATASET SIZE> train_size, val_size = int(0.8 * dataset_size), int(0.1 * dataset_size) train_set, val_set, test_set = np.split(np.random.permutation(dataset_size), [train_size, train_size + val_size]) np.save('train_set.npy', train_set) np.save('val_set.npy', val_set) np.save('test_set.npy', test_set) - Create a config. This is a JSON file consisting of a single object whose properties correspond to the hyperparameters of the model and optimization algorithm. See examples in the
sample_configsdirectory of the repository - Train a model:
python -m vocalocator --data /path/to/directory/containing/trainset/ --config /path/to/config.json --save-path /path/to/model/weight/directory/ --indices /optional/path/to/index/directory- (Optional) Initialize with pretrained weights by populating the "WEIGHTS_PATH" field in the top-level of the config file with a path to the saved model state as a .pt file.
- Using the trained model, perform inference:
python -m vocalocator.assess --inference --data /path/to/hdf5/dataset.h5 --config /path/to/model_dir/config.json -o /optional/output/path.h5 --index /optional/index/path.npy.- Note that here, the config should point toward a config.json in a trained model's directory. This ensures the "WEIGHTS_PATH" field exists and contains the path to the weights corresponding to the best-performing epoch of the model.
- Output predictions will be stored in a dataset labeled
point_predictionsat the root of the HDF5 file.
Public datasets
See our dataset website to learn more about and download our public datasets.