ASN Lookup Tool and Traceroute Server
![]()
Container support:
![]()
![]()
OS support:
![]()
![]()
Table of contents:
- Description
- Screenshots
- Running the script from a container
- Installation
- Optional: adding your API tokens to improve functionalities
- Usage (as a command line tool)
- Usage (as a lookup & traceroute server)
- Usage (as a lookup API with JSON output)
Description
ASN / RPKI validity / BGP stats / IPv4v6 / Prefix / ASPath / Organization / IP reputation / IP geolocation / IP fingerprinting / Network recon / lookup tool / Web traceroute server.
This script serves the purpose of having a quick OSINT command line tool at disposal when investigating network data, which can come in handy in incident response scenarios as well (with features such as bulk geolocation and threat scoring).
It can be used as a recon tool by querying Shodan for data about any type of target (CIDR blocks/URLs/single IPs/hostnames). This will quickly give the user a complete breakdown about open ports, known vulnerabilities, known software and hardware running on the target, and more - without ever sending a single packet to the target. JSON output of the results, multiple simultaneous targets and IP list file inputs and are also supported. Click here for more information about Shodan scanning mode.
It can also be used as a web-based traceroute server, by running it in listening mode and launching lookups and traces from a local or remote browser (via a bookmarklet or custom search engine) or terminal (via curl, elinks or similar tools). Click here for more information about server mode functionality.
Furthermore, it can serve as a self-hosted lookup API endpoint and output JSON-formatted data while running in both interactive and server mode. Click here for more information about API mode functionality.
Features:
-
It will lookup relevant Autonomous System information for any given AS number, including:
- Organization name and RIR region
- IXP Presence (Internet Exchange facilities where the AS is present)
- Global AS rank (derived from the size of its customer cone, number of peering relationships and more)
- BGP statistics (neighbours count, originated v4/v6 prefix count)
- BGP incident history (number of BGP hijacks and route leaks involving the target AS in the past 12 months, as a victim or a hijacker)
- Peering relationships separated by type (upstream/downstream/uncertain), and sorted by observed path count, to give more reliable results (so for instance, the first few upstream peers are most likely to be transits). Furthermore, a recap of transits/peers/customers amount (per latest CAIDA data) is displayed.
- Announced prefixes aggregated to the most relevant less-specific
INET(6)NUMobject (actual LIR allocation).
-
It will perform an AS path trace (using mtr and retrieving AS data from the results) for single IPs or DNS results, optionally reporting detailed data for each hop, such as RPKI ROA validity, organization/network name, geographic location, etc.
-
It will detect IXPs (Internet Exchange Points) traversed during the trace, and highlight them for clarity.
-
It will attempt to lookup all relevant abuse contacts for any given IP or prefix.
-
It will perform RPKI validity lookups for every possible IP. Data is validated using the RIPEStat RPKI validation API. For path traces, the tool will match each hop's ASN/Prefix pair (retrieved from the Prefix Whois public server) with relevant published RPKI ROAs. In case of origin AS mismatch or unallowed more-specific prefixes, it will warn the user of a potential route leak / BGP hijack along with the offending AS in the path (requires
-doption, see below for usage info). -
It will perform IP geolocation lookups according to the logic described below.
- geolocation can be performed in bulk mode. See here for more info.
- the script can also map all IPv4/IPv6 CIDR blocks allocated to any given country, by querying data from Marcel Bischoff's country-ip-blocks repo. See below for more info.
-
It will perform IP reputation, noise classification and in-depth threat analysis reporting (especially useful when investigating foreign IPs from log files).
-
It will perform IP fingerprinting using Shodan's InternetDB API and report any known vulnerabilities, open ports and services/operating system/hardware pertaining to target IPs and individual trace hops (detailed traces only).
- Directly querying Shodan for any type of targets (including CIDR blocks) is also possible. More informations here about how to use the script as a recon tool.
-
It will perform IP type identification (Anycast IP/Mobile network/Proxy host/Datacenter or hosting provider/IXP prefix) for target IPs and individual trace hops. Broad type classification comes from ip-api, while detailed DC+region identification comes from incolumitas.com
- It will also identify bogon addresses being traversed and classify them according to the relevant RFC (Private address space/CGN space/Test address/link-local/reserved/etc.)
-
It is possible to search by organization name in order to retrieve a list of IPv4/6 network ranges related to a given company. A multiple choice menu will be presented if more than one organization matches the search query.
-
It is possible to search for ASNs matching a given name, in order to map the ASNs for a given organization. The list will be enriched by each result's AS rank and useful tags highlighting the highest-ranking ASNs found.
-
It is possible to quickly identify the transit/upstream AS network(s) for a given prefix, through analysis of observed BGP updates and ASPATHs.
- the tool will also inform the user when a prefix is likely coming from a large tier-1 or multihomed network.
-
Lookup data can be integrated by third party tools by choosing JSON output and parsing the results externally, turning the script into a lookup API endpoint.
Screenshots for every lookup option are below.
The script uses the following services for data retrieval:
- Team Cymru
- The Prefix WhoIs Project
- PeeringDB
- CAIDA ASRank
- ifconfig.co
- ipify
- ipinfo.io
- RIPEStat
- RIPE IPmap
- ip-api
- StopForumSpam
- IP Quality Score
- Cloudflare Radar
- ISC DSHIELD
- GreyNoise
- Shodan
- NIST National Vulnerability Database
- Incolumitas.com
- RestCountries
- Marcel Bischoff's country-ip-blocks repo
It also provides hyperlinks (in server mode) to the following external services when appropriate:
Requires Bash v4.2+. Tested on:
-
Linux
-
FreeBSD
-
Windows (WSL2, Cygwin)
-
MacOS (thanks Antonio Prado and Alessandro Barisone)
-
- -
Screenshots
Generic usage
-
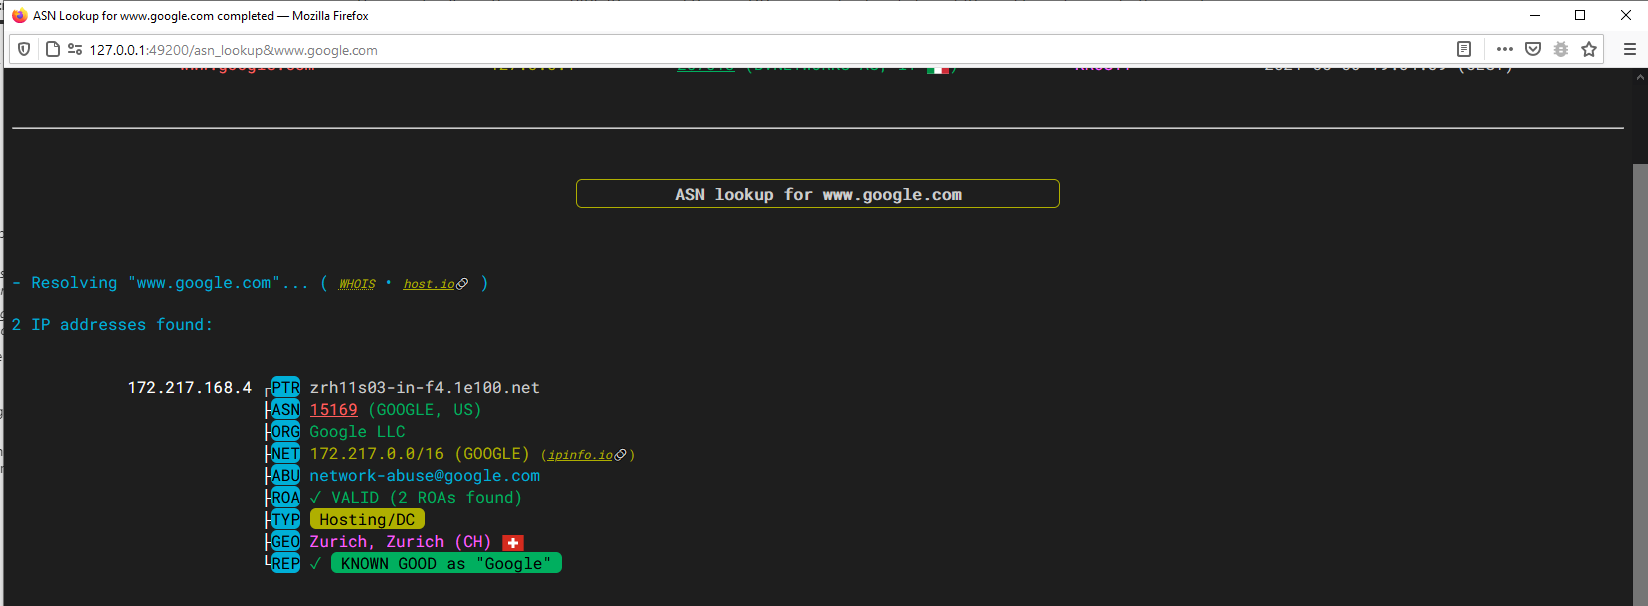
IPv4 lookup with IP type detection (Anycast, Hosting/DC) and classification as good
-
IPv4 lookup (bad reputation IP) with threat analysis/scoring, CPE/CVE identification and open ports reporting
-
IP fingerprinting with advanced datacenter+region identification, known vulnerabilities affecting the target and honeypot identification according to Shodan data

-
IPv6 lookup

-
Autonomous system number lookup with AS ranking, operational region, BGP stats and incident history, peering and prefix informations
-
Hostname/URL lookup
AS Path tracing
-
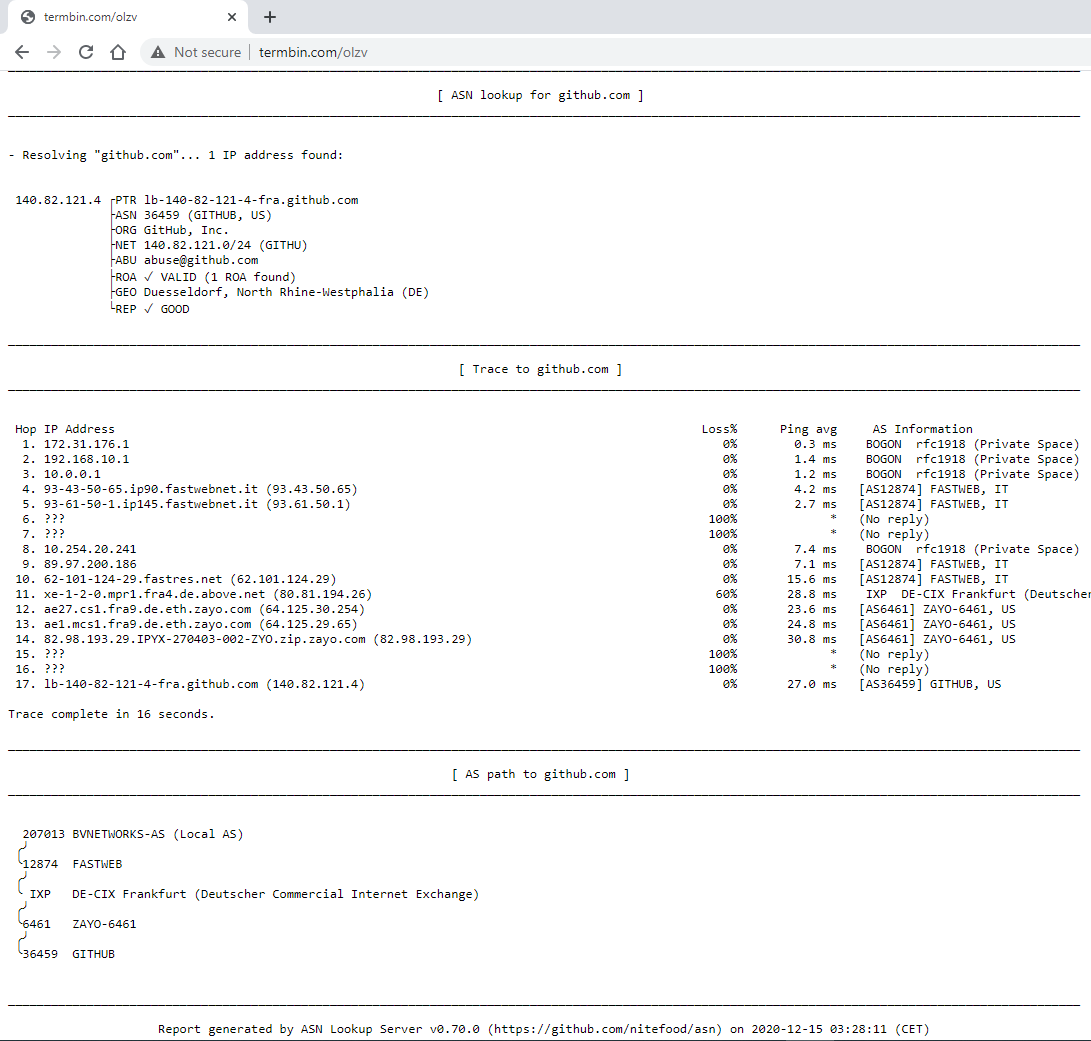
ASPath trace to www.github.com
-
ASPath trace traversing both an unannounced PNI prefix (FASTWEB->SWISSCOM at hop 11) and an IXP (SWISSCOM -> RCN through Equinix Ashburn at hop 16)

-
Detailed ASPath trace to 8.8.8.8 traversing the Milan Internet Exchange (MIX) IXP peering LAN at hop 6

Network search by organization
-
Organization search for "github"

Shodan scanning
-
Scanning for Shodan informations for a list of IPs
Country IPv4/IPv6 CIDR mapping
-
Displaying a list of CIDR blocks allocated to Jamaica

Bulk Geolocation / country stats
-
Performing bulk extraction, geolocation and stats for IPs from a logfile

Suggested ASNs search
-
Suggested ASNs (and respective AS rankings) for "google"
Transit/Upstream lookup
-
A large tier-1 network (COMCAST, AS7922) prefix is reachable through multiple other tier-1 networks like COGENT (AS174), LEVEL3 (AS3356) etc. - likely through settlement-free peering rather than BGP transit:
-
Transit identification for a multihomed AS (AS30036 announces this prefix to Hurricane and GTT in a balanced way):
-
Preferred transit identification - Chinese UNICOM AS is a large network, but likely prefers Russian TRANSTELECOM (AS20485) transit over TELIA (AS1299), HURRICANE (AS6939), GTT (AS3257) and others:
-
- -
Running the script from a container
To run the script without installing it locally, you have the following options:
-
Docker (thanks Gianni Stubbe, anarcat, Francesco Colista, arbal)
_Note: the Docker image runs by default in server mode, if no parameters are given. This is equivalent to running the tool as
asn -l 0.0.0.0(run server, bind to all IPv4 interfaces - this is necessary to expose the server port to the host machine). You can run the server with different options by explicitly passing-l [options]. It's also possible to pass an IpQualityScore, ipinfo.io and/or Cloudflare API token (both client and server runs) by setting, respectively, theIQS_TOKEN,IPINFO_TOKENandCLOUDFLARE_TOKENenvironment variables (examples below) in the container._Usage examples:
- Start server:
docker run -it -p 49200:49200 nitefood/asn - Client mode:
docker run -it nitefood/asn 1.1.1.1 - Supply an IQS token:
docker run -it -e IQS_TOKEN="xxx" nitefood/asn [...] - Supply multiple tokens:
docker run -it -e IQS_TOKEN="xxx" -e IPINFO_TOKEN="yyy" -e CLOUDFLARE_TOKEN="zzz" nitefood/asn [...]
- Start server:
-
Google Cloud Shell
Note: server mode is supported out of the box in Cloud Shell, just follow the bookmarklet link that will be shown at server launch to access the VM for remote lookups.
1. Clone the repository in Cloud Shell by clicking the following button:

2. Prepare the GCP environment by launching
./cloudshell_bootstrap.sh3. (OPTIONAL) Input your API tokens when requested to enable full script features
-
- -
Installation
This script requires BASH v4.2 or later. You can check your version by running from your shell:
bash -c 'echo $BASH_VERSION'After installation, you can use the script by running the asn command.
Method 1: Install prerequisites + manual download
Note: this method is recommended as it will always get you the latest version of the script.
STEP 1. Install prerequisite packages
Some packages are required for full functionality: * **Debian 10 / Ubuntu 20.04 (or newer):** ``` apt -y install curl whois bind9-host mtr-tiny jq ipcalc grepcidr nmap ncat aha ``` * **Debian 9 / Ubuntu 18.04 (or older):** ``` apt -y install curl whois bind9-host mtr-tiny jq ipcalc grepcidr nmap git gcc make && \ git clone https://github.com/theZiz/aha.git && \ make install -C aha/ ``` * **CentOS / RHEL / Rocky Linux 9:** ``` dnf -y install epel-release && \ dnf -y install curl whois bind-utils mtr jq nmap nmap-ncat ipcalc aha grepcidr ``` * **CentOS / RHEL / Rocky Linux 8:** *(thanks [Robert Scheck](https://github.com/robert-scheck))* ``` dnf -y install epel-release 'dnf-command(copr)' && \ dnf -y copr enable robert/ipcalc && \ dnf -y install curl whois bind-utils mtr jq nmap nmap-ncat ipcalc aha grepcidr ``` * **CentOS / RHEL 7:** *(thanks [Robert Scheck](https://github.com/robert-scheck))* ``` yum -y install epel-release yum-plugin-copr && \ yum -y copr enable robert/ipcalc && \ yum -y install curl whois bind-utils mtr jq nmap nmap-ncat ipcalc aha grepcidr && \ hash -d ipcalc ``` * **Fedora:** ``` dnf -y install curl whois bind-utils mtr jq nmap nmap-ncat ipcalc aha grepcidr ``` * **openSUSE Leap 15.5 (or newer), openSUSE Tumbleweed** ``` zypper in -y curl whois bind-utils mtr jq nmap ncat ipcalc aha grepcidr ``` * **FreeBSD**: ``` env ASSUME_ALWAYS_YES=YES pkg install bash coreutils curl whois mtr jq ipcalc grepcidr nmap aha ``` * **Windows**: * **using [WSL2](https://docs.microsoft.com/en-us/windows/wsl/about) (recommended):** Install Windows Subsystem for Linux (v2) by following Microsoft's [guide](https://docs.microsoft.com/en-us/windows/wsl/install-win10#manual-installation-steps). On step 6, choose one of the Linux distributions listed above (Ubuntu 20.04 LTS is recommended). Once your WSL2 system is up and running, open a Linux terminal and follow the prerequisite installation instructions above for your distribution of choice. > *Note for WSL2 users: Check [this](https://devblogs.microsoft.com/commandline/systemd-support-is-now-available-in-wsl/) page for details on how to activate **systemd** if you plan to install the [asn service](#optional-installing-the-asn-server-as-a-system-service).* * **using [Cygwin](https://cygwin.com/index.html):** Most of the prerequisite packages listed above for *Debian 10 / Ubuntu 20.04 (or newer)* are obtainable directly with Cygwin's own Setup wizard (or through scripts like *apt-cyg*). You will still have to manually compile (or find a suitable third-party precompiled binary) the *mtr*, *grepcidr* and *aha* tools. Instructions on how to do so can be found directly on the respective projects homepages.
STEP 2. Script download and installation
Afterwards, to install the **asn** script from your shell to **/usr/bin**: `curl "https://raw.githubusercontent.com/nitefood/asn/master/asn" > /usr/bin/asn && chmod 0755 /usr/bin/asn`
Method 2: Installing a packaged version of the script
Note: packages may not reflect the latest version, check Repology first.
Packaged versions of the tool are available for the following distributions:
Distribution list
* **Debian-based:** *(thanks [Marcos Rodrigues de Carvalho](https://github.com/odaydebian))* > *Debian 13 / Sid*\ > *Ubuntu 24.04 (or newer)*\ > *Kali (rolling)*\ > *Raspbian (testing)* ``` sudo apt update && sudo apt install asn ``` * **Manjaro / Arch Linux:** *(thanks [Worty](https://github.com/worty))* ``` yay -S asn-git ``` * **Alpine Linux 3.18 (or newer)** *(thanks [Francesco Colista](https://github.com/fcolista))* ``` apk add -X https://dl-cdn.alpinelinux.org/alpine/v3.19/community asn ``` * **NixOS** *(thanks [devhell](https://github.com/devhell))* * Package [here](https://github.com/NixOS/nixpkgs/tree/master/pkgs/applications/networking/asn) * **MacOS** *(using [Homebrew](https://formulae.brew.sh/formula/asn), thanks [filippovitale](https://github.com/filippovitale))* ``` brew install asn ``` >*Note for MacOS users:* > > *Homebrew has a [policy](https://github.com/Homebrew/homebrew-core/issues/35085#issuecomment-447184214) not to install any binary with the **setuid** bit, and mtr (or actually, the mtr-packet helper binary that comes with it) requires to elevate to root to perform traces (good explanations for this can be found [here](https://github.com/traviscross/mtr/issues/204#issuecomment-723961118) and [here](https://github.com/traviscross/mtr/blob/master/SECURITY)). If mtr (and therefore `asn`) traces are not working on your system, you should either run `asn` as root using **sudo**, or set the proper SUID permission bit on the mtr (or better, on the mtr-packet) binary.*
(Optional) Installing the asn server as a system service
Note: this step is optional, and these instructions are only for systemd-based Linux systems (most current major distributions).
To control the asn server with utilities like systemctl and service, and to enable it to automatically start at boot, follow these steps:
- create a new file called
/etc/systemd/system/asn.servicewith the following content (make sure you edit the ExecStart line to match your installation path and desired startup options):
[Unit]
Description=ASN lookup and traceroute server
After=network.target
StartLimitIntervalSec=0

[Service]
Type=simple
Restart=always
RestartSec=1
User=nobody
ExecStart=/usr/bin/asn -l 0.0.0.0

[Install]
WantedBy=multi-user.target- Enable the CAP_NET_RAW capability for the mtr-packet binary:
setcap cap_net_raw+ep $(which mtr-packet)Explanation: this will allow mtr-packet to create raw sockets (and thus perform traces) when launched as an unprivileged user (we're setting up the service to run as user nobody for added security), without the requirement of the setuid-root bit and without having to invoke mtr as root. A thorough explanation for this can be found here. - Now you can refer to standard systemd utilities to perform service operations:
- To start the service:
systemctl start asn - To stop the service:
systemctl stop asn - To check its status and latest logs:
systemctl status asn - To follow its logging in real time:
journalctl -f -u asn - To start the service automatically on boot:
systemctl enable asn - To disable automatic start on boot:
systemctl disable asn
- To start the service:
API tokens
The script can be configured to make use of your API tokens to enhance its functionalities.
The currently supported API tokens are:
Geolocation API token (ipinfo.io)
Geolocation API token details
The geolocation provider of choice for single lookups (i.e. when not running bulk geolocation queries with the `-g` option) is **ipinfo.io**.
By default, the script uses the free (no API key) tier that supports up to **1,000** geolocation requests per day. In order to boost this limit (for free) to **50,000** requests per month, an API key token is required.
In order to obtain an API token, after [signing up](https://ipinfo.io/signup), the API token can be found in the [token section](https://ipinfo.io/account/token) of your reserved area. Once copied, the token should be written to one of the following files (parsed in that order):
`$HOME/.asn/ipinfo_token` or
`/etc/asn/ipinfo_token`
The `/etc`-based file should be used when running asn in **server mode**. The `$HOME`-based file takes precedence if both files exist, and is ideal for **user mode** (that is, running `asn` interactively from the command line).
In order to do so, you can use the following command:
***User mode:***
`TOKEN="
IP reputation API token (IPQualityScore)
IP reputation API token details
The script will perform first-level IPv4/v6 reputation lookups using [StopForumSpam](https://www.stopforumspam.com/), and in case of a match it will perform a second-level, in-depth threat analysis for targets and trace hops using the [IPQualityScore](https://www.ipqualityscore.com/) API. The StopForumSpam API is free and requires no sign-up, and the service aggregates a [huge](https://www.stopforumspam.com/contributors) amount of blacklist feeds.
Still, in order to use the IPQualityScore API for in-depth threat reporting, it's necessary to [sign up](https://www.ipqualityscore.com/create-account) for their service (it's free) and get an API token (it will be emailed to you on sign-up), which will entitle you to 5000 free lookups per month.
Once obtained, the api token should be written to one of the following files (parsed in that order):
`$HOME/.asn/iqs_token` or
`/etc/asn/iqs_token`
The `/etc`-based file should be used when running asn in **server mode**. The `$HOME`-based file takes precedence if both files exist, and is ideal for **user mode** (that is, running `asn` interactively from the command line).
In order to do so, you can use the following command:
***User mode:***
`TOKEN="
BGP hijack and route leak incidents (Cloudflare Radar)
Cloudflare token details
When this token is available, an additional lookup will be enabled for **autonomous system** targets, in order to enumerate the BGP incidents (both **BGP hijacks** and **BGP route leaks**) involving the target ASN.
The script will use the [Cloudfare Radar](https://radar.cloudflare.com/) API to retrieve the amount of incidents involving the target ASN in the past 12 months. Additionally, it will report how many incidents saw the target ASN as a **hijacker** or as a **victim**.
The Cloudflare Radar API is **free** to use, but requires a registration. The steps are:
1. [Sign up](https://dash.cloudflare.com/sign-up) for a free Cloudflare account and **validate your email**
2. From the [Cloudflare dashboard](https://dash.cloudflare.com/profile/api-tokens/), go to **My Profile > API Tokens**.
3. Select **Create Token**
4. Choose the "*Read Cloudflare Radar data*" template
5. Click **Continue to summary** (the default values are fine)
6. Click **Create token**
Once obtained, the api token should be written to one of the following files (parsed in that order):
`$HOME/.asn/cloudflare_token` or
`/etc/asn/cloudflare_token`
The `/etc`-based file should be used when running asn in **server mode**. The `$HOME`-based file takes precedence if both files exist, and is ideal for **user mode** (that is, running `asn` interactively from the command line).
In order to do so, you can use the following command:
***User mode:***
`TOKEN="
Usage
Syntax
asn [OPTIONS] [TARGET]
asn [-v] -l [SERVER OPTIONS]
where TARGET can be one of the following:
- AS number -- lookup matching ASN and BGP announcements/neighbours data. Supports "as123" and "123" formats (case insensitive)
- IPv4/IPv6/Prefix -- lookup matching route(4/6), IP reputation and ASN data
- Hostname -- resolve the host and lookup data (same as IPv4/IPv6 lookup. Supports multiple IPs - e.g. DNS RR)
- URL -- extract hostname/IP from the URL and lookup relative data. Supports any protocol prefix\, non-standard ports and prepended credentials
- Organization name -- search by company name and lookup network ranges exported by (or related to) the company
Options:
-
-t- enables lookup and path tracing for targets (this is the default behavior)
.asnrc option equivalent:
MTR_TRACING=true(default:true) -
-d- enables detailed trace mode (more info below)
.asnrc option equivalent:
DETAILED_TRACE=true(default:false) -
-n- disables path tracing and only outputs lookup info (for IP targets)
- disables additional INETNUM/origin lookups (for AS targets)
.asnrc option equivalent:
MTR_TRACING=false(default:true),ADDITIONAL_INETNUM_LOOKUP=false(default:true) -
-s- Launch a Shodan InternetDB scan for the target(s). Supports multiple targets, mixed target types (IP/hostname/CIDR/URL) and piping from stdin.
-
-o- forces a Search-By-Organization lookup and skip all target identification checks
-
-a- enable ASN suggestion mode. This will search for all ASNs matching a given name.
-
-u- enable Transit/Upstream lookup mode. This will inspect BGP updates and ASPATHs for the TARGET address/prefix and identify possible transit/upstream autonomous systems.
-
-c- enable Country CIDR mode. This will output all IPv4/v6 CIDR blocks allocated to the specified country.
-
-g- enable Bulk Geolocation mode. This will extract all IPv4/v6 addresses from the input, geolocate them and draw some stats.
-
-l- Launch the script in server mode. See Server Options below
-
-j- enables compact JSON output. Useful for feeding the output into other tools (like
jqor other parsers), or storing the lookup results.
.asnrc option equivalent:
JSON_OUTPUT=true(default:false) - enables compact JSON output. Useful for feeding the output into other tools (like
-
-J- enables pretty-printed JSON output.
.asnrc option equivalent:
JSON_PRETTY=true(default:false) -
-m- enables monochrome mode (disables all colors).
.asnrc option equivalent:
MONOCHROME_MODE=true(default:false) -
-v- Enable debug messages (will display all URLs being queried to help identify external API slowdowns). In client mode,
asnwill log all output (external calls and their response data) to the location defined by$ASN_LOGFILE(by default the logfile can be found at$HOME/asndebug.log).
.asnrc option equivalent:
ASN_DEBUG=true(default:false) - Enable debug messages (will display all URLs being queried to help identify external API slowdowns). In client mode,
-
-h- Show usage information.
Server Options:
-
BIND_ADDRESS- IP address (v4/v6) to bind the listening server to (e.g.
asn -l 0.0.0.0)
.asnrc option equivalent:
DEFAULT_SERVER_BINDADDR_v4="<IPv4address>"(default:"127.0.0.1") andDEFAULT_SERVER_BINDADDR_v6="<IPv6address>"(default:"::1") - IP address (v4/v6) to bind the listening server to (e.g.
-
BIND_PORT- TCP Port to bind the listening server to (e.g.
asn -l 12345)
.asnrc option equivalent:
DEFAULT_SERVER_BINDPORT="<port>"(default:"49200") - TCP Port to bind the listening server to (e.g.
-
BIND_ADDRESS BIND_PORT- IP address and port to bind the listening server to (e.g.
asn -l ::1 12345)
- IP address and port to bind the listening server to (e.g.
-
-v- Enable verbose output and debug messages in server mode
.asnrc option equivalent:
ASN_DEBUG=true(default:false) -
--allow host[,host,...]- Allow only given hosts to connect to the server
-
--allowfile file- A file of hosts allowed to connect to the server
-
--deny host[,host,...]- Deny given hosts from connecting to the server
-
--denyfile file- A file of hosts denied from connecting to the server
-
--max-conns <n>- The maximum number of simultaneous connections accepted by the server. 100 is the default.
Note: Every option in server mode (after
-l) is passed directly to the ncat listener. Refer toman ncatfor more details on the available commands. Unless specified, the default IP:PORT values of 127.0.0.1:49200 (for IPv4) or [::1]:49200 (for IPv6) will be used (e.g.asn -l)
Default behavior:
- The script will attempt to automatically identify the
TARGETtype, if invoked with-t,-n,-dor without options, - AS path tracing is enabled by default for all lookups involving an IP or hostname. In case of multiple IP results, the script will trace the first IP, with a preference for IPv6 if possible on the user's host.
Preferences file ($HOME/.asnrc)
Options defaults can be overridden by creating a file called .asnrc in the user's home directory.
The following values are the defaults. Any (or all) of them can be specified in the settings file and adjusted to the user's preference:
ASN_LOGFILE="$HOME/asndebug.log"
MTR_TRACING=true
ADDITIONAL_INETNUM_LOOKUP=true
DETAILED_TRACE=false
MTR_ROUNDS=5
MAX_CONCURRENT_SHODAN_REQUESTS=10
SHODAN_SHOW_TOP_N=5
MONOCHROME_MODE=false
ASN_DEBUG=false
JSON_OUTPUT=false
JSON_PRETTY=false
DEFAULT_SERVER_BINDADDR_v4="127.0.0.1"
DEFAULT_SERVER_BINDADDR_v6="::1"
DEFAULT_SERVER_BINDPORT="49200"
IQS_ALWAYS_QUERY=false
IQS_CUSTOM_SETTINGS=""
Detailed mode (-d | DETAILED_TRACE=true)
- Detailed hop info reporting and RPKI validation can be turned on by passing the
[-d|--detailed]command line switch. This will enable querying the public pWhois server and the RIPEStat RPKI validation API for every hop in the mtr trace. Relevant info will be displayed as a "tree" below the hop data, in addition to Team Cymru's server output (which only reports the AS name that the organization originating the prefix gave to its autonomous system number). This can be useful to figure out more details regarding the organization's name, the prefix' intended designation, and even (to a certain extent) its geographical scope. Furthermore, this will enable a warning whenever RPKI validation fails for one of the hops in the trace, indicating which AS in the path is wrongly announcing (as per current pWhois data) the hop prefix, indicating a potential route leak or BGP hijacking incident.
Organization search (-o)
- The script will try to figure out if the input is an Organization name (i.e. if it doesn't look like an IP address, an AS number or a hostname).
In order to force an organization search (for example for Orgs containing
.in their name), pass the[-o|--organization]command line switch.
ASN suggest (-a)
- The script will try to find ASNs matching the given search string, using the RIPEStat API. This mode can be used to map all the autonomous systems related to a given company.
Upstream/transit identification (-u)
- The script will inspect BGP updates for the given IP (v4/v6) and identify the likelyhood of the upstream autonomous system(s) being transit(s) for the origin AS. A probability of the upstreams being transits will be inferred by the amount of times the upstream AS appears in the observed ASPATHs towards the target IP, in comparison to other BGP peers. The script will also inform the user if the prefix is being simultaneously announced to multiple upstreams (e.g. in case of BGP multihoming, tier-1 prefixes, anycast addresses, etc.). JSON mode is supported.
Server mode (-l)
- The script will start up a webserver allowing the user to run remote lookups and traceroutes directly from the browser. The web server is actually an ncat listener waiting for requests, responding to browsers querying through the HTTP protocol. This interface makes for a straightforward integration into user workflow and no need to download any client-side tools. By simply using a Javascript bookmarklet or custom search engine, it will be possible to launch remote traces and lookups without ever leaving the browser. Refer to the this section for more information.
Notes
Organization data, IP Reputation, noise classification and IP fingerprinting
- Organization data is taken from pWhois
- IP reputation data is taken from StopForumSpam and IpQualityScore
Reputation is also enriched with IP noise classification (addresses that have been observed scanning the Internet, and very likely to appear in your logs), taken from GreyNoise. This will also help identify known-good IPs (e.g. Google networks, CDNs, etc.) from aggressive, known-malicious scanners.
- IP fingerprinting data is retrieved from Shodan's InternetDB API. Data includes open ports, software/hardware information and known vulnerabilities pertaining to the IP address.
Geolocation
The script will perform IP and trace hop geolocation with this logic:
- Using the ipinfo.io service as a primary source of geolocation data. It offers extremely precise geolocation data based on a proprietary network of geographically distributed probes, and is extremely reliable
- Using the ip-api service as a fallback source of geolocation data
- Using the Prefix Whois service as a last-resort source of geolocation data
IP Classification
The script will use the ip-api, incolumitas.com, ipinfo.io and PeeringDB services to classify target IPs and trace hops into these categories:
- Anycast IP
- Mobile network
- Proxy host (TOR exit node/VPN/etc)
- Hosting network (datacenter/hosting provider/etc) along with detailed DC and region identification where available
- IXP network
IXP detection and unannounced prefixes
- The script will detect IXPs traversed during path traces by matching them with PeeringDB's comprehensive dataset of IXP prefixes.
- The script will also attempt a best-effort, fallback generic
whoislookup when Team Cymru, pWhois and PeeringDB have no info about the IP address or prefix. This is usually the case with some PNI prefixes, and will give better insight into the path taken by packets.
Running lookups from the browser
Prerequisite tools for server mode
Server mode requires two tools for its functionality: ncat and aha. Specifically, aha (the ANSI->HTML converter) v0.5+ is required. The ncat tool is contained inside the nmap package on older distributions (e.g. Ubuntu 18.04, Debian 9), while it is packaged as a standalone tool on newer ones.
Please refer to the installation section and run the appropriate commands to install the required packages for your operating system, and optionally to install the asn server as a systemd service.
Advantages of server mode
The main advantage of running lookups from the browser, is that every IP address and AS number gets converted into a hyperlink, allowing to perform subsequent lookups by simply clicking on them.
When looking up an URL/hostname/domain, quick WHOIS info and links to relevant external resources will be available in the results.
When looking up an AS number, all peering ASNs will be clickable. Also, if an AS peers at a public facility, PeeringDB info for that facility will be linked directly. Furthermore, additional external BGP information sources will be linked, directly for the target ASN.
Here are some examples:


Server side
Once started in server mode, asn will spin up a custom webserver waiting for browser requests. This is what the server-side console looks like:

The server is now ready to accept browser requests (only from the local machine, in this case - since I've launched it with no command line switches, which defaults to listening on 127.0.0.1:49200. Refer to the usage section for more information about the available server options).
Client side
Visit this page in your browser and follow the instructions to copy the bookmarklet to your bookmarks toolbar:

How it works
The bookmarklet is actually a small piece of Javascript code which will grab the hostname of the website you're currently visiting in the browser, and pass it to the server through a simple HTTP GET request. The server then proceeds to perform the lookup and traceroute (from its own viewpoint, just like it does when ran interactively from the command line), and feed the results to your browser through an HTML page, mimicking the effect of a scrolling terminal.
Note: The link you drag to the bookmarks bar is actually a minified (i.e.: compacted) version of the source javascript code, but for reference, here's the full source:
javascript:(function () {
   var asnserver = "localhost:49200";
   var target = window.location.hostname;
   var width = screen.width - screen.width / 7;
   var height= screen.height - screen.height / 4;
   var left = window.innerWidth / 2 - width / 2;
   var top = window.innerHeight / 2 - height / 2;
   window.open("http://" + asnserver + "/asn_lookup&" + target, "newWindow", "width=" + width + ",height=" + height + ",top=" + top + ",left=" + left);
})();
If you want to "un-minify" the actual bookmarklet code, you can refer to this site
Once the trace is finished, an option to share the output on termbin is given to the user. This makes for quick sharing of the traceroute or lookup output with other people:

Search engine setup
In order to take full advantage of having asn inside the browser, it is possible to configure it as a custom search engine for the browser search bar. This allows to leverage the server to search for ASNs, URLs, IPs, Hostnames, and so on, depending on the search string.
Generally speaking, this implies instructing the browser that when a certain keyword is prepended to a search, the following characters (the actual search string, identified by %s) have to be passed to a certain URL. The URL is then composed according to this logic, and opened just like a normal webpage.
I've used @asn for my keyword, but anything would do. In order to speed up things, one could very well use a shorter tag (e.g. #) that, when used in the address bar, automatically switches your search engine to the ASN Lookup server.
Note that the leading @ sign is not mandatory, just handy since it doesn't get in the way of normal searches, but there's much freedom with that.
For quick reference, the location URL string to enter (for both Firefox and Chrome) is: http://127.0.0.1:49200/asn_lookup&%s. Of course that sends lookup requests to the locally running ASN server.
Here's how to add a search engine in Firefox and Chrome:
Firefox:
-
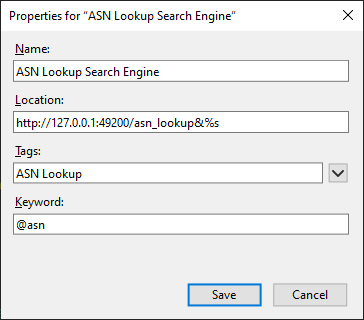
Simply create a new bookmark and fill its details like this:
Afterwards, you will be able to run queries and traceroutes by simply entering, for example, @asn 8.8.8.8 in the browser's location bar.
Chrome:
-
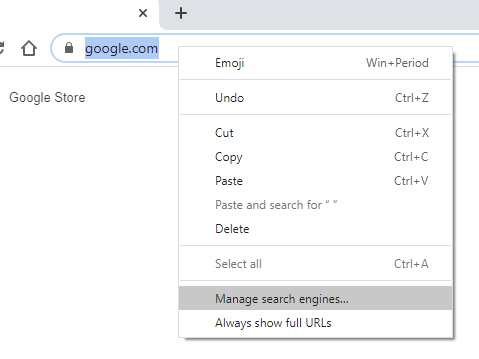
Right click the location bar and select Manage search engines...
-
Click Add:
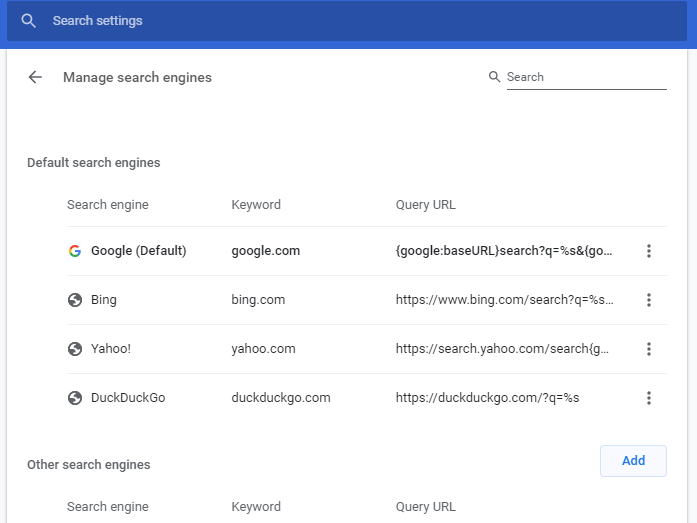
-
Fill in the details as shown below:

As usual, the keyword is entierly customizable to your preference.
Other browsers:
- You may want to follow this post to search for instructions on how to add a custom search engine for your browser of choice.
Running the server on an external host
Port forwarding
In order to access the server remotely, beside binding to 0.0.0.0 (or any other relevant IP address for your scenario), if the host is behind a NAT router, you'll need to forward the listening port (BIND_PORT) from the host/router outside IP to the actual machine where the ASN server is running on.
It is a single TCP port (by default TCP/49200), and you can change it via the command line parameters (see Usage).
Textual browser client
It is possible to launch remote traces from another command line, and view the results directly in the terminal. All it takes is a compatible text browser, for example elinks (but you can download results for later reviewing even using curl or really anything else).
The script makes use of 8-bit ANSI colors for its output, so the command to launch a remote trace using elinks would be something like this:
elinks -dump -dump-color-mode 3 http://<ASN_SRV_IP>:49200/asn_lookup&8.8.8.8
Security considerations
The server logic in itself is very simple: the script implements a basic web server entirely in BASH, leveraging the fact that it can talk to a browser using the HTTP protocol and the HTML language, in a reasonably simple way.
The core behind it revolves around ncat, a very robust and stable netcat-like network tool. This is the actual "server" listening for incoming connection, and spawning connection handlers (that is, 'single-purpose' instances of the asn script itself) as clients connect.
If you decide to open it to the outside (i.e.: binding it to something that is not localhost, and launching traces from outside your local machine), please bear in mind that there is no authentication mechanism (yet) integrated into the code, so theoretically anybody with the right URL could spawn traceroutes from your server and view the results (bear in mind however that the server sanitizes user input by stripping any dangerous characters).
To contrast that, fortunately ncat implements a robust allow/deny logic (based both on command line parameters and files, a la /etc/hosts.allow and hosts.deny). The script supports passing parameters directly to ncat, therefore it's possible to make full use of its filtering capabilities and lock the server to a restricted range of trusted IPs.
The available options, and some usage examples, can be viewed by running asn -h.
Note: if you plan to run the server somewhere else than your local machine, remember to change the bookmarklet code and the custom search engine URL values to reflect the actual IP of the asn server. It is naturally possible to have multiple bookmarklets and search engine keywords to map to different ASN server instances.
For the bookmarklet, you'll need to change this value at the very beginning:
var asnserver="localhost:49200"and make it point to the new address:port pair. No further change is required in the remaining JS code.
Shodan scanning (Recon Mode)
The tool can query Shodan's InternetDB API to look up informations regarding any type of targets when launched with the -s command line switch.
If the scan identifies any vulnerabilities, the NIST NVD API is queried in order to provide descriptions, any well known names and a link to learn more about the top ones.
Currently supported targets are:
- IP addresses
- CIDR blocks (will scan all of the IPs in the range)
- URLs
- Hostnames (will resolve to an IP (or list of IPs) and query all of them)
Target types can be mixed and queried in a single run. Targets can be piped to the tool via standard input as well.
Usage Examples:
asn -s 1.1.1.1 8.8.8.8 9.9.9.9
asn -s https://www.google.com 8.8.8.0/24
asn -s < iplist
curl -s https://raw.githubusercontent.com/firehol/blocklist-ipsets/master/blocklist_de_bots.ipset | asn -s
Shodan scan results can be output in JSON mode by passing the -j or -J options.
Note: the Nmap tool is needed to use this feature, but note that no packets whatsoever are sent to the targets. Nmap is only required to break down CIDR blocks into single IPs (as a calculator tool).
Mapping the IP(v4/v6) address space of specific countries
The tool will search and display all IPv4 and IPv6 CIDR blocks allocated to a specific country when launched with the -c command line switch, plus some statistics.
- Searching for a specific country code with a leading dot (e.g.
.fr) will yield direct results for France, while full text search will display country codes matching the search string, or proceed to display the results if only one match is found. - Statistics such as v4 prefix length distribution, total IPv4 addresses available to the country, IPv4 addresses per capita, etc. are included.
- JSON output is supported.
Usage Examples:
asn -c germany
asn -c .de
# scan a random norwegian subnet for CVE/CPE/open ports/hostnames:
asn -jc .no | jq -r ".results[] | .ipv4[$RANDOM % .ipv4_blocks]" | asn -s
Bulk geolocation mode
In this mode the tool will extract all IPv4 and IPv6 addresses from the input data and geolocate them. Anycast detection and general stats (top IPv4/IPv6 addresses with number of occurrences, number of IPs per country etc.) are included in the output. Bulk geolocation is quicker than normal asn lookups (300 IP addresses can be parsed in ~5s), and its main use case is to extract, geolocate and calculate country/occurrence stats for any number of IPs from arbitrarily formatted data streams (e.g. server logs). JSON output and stdin input are supported.
Usage Examples:
asn -g 1.1.1.1 8.8.8.8
# geolocate webserver clients
asn -g < /var/log/apache2/access.log
# geolocate IPs that have logged in to the system
last | asn -gJSON output and API mode
Locally (shell mode)
The tool can be instructed to output lookup results in JSON mode by using the -j (compact JSON) or -J (pretty-printed JSON) command line options:
Example 1 - IPv4 lookup
##### Command: `asn -J 8.8.8.8` ##### Output: ```json { "target": "8.8.8.8", "target_type": "ipv4", "result": "ok", "reason": "success", "version": "0.78.0", "request_time": "2024-08-20T02:50:28", "request_duration": 5, "api_tokens": { "ipqualityscore": true, "ipinfo": true, "cloudflare": true }, "result_count": 1, "results": [ { "ip": "8.8.8.8", "ip_version": "4", "reverse": "dns.google", "org_name": "Google LLC", "net_range": "8.8.8.0/24", "net_name": "GOGL", "abuse_contacts": [ "network-abuse@google.com" ], "routing": { "is_announced": true, "as_number": "15169", "as_name": "GOOGLE, US", "as_rank": "1788", "route": "8.8.8.0/24", "route_name": "", "roa_count": "1", "roa_validity": "valid" }, "type": { "is_bogon": false, "is_anycast": true, "is_mobile": false, "is_proxy": false, "is_dc": true, "dc_details": { "dc_name": "Google LLC" }, "is_ixp": false }, "geolocation": { "city": "Mountain View", "region": "California", "country": "United States", "cc": "US" }, "reputation": { "status": "good", "is_known_good": true, "known_as": "Google Public DNS" }, "fingerprinting": { "ports": [ 53, 443 ] } } ] } ```
Example 2 - ASN lookup
##### Command: `asn -J 5505` ##### Output: ```json { "target": "5505", "target_type": "asn", "result": "ok", "reason": "success", "version": "0.78.0", "request_time": "2024-08-20T02:50:46", "request_duration": 17, "api_tokens": { "ipqualityscore": true, "ipinfo": true, "cloudflare": true }, "result_count": 1, "results": [ { "asn": "5505", "asname": "VADAVO, ES", "asrank": 4448, "org": "VDV-VLC-RED06 VDV-VLC-RED06 - CLIENTES TELECOM", "holder": "VADAVO SOLUCIONES SL", "abuse_contacts": [ "abuse@vadavo.com" ], "registration_date": "2016-12-13T08:28:07", "ixp_presence": [ "DE-CIX Madrid: DE-CIX Madrid Peering LAN", "ESpanix Madrid Lower LAN" ], "prefix_count_v4": 8, "prefix_count_v6": 1, "bgp_peer_count": 36, "bgp_hijack_incidents": { "total": 0, "as_hijacker": 0, "as_victim": 0 }, "bgp_leak_incidents": { "total": 0 }, "bgp_peers": { "upstream": [ "1299", "6939", "59432", "174", "34549", "25091", "35625", "33891", "48348", "13030", "8218", "41327", "3303", "4455", "6424", "6057", "34927", "9498", "35280", "1239" ], "downstream": [ "48952", "208248", "205086", "202054" ], "uncertain": [ "24482", "51185", "41047", "29680", "212483", "198150", "14840", "49544", "39384", "37721", "36236", "25160" ] }, "announced_prefixes": { "v4": [ "185.210.225.0/24", "188.130.247.0/24", "185.210.227.0/24", "185.123.205.0/24", "185.123.207.0/24", "185.210.226.0/24", "185.123.206.0/24", "185.123.204.0/24" ], "v6": [ "2a03:9320::/32" ] }, "inetnums": { "v4": [ "185.123.204.0/22", "185.210.225.0/24", "185.210.226.0/24", "185.210.227.0/24", "188.130.247.0/24" ], "v6": [ "2a03:9320::/32" ] }, "inetnums_announced_by_other_as": { "v4": [ { "prefix": "188.130.254.0/24", "origin_asn": "", "origin_org": "", "is_announced": false } ], "v6": [] } } ] } ```
Example 3 - enumerating abuse contacts for every IP to which a hostname resolves
##### Command: `asn -j www.google.com | jq '[.results[].abuse_contacts[]] | unique[]'` ##### Output: ``` "network-abuse@google.com" "ripe-contact@google.com" ```
Example 4 - enumerating known vulnerabilities for a target
##### Command: `asn -j 45.67.34.100 | jq '.results[].fingerprinting.vulns[]'` ##### Output: ``` "CVE-2017-15906" "CVE-2018-15919" ```
Example 5 - upstream/transit AS lookup for a given IP
##### Command: `asn -Ju 72.17.119.201` ##### Output: ```json { "target": "72.17.119.201", "target_type": "ipv4", "result": "ok", "reason": "success", "version": "0.78.0", "request_time": "2024-08-20T02:54:03", "request_duration": 4, "api_tokens": { "ipqualityscore": true, "ipinfo": true, "cloudflare": true }, "result_count": 1, "results": [ { "prefix": "72.17.0.0/17", "origin_as": "33363", "origin_as_name": "BHN-33363, US", "origin_as_rank": 441, "upstreams_count": 1, "upstreams": [ { "asn": "7843", "asname": "TWC-7843-BB, US", "probability": 100, "is_tier1": false } ], "multiple_upstreams": false } ] } ```
Example 6 - enumerating unannounced address blocks for a given AS
##### Command: `asn -j AS5505 | jq -r '.results[].inetnums_announced_by_other_as.v4[] | select(.is_announced==false) | .prefix'` ##### Output: ``` 188.130.254.0/24 ```
Example 7 - enumerating the amount of BGP hijacking incidents involving a given AS
##### Command: `asn -j AS8860 | jq '.results[].bgp_hijack_incidents'` ##### Output: ``` { "total": 18, "as_hijacker": 11, "as_victim": 7 } ```
Remotely (API endpoint)
By running the script in server mode, it is possible to use it as a self-hosted lookup API service by running HTTP queries against it and retrieving the results in compact or pretty-printed JSON format. The server exposes the asn_lookup_json and asn_lookup_jsonp endpoints for this purpose. The syntax is the same as with normal browser-based remote queries.
Example 1: querying the server remotely using curl (compact output):
root@KRUSTY:~# curl -s "http://localhost:49200/asn_lookup_json&1.1.1.1"
{"target":"1.1.1.1","target_type":"ipv4","result":"ok","reason":"success","version":"0.72.1","request_time":"2022-03-29T00:13:11","request_duration":5,"result_count":1,"results":[{"ip":"1.1.1.1","ip_version":"4","reverse":"one.one.one.one","org_name":"APNIC and Cloudflare DNS Resolver project","abuse_contacts":["helpdesk@apnic.net"],"routing":{"is_announced":true,"as_number":"13335","as_name":"CLOUDFLARENET, US","net_range":"1.1.1.0/24","net_name":"APNIC-LABS","roa_count":"1","roa_validity":"valid"},"type":{"is_bogon":false,"is_anycast":true,"is_mobile":false,"is_proxy":false,"is_dc":true,"dc_details":{"dc_name":"Cloudflare"},"is_ixp":false},"geolocation":{"city":"Magomeni","region":"Dar es Salaam","country":"Tanzania","cc":"TZ"},"reputation":{"status":"good","is_known_good":true,"known_as":"Cloudflare Public DNS"},"fingerprinting":{"ports":[53,80,443]}}]}
Example 2: querying the server remotely using curl (pretty printed output):
root@KRUSTY:~# curl -s "http://localhost:49200/asn_lookup_jsonp&10.0.0.1"
{
  "target": "10.0.0.1",
  "target_type": "ipv4",
  "result": "ok",
  "reason": "success",
  "version": "0.72.1",
  "request_time": "2022-03-29T00:14:57",
  "request_duration": 0,
  "result_count": 1,
  "results": [
    {
      "ip": "10.0.0.1",
      "ip_version": "4",
      "org_name": "IANA",
      "routing": {
        "is_announced": false,
        "net_name": "PRIVATE-ADDRESS-ABLK-RFC1918-IANA-RESERVED"
      },
      "type": {
        "is_bogon": true,
        "bogon_type": "rfc1918 (Private Space)"
      },
      "reputation": {},
      "fingerprinting": {}
    }
  ]
}
Thanks
An initial version of this script was featured in the Security Trails blog post "ASN Lookup Tools, Strategies and Techniques". Thank you Esteban!
Thanks Massimo Candela for your support and excellent work on IPmap, BGPlay and TraceMON!
Thanks to all the awesome contributors for their code, ideas, suggestions, packages and bug reports!
Feedback and contributing
Any feedback or pull request to improve the code is welcome. Feel free to contribute!