 youssefelgebaly
commented
2 years ago
youssefelgebaly
commented
2 years ago 
LMS
How To Install Software Needed
Install git
- From your shell, install Git using apt-get:
$ sudo apt-get update$ sudo apt-get install git- Verify the installation was successful by typing
$ git --versionHow to Install Android Studio on Ubuntu
- Verify the installation was successful by typing
Minimum System Requirements:
- 4 GB of Disk Space
- 8 GB of Memory
- 64 bit OS architecture capable of running 32-bit type applications
Installing Java for Android Studio:
Before you install the Android Studio IDE, you need to make sure your Ubuntu installation is armed and ready with the recommended Java development kit for Android Studio – Oracle JDK.
To check the version of Java
$ java --versionIf you don’t have Java installed, the output should be something like:

Note: Make sure that you have updated the Advanced Package Tool (APT) before you move forward to install OpenJDK.
Install OpenJDK on Ubuntu
$ sudo apt install openjdk-14-jdkAll you have to do now is to set the “JAVA_HOME” and “PATH” environment variables and then you are done.
$ export JAVA_HOME=/usr/lib/jvm/java-8-openjdk-amd64
$ export JAVA_HOME
$ PATH=$PATH:$JAVA_HOME
$export PATH
Save the bash file, restart the terminal, and type echo $JAVA_HOME to make sure the path is properly set.

Installing Android Studio From The Ubuntu Software Center
Locate the Ubuntu Software Center icon in your taskbar and use the search functionality to find Android Studio. Click install and let it download and run initial setup.

Install Flutter SDK on Ubuntu
System requirun the following command to begin signing licenses. rements
- Operating Systems: Linux (64-bit)
- Disk Space: 600 MB (does not include disk space for IDE/tools).
Install Flutter using snapd
$ sudo snap install flutter --classicuse the following command to display your Flutter SDK path:
$ flutter sdk-pathRun flutter doctor
$ flutter doctor[-] Android toolchain - develop for Android devices
• Android SDK at /Users/obiwan/Library/Android/sdk
✗ Android SDK is missing command line tools; download from https://goo.gl/XxQghQ
• Try re-installing or updating your Android SDK,
visit https://docs.flutter.dev/setup/#android-setup for detailed instructions.Install Android SDK Command-line Tools (latest)
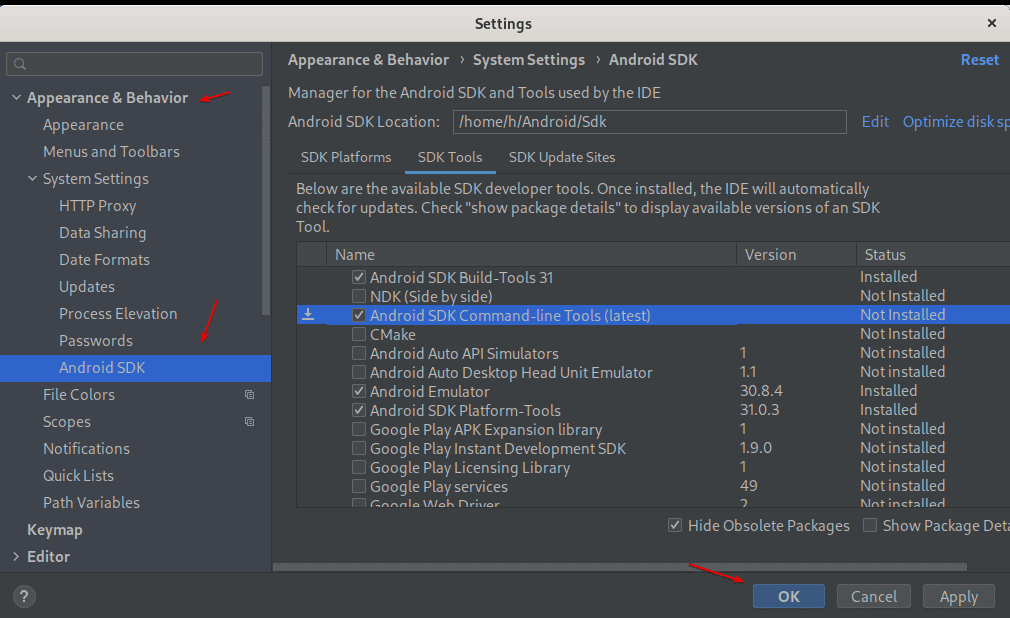
On your Android Studio Project, click on the File and then “Settings“.

Select Appearance & Behavior > System Settings > Android SDK > SDK Tools
Check the box given for “Android SDK Command-line Tools (latest)” and then press the OK button
Agree to Android Licenses
-
Before you can use Flutter, you must agree to the licenses of the Android SDK platform. This step should be done after you have installed the tools listed above.
-
Make sure that you have a version of Java 8 installed and that your JAVA_HOME environment variable is set to the JDK’s folder.
Android Studio versions 2.2 and higher come with a JDK,
run the following command to begin signing licenses.
$ flutter doctor --android-licensesSet up an editor
Backend
Install Node.js and npm
$ sudo apt update
$ sudo apt install nodejs npm
$ nodejs --versionInstall Visual studio code
Install MongoDB
How to git project from GitHub
$ git clone https://github.com/omarokasha1/TheFirstProject.gitWhich libraries you used through the development process?
![]()
bcryptto encrypt the passwordexprss jsexpress async errorsto handle any error async like connect to DBjoito validate the inputsjsonwebtokento generate token that have user infomongooseit’s the databaselodashto take just input that neededwinstonto save the errors in log in filewinston-mongodbto save the errors in log in the databasecompressionto compress the request
packages in development environment
-  `dotenv` to store constant strings like database URL connection
- `modemon` when click on ctrl + s restart the server automatically omarokasha1
We need to Start a new Documentation Phase @youssefelgebaly .
What Actually you will need to do is what to do after Installing Linux to Have this Project up and Running Locally For example : 1) How to Install Software Needed to run this Code and Can Edit it ? 2) How to Establish my Connection with git ? 3) How to License this Project and Which one we are going to use ? 4) How to download the software ? 5) How to make the Software Up and Running ? 6) How to Open the Product Owner Documents ? 7) How to run tests and Understand the Operations Over Github ?
You are going to consolidate your Colleagues works in one Document.
@mirette3 Please Follow Up on that