ZoneMinder Tapo C200 camera control script
A ZoneMinder PTZ control script for the Tapo C200 camera.
Features
- Pan
- Tilt
- Zoom through ZoneMinder
- Sleep : Lens Mask On
- Wake : Lens Mask Off
- Up to 8 presets
- Reset (camera recalibrates and returns to its default position)
- Reboot
Demos
Pan/Tilt
Presets
Lens Mask
Reset & Reboot explanations
Reset
The camera will recalibrate by panning and tilting itself.
Or, if you enabled the script debugging, it will reload the script.
Reboot
It does indeed reboot the camera...
Step 1 : Install the script on the system
This was tested on Ubuntu Server 20.04, just after installing ZoneMinder (following their wiki).
Install dependencies :
sudo apt install libjson-pp-perl libjson-parse-perlOn your system, copy the file named TapoC200.pm to /usr/share/perl5/ZoneMinder/Control/ :
cd /usr/share/perl5/ZoneMinder/Control/
sudo wget https://raw.githubusercontent.com/oparm/zoneminder-tapo-c200/main/TapoC200.pm
sudo systemctl restart zoneminder
Make sure it has the same permissions as the existing control scripts in that directory :
root@security:/usr/share/perl5/ZoneMinder/Control# ls -alh
total 584K
drwxr-xr-x 2 root root 4.0K May  9 20:08 .
drwxr-xr-x 5 root root 4.0K May  6 22:27 ..
-rw-r--r-- 1 root root  12K Apr 20 01:34 3S.pm
-rw-r--r-- 1 root root  14K Apr 20 01:34 Amcrest_HTTP.pm
-rw-r--r-- 1 root root  12K Apr 20 01:34 AxisV2.pm
-rw-r--r-- 1 root root  18K Apr 20 01:34 Dahua.pm
-rw-r--r-- 1 root root 4.8K Apr 20 01:34 DCS3415.pm
-rw-r--r-- 1 root root 7.3K Apr 20 01:34 DCS5020L.pm
-rw-r--r-- 1 root root  13K Apr 20 01:34 DericamP2.pm
-rw-r--r-- 1 root root  23K Apr 20 01:34 FI8608W_Y2k.pm
-rw-r--r-- 1 root root  26K Apr 20 01:34 FI8620_Y2k.pm
-rw-r--r-- 1 root root 6.2K Apr 20 01:34 FI8908W.pm
-rw-r--r-- 1 root root 7.6K Apr 20 01:34 FI8918W.pm
-rw-r--r-- 1 root root  22K Apr 20 01:34 FI9821W_Y2k.pm
-rw-r--r-- 1 root root  23K Apr 20 01:34 FI9831W.pm
-rw-r--r-- 1 root root 8.2K Apr 20 01:34 Floureon.pm
-rw-r--r-- 1 root root 9.5K Apr 20 01:34 FOSCAMR2C.pm
-rw-r--r-- 1 root root  12K Apr 20 01:34 HikVision.pm
-rw-r--r-- 1 root root 6.9K Apr 20 01:34 IPCAMIOS.pm
-rw-r--r-- 1 root root 8.1K Apr 20 01:34 IPCC7210W.pm
-rw-r--r-- 1 root root 6.9K Apr 20 01:34 Keekoon.pm
-rw-r--r-- 1 root root 9.6K Apr 20 01:34 LoftekSentinel.pm
-rw-r--r-- 1 root root  11K Apr 20 01:34 M8640.pm
-rw-r--r-- 1 root root 7.2K Apr 20 01:34 MaginonIPC.pm
-rw-r--r-- 1 root root 4.6K Apr 20 01:34 mjpgStreamer.pm
-rw-r--r-- 1 root root 4.6K Apr 20 01:34 Ncs370.pm
-rw-r--r-- 1 root root  25K Apr 20 01:34 Netcat.pm
-rw-r--r-- 1 root root 8.7K Apr 20 01:34 onvif.pm
-rw-r--r-- 1 root root 6.6K Apr 20 01:34 PanasonicIP.pm
-rw-r--r-- 1 root root  18K Apr 20 01:34 PelcoD.pm
-rw-r--r-- 1 root root  19K Apr 20 01:34 PelcoP.pm
-rw-r--r-- 1 root root 9.7K Apr 20 01:34 PSIA.pm
-rw-r--r-- 1 root root  39K Apr 20 01:34 Reolink.pm
-rw-r--r-- 1 root root 6.3K Apr 20 01:34 SkyIPCam7xx.pm
-rw-r--r-- 1 root root 8.2K Apr 20 01:34 Sony.pm
-rw-r--r-- 1 root root 7.7K Apr 20 01:34 SPP1802SWPTZ.pm
-rw-r--r-- 1 root root 9.6K May  9 20:08 TapoC200.pm
-rw-r--r-- 1 root root 5.2K Apr 20 01:34 Toshiba_IK_WB11A.pm
-rw-r--r-- 1 root root  12K Apr 20 01:34 Trendnet.pm
-rw-r--r-- 1 root root  20K Apr 20 01:34 Visca.pm
-rw-r--r-- 1 root root 4.6K Apr 20 01:34 Vivotek_ePTZ.pm
-rw-r--r-- 1 root root 8.9K Apr 20 01:34 WanscamHW0025.pm
-rw-r--r-- 1 root root  13K Apr 20 01:34 Wanscam.pm
Step 2 : Add the control script to ZoneMinder
Use the same configuration when testing, unless stated otherwise.
In ZoneMinder "Console" Tab, click "Add" to add a new camera.
Go to "Control" tab and click on "Edit" next to "Control Type".
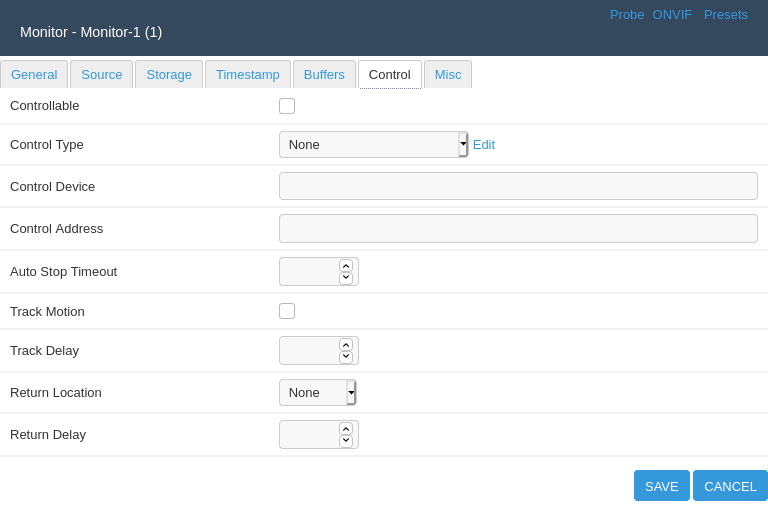
Click on "Add New Control" :
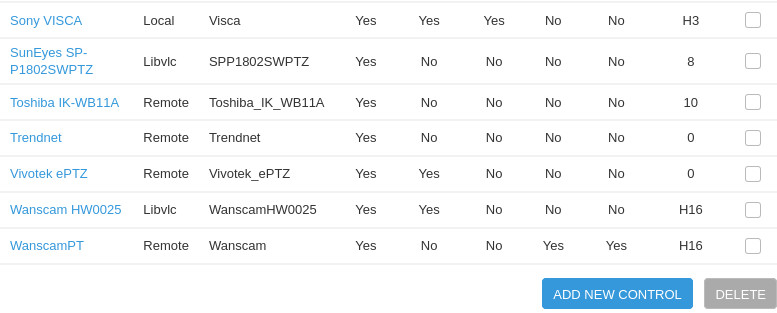
Now fill each tab as shown in the following captures.
Control capability main tab
Use the same settings as :

Control capability move tab
Use the same settings as :

Control capability pan tab
Use the same settings as :

Control capability tilt tab
Use the same settings as :

Control capability presets tab
Use the same settings as :
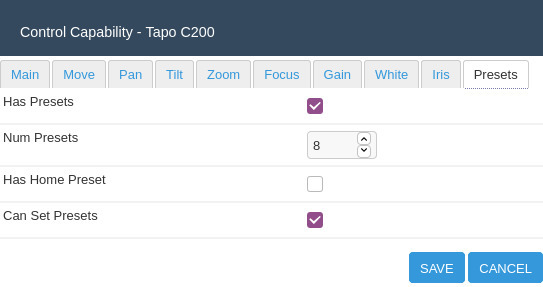
Now click on "Save" to save the new control.
Step 3 : Add the new monitor to ZoneMinder
Important : Click on cancel in the previously opened window (the Monitor one), and in ZoneMinder "Console" Tab, click again on "Add" to add a new camera. This is needed to refresh the "Control Type" dropdown list with the new control we just added.
Monitor source tab
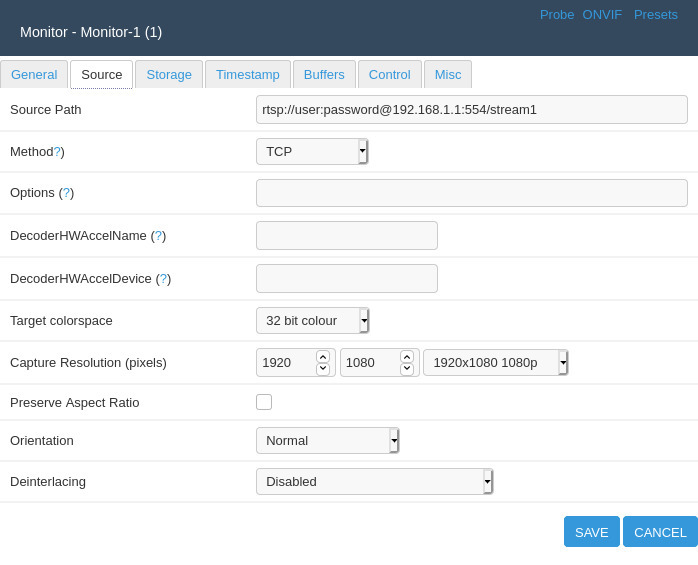
Source Path is the RTSP path used to display the stream inside ZoneMinder, it has nothing to do with the control script. Inside the mobile application, create an account linked to the camera and use those credentials in the "Source Path".
Change user, password and IP. Leave the port to 554 and /stream1.
Monitor control tab
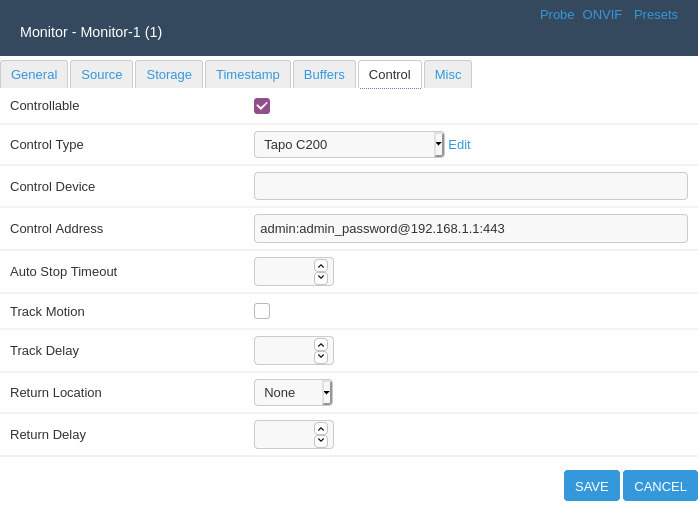
Control Address is the HTTPS path used to control the camera inside ZoneMinder.
Change admin_password to the password you created when you installed the mobile application (the password linked to your email address).
Change the IP address. Leave the username to "admin", and the port to 443.
Control Type : Select "Tapo C200" inside the dropdown list.
Now click on "Save" to save the new monitor.
If everything went smoothly, you should now be able to control the camera.
Check that the script is running
You can see the script's output in two ways :
- Inside ZoneMinder in the by clicking on "Log" in the main menu
- Or directly inside */var/log/zm/zmcontrol_.log**, here is how it should looks like :
...
05/09/2021 20:08:43.224080 zmcontrol_1[18057].INF [main:134] [Starting control server 1/TapoC200]
05/09/2021 20:08:43.264927 zmcontrol_1[18057].INF [main:141] [Control server 1/TapoC200 starting at 21/05/09 20:08:43]
05/09/2021 20:08:43.401039 zmcontrol_1[18057].INF [ZoneMinder::Control::TapoC200:165] [Token retrieved for https://192.168.1.1:443]
05/09/2021 20:08:43.406488 zmcontrol_1[18057].INF [ZoneMinder::Control::TapoC200:109] [Tapo C200 Controller opened]
...
How to edit & troubleshoot the script
If you need to troubleshoot more deeply, enable the script debugging :
...
my $tapo_c200_debug = 1;
...
Reload the script by clicking "Save" in any window shown on the screenshots.
Now you can reload the script easily by clicking the "Reset" buttons inside ZoneMinder.
When the variable is set to 1, the "Reset" button in ZoneMinder will reload the script instead of calibrating the camera position. This allows you to edit the script file and click on "Reset" so that your modifications are taken into account by ZoneMinder.
When you are done set that variable back to 0.
...
my $tapo_c200_debug = 0;
...
Pan and tilt stepping
Set this variable to either 5/10/15. Those are the steps used by the mobile application, so they are supposed safe.
...
my $step = 15;
...
Useful links and thanks to :
https://github.com/likaci/mercury-ipc-control
https://github.com/ttimasdf/mercury-ipc-control
http://blog.xiazhiri.com/Mercury-MIPC251C-4-Reverse.html
https://md.depau.eu/s/r1Ys_oWoP#
https://github.com/JurajNyiri/HomeAssistant-Tapo-Control
https://www.henrychang.ca/foscam-f9821p-v2-control-zoneminder-script/