Spagety
Spagety can be used for making Single Page Apps (SPA) by lazily-loading resources using GET requests. It allows a developer to bundle their AMD javascript modules, along with any required html and css files into packages, and lazily-load all resources when needed.
Spagety creates a custom Knockout binding that allows a user to specify a variety of parameters needed to load resources for a specific module, as well as configure it. Resources are currently loaded using Require and its text-plugin.
Spagety is intended to be simple, with minimal dependencies and overhead. It is intended to be flexible to allow applications to build and extend off of it. Instead of providing default functionality (like redirecting to a 404 page, if a url does not resolve), numerous events are fired to allow each application to respond accordingly. Likewise, Spagety does not use any css, sprites, or images itself (ex: like a default loading animation), so that it may remain small, and flexible for each scenario to customize itself.
By providing many events and hooks throughout Spagety's processes, creating simple plugins(/meatballs) should be easy to do. For example, creating a plugin such as something like a scrollSpy should be easy to do by hooking up to the different events fired, and node visibility states.
To see a working demo, check out this (temporary) demo site:
http://www.argisland.com/spagety
Requirements
- Knockout: http://knockoutjs.com/
- Require: http://requirejs.org/
- Require text-plugin: https://github.com/requirejs/text
- IE 9+: http://youmightnotneedjquery.com/
Getting Started
After getting the spagety.js file, as well as its dependencies in your project, you will need to create a config.js file to configure Require.
In the config.js file all you need to do to get started, is create a require call like so:
require(["spagety", "rootViewModel"], function(spagety, rootViewModel) {
    spagety.start({
        viewModel: new rootViewModel()
    });
});
The rootViewModel is an optional viewModel that would be bound for the root page, that all sub-pages could inherit from.
Then within your index.html page you can create an element with a page binding like so:
<div data-bind="page: { id: 'testPg',
                        html: 'testPg.html',
                        css: 'testPg.css',
viewModel: 'testPgViewModel'}"></div>id: The id is used for matching against the url crumbshtml: The external html file to load and place into this containercss: The external css file that will be scoped to apply only to the page (and descendants)viewModel: The AMD javascript module you would like to bind to this element
You can also use Spagety to show/hide inline elements, without having to load or bind any external resources:
<div data-bind='page: {id: "testInlinePg"}'>
    <div>I will only be shown when the url crumb matches 'testInlinePg'</div>
</div>
How It Works
Spagety listens to the hashchange event on the window.location and breaks apart the url (after the hashbang, #!/ ) into crumbs, and then tries to navigate to that specific nested page.
To nest a page in another, you simply add a page data-binding to the html specifying the resources needed, and an id (to match a crumb).
For example, if we had a.html, we could define 2 sub pages within it:
...
<body>
    <h1>I am 'a'</h1>
    <a href="#!/a/b">Go to B</a>
    <a href="#!/a/c">Go to C</a>
    <div data-bind='page: {id: "b", html: "b.html"}'></div>
    <div data-bind='page: {id: "c", html: "c.html"}'></div>
</body>
The way that Spagety navigates, is step-by-step resolving each crumb, trying to load the sub page if it exists, then iterating down the line. In the example above, Spagety knows that a has 2 child pages b and c because of the page binding (although they have not been loaded yet).
Navigation occurs after the window fires a hashchange event. This triggers navigation to occur at the root node, and traverse until the url is found. There are 3 stages to navigation:
- Loading & Finding: Load content as needed, to try and match the url, setting
pending visibleflags on each page it travels. If it is part of the url, then set the pending visible to true.- Auto Pages: Some pages may want to be displayed even if the url does not match exactly to their depth. From the last matching node, all of its children pages will be checked if they are to be auto-displayed, and their pending visibility is set to true as well.
- Reveal: Once the url has been resolved, and all auto-pages are loaded, the last matching node to the url begins the reveal process. This last matching node calls upon its parent to toggle its (the parent's) direct childrens visibility, before traversing up the graph until the root. If the reveal process started at the root node, and traversed down the graph the user would see the UI 'roll out' in front of them. Starting at a more specific node, and going upwards creates a smoother UI transition.
- Clean Up: Once the root node is reached, it will then traverse the entire graph, resolving any outstanding visibility flags (as some of the deeper nodes may still be visible despite the url not matching).
Example
Navigate to #!/a/b/f/k
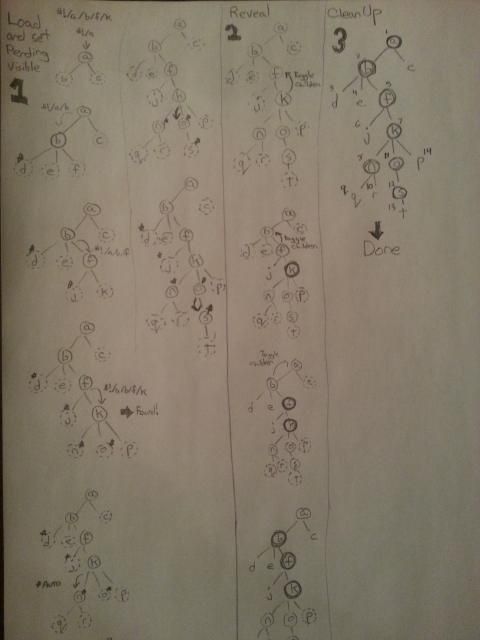
Step 1: We can see that when the page is first loaded, we only have a.html which only knows about its 2 children b and c. We try to match crumb by crumb navigating down the graph. If node has not been loaded yet, then Spagety will load and bind the node in order to identify if it has any child pages. This continues untl k is loaded and found. Each page with a circle indicates it has been loaded / pending-visible is true.
Step 1.2: After the found event, we see that we still load n o and s. This is because they are indicated as autoShow by a star. However, we can also see that d and j also have a star by them, but they are not loaded. This is because the autoShow pages are only loaded after the last resolved node.
Step 2: Starting at k, the last resolved node, it calls its parent node f to toggle f's direct children nodes' visibility. Once f has toggled it's children, f then calls its parentb to do the same. This repeats until the root node (a) has toggled its direct children.
Step 3: The final step begins at the root node, which traverses the entire graph (as indicated by the numbers beside each node), toggling the visibility to match whatever the pending state was set to. This is important to clean up any nodes that are left visible when they should not be. This occurs when the user navigates between pages, and is illustrated below:
Navigate from #!/a/b/f/k to #!/a/c/i/m:
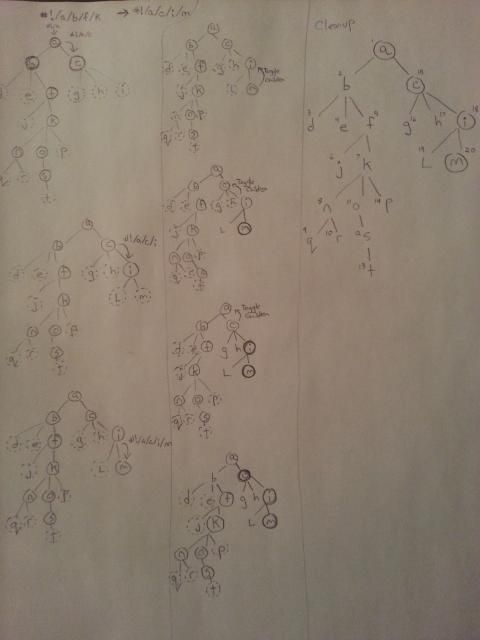
Here we can see a similar process as described above with the first 2 steps. However, we can see at the end of the second step, after m began the reveal process, that several nodes are still visible when they should not be. Nodes f k n o and s are all still visible despite not matching the url. This is because the reveal process only toggles direct children, in this case b. The nodes mentioned above will not be visible to the user (since b is not visible), but to resolve their proper state, this is why we need Step 3.
Events
To make Spagety flexible numerous events are fired throughout the navigation process. Each of these events can be configured on a global scale, or on a per node basis. Each event bubbles up through its parent's until the global event handler is called. Each node can also prevent the event from bubbling up as well.
An overview of the Events can be seen below:
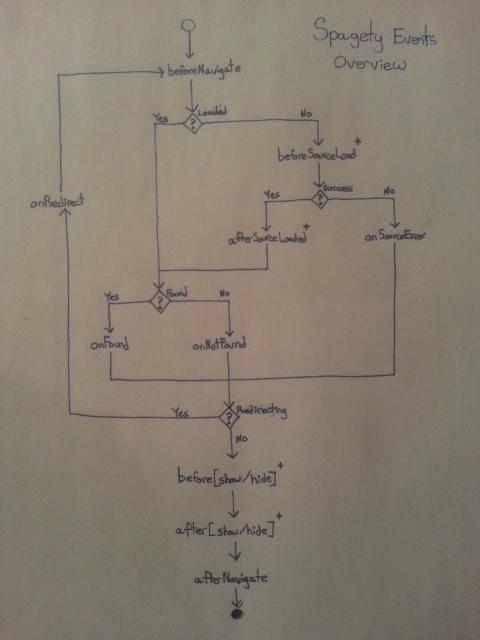
There are 12 different events that may be fired during the navigation process. Events marked with a + indicate that these will be called on each node affected, instead of just once for the navigation cycle.
- beforeNavigate: This event is called just as the
windowhashchangeevent is fired. This occurs just before the navigation process starts. - beforeSourceLoad: This event is called before the node has been loaded. This is fired before any external resources are requested, and before the binding has been applied. You can use the
element.loaderDivto create a loading animation if desired at this point. - afterSourceLoad: This event is called after all resources are returned, applied, and the binding has been applied.
- onSourceError: This event is triggered if there is a request error, when trying to obtain the external resources.
- onFound: This event is fired after the url has been resolved, and after all
autoShowpages have been loaded. - onNotFound: This event is fired if the url can not fully be resolved by the graph hierarchy
- onRedirect: This event is fired if during any of the previous events, the
window.locationwas changed. This resets the navigation process back tobeforeNavigatein case a redirect is desired to hide specific pages, (ex:onNotFoundmight redirect to a 404 page). - (before/after)(show/hide): 2 out of the 4 events here are fired as the node's visibility is toggled.
- afterNavigate: This event is finally fired once the entire navigation process is completed, and all nodes are properly visible.
To create an event callback, you can either specify a global event handler, by passing in a parameter into the spagety.start() function, or by passing in a function into the data-binding.
spagety.start({
    viewModel: new rootViewModel(),
    onNotFound: function() { alert("404 PAGE NOT FOUND!"); }
});
OR
<div data-bind="page: {id: 'test', onFound: function() { alert('YOU FOUND ME!'); }}"></div>Each event callback is passed three parameters. function eventCallback(element, page, urlObj) {}
- The
elementis a handle to the element thepageis defined on. - The
pageis a handle to thepageBindingModelthat Spagety creates to manage navigation and state of the node - The
urlObjis an object containing url information.crumbsis an array of the url broken into crumbsparamsis a key/val object of the query string (?a=4&b=5)urlis the actual url string being navigated
To prevent bubbling, the event callback just has to return {preventBubbling: true};.
Html
Html can either be lazily-loaded on defined inline.
To lazily-load an external resource, simply add an html attribute to the page binding, and specify the html page to load:
<div data-bind="page: {id: 'test', html: 'test.html'}"></div>To define html inline, just place it between the container tags.
<div data-bind="page: {id: 'test'}">
    <div>I am inline!</div>
    <div data-bind="page: {id: 'test2'}">
        <div>I am a subPage who is inline!</div>
    </div>
</div>
Css
If a module has its own css that is different than the global style sheets, then Spagety can load the css file and scope it to this element (as to not interfere with other components, ex: if this css class defines a h1 element differently than the global css file).
The css is scoped by creating a unique identifier, and then prepending this identifier as a class to each rule within the css file. The identifier is then added as a class onto the container page element. The css is then added as a <style> inside the head of the document.
To load a css file, simply add a css attribute to the data-binding:
<div data-bind="page: {id: 'test', css: 'testStyles.css'}"></div>ViewModel
If the viewModel attribute is used within the page binding, then Spagety will try to get the javascript module. This module will then be bound to the bindingContext of the page element.
NOTE: The element that the page binding occurs on, belongs to the previous / parent bindingContext, where as the child elements will be bound with a new bindingContext with the specified javascript module.
If a viewModel is not specified, then the bindingContext will inherit the parent bindingContext's.
To load a module simply add a viewModel attribute to the data-binding:
<div data-bind="page: {id: 'test', viewModel: 'testViewModel'}"></div>Params / Config
Global Config
To set global configuration for Spagety please pass the parameters into the spagety.start() function.
The parameters it currently accepts are:
spagety.start({
    viewModel: ,
    allowBubbling: ,
    ~events~:
})- viewModel: A viewModel to be bound to the root
bindingContextthat all child contexts could inherit from. - allowBubbling: [true/false] If false, only the event handler on the node that fired it will be executed.
- ~events~: A function for any of the events listed in the Events section, that accepts three parameters:
eventCallback(element, page, urlObj){}. See Events for more details.
Page Params
Each page binding can accept a number of parameters to configure the node. These include:
page: {
    id: [string](required),
    html: [string]
    css: [string]
    viewModel: [sting]
    autoShow: [true/false]
    title: [string/observable]
    ~events~: [function]
}- id: This is required, as it is what resolves against the url
- html: A path to the html file to load
- css: A path to the css file to load
- viewModel: A path to the javascript AMD module to load
- autoShow: A bool to indicate if to autoShow the page.
- Auto-showing a page, allows child pages to be displayed on their parent page as long as the parent page resolves. Ex: On
index.htmlinstead of having a blank page, perhaps the first child will be displayed by default.
- Auto-showing a page, allows child pages to be displayed on their parent page as long as the parent page resolves. Ex: On
- title: A string/observable that changes the window's title. If not set, it defaults to the id.
- ~events~: A function that corresponds to an event as described in the Events section.
Authors
Corey Jasinski
License
MIT License - http://www.opensource.org/licenses/mit-license.php