Pseudo Linux Bash Terminal on Web
The purpose of this app is NOT to emulate a true Terminal. It is designed to let website owners give a web based Pseudo Terminal to their users who can run linux commands.
Unique Features
- No typing lag Unlike any other web Terminal emulation on the web (or a remote SSH client), which reports every keypress to the backend & eventually slowing down the typing, this app only sends data when 'enter' key is pressed making typing of commands super-fast.
- Super fast execution & data transfer The app uses Node.js backend & SockJS for communication. You probably cant get anything else doing things faster than what the two beasts are doing. Scroll down to check latency figures.
- Works for users behind proxy One of the most popular project Gateone which solved the problem, does not work behind proxy. Since this project has SockJS, the communication protocol degrades to a non-websocket protocol behind proxy keeping the functionality alive.
Cons
- Bash shortcuts do not work
Bash shortcuts like tab autocomplete, previous/next command navigation using up/down arrow key etc does not work.The data is sent to the server only on 'enter' press & the response is populated in the output area. Update - Autocomplete works the native way now. Command navigation is handled on the javascript side so it does NOT persist across page load. Other complicated bash shortcuts wont work. - Can not run Vim/Emacs Again since every keypress does not get reported, things simply hung while running Vim or Emacs.

Check the live demo. The app is currently deployed in production in Codelearn Playground.
Note : Server side security is not covered as part of this app. You need to jail the Terminal user & limit his system privileges using /etc/security/limits.conf .
Additional Features
1. Multi user support
Set USERNAME & SIGNATURE variable in public/client.html to spawn Terminal as a linux user with the USERNAME value you specified. SIGNATURE is a ssha encrypted USERNAME with secret (defined in lib/config.js . Feel free to change it).
While integrating the Terminal in your app, you need to 'externally' generate SIGNATURE for the USERNAME & set the value in public/client.html . Here is a Node.js code to generate the same
  crypto = require('crypto')
  var hmac = crypto.createHmac('sha1', Config.secret) //change secret to the key inside lib/config.js
  hmac.update(USERNAME)
  SIGNATURE = hmac.digest('hex')
You may leave USERNAME & SIGNATURE empty in public/client.html . In that case, the user with which the server was started will be the owner of the Terminal.
2. Terminal command logging in Mongodb The application logs each command executed by the user with it's output and time at which it was executed in MongoDB. MongoDB is an open source and a NoSQL database. You can follow the Installation Guide to install MongoDb on your specific platform.
3. Error intimation emails to admin
This application uses Nodemailer to send email about errors. You can change the settings according to yourself in the file lib/mailer.js. The response whether the email was succesful or not is logged in the email.log file.
4. Logging
This application logs all the errors in the err.log file.
Also all the miscellaneous logs are logged in the out.log file.
Latency
How-to run benchmark tests
For server side Benchmarking, checkout the server-profiling branch
git checkout server-profilingNow run the server. In this benchmarking, results are averaged out over all the commands that a particular user runs as well as over the numbers of users who have been connected till now.
Note: To reset the averages, restart the server.
For client side Benchmarking, there are two scripts available in the benchmarking directory. You can run the scripts by
node <script_name>-
multiple-clients.jsOpens multiple connections to a single server and sends a particular number of messages through each connection. The average time per user per message at a particular concurrency level is recorded inoutput-mutltiple.datfile. -
single-client.jsOpens a single connection to the server and sends a particular number of messages . The time taken for the client to receive the output from the server for each request is recorded inoutput-single.datfile.
Benchmarking Results
The scripts in benchmark directory were used to generate the graphs.The server and the client specifications are given below
-
Server configuration
- CPU : Intel Core i7 920 @ 2.67GHz
- CPU cores : 4
- Memory : 11.72 GB
-
Client configuration
- CPU : Intel Xeon E5645 @ 2.40GHz
- CPU cores : 1
- Memory : 595 MB
Server to Client ping delay = 98.9 ms
Each message sent to the server was the 'whoami' command of which the server returned the output.
Single client benchmark data The graph below shows the client side delay measured when a single client is connected to the server.
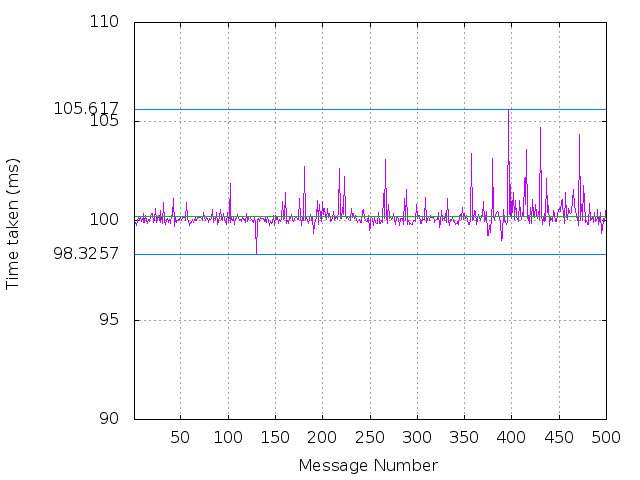
The blue lines give the minimum and the maximum of the dataset while the green one shows the average of the whole data
Multiple clients benchmark data This test tries to emulate multiple browsers connecting and interacting with the server.
The Y-axis of the graph below shows the average time taken by the server to respond to a request . This time is measured on the server because the client script introduces delay in processing the messages it receives from the server.
The X-axis of the graph gives the total number of concurrent users connected to the server.
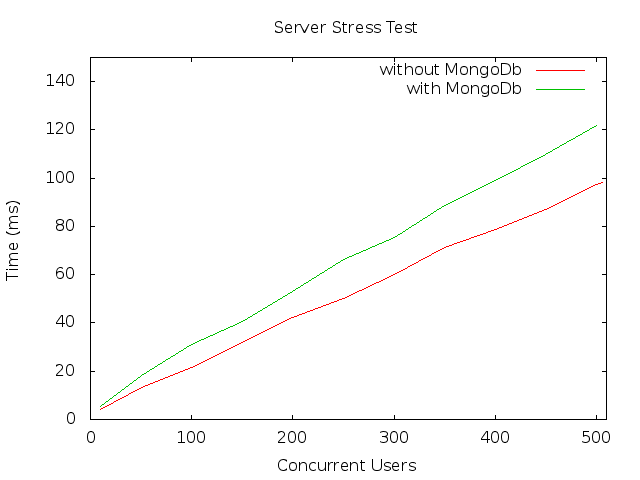
This graph measures the time taken upto 506 clients only. More than 506 clients are not able to connect because 'pty.js' modules gives error that 'forkpty(3) failed'.
Installation
Install the modules required to run the application.
npm install --productionStart the server.
npm startThis will start the server at port 1134.
Now go to http://localhost:1134/client.html to see the application running.
To start the server as daemon you can use Forever. Install Forever by
npm install forever -gNow you can start the server as daemon
forever start app.jsMocha tests
Install the modules required for testing.
npm install --devInstall Mocha by
npm install -g mochaRun the Mocha tests
sudo mocha -r should -R spec