
GitLabelWizard 

GitLabelWizard is a tool designed to automatically create and delete GitHub issue labels upon the creation of a new GitHub repository. This is done by using a GitHub app (GitLabelWizardBot) and Firebase Cloud Functions, which will manipulate labels through Github API.
Background
The goal for this project was to solve the following issue:
Everytime we create a new repository, we need to have the labels in GitHub issues set up right in order to use it in our agile planning, our Git Phlow and on Waffle.io. Git repos on GitHub comes with a set of predefined labels, but they don’t match what we need and should be removed. Currently we have scripts that can set this up for us, but the problem with this method is
- The scripts run locally on a machine, in the repo they must set the labels in - so the repo needs to be cloned to the machine where the scripts executes.
- The scripts has a dependency to GHI which must be installed prior to running the scripts.
- The scripts includes both the information about what needs to be done and how it should be done (not separating what from how).
Originally we started this project on AWS Lambda where we almost finished a working product written in Python 3. Though, due to complications with local testing of Lambda and CircleCI implementation, we decided to move to Firebase, which meant that we had to rewrite our codebase to Javascript (Nodejs). We have included the old codebase here.
Solution
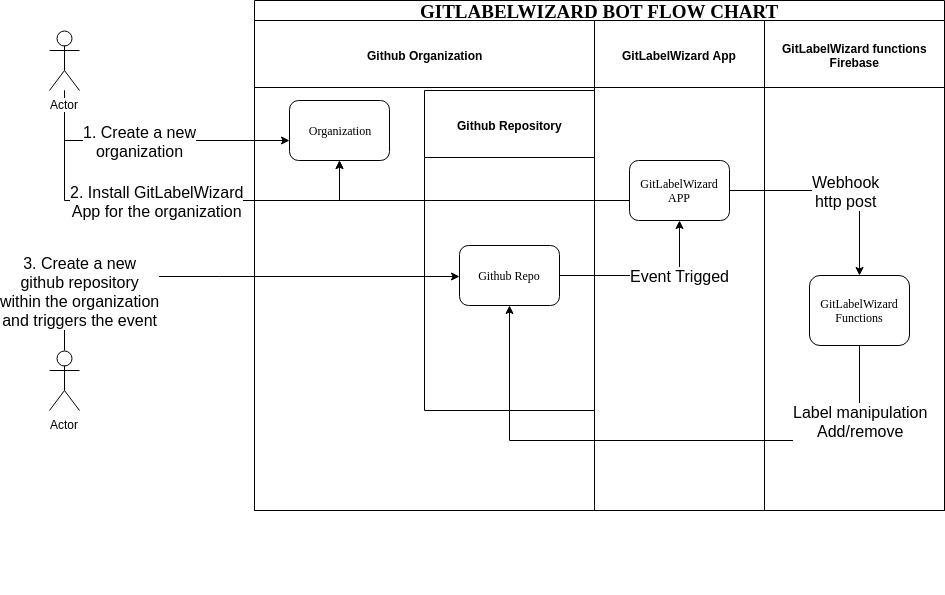
By using serverless functions (in this case on Firebase) we make HTTP requests to the GitHub label API to create our desired labels and delete the default ones. These functions are called by our GitHub App (GitLabelWizardBot) through a webhook, which is triggered when a new repository is created. Seen below is a flowchart describing the process.
GitLabelWizard REST API documentation
REST API HTTP Request
- Params :
api_key - Method :
POST - Accepts :
application/json
JSON FORMAT
{
  "action": "created",
  "repository": {
    "name": "{YOUR_REPO_NAME}",
    "owner": {
      "login": "{REPO_OWNER_NAME}"
    }
  }
}
Prerequisites
1. A Firebase account with a Blaze plan*
* You need a account with blaze plan to be have any outbound connection,
but no worries it will be almost free anyway.
2. A Firebase project
3. Git & Node.js installed
Prepare your setup
We will go though some few steps to prepare the setup that will run the GitLabelWizard Bot.
1. Create a firebase account
Visit the link, and create a account for yourself
2. Create a new project
You will now enter the console panel for your firebase account, and create a new project, and assign a name to the project. We will be using this project as our serverless/cloud functions service to doing label manipulation in a Github repository.
3. Find your ProjectID
Enter your firebase project -> Click project settings -> There you can find your project ID Save the ProjectID for later use in installation.
Installation
1. Clone github repo
Clone the repository
$ git clone https://github.com/prolike/gitlabelwizard.git2. Install Node.js (Skip if you have already Node.js installed)
Download and install your Node.js https://nodejs.org/en/download/
3. Configure firebase file
Open GitLabelWizard/.firebasesrc and change the default value to your projectID.
You can find your projectID from your firebase console.
{
  "projects": {
    "default": "gitlabelwizard-8a56d"
  }
}
4. Install firebase tools
$ sudo npm install -g firebase-tools5. Install npm modules
$ cd GitLabelWizard/functions
$ cd sudo npm install
Running the tests
To run the automated tests you need to be in the folder GitLabelWizard/functions/.
You have to make sure you have the GitLabelWizard/functions/node_modules/ folder installed. If not, please redo part 5 in the installation guideline.
You should now have the requirements to run the tests.
Make sure you're still inside GitLabelWizard/functions/ and run
$ npm testYou should now see the test passes.
Running the firebase functions locally
You can now test your firebase function locally. Currently state: The function will be invoked but not run correctly and will fail since the environment config is not yet set, we will do that later under deloyment. Read the documentation.
If you want to invoke the functions locally as a API service, then run this command:
$ sudo firebase serveIf you want to invoke the functions locally as a functions, then run this command:
$ sudo firebase functions:shellDeployment guideline
In order to deploy the project into a firebase functions, you need to generate 3 tokens:
- RANDOM_GENERATED_API_KEY
- GITHUB_BASIC_AUTHENTICATION_TOKEN
- FIREBASE_TOKEN
1 RANDOM_GENERATED_API_KEY
This token is your API_KEY for accessing the firebase functions.
Write following in your terminal/commandline
$ date +%s | sha256sum | base64 | head -c 32 ; echo You will get something like:
$ nGNiMDYzMWVjMmE2ZGYxNGZkNTJmMjYz
This is your secret RANDOM_GENERATED_API_KEY for the project, save the api key and dont expose it someplace!
2. GITHUB_BASIC_AUTHENTICATION_TOKEN
This token is your basic authentication token for github project (Base64)
Write following in your terminal/
$ echo yourgithubusername:yourgithubpassword | base64You will get something like:
$ eGF4YW5zdHhheGFzOnNhc2RICg==
This is your secret GITHUB_BASIC_AUTHENTICATION_TOKEN for the project, save the key and dont expose it someplace!
3. FIREBASE_TOKEN
This is your authentication token for firebase
Write following in your terminal/commandline
$ firebase login:ciYou will get prompted and redirected to a login screen for firebase, sign yourself in and then the token will be showed in terminal.
Waiting for authentication...

✔  Success! Use this token to login on a CI server:

1/_4hiNWKtrhWNmxIbM10PXH779BkRIvS5pn50JNtoNst

Example: firebase deploy --token "$FIREBASE_TOKEN"
This is your secret FIREBASE_TOKEN for the project, save the key and dont expose it someplace!
Deployment
Hereby you have created a firebase project, installed the project locally and ran the test successfully. Now your project is ready for the deployment to firebase cloud functions. Run following commands to deploy.
$ firebase functions:config:set github.authkey={YOUR_GITHUB_BASIC_AUTHENTICATION_TOKEN} --token={YOUR_FIREBASE_TOKEN_HERE}
$ firebase functions:config:set fb.apikey={YOUR_RANDOM_GENERATED_API_KEY} --token={YOUR_FIREBASE_TOKEN_HERE}
$ firebase deploy --only functions --token={YOUR_FIREBASE_TOKEN_HERE}
Now the firebase functions should be deployed and visible in firebase console panel under "functions". There you can aswell find the HTTP URL for api entrypoint. This url you will be using for setting up the Webhook.
Implement the bot for your project
Using the bot as a webhook for a organization
Goto the organization or repository and put your HTTP URL and concat it with your API URL.
-
Firebase functions URL:
{YOUR FIREBASE FUNCTION URL} -
API Key:
{YOUR_RANDOM_GENERATED_API_KEY} -
Param: :
api_key -
Webhook URL: :
{YOUR FIREBASE FUNCTION URL}?api_key={YOUR_RANDOM_GENERATED_API_KEY}
So your webhook URL should look like: https://us-central1-gitlabelwizard.cloudfunctions.net/helloWorld?api_key=nGNiMDYzMWVjMmE2ZGYxNGZkNTJmMjYz
Insert your Webhook URL in your github organization or repository that you have owner access to.
Future development
To expand this service, we would like to add the following features in the future:
- Instead of having the labels stored locally, we would want the labels to be in a YML-file, which the wizard then reads to create labels.
- To delete labels, we would then match the labels in the file to the existing labels on the repository and delete any labels not mentioned in the file. Here we would also ensure that the wizard only deletes labels that are not in use on any issue.
- When the YML-file is edited by the repository owner, the wizard will read the file again and then create or delete any labels added to or removed from the file.
Some of these features were actually already developed in the first part of the project when we were still running on AWS Lambda. The codebase (written in Python 3) can be found here.