pgen_client - PGenerator client
Utility to control a Raspberry Pi with a PGenerator installation.
Includes both manual & automatic calibration features.
Built on top of egui, kolor and ArgyllCMS.
Features
- Settings to configure the PGenerator similar to
DeviceControl.- Allows configuring the output colour format, HDR mode as well as metadata.
- Ability to send test patterns manually to the device.
- Can be used as an external pattern generator for DisplayCAL, through the Davinci Resolve interface.
- An internal pattern generator is available for manual calibration and measuring patch lists.
- The internal generator uses
ArgyllCMS'spotreadutility to measure colour patches.
- The internal generator uses
Building
Dependencies:
- Linux: see eframe dependencies.
cargo build --release
Device
The Raspberry Pi must be setup with an installation of PGenerator.
pgen_client was only tested with a Raspberry Pi 4B device. Some features may not be working on older devices.
Configuring the PGenerator output
First, the program communicates to the PGenerator device through TCP over the network.
So you will need to start by figuring out the IP address to connect to.
You should then be able to connect to the default port, 85.
Configurations:
Display mode: the resolution/refresh rate combination to use for the display.Color format: RGB or YCbCr is possible, whether it works is dependent on the display.Quant range: Full/Limited range for the display output. Also requires the display to support the selected option.Bit depth: Sets the output bit depth for the HDMI data.Colorimetry: Sets the HDMI colorimetry flag. This is used by the display to interpret the pixels correctly.Dynamic range: Allows switching the output mode toSDR,HDR10orDolby Vision.- This is handled by the
PGeneratorsoftware. The display must support the selected mode.
- This is handled by the
HDR metadata / DRM infoframe is for the metadata signaling in HDMI for HDR output. It is only used for the HDR dynamic range mode.
The HDR mode can also switch to HLG if the HLG EOTF is selected.
With the exception of Display mode and Dynamic range configurations:
- All configuration changes require that the
PGeneratorsoftware be restarted before they are applied to the output.
This can be done with either theRestart PGenerator softwareor theSet AVI/DRM infoframebuttons.
Configuring the test patterns
Once the PGenerator device is properly connected, test patterns can be displayed.
The most important settings here are:
Patch precision: Whether to use 8 bit or 10 bit patches.- Changing the pattern depth may reconfigure the output to a different depth.
- It would be reconfigured every time a different precision pattern is sent.
Patch size: Size the patches take on the display, in % windows.Position: How the patches are positioned on the display. This can be a preset position or specific pixel coordinates.
With both internal/external pattern generators, the patches are sent at the configured size/position in pgen_client.
Info about Quant range and the pattern limited range config:
- When the quant range is set to
Full:- Display may be setup with Auto/Full range. Patches must be sent as full range.
- Setting the display to Limited range input, patches may be sent with limited range enabled.
- When the quant range is set to
Limited:- Patches must always be sent as full range, so Limited range must be disabled.
- Display must be set to Auto/Limited, never Full.
For patch and background colours, they are either selected manually or through a pattern generator as described below.
Patterns can be sent manually to test the configuration.
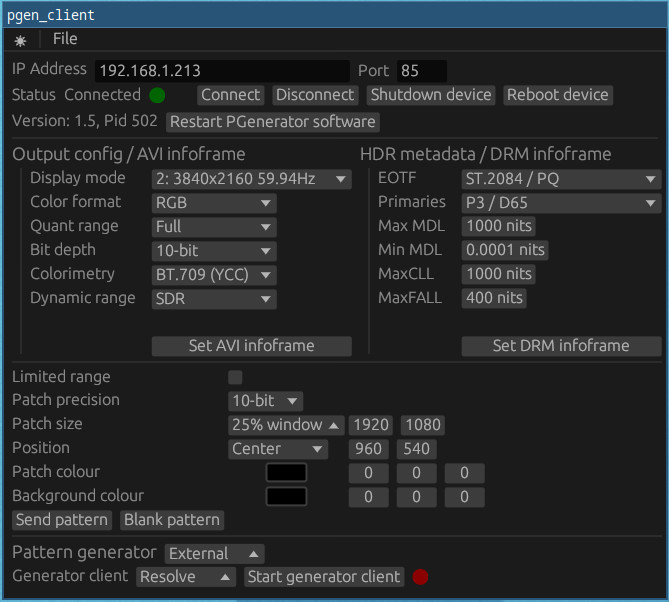
External pattern generator
Currently only supports displaying 10 bit patterns from DisplayCAL.
DisplayCAL must be configured with a Resolve display.
Instructions:
- To connect, start a calibration.
- Select the
Externalpattern generator and click theStart generator clientbutton. - DisplayCAL should start sending test patterns to the display.
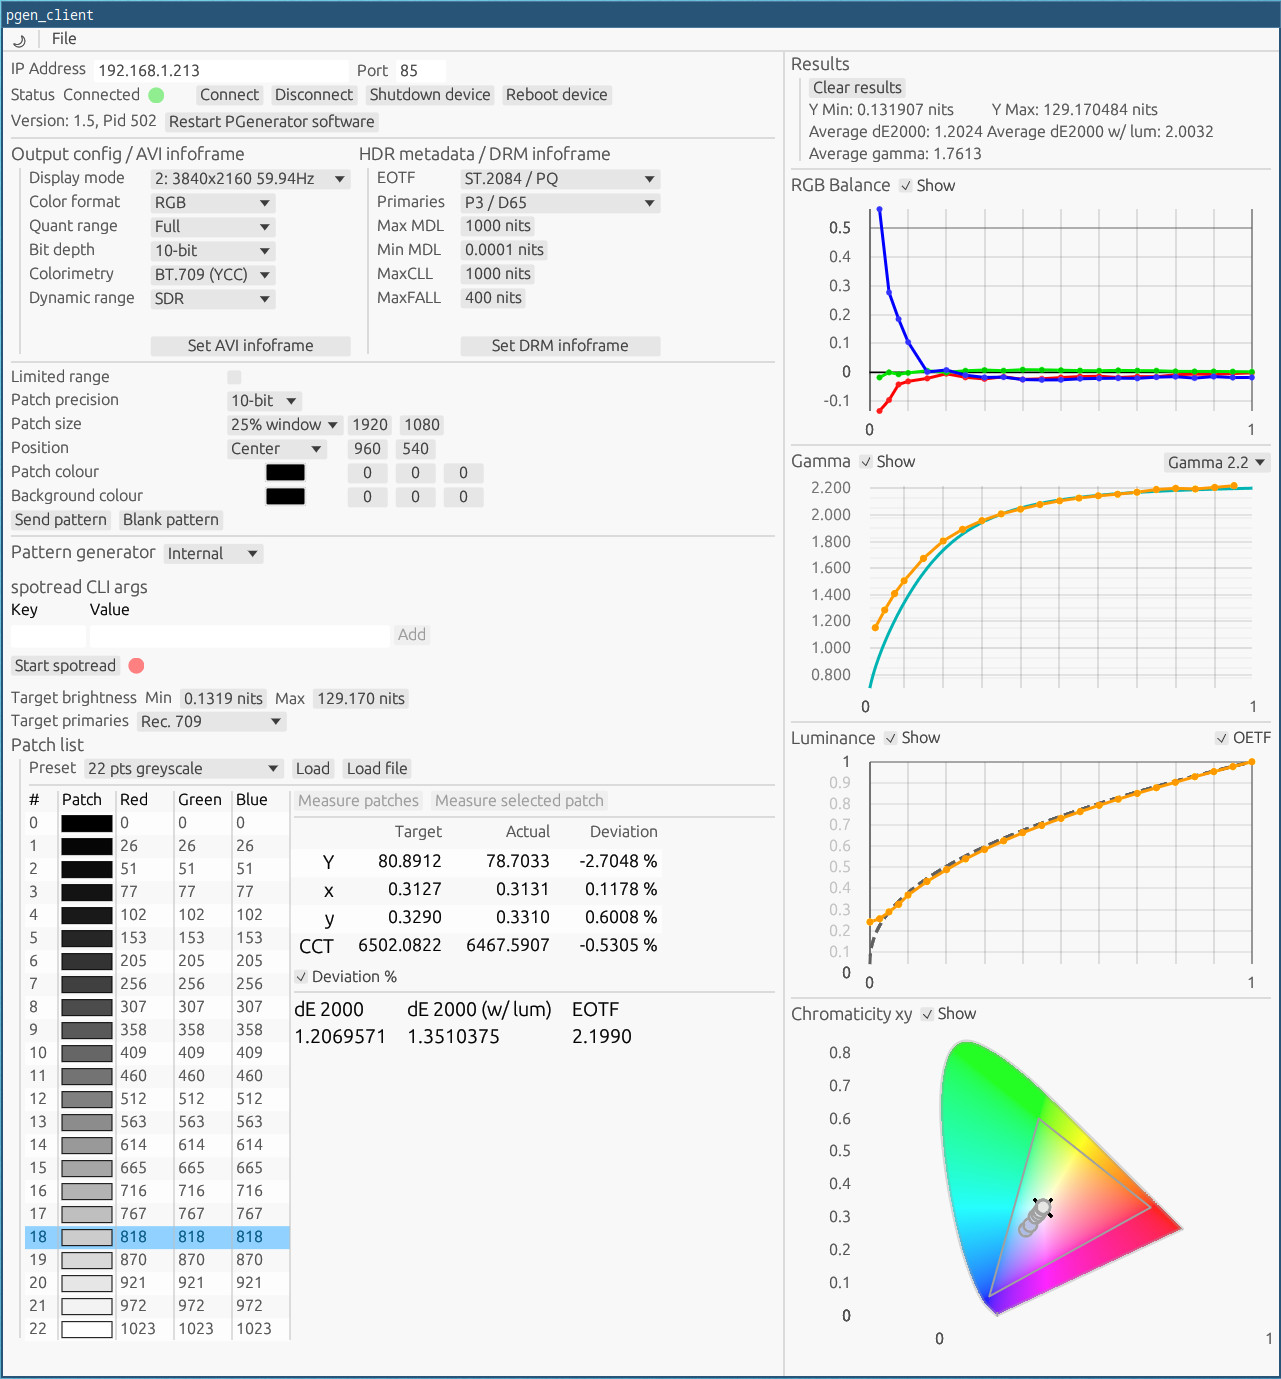
Internal pattern generator
pgen_client can be used for simple manual calibration.
It supports basic presets as well as the ability to load custom CSV patch lists.
Usage is targeted at more advanced users that know how to interpret the measurements data.
ArgyllCMS must be installed on the system and the executables present in PATH.
[!WARNING] I cannot guarantee that the displayed measurement data is accurate or even correct.
My knowledge of colour math is limited and I have not done extensive verification.
Do consider double checking results with other calibration software such asDisplayCALorHCFR.
Instructions:
- Select the
Internalpattern generator. - Set up the
spotreadCLI arguments and startspotread. - Set the min/max target brightness as well as target primaries for the calibration.
- Load a patch list to measure.
- Measure all patches or select a single one and measure it.