AppTrak (CSE210_Group6)
Table of contents
- Introduction
- Features of AppTrak
- Technology Architecture
- Database Design
- Testing Strategies
- Development standards
- Steps to Run the Project
- Steps to Use the App
- Relevant Documents
- Owners
Introduction
Every year, students from various fields of study apply for internships and jobs. However, keeping track of the applications and their status gets cumbersome in an Excel sheet, looking something like:
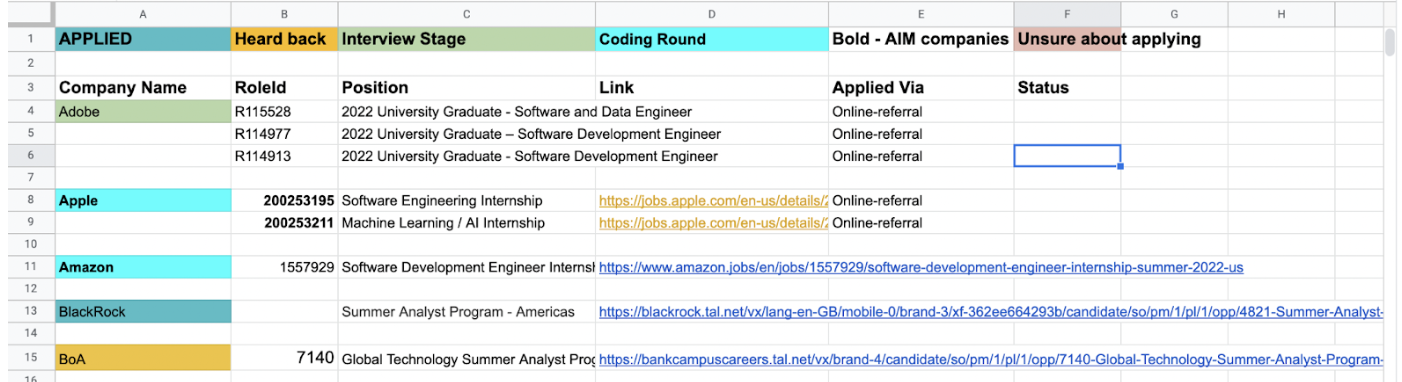
This usually results in students abandoning their efforts to keep track of their progress, often leading to missed deadlines and poor planning. This overall hinders the student learning experience and adds to their frustration.
To tackle this problem, we propose a solution –
AppTrak - A local first and single-user web app that saves us from the excel sheet management mess and allows us to declutter our application tracking and make it easier.
Features of AppTrak
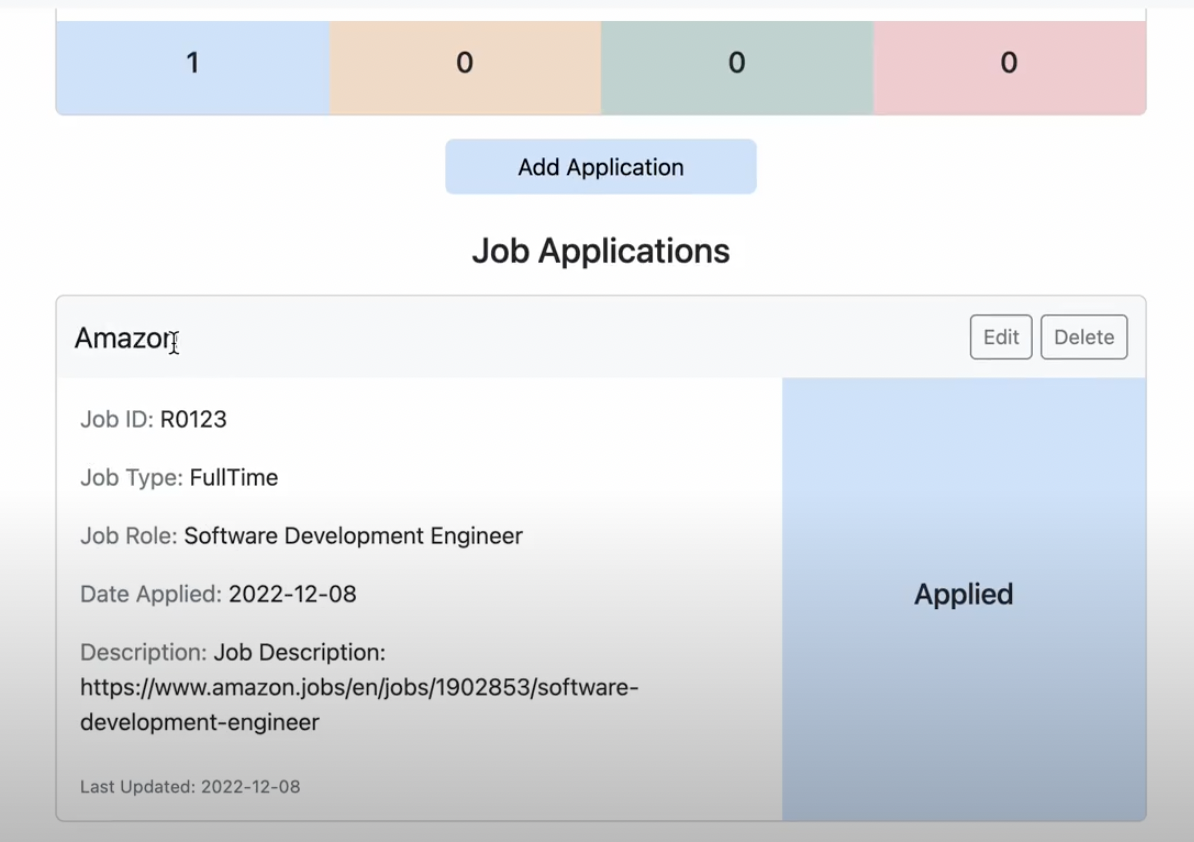
- The user can create a new application in the dashboard.
- The user can view already created application in the dashboard.
- The user can delete an existing application in the dashboard.
- The user can update an existing application in the dashboard.
- The user can see the statistical data of applications.
- The user can download the applications in format of a CSV file.
The application is local first: when the Internet does not work, events can still be read, created, deleted, updated through the application
Through our discussions with the stakeholders, we were suggested additional requirements. We could implement some of them while had classify some of them as out of scope(Allow Duplicates, No Login).
Technology Architecture

-
Presentation Layer : It consists of the HTML pages with CSS styling that are responsible for displaying the various interactable components of the application. The presentation layer uses the very popular Bootstrap library(ADR) that allows the page to be aesthetic, easy to organize and responsive.
-
Integration Layer: This layer is mainly responsible for integrating the front end with back end of the product. For example, this layer would fetch details from the HTML page, validate it and pack it into data structures that the backend can understand. The layer is decomposed into multiple modules based on utility which allows clean code and modularity. The integration layer listens to events in the presentation layer to trigger the corresponding actions.
-
Data Access Layer: This layer is responsible for communicating asynchronously with the data store. Contrary to the integration layer, the data access layer is agnostic of the domain of the application. This means that the implementation can work for any domain by exposing the same APIs. This also means that the data access layer is abstracted away from the integration code. We can completely change the actual database being used while still exposing the same APIs. This demonstrates abstraction and separation of concerns.
-
Data Store: IndexedDB (ADR) is browser based key-value store. The data access layer sends CRUD requests to indexedDB and it returns a response back to the data access layer.
-
Bundler: The integration layer and database layer dependencies are bundled together by using webpack(ADR). Webpack allows pre-compiling of dependencies and thus eliminates the need for having a live server to host the application.
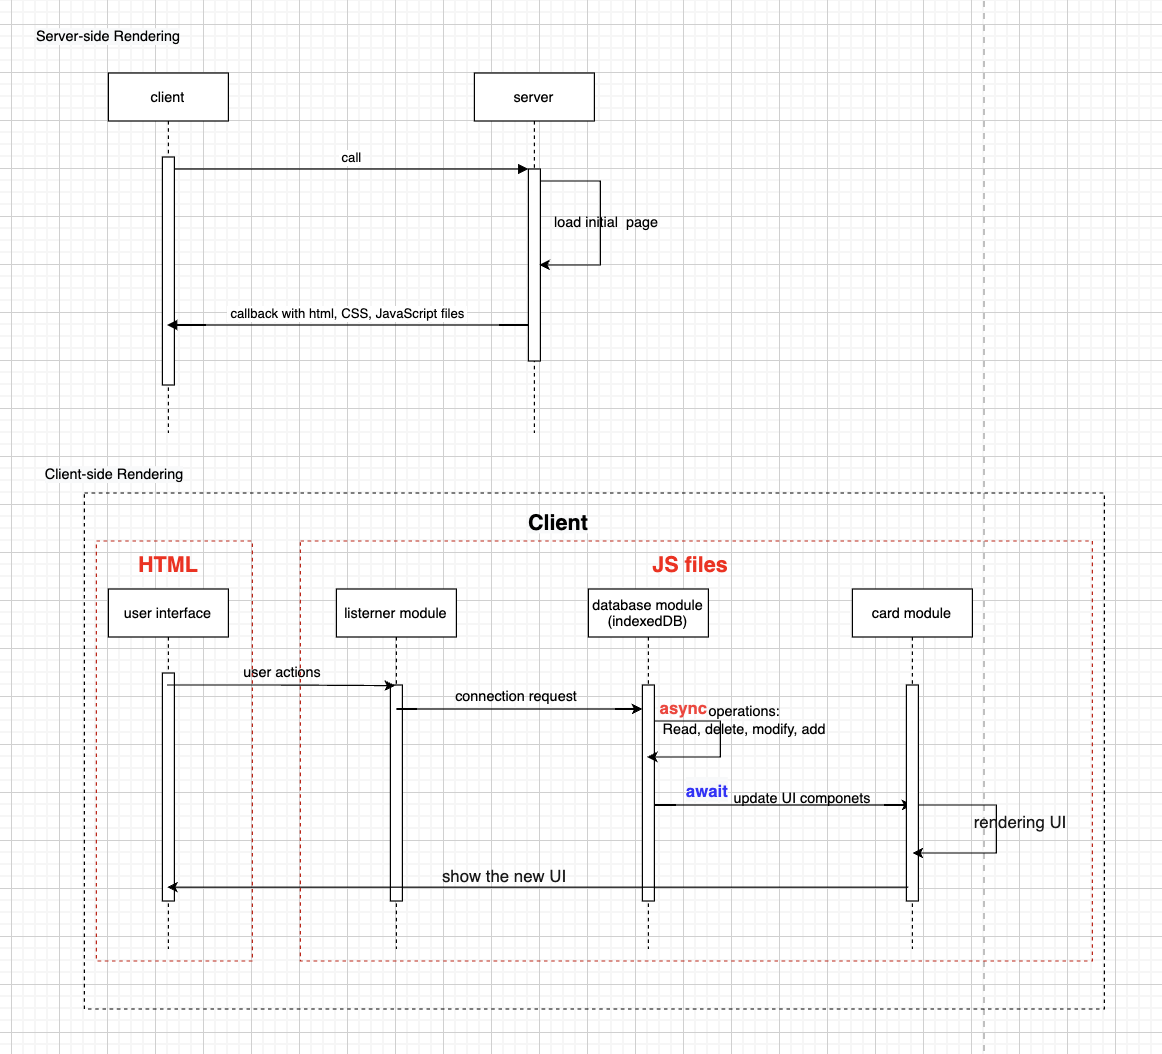
AppTrak is Front-end only web application with both client-side rendering and server-side rendering. Server-side rendering is run once when the initial page is loaded. Then, the UI change is rendered on client-side based on user interaction.
Database Design
- Each record is uniquely identified by an auto-incrementing integer key defined as "Card Id".
- Duplicate entries for a job are allowed. This is done to relax the mandatory constraint of having to enter jobId which is an overhead for an end user.
| Name | Type | Mandatory | Max chars | Default |
|---|---|---|---|---|
| Card Id | Alphanumeric | Y(Primary Key) | 200 chars | |
| Job Id | Alphanumeric | N | 200 chars | |
| Company Name | String | Y | 200 chars | |
| Date | Date | Y | NA | |
| Last Updated Date | Date | Automatic-System Date | NA | |
| Job Type | Enum (FullTime, PartTime, Internship) | Y | FullTime | |
| Job Role | String | N | 500 chars | |
| Status | Enum (Applied, InProgress, Offer, Reject) | Y | Applied | |
| Description | String | N | 5000 chars |
Testing Strategies
Use Jest as TestingFramework
- Good, automatically runs tests after each change to ensure they are up to date. Many users report that this reduces development time.
- Good, automatically mocks any modules not explicitly required in the test file, which can save time during development.
- Bad, Jest has fewer features straight out of the box comparing with Mocha.
In conclusion, Jest is a better choice becasue it is easy to get started with and doesn’t require learning a new syntax
Use Selenium as UI Testing
While unit tests are able to determine whether the code is fit to use, it isn't able to simulate user interaction with the software or project. Thus we have used Selenium, an open source browser automation tool that helps us in writing tests that simulate the dynamic changes in the HTML caused by user interaction. This would allow the developer to write tests with regards to HTML elements and check whether the application exhibits the expected behaviour from the user's perspective. Selenium can be used for multiple browsers, and in this project the tests are written in Python and simulated on Google Chrome. Further justification for utilizing Selenium can be found on this page
In this project these tests are grouped together in the folder called e2e_testing. We understand that it is impractical to expect the developers to install the libraries required to run the tests manually. But we do operate under the assumption that the developer has installed Python correctly, which means that the library setuptools is available as a default library, similar to how the more known os library is. The presence of this library enables us to write the code that checks whether the required libraries are present, and installs them automatically if they aren't.
Moving on to the execution of the tests, we have created a new Selenium test for each functionality. If the developer is working in the root directory, then they can execute the individual test by typing the following command in the terminal: python e2e_testing/test_file_name.py where test_file_name.py refers to the name of the test file present in the directory. For example, to execute the test for inserting an application, we type python e2e_testing/selenium_insert_test.py in the terminal.
However, there might be instances where a developer wishes to run a single file that executes all the other tests. For this, the developer can execute the following command in the terminal: python e2e_testing/selenium_all_tests.py which executes each test one after the other. If a developer creates a new test file called new_test.py and wants this to run together with other tests, then they need to add the following code at the bottom of selenium_all_tests.py:
os.system("python " + tests_directory_path + "new_test.py")
The modified selenium_all_tests.py file will then look like this:
os.system("python " + tests_directory_path + "test1.py")
os.system("python " + tests_directory_path + "test2.py")
.
.
.
os.system("python " + tests_directory_path + "new_test.py")
Thus, the developer can now use the python e2e_testing/selenium_all_tests.py command in the terminal to run the entire test suite which now includes the Selenium test file they created.
Development standards
Throughout the development of the project, we established and followed high standards of development. This helped greatly in managing complexity and prevented things getting out of hand.
-
Some standards were enforced by the CICD pipeline like linting and automated tests. Other standards included not only coding conventions, but also good documentation, project management, github workflow, PR formats, e2e-testing etc.
-
Any new tool was documented as a tutorial. We established these standards very early in our project phases and designed them as guidelines for all developers.
-
All key decisions were documented as ADRs.
-
The team met twice every week (and additionally on need basis) and made it a point to record (meeting notes)[https://github.com/r4sharma/CSE210_Group6/tree/dev/Docs/meeting-notes].
Steps to Run the Project
-
Clone this project (or a fork of this project)
git clone https://github.com/r4sharma/CSE210_Group6.git -
Open the repository in a terminal
cd CSE210_Group6 -
Install node modules
npm installIf you wish to only use the app (and not make changes/run tests), you can skip to step 9.
-
To run unit tests
npm run test -
To run integration tests
python e2e_testing/selenium_all_tests.py -
To run lint check
npm run lint -
To fix lint errors (if any)
npm run lint-fix -
Compile the JSDoc
npm run doc -
Build the project
npm run build -
Start the application by opening src/index.html in a browser
-
Access the JSDoc by opening docs/jsdoc/index.html in a browser
-
Repeat steps 4 to 9 after any changes to the application
Note : Our app is tested and developed in Google Chrome as of now.
Steps to use the App
-
Add Application - The steps to add an application are as follows:
- Click on the Add Applications Button on the main page of the app.
- Add Application Form will appear to add all the details of new application.
- After adding all required details, hit Save button.
- The new application card will appear pertaining to the application added.
-
Edit Application - The steps to edit an application are as follows:
- Go to the Application card of the application to be edited and click on the Edit button of that particular card.
- Edit Modal will pop up with all the details of the current application populated.
- Edit the required details and hit the Save button.
- The last updated date field will be automatically updated based on the last change made to the application.
- View the changed application in the application card.
-
Delete Application - Go to the Application card of the application to be edited and click on the Delete button of that particular card. The corresponding application will be deleted from all application cards after confimation of delete from delete modal.
-
View Statistics - On top of the main page, we can view the count of applications in different stages of application tracking to be aware of our application progress.
-
Export Applications - To export all the applications into a CSV file for ease of access, there is an Export button on the top right corner of the main page, which will generate and download the exported CSV file.
Note : Our app is tested and developed in Google Chrome as of now.
Relevant Documents
- ADR
- AllowDuplicates - Why we didn't check for duplicates?
- AsynchronousCodeStrategy - Why we used Promise for Asynchronous Code?
- CICD - Why we used GitHub Actions for configuring CICD pipeline?
- NoLogin - Why we don't have a profile login page?
- Database - Why we used IndexedDB for storage?
- DatabaseTesting - Why we used Jest as TestingFramework?
- UITesting - Why we used Selenium for e2e testing?
- Webpack - Why we used WebPack as our integration layer?
- GitWorkflow - Why we used Gitflow as our Git Workflow Strategy?
- UI - Why we made certain design decisions pertaining to UI?
- Developing Guildline
- branch-merge - How to merge branches safely?
- coding-conventions - What are the proper coding conventions to follow?
- git-conventions - What are git conventions to follow to commit in this repository?
- jsdoc-conventions - What are the JSDoc conventions?
- project-management - What is the Project Management workflow for this project?
- Meeting Notes
Owners
This project is created by:
- Alex Martakis
- Mohammad Anas Mudassir
- Purva Kothari
- Ripunjay Sharma
- Savani Suranglikar
- Siddharth Bagdi
- Yinchao He
Please reach out in case of queries.