Atomik Controller README
By: Rahim Khoja (rahim@khoja.ca)
Version 0.8 Alpha
By Rahim Khoja
The Atomik Controller manages automated and smart lights. Initially The Atomik Controller will manage Mi-Light brand lights and Remotes, but it will expand to other Atomik and third party smart devices. The goal is to create a drop in replacement for the Mi-Light wifi bridge, that expands the zone and device limitations, while providing a more robust home lighting controller. The Atomik controller currently includes a Web GUI for system management, a Nrf24l01+ 2.4 GHz transceiver for listening and transmitting, Mi-Light RF RGB remote compatibility, a Mi-Light Smartphone server emulator that allows use of the Mi-Light Smartphone app as a remote, an API for 3rd party integration, and a task scheduling system to control light zones.
Hopefully in the future the Atomik Controller will add blue tooth connectivity, additional devices from a variety of manufacturers, Zigbee compatibility, Z-Wave compatibility, OpenHAB compatibility, a simple light io scripting interface, a fully documented API for 3rd party compatibility, and other types of devices and sensors.
Features:
- Full featured web administration GUI
- Maximum of 65,280 uniquely addressable Mi-Light RGB Devices ( But an unlimited amount of Devices can be Synced to a single address )
- Maximum of 65,280 uniquely addressable Mi-Light CCT Devices ( But an unlimited amount of Devices can be Synced to a single address )
- Unlimited amount of Mi-Light Smartphone Remotes ( Secured by MAC Address )
- Maximum of 256 Mi-Light RGB RF Remotes
- Unlimited amount of Atomik API Remotes ( for 3rd party integration )
- Unlimited amount of Device Zones
- Zones can include ANY mix of Devices and Remotes
- Unlimited amount of scheduled Zone Tasks
- WiFi and Ethernet connectivity
- Drop-in replacement for the Mi-Light WiFi Bridge
Compatible Bulbs & Remotes (LimitlessLED - MiLight - EasyBulb)
- 9.0 Watt ALL RGBCW & RGBWW Bulbs (Cool White/Warm White)
- 9.0 Watt ALL Dual White Bulbs
- 6.0 Watt ALL RGBCW & RGBWW Bulbs (Cool White/Warm White)
- 6.0 Watt ALL Dual White Bulbs
- 5.0 Watt E14 RGBWW & RGBWW Bulbs (Cool White/Warm White)
- 4.0 Watt GU10 RGBCW & RGBWW Bulbs (Cool White/Warm White)
- 4.0 Watt MR16 RGBWW Bulbs (Warm White)
- Not Fully Compatible With V6 WiFi Bridge Bulbs (Only Tested with 9 W Beam Bulbs)
- Compatible With All Mi-Light RGBWW & RGBCW Remotes
- Compatible With All IOS/Android Mi-Light SmartPhone Applications (Anything that communicates with the WiFi Bridge)
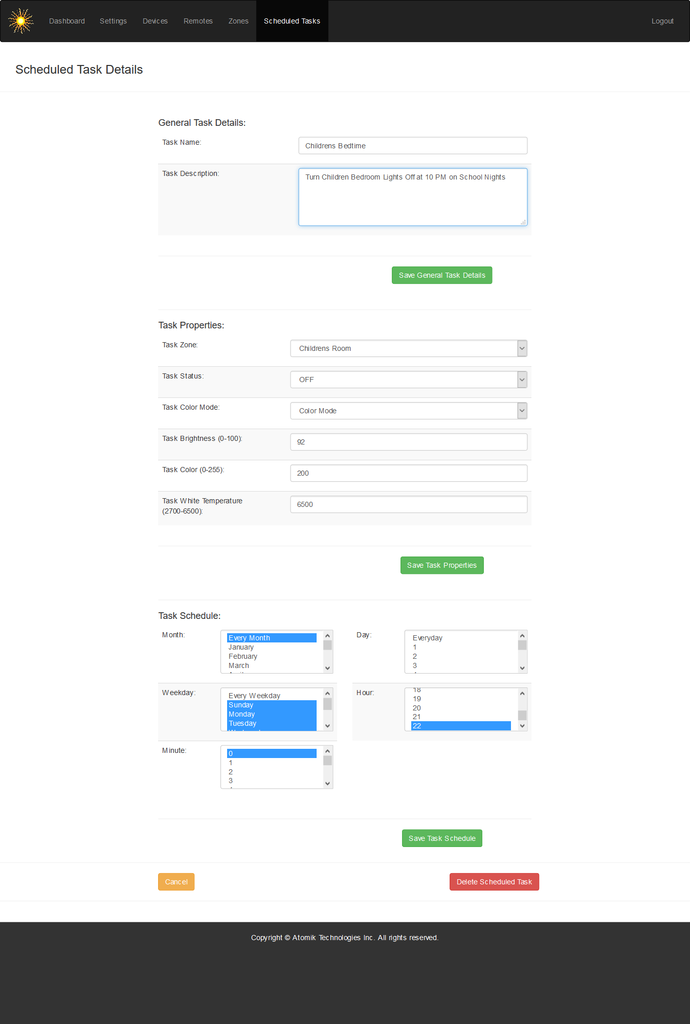
Screenshots of Web GUI
-
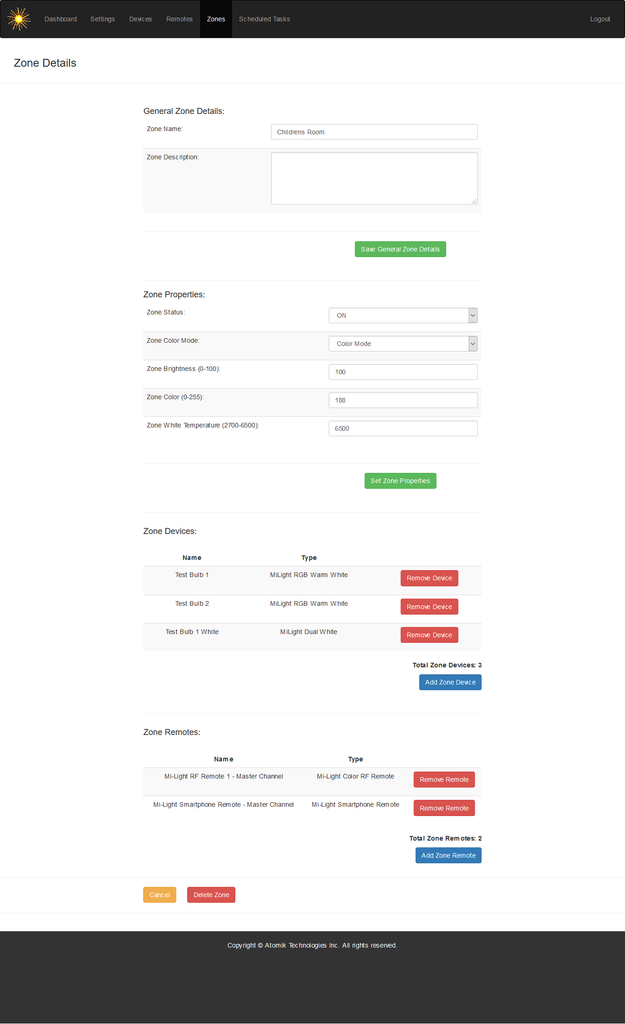
-

-
Settings Screen
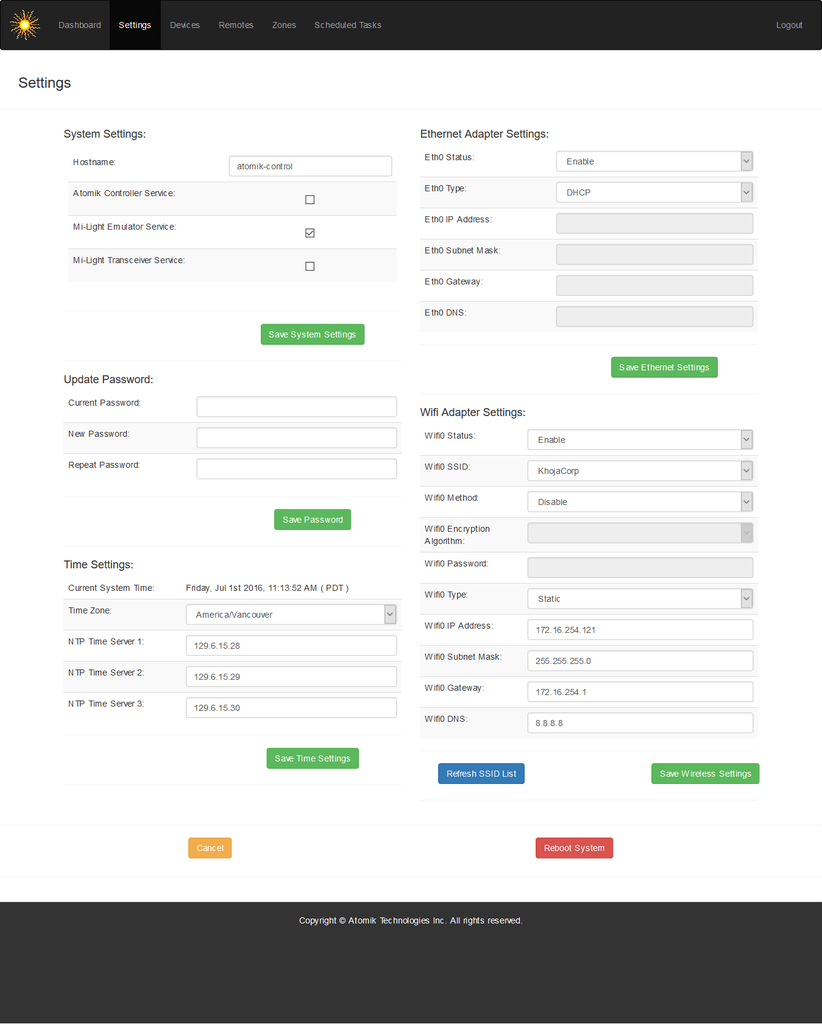
-
Atomik API Details
The Atomik API accepts JSON Commands on Port 4200 of the Atomik Controller to control the Atomik lighting Zones. Atomik API Remotes are setup, and applied to Zones from within the Atomik Controller web administration GUI. Atomik Api Remotes only have two types of commands, List and Issue. List will accept JSON that contains a valid username and password and return a JSON list of all the available zones and their current settings to the user. Issue will accept JSON that contains a valid username and password along with zone light settings, then it will update the light settings and return a JSON list of all the available zones along with the updates zone information from the Issued command. If command is not accepted or invalid credentials are passed to the Atomik API, an error JSON is returned.
All Commands are posted to 'http://192.168.1.100:4200/atomik' ( or the IP Address of the controller )
Here are some example commands:
List Command - JSON Request Example:
{"Command":"List","User":"rahimk","Password":"password"}List Command - JSON Response:
{
 { "ZoneName":"Bedroom", "Configuration":{ "Channel":"0", "Status":"1", "ColorMode":"0", "Brightness":"100", "Color":"198", "WhiteTemp":"2700" }}
 { "ZoneName":"Living Room", "Configuration":{ "Channel":"1", "Status":"1", "ColorMode":"1", "Brightness":"100", "Color":"0", "WhiteTemp":"2700" }}
 { "ZoneName":"Hallway", "Configuration":{ "Channel":"2", "Status":"0", "ColorMode":"1", "Brightness":"100", "Color":"0", "WhiteTemp":"6500" }}
}
Issue Command - JSON Request Example:
{"Command":"Issue","User":"rahimk","Password":"password","Configuration":{"Channel":"1","Status":"1","Brightness":"65","ColorMode":"1","Color":"215","WhiteTemp":"6500"}}Issue Command - JSON Response:
{
 {"ZoneName":"Bedroom", "Configuration":{"Channel":"0", "Status":"1", "ColorMode":"0", "Brightness":"96", "Color":"221", "WhiteTemp":"6500"}}
 {"ZoneName":"Living Room", "Configuration":{"Channel":"1", "Status":"1", "ColorMode":"1", "Brightness":"68", "Color":"215", "WhiteTemp":"6500"}}
 {"ZoneName":"Hallway", "Configuration":{"Channel":"2", "Status":"1", "ColorMode":"1", "Brightness":"18", "Color":"215", "WhiteTemp":"6500"}}
}
Invalid Request - JSON Error Response Example:
{"Error": "Invalid Username or Password"}Notes on Atomik JSON Requests and Response:
- Channel can be any integer, but it is assigned by the controller. Each Atomik API will have a channel associated to a Zone.
- User is the Atomik Username of the Atomik Remote.
- Password is the Atomik User's password of the Atomik Remote.
- Status can be 0 or 1. 0 represents Zone lights Off, and 1 represents Zone lights On.
- ColorMode can be 0 or 1. 0 represents Color Mode, and 1 represents White Mode.
- Brightness can be any integer between 0 and 100. Brightness represents the percentage of Brightness a Zone is set to.
- Color can be any integer between 0 and 255. Each Color integer represents a different color while in Color Mode.
-
WhiteTemp can be any integer between 2700 ( Warm White ) and 6500 ( Cold White ).
Testing the API with cURL:
curl -H "Content-Type: application/json" -X POST -d '{"Command":"Issue","User":"rahimk","Password":"password","Configuration":{"Channel":"2","Status":"1","Brightness":"10","ColorMode":"1","Color":"215","WhiteTemp":"6500"}}' http://192.168.1.100:4200/atomik
curl -H "Content-Type: application/json" -X POST -d '{"Command":"List","User":"rahimk","Password":"password"}' http://192.168.1.100:4200/atomik
How do I get set up?
Required Hardware:
- Raspberry Pi [All Models]
- A Nrf24l01+ Radio Module
- A USB Wifi Adapter
- (Optional) A USB Bluetooth Adapter
- (Optional) Apple Smartphone with Mi-Light Software
- (Optional) Mi-Light RGB RF Remote
- 8GB or Greater SD Card
- Mi-Light or Compatible RGB or CCT Bulbs
- Local Area Network Access
-
A Web Browser
Hardware Setup:

Quick Install Instructions:
- Download the IMG of the Atomik Controller 7z Direct Download
- Download an IMG burning tool such as win32diskimager
- Write the IMG to an SD Card (Must fit in your Raspberry Pi)
- Put the SD Card into the Raspberry Pi that has been modified
- Set your systems Ethernet adapter's IP to 192.168.1.1
- Plug the Atomik Controller into your lan and power it up
- After 2 Minutes go to http://192.168.1.100 in your web browser
- Login to the Atomik Controller with (Username: admin, Password: admin)
-
Restart the Emulator, Transceiver, and API from the settings page after first boot
Full System Install Instructions:
Coming Soon! (or when I get around to it)
Most Important CPP files have compile instruction on line 1
SSH Credentials (pi/raspberry)
MariaDB Credentials (root/raspberry)
Atomik Controller Technical Details
Operating System:
-
Raspbian (jessie)
Software Dependencies:
-
RF24 Driver ( https://tmrh20.github.io/RF24/RPi.html )
-
Node.js 4.0+ ( https://nodejs.org/en/download/ )
-
Nginx
-
PHP
-
LibCurl
-
JSONCPP
-
MariaDB (MySQL Fork) - Cuz we all love Microseconds
-
G++
-
MySQL C++ Connector
References & Thanks
-
https://github.com/pmoscetta/authometion-milight - Pietro Moscetta
-
https://github.com/henryk/openmili - henryk
-
http://torsten-traenkner.de/wissen/smarthome/ (In German, Can't Actually Read Anything But The Code) - ?
-
https://github.com/bakkerr/openmilight_pi - Roy Bakker
-
https://hackaday.io/project/5888-reverse-engineering-the-milight-on-air-protocol - Henryk Plötz
-
https://gist.github.com/jpawlowski/5359556 - Julian Pawlowski
Notes
- The code is rather messy and inefficient ( sorry ). With some polishing it should easily become efficient.
- Comments have not been added yet. This is still a work in progress.
- If the Atomik Transceiver is reprogrammed to use two Nrf24l01+ Radio Modules it would greatly improve responsiveness.
Who do I talk to?
- Managed by Rahim Khoja (rahimk@khoja.com)
Disclaimer
THIS SOFTWARE IS PROVIDED BY ATOMIK (Rahim Khoja) AND CONTRIBUTORS "AS IS" AND ANY EXPRESS OR IMPLIED WARRANTIES, INCLUDING, BUT NOT LIMITED TO, THE IMPLIED WARRANTIES OF MERCHANT ABILITY AND FITNESS FOR A PARTICULAR PURPOSE ARE DISCLAIMED. IN NO EVENT SHALL ATOMIK OR ITS CONTRIBUTORS BE LIABLE FOR ANY DIRECT, INDIRECT, INCIDENTAL, SPECIAL, EXEMPLARY, OR CONSEQUENTIAL DAMAGES (INCLUDING, BUT NOT LIMITED TO, PROCUREMENT OF SUBSTITUTE GOODS OR SERVICES; LOSS OF USE, DATA, OR PROFITS; OR BUSINESS INTERRUPTION) HOWEVER CAUSED AND ON ANY THEORY OF LIABILITY, WHETHER IN CONTRACT, STRICT LIABILITY, OR TORT (INCLUDING NEGLIGENCE OR OTHERWISE) ARISING IN ANY WAY OUT OF THE USE OF THIS SOFTWARE, EVEN IF ADVISED OF THE POSSIBILITY OF SUCH DAMAGE.
Support
Since I am extremely lazy I am not going to offer any support. Well maybe every once-n-a while. It really depends on my mood.
That being said, time was spent documenting each command in the scripts. This should allow the scripts to be easily understood and modified if needed.
Donations
Many Bothans died getting this Mi-Light Bulb Controller to you, honor them by sending me some Crypto. ;)
ETH Mainnet: 0x1F4EABD7495E4B3D1D4F6dac07f953eCb28fD798
BNB Chain: 0x1F4EABD7495E4B3D1D4F6dac07f953eCb28fD798
License
Released under the GNU General Public License v2