EzDialogue Plugin for Godot
EzDialogue is a Dialogue extension for Godot Game Engine.
The Plugin provides ways to create and organize in-game dialogues by providing customized dialogue management tab in Godot Engine. Use EzDialogue's own scripting language to write dialogues, control narrative branches, and trigger custom in-game functions.
Requirement
EzDialogue plugin has only been tested with Godot v4.0+
Video Tutorial
Click here for video tutorial/demo.
Installation
- Copy the directory
./addon/ez-dialogueto your Godot Project resource pathres://addon/ - Open
Project > Project Settings..., then gotoPluginstab - Under
Installed Plugins, there should already beDeveloperEzra's Dialogue Manageralready. Click to checkEnableunder status column for this plugin. - There should be
EzDialoguetab in your Editor now.
Writing Dialogue
To begin writing your dialogue, go to EzDialogue tab.
Dialogue Node
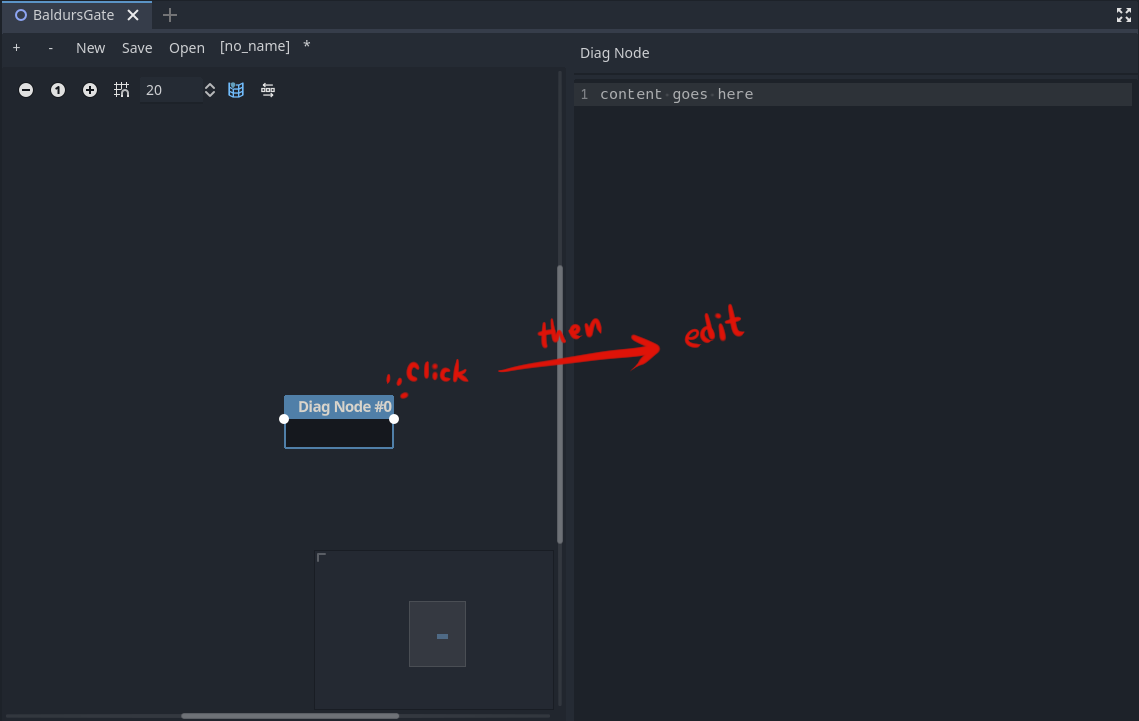
Create a dialogue node by clicking the + on the top left corner of the dialogue editor window.

Once you select the node (the created Dialogue Node should be alrady selected), the right-side panel enables. This is where you edit the Dialogue Node's name and its content.

Writing Content
Dialogue Name
The name of a dialogue should be unique within the file (case-INsensitive). Dialogue Node's name is how you instruct the flow between different nodes.
By default, You should name the starting node Start.
Plain Text
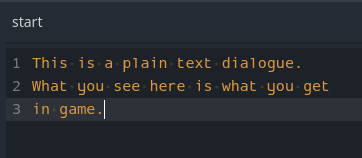
You can simply start writing your plain text dialogue in the content section of the Dialogue Node. Whatever you write would show up as dialogue message in your game.

Variable Injection in Text
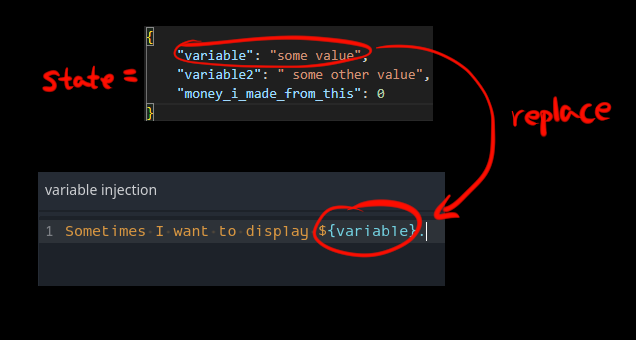
You can inject the value of variable defined in the state Dictionary within the text by surrounding the varaible name with ${variable_name}

Flow Control and Branching
Naturally, you want to navigate to different dialogue based on conditions and player choices. This section focuses on this.
Go To Node
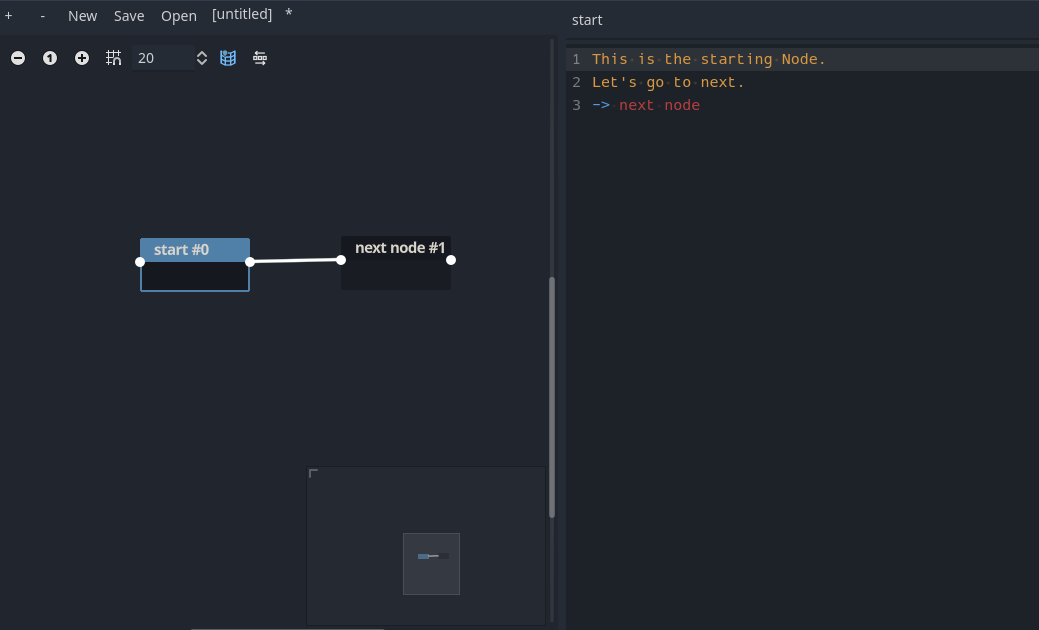
You can transition and begin processing the desired node with a simple go to command with a syntax -> node name.
Remember I mentioned you should make sure the node name is unique? It's because of this, the system will try to search for a case-insensitive node name matching the target of the -> command.

Player Choices
You can present choices with a choice(?>) command with a syntax:
?> choice text to show to player -> target nodethe text "Choice ttext to show to player" will be displayed as an option for your player,
and the result of selecting the choice is -> target node, where the system would transition and begin processing the dialogue node named "target node" in this example.
While I believe most of the post-choice selection logic should be handled in the new node, you still have the option to execute commands before transitioning (or not transition at all) by using brackets {}:
?> some choice txt {
    nice choice
    signal(set,variable,2)
    -> next node
}
In the above example, when the choice "some choice txt" is selected, the system would execute the commands surrounded by the brackets:
- display text "nice choice"
- emit custom signal with signal parameter "set,variable,2"
- transition to a node named "next node"
NOTE Sometimes you might want to have an "empty" choice to immediately end the dialogue after the player made a choice. You can make your prompt "do nothing" with the format
?> choice text {}.
Conditional
To display or transition based on a state condition, you can use the conditional statement with a command $if [condition] {...} $else {...}
Here's an example of displaying 2 different message based on the value of the state variable named "roll":

As with #player-choices , you can nest and include as many commands as you want within the brackets.. However, as of right now, I cannot guarantee that it would function 100% until further development :)
Custom Commands
The EzDialogue manager uses the signal pattern that Godot is familiar with. Anytime the dialogue sees a pattern of signal(some value), a signal is emitted from the dialogue handler with values in between the parenthesis as the signal value.
Fortunately (unfortunately), the way Godot handles signal is still synchronous, so the headache of having to race between the next part of the dialogue being processed vs your custom signal processing should not have to be a problem.
Some examples, I personally use for custom signal are : setting values of the variable, triggering animation/effect/sound, and etc.
Escape Commands
You can escape any of the above "special" reserved commands and words with a single backslash to display them as plain text.
For example the following dialogue script:
\$if you wish to see me {
    call me.
}
would be displayed as:
"$if you wish to see me { call me. }"
instead of being interpretted as $if command.
How to Load Dialogue in Game
This section is an instruction on how you can load and use the dialogue resource created from EzDialogue editor tab.
Here are basic concepts in how the dialogue handler node works.
- In the Scene find and add
EzDialogueNode. - In the Script of your game logic, load JSON resource containing the desired Dialogue information (generated by EzDialogue Editor)
- Call
start_dialogue(dialogue: JSON, state: Dictionary, starting_node = "start")function ofEzDialoguenode. - Handle signals from
EzDialoguenameddialogue_generatedfor dialogue to display, andcustom_signal_receivedfor when the dialogue reaches a line with your custom signal. - If the Dialogue response contains
choicesproperty, select the index of the choice item you want to proceed with. - Call
next(choice_index: int)from EzDialogue Node, ommittingchoice_indexif no choice is expected. go to step 4 and repeat. - If the signal
end_of_dialogue_reached, there is no more dialogue to read in the current file. Therefore, end of the dialogue.
For a basic and complete implementation of this see demo in ./crpg_dialogue_demo
Design Goals and Future Plans
I believe between custom signal and other basic dialogue commands, there's a "round about" way to do pretty much anything one would desire. However, some of the "round about" solution might end up being very inconvenient, and I would like to resolve them as they come up. So, please feel free to share any thoughts and suggestions.
As of right now, the immediate items on the roadmap are biased towards usage in my own game.
I personally believe writing as much as you can without taking short cuts in narrative is the best player experience. So, I want to develop the tool towards helping with that goal in mind.
I do not wish for this tool to start over-reaching into another programming/scripting language, but focused on the goal of "writing dialogues and branch in full depth where nothing but my own creativity blocks the process."
Having said this, my future features are:
- TAG in nodes to both quickly filter/search nodes I need to fix/continue writing.
- Flow reference - When in any given node, be able to quickly see what nodes could potentially reach the current node.
- Jump to earliest uhnadled branch - this is to pre plan a split and keep writing depth first for one specific branch and be able to retur nto the starting point and start writing next branch until all the branch has been handled.
- Syntax highlighting hardening (currently syntax highlighting of the format in the editor isn't really complete...)
- Bugs - there are bugs- some minor some major. While I really wish to provide support for the community to fix all the relevant bugs, unless I somehow find funding to spend extra time and effort on this tool - I would have to bias towards dealing with a "work around" if it exists and only a blocking bug for my own project would see a fix.