ST7735 FrameBuffer for Raspberry Pi
The ST7735 is a single-chip controller/driver for 262K-color, graphic type TFT-LCD, which can be picked up on eBay relatively cheaply with pin-outs on a break-out board.

Tested working with Rev B 512Mb Rasberry Pi (Raspbian "Wheezy" & latest kernel sources - 3.8.11+). A couple of video demos are available here:
Further technical details for the LCD screen can be found in the datasheet [PDF]. Other documentation can also be found in docs/tech-spec.
Building and installing the frame buffer driver
-
On the Raspberry Pi, enable SPI: edit
/etc/modprobe.d/raspi-blacklist.confto comment out blacklisting of _spibcm2708. -
Ensure that the latest firmware has been applied to the Raspberry Pi. Use the updater from https://github.com/Hexxeh/rpi-update to perform the update (use the BRANCH=next prefix). After rebooting, confirm the kernel version as follows (digits xx and yyy dont matter too much):
$ uname -a Linux raspberrypi 3.8.xx+ #yyy PREEMPT ... -
Ensure the gcc build tools are installed on a host PC (it is much quicker to cross-compile on an x86 linux machine than build the kernel on the RPi):
$ sudo apt-get install make build-essential ncurses-dev git-core -
Download the kernel sources with the ST7735 drivers:
$ mkdir ~/RPi $ cd ~/RPi $ git clone https://github.com/rm-hull/raspberrypi-linux.git $ git checkout rpi-3.8.y+rmh-st7735fb -
Download the cross-compiler tools:
$ cd ~/RPi $ git clone git://github.com/raspberrypi/tools.git -
Follow the instructions for building a cross-compiled kernel here. Note that when the guide refers to
.config, this is provided asetc/config.gzin git.Let's assume that the tools are installed in
~/RPi/tools, and the kernel source is~/RPi/raspberrypi-linux. Briefly the compile steps are:$ cd ~/RPi $ export CCPREFIX=~/RPi/tools/arm-bcm2708/arm-bcm2708hardfp-linux-gnueabi/bin/arm-linux-gnueabi- $ export MODULES_TEMP=~/RPi/modules $ wget https://github.com/rm-hull/st7735fb/raw/master/etc/config.gz $ cd raspberrypi-linux $ make mrproper $ zcat config.gz > raspberrypi-linux/.config $ make ARCH=arm CROSS_COMPILE=${CCPREFIX} oldconfig $ make ARCH=arm CROSS_COMPILE=${CCPREFIX} -j 6 $ make ARCH=arm CROSS_COMPILE=${CCPREFIX} INSTALL_MOD_PATH=${MODULES_TEMP} modules_install
Once compiled, scp the arch/arm/boot/zImage over the /boot/kernel.img on the Raspberry Pi (make a backup first).
Next copy the ~/RPi/modules/lib/modules/3.8.11+ directory to /lib/modules/3.8.11+ on the device (again move the
existing directory out of the way first).
On rebooting, you should get a second frame buffer at /dev/fb1, and the screen should present a nice gradient pattern.
Break-out board pin-outs
There appear to be a large number of break-out boards available for this device; this is the one I have, with an additional SD card slot:
| TFT Pin | Name | Remarks | RPi Pin | RPi Function | Wire color |
|---|---|---|---|---|---|
| 1 | GND | Ground | 6 | GND | Black |
| 2 | VCC | Power | 1 | 3V3 | Red |
| 3 | NC | ||||
| 4 | NC | ||||
| 5 | NC | ||||
| 6 | RESET | Set low to reset | 18 | GPIO 24 | Blue* |
| 7 | A0 | Data/command select (aka DC or 'register select') | 16 | GPIO 23 | Grey* |
| 8 | SDA | SPI data | 19 | GPIO 10 (MOSI) | Orange |
| 9 | SCK | SPI clock | 23 | GPIO 11 (SPI CLK) | Brown |
| 10 | CS | SPI chip select - set low | 24 | GPIO 8 (SPI CS0) | Green |
| 11 | SD-SCK | SD serial clock | |||
| 12 | SD-MISO | SD master in, slave out | |||
| 13 | SD-MOSI | SD master out, slave in | |||
| 14 | SD-CS | SD chip select | |||
| 15 | LED+ | Backlight control 3V3 - 3V7, already fitted with 10K resistor? | 1 | 3V3 | Red |
| 16 | LED- | Backlight ground | 6 | GND | Black |
*-not shown on stripboard layout below - direct track connection.
Stripboard Layout
With 4 push-buttons, resistor values 10K.
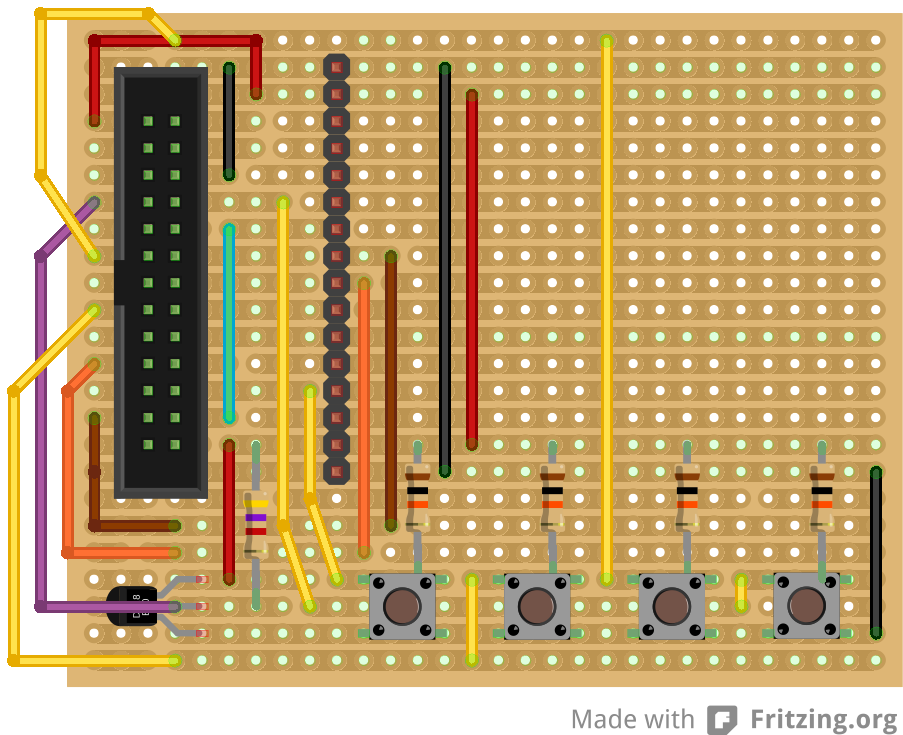
Buttons (from left to right) are wired onto BCM pins as follows:
- GPIO 22
- GPIO 25
- GPIO 17
- GPIO 14 (TxD)
Also: Dallas Semiconductors DS18B20 digital thermometer, wired onto GPIO 4, with 4.7K pull-up resistor. See separate usage note here.
Testing
mplayer
scale is used because the movie is larger than most small displays. -3 means keep aspect ratio and calculate height.
$ sudo mplayer -nolirc -vo fbdev2:/dev/fb1 -vf scale=156:-3,rotate=2 examples/video/bird-is-the-word.mp4 Image viewer
$ FRAMEBUFFER=/dev/fb1 fim examples/images/tux-small.pngUsing the LCD as a console device
To use the display as a console, the kernel must be re-compiled with the BCM SPI & ST7735 drivers 'baked in'
rather than as separate modules (the config settings above do this); add this to the end of the line in
/boot/cmdline.txt
fbcon=map:10 fbcon=rotate:3 fbcon=font:MINI4x6See fbcon doc for more info.
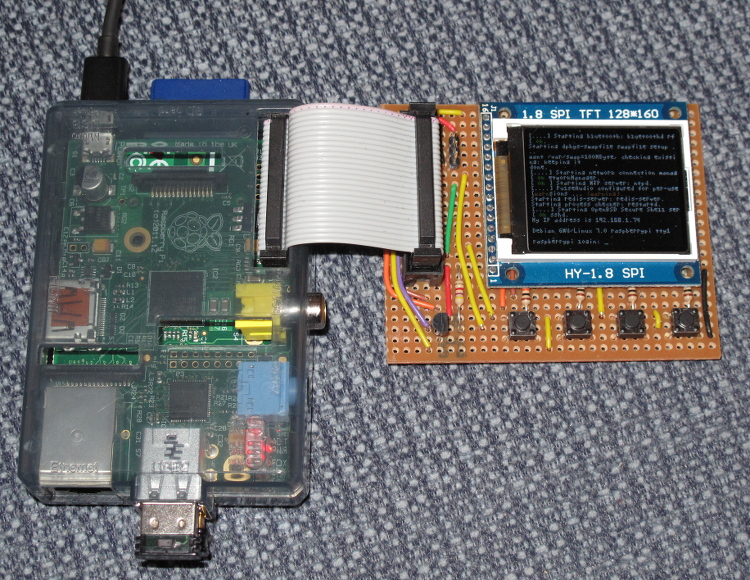
And the finished article:
Examples
The framebuffer is owned by root, so first:
$ sudo -s
$ export FRAMEBUFFER=/dev/fb1
To demo the maze generator:
$ python maze.pyCopper bar animation:
$ python copper_bar.pySnake game (needs Wii Remote and bluetooth enabled):
$ python snake.pyTODO
-
Extended documentation
-
Improve build instructions
-
Example code (SDL / Python)
References
-
http://elinux.org/Rpi_Low-level_peripherals#General_Purpose_Input.2FOutput_.28GPIO.29
-
http://www.sitronix.com.tw/sitronix/product.nsf/Doc/ST7735?OpenDocument
-
http://www.raspberrypi.org/phpBB3/viewtopic.php?t=28696&p=262909
-
http://elinux.org/images/1/19/Passing_Time_With_SPI_Framebuffer_Driver.pdf
-
http://harizanov.com/product/1-8-tft-display-for-raspberry-pi/