CadQuery Server
This project is no longer actively supported. You might be interested by vscode OCP CAD viewer, an extension to show CadQuery and build123d objects in VS Code via the three-cad-viewer viewer component. You can also contact me if you want to continue to maintain this project.
A web server used to render 3d models from CadQuery code, and eventually build a static website as a showcase for your projects.
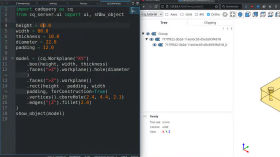
Example usage with Kate on the left and Firefox on the right:

Demonstration video:
About CadQuery Server
Features
- build-in static website builder
- fast response time
- multi-file support
- built-in file-watcher
- live-reload
- use your favorite text editor or IDE
- display model on an external monitor or other device
- compatible with VSCode built-in browser
- options to customize ui
Functionning
CadQuery Server dynamically loads your CadQuery code and renders the model on the browser using three-cad-viewer (the same used in jupyter-cadquery). It includes a file watcher that reloads the Python code and updates the web page when the file is updated.
This approach allows users to work on any IDE, and render the model on any web browser. It also allow them to display the model in an other monitor, or even in an other computer on the same local network (for instance a tablet on your desktop).
The project was originally started for the VSCode extension, but since it doesn't depend on VSCode anymore, it's now a project as it own.
About CadQuery
From the CadQuery readme:
CadQuery is an intuitive, easy-to-use Python module for building parametric 3D CAD models. Using CadQuery, you can write short, simple scripts that produce high quality CAD models. It is easy to make many different objects using a single script that can be customized.
Read CadQuery documentation for more information about CadQuery and its usage.
Installation
Create a virtual environment (recommended)
python -m venv .venv
source .venv/bin/activate
Upgrade pip and setuptools
pip install --upgrade pip setuptoolsInstall with pip
If you already have CadQuery installed on your system:
pip install cadquery-serverIf you want to install both cq-server and CadQuery:
pip install 'cadquery-server[cadquery]'Install with Docker
docker pull cadquery/cadquery-serverThen add a volume and port when running the container. Typically:
docker run -p 5000:5000 -v $(pwd)/examples:/data cadquery/cadquery-serverWhere examples is in your current directory and contains CadQuery scripts.
Install from sources
git clone https://github.com/roipoussiere/cadquery-server.git
cd cadquery-server
If you already have CadQuery installed on your system:
pip install .If you want to install both cq-server and CadQuery:
pip install '.[cadquery]'Usage
Once installed, the cq-server command should be available on your system (or on your virtual env).
CLI usage is detailled here but might be not up to date. Type cq-server -h to get last instructions.
Global options
-h,--help: show main cq-server help message and exit-V,--version: print CadQuery Server version and exit
run
Run the server
Usage
cq-server run [-h] [-p PORT] [-r] [-d] [ui options] [target]Positional arguments
target: python file or folder containing CadQuery script to load (default: ".")
Options
-h,--help: show the help message of the run command and exit-p PORT,--port PORT: server port (default: 5000)-r,--raise: when an error happen, raise it instead showing its title-d,--dead: disable live reloading
As well as the UI options, listed in the dedicated section below.
Examples
cq-server run # run cq-server with current folder as target on port 5000
cq-server run -p 8080 ./examples # run cq-server with "examples" as target on port 8080
cq-server run ./examples/box.py # run cq-server with only box.py as target
build
Build static website
Usage
cq-server build [-h] [-f FMT] [-m] [ui options] [target] [destination]Positional arguments
target: python file or folder containing CadQuery script to load (default: ".")destination: output file path (default:<module_name>.html), or-for stdout
Options
-h,--help: show the help message of the build command and exit-f FMT,--format FMT: output format: html, json, step, xml, gltf, vtkjs, vrml, dxf, svg, stl, amf, tjs, vtp, 3mf, png, pdf (default: file extension, or html if not given)-m,--minify: minify output when exporting to html
As well as the UI options, listed in the dedicated section below.
Examples
cq-server build examples docs # build website of "example" project in "docs"
cq-server build examples/box.py # build web page of box.py in examples/box.html
cq-server build examples/box.py -f stl # build stl file in examples/box.stl
cq-server build examples/box.png build # build web page in build/box.html
cq-server build examples/box.png build/box.step # build step file in build/box.step
info
Show information about the current target and exit
Usage
cq-server info [-h] [target]Positional arguments
target: python file or folder containing CadQuery script to load (default: ".")
UI options
You can configure the user interface via CLI options:
--ui-hide: a comma-separated list of buttons to disable, among:axes,axes0,grid,ortho,more,helpandall--ui-glass: activate tree view glass mode--ui-theme: set ui theme,lightordark(default: browser config)--ui-trackball: set control mode to trackball instead orbit--ui-perspective: set camera view to perspective instead orthogonal--ui-grid: display a grid in specified axes (x,y,z,xy, etc.)--ui-transparent: make objects semi-transparent--ui-black-edges: make edges black
Writing a CadQuery code
CadQuery Server renders the model defined in the show_object() function (like in CadQuery Editor).
You must import it before from the cq_server.ui module, among with the UI class, which is used by the server to load the model.
Minimal working example:
import cadquery as cq
from cq_server.ui import ui, show_object

show_object(cq.Workplane('XY').box(1, 2, 3))
Please read the CadQuery documentation for more details about the CadQuery library.
Added Python functions
cq_server.ui module tend to be as compatible as possible to the CQ Editor behaviour and thus accept the same Python functions:
show_object()
Tell CQ server to render this object in the UI. Can be used several times.
Parameters:
name: the name of the object, displayed in the UI tree viewoptions: a dictionary of options, as:alpha: the alpha value of the object, between 0 and 1color: object color, can be defined as:- an html color name (
red,khaki, etc.) - a tuple of 3 or 4 numbers between 0 and 1
- a CQ
Colorobject
debug
Same as show_object() but predefined to a semi-transparent red.
Using the web server
Once the server is started, go to its url (ie. http://127.0.0.1:5000).
Other endpoints:
/json: returns the model as a threejs json object. Used internally to retrieve the model;/html: returns a static html page that doesn't require the CadQuery Server running.
Optional url parameters, available for all listed endpoints:
m: name of module to load (if target is a folder)
Examples: /?m=box, /json?m=box, /html?m=box.
Integration with VSCode
The web page can be displayed within VSCode IDE using LivePreview extension:
- install the LivePreview VSCode extension;
- hit
ctrl+shift+P-> Simple Browser: Show; - update the url according to your running CadQuery server instance (ie.
127.0.0.1:5000).
Publish a website to GitHub pages
You have a repository published on GitHub containing code CadQuery you want to share.
You could setup a CI to publish your website using the Docker image, but you might eventually edit your CI config it each time you have a new project dependency. Thus this section will explain how to publish it manually (but do what you want).
-
Using the
buildcommand, build the static website in/docs:cq-server build ./examples docs
Note that the folder name must be /docs in order to publish to GitHub pages.
- Add your website folder to .gitignore:
# Static website generated by cadquery-server
/docs-
Create a new orphan branch named
gh-pages:gc --orphan gh-pages
-
In this branch, replace the .gitignore file by this:
# ignore all...
/*

# ...except build folder and gitignore
!/docs
!.gitignore-
Push your website branch
git add . git commit -m 'update website' git push origin gh-pages
-
Configure GitHub:
From your project page: Settings, Pages (side bar), then:
- Source: deploy from a branch
- Branch:
gh-pages,/docs
Then save. Wait few minutes and then you can go visit your website at https://user_name.github.io/project_name/. Congratulations!
-
To update your website, repeat step 1, 3 and 5:
cq-server build ./examples docs gc gh-pages git add . git commit -m 'update website' git push