FastSD CPU :sparkles:
FastSD CPU is a faster version of Stable Diffusion on CPU. Based on Latent Consistency Models and Adversarial Diffusion Distillation.
 The following interfaces are available :
- Desktop GUI, basic text to image generation (Qt,faster)
- WebUI (Advanced features,Lora,controlnet etc)
- CLI (CommandLine Interface)
🚀 Using OpenVINO(SDXS-512-0.9), it took 0.82 seconds (820 milliseconds) to create a single 512x512 image on a Core i7-12700.
Table of Contents
- Supported Platforms
- Dependencies
- Memory requirements
- Features
- Benchmarks
- OpenVINO Support
- Installation
- AI PC Support - OpenVINO
- GGUF support (Flux)
- Real-time text to image (EXPERIMENTAL)
- Models
- How to use Lora models
- How to use controlnet
- Android
- Raspberry Pi 4
- Orange Pi 5
- API Support
- License
- Contributors
Supported platforms⚡️
FastSD CPU works on the following platforms:
- Windows
- Linux
- Mac
- Android + Termux
- Raspberry PI 4
Dependencies
- Python 3.10 or Python 3.11 (Please ensure that you have a working Python 3.10 or Python 3.11 installation available on the system)
Memory requirements
Minimum system RAM requirement for FastSD CPU.
Model (LCM,OpenVINO): SD Turbo, 1 step, 512 x 512
Model (LCM-LoRA): Dreamshaper v8, 3 step, 512 x 512
| Mode | Min RAM |
|---|---|
| LCM | 2 GB |
| LCM-LoRA | 4 GB |
| OpenVINO | 11 GB |
If we enable Tiny decoder(TAESD) we can save some memory(2GB approx) for example in OpenVINO mode memory usage will become 9GB.
:exclamation: Please note that guidance scale >1 increases RAM usage and slow inference speed.
Features
- Desktop GUI, web UI and CLI
- Supports 256,512,768,1024 image sizes
- Supports Windows,Linux,Mac
- Saves images and diffusion setting used to generate the image
- Settings to control,steps,guidance and seed
- Added safety checker setting
- Maximum inference steps increased to 25
- Added OpenVINO support
- Fixed OpenVINO image reproducibility issue
- Fixed OpenVINO high RAM usage,thanks deinferno
- Added multiple image generation support
- Application settings
- Added Tiny Auto Encoder for SD (TAESD) support, 1.4x speed boost (Fast,moderate quality)
- Safety checker disabled by default
- Added SDXL,SSD1B - 1B LCM models
- Added LCM-LoRA support, works well for fine-tuned Stable Diffusion model 1.5 or SDXL models
- Added negative prompt support in LCM-LoRA mode
- LCM-LoRA models can be configured using text configuration file
- Added support for custom models for OpenVINO (LCM-LoRA baked)
- OpenVINO models now supports negative prompt (Set guidance >1.0)
- Real-time inference support,generates images while you type (experimental)
- Fast 2,3 steps inference
- Lcm-Lora fused models for faster inference
- Supports integrated GPU(iGPU) using OpenVINO (export DEVICE=GPU)
- 5.7x speed using OpenVINO(steps: 2,tiny autoencoder)
- Image to Image support (Use Web UI)
- OpenVINO image to image support
- Fast 1 step inference (SDXL Turbo)
- Added SD Turbo support
- Added image to image support for Turbo models (Pytorch and OpenVINO)
- Added image variations support
- Added 2x upscaler (EDSR and Tiled SD upscale (experimental)),thanks monstruosoft for SD upscale
- Works on Android + Termux + PRoot
- Added interactive CLI,thanks monstruosoft
- Added basic lora support to CLI and WebUI
- ONNX EDSR 2x upscale
- Add SDXL-Lightning support
- Add SDXL-Lightning OpenVINO support (int8)
- Add multilora support,thanks monstruosoft
- Add basic ControlNet v1.1 support(LCM-LoRA mode),thanks monstruosoft
- Add ControlNet annotators(Canny,Depth,LineArt,MLSD,NormalBAE,Pose,SoftEdge,Shuffle)
- Add SDXS-512 0.9 support
- Add SDXS-512 0.9 OpenVINO,fast 1 step inference (0.8 seconds to generate 512x512 image)
- Default model changed to SDXS-512-0.9
- Faster realtime image generation
- Add NPU device check
- Revert default model to SDTurbo
- Update realtime UI
- Add hypersd support
- 1 step fast inference support for SDXL and SD1.5
- Experimental support for single file Safetensors SD 1.5 models(Civitai models), simply add local model path to configs/stable-diffusion-models.txt file.
- Add REST API support
- Add Aura SR (4x)/GigaGAN based upscaler support
- Add Aura SR v2 upscaler support
- Add FLUX.1 schnell OpenVINO int 4 support
- Add CLIP skip support
- Add token merging support
- Add Intel AI PC support
- AI PC NPU(Power efficient inference using OpenVINO) supports, text to image ,image to image and image variations support
- Add TAEF1 (Tiny autoencoder for FLUX.1) openvino support
Fast Inference Benchmarks
🚀 Fast 1 step inference with Hyper-SD
Stable diffuion 1.5
Works with LCM-LoRA mode.
Fast 1 step inference supported on runwayml/stable-diffusion-v1-5 model,select rupeshs/hypersd-sd1-5-1-step-lora lcm_lora model from the settings.
Stable diffuion XL
Works with LCM and LCM-OpenVINO mode.
-
Hyper-SD SDXL 1 step - rupeshs/hyper-sd-sdxl-1-step
-
Hyper-SD SDXL 1 step OpenVINO - rupeshs/hyper-sd-sdxl-1-step-openvino-int8
Inference Speed
Tested on Core i7-12700 to generate 768x768 image(1 step).
| Diffusion Pipeline | Latency |
|---|---|
| Pytorch | 19s |
| OpenVINO | 13s |
| OpenVINO + TAESDXL | 6.3s |
Fastest 1 step inference (SDXS-512-0.9)
:exclamation:This is an experimental model, only text to image workflow is supported.
Inference Speed
Tested on Core i7-12700 to generate 512x512 image(1 step).
SDXS-512-0.9
| Diffusion Pipeline | Latency |
|---|---|
| Pytorch | 4.8s |
| OpenVINO | 3.8s |
| OpenVINO + TAESD | 0.82s |
🚀 Fast 1 step inference (SD/SDXL Turbo - Adversarial Diffusion Distillation,ADD)
Added support for ultra fast 1 step inference using sdxl-turbo model
:exclamation: These SD turbo models are intended for research purpose only.
Inference Speed
Tested on Core i7-12700 to generate 512x512 image(1 step).
SD Turbo
| Diffusion Pipeline | Latency |
|---|---|
| Pytorch | 7.8s |
| OpenVINO | 5s |
| OpenVINO + TAESD | 1.7s |
SDXL Turbo
| Diffusion Pipeline | Latency |
|---|---|
| Pytorch | 10s |
| OpenVINO | 5.6s |
| OpenVINO + TAESDXL | 2.5s |
🚀 Fast 2 step inference (SDXL-Lightning - Adversarial Diffusion Distillation)
SDXL-Lightning works with LCM and LCM-OpenVINO mode.You can select these models from app settings.
Tested on Core i7-12700 to generate 768x768 image(2 steps).
| Diffusion Pipeline | Latency |
|---|---|
| Pytorch | 18s |
| OpenVINO | 12s |
| OpenVINO + TAESDXL | 10s |
-
SDXL-Lightning - rupeshs/SDXL-Lightning-2steps
-
SDXL-Lightning OpenVINO - rupeshs/SDXL-Lightning-2steps-openvino-int8
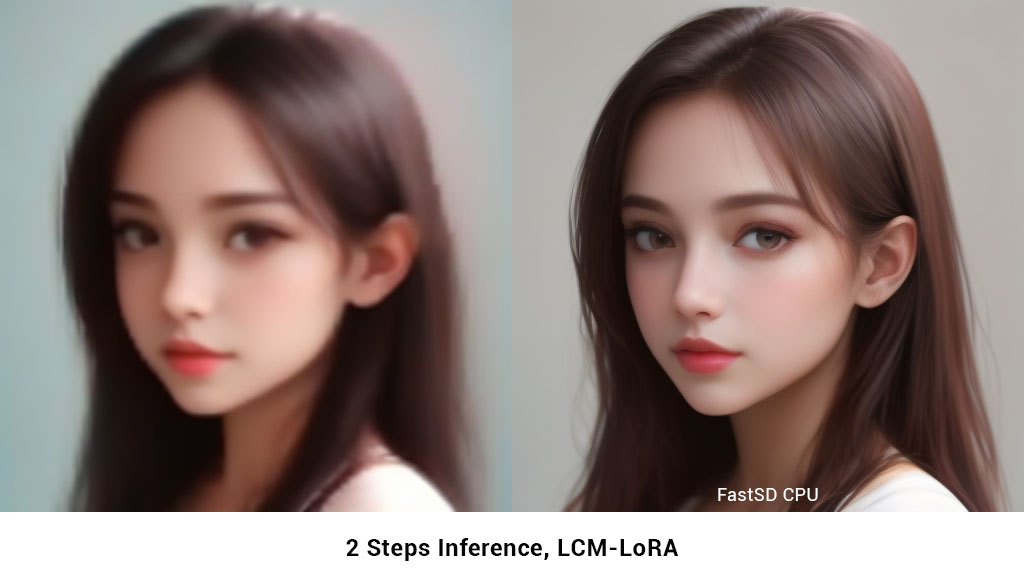
2 Steps fast inference (LCM)
FastSD CPU supports 2 to 3 steps fast inference using LCM-LoRA workflow. It works well with SD 1.5 models.
FLUX.1-schnell OpenVINO support
:exclamation: Important - Please note the following points with FLUX workflow
- As of now only text to image generation mode is supported
- Use OpenVINO mode
- Use int4 model - rupeshs/FLUX.1-schnell-openvino-int4
- 512x512 image generation needs around 30GB system RAM
Tested on Intel Core i7-12700 to generate 512x512 image(3 steps).
| Diffusion Pipeline | Latency |
|---|---|
| OpenVINO | 4 min 30sec |
Benchmark scripts
To benchmark run the following batch file on Windows:
benchmark.bat- To benchmark Pytorchbenchmark-openvino.bat- To benchmark OpenVINO
Alternatively you can run benchmarks by passing -b command line argument in CLI mode.
OpenVINO support
Fast SD CPU utilizes OpenVINO to speed up the inference speed. Thanks deinferno for the OpenVINO model contribution. We can get 2x speed improvement when using OpenVINO. Thanks Disty0 for the conversion script.
OpenVINO SDXL models
These are models converted to use directly use it with FastSD CPU. These models are compressed to int8 to reduce the file size (10GB to 4.4 GB) using NNCF
- Hyper-SD SDXL 1 step - rupeshs/hyper-sd-sdxl-1-step-openvino-int8
- SDXL Lightning 2 steps - rupeshs/SDXL-Lightning-2steps-openvino-int8
OpenVINO SD Turbo models
We have converted SD/SDXL Turbo models to OpenVINO for fast inference on CPU. These models are intended for research purpose only. Also we converted TAESDXL MODEL to OpenVINO and
- SD Turbo OpenVINO - rupeshs/sd-turbo-openvino
- SDXL Turbo OpenVINO int8 - rupeshs/sdxl-turbo-openvino-int8
- TAESDXL OpenVINO - rupeshs/taesdxl-openvino
You can directly use these models in FastSD CPU.
Convert SD 1.5 models to OpenVINO LCM-LoRA fused models
We first creates LCM-LoRA baked in model,replaces the scheduler with LCM and then converts it into OpenVINO model. For more details check LCM OpenVINO Converter, you can use this tools to convert any StableDiffusion 1.5 fine tuned models to OpenVINO.
Intel AI PC support - OpenVINO (CPU, GPU, NPU)
Fast SD now supports AI PC with Intel® Core™ Ultra Processors. To learn more about AI PC and OpenVINO.
GPU
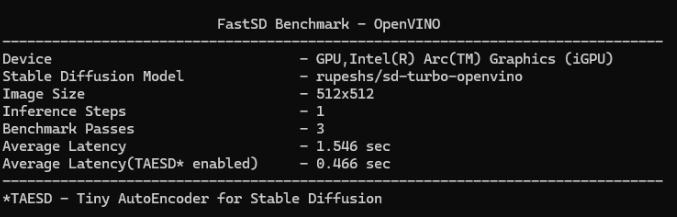
For GPU mode set device=GPU and run webui. FastSD GPU benchmark on AI PC as shown below.
NPU
FastSD CPU now supports power efficient NPU (Neural Processing Unit) that comes with Intel Core Ultra processors.
FastSD tested with following Intel processor's NPUs:
- Intel Core Ultra Series 1 (Meteor Lake)
- Intel Core Ultra Series 2 (Lunar Lake)
Currently FastSD support this model for NPU rupeshs/sd15-lcm-square-openvino-int8.
Supports following modes on NPU :
- Text to image
- Image to image
- Image variations
To run model in NPU follow these steps (Please make sure that your AI PC's NPU driver is the latest):
- Start webui
- Select LCM-OpenVINO mode
- Select the models settings tab and select OpenVINO model
rupeshs/sd15-lcm-square-openvino-int8 - Set device envionment variable
set DEVICE=NPU - Now it will run on the NPU
This is heterogeneous computing since text encoder and Unet will use NPU and VAE will use GPU for processing. Thanks to OpenVINO.
Please note that tiny auto encoder will not work in NPU mode.
Thanks to Intel for providing AI PC dev kit and Tiber cloud access to test FastSD, special thanks to Pooja Baraskar,Dmitriy Pastushenkov.
GGUF support - Flux
GGUF Flux model supported via stablediffusion.cpp shared library. Currently Flux Schenell model supported.
To use GGUF model use web UI and select GGUF mode.
Tested on Windows and Linux.
:exclamation: Main advantage here we reduced minimum system RAM required for Flux workflow to around 12 GB.
Supported mode - Text to image
How to run Flux GGUF model
-
Download stablediffusion.cpp prebuilt shared library and place it inside fastsdcpu folder For Windows users, download stable-diffusion.dll
For Linux users download libstable-diffusion.so
You can also build the library manully by following the guide "Build stablediffusion.cpp shared library for GGUF flux model support"
-
Download diffusion model from flux1-schnell-q4_0.gguf and place it inside
models/gguf/diffusiondirectory -
Download clip model from clip_l_q4_0.gguf and place it inside
models/gguf/clipdirectory -
Download T5-XXL model from t5xxl_q4_0.gguf and place it inside
models/gguf/t5xxldirectory -
Download VAE model from ae.safetensors and place it inside
models/gguf/vaedirectory -
Start web UI and select GGUF mode
-
Select the models settings tab and select GGUF diffusion,clip_l,t5xxl and VAE models.
-
Enter your prompt and generate image
Build stablediffusion.cpp shared library for GGUF flux model support(Optional)
To build the stablediffusion.cpp library follow these steps
git clone https://github.com/leejet/stable-diffusion.cppcd stable-diffusion.cppgit pull origin mastergit submodule initgit submodule updategit checkout 14206fd48832ab600d9db75f15acb5062ae2c296cmake . -DSD_BUILD_SHARED_LIBS=ONcmake --build . --config Release- Copy the stablediffusion dll/so file to fastsdcpu folder
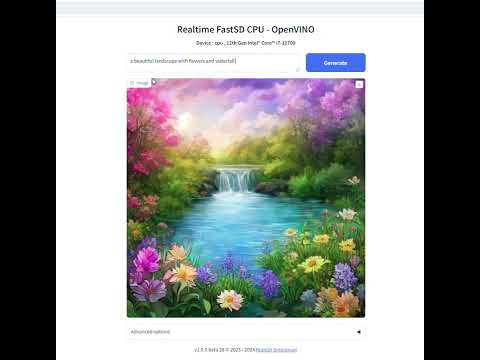
Real-time text to image (EXPERIMENTAL)
We can generate real-time text to images using FastSD CPU.
CPU (OpenVINO)
Near real-time inference on CPU using OpenVINO, run the start-realtime.bat batch file and open the link in browser (Resolution : 512x512,Latency : 0.82s on Intel Core i7)
Watch YouTube video :
Models
To use single file Safetensors SD 1.5 models(Civit AI) follow this YouTube tutorial. Use LCM-LoRA Mode for single file safetensors.
Fast SD supports LCM models and LCM-LoRA models.
LCM Models
These models can be configured in configs/lcm-models.txt file.
OpenVINO models
These are LCM-LoRA baked in models. These models can be configured in configs/openvino-lcm-models.txt file
LCM-LoRA models
These models can be configured in configs/lcm-lora-models.txt file.
- lcm-lora-sdv1-5 - distilled consistency adapter for runwayml/stable-diffusion-v1-5
- lcm-lora-sdxl - Distilled consistency adapter for stable-diffusion-xl-base-1.0
- lcm-lora-ssd-1b - Distilled consistency adapter for segmind/SSD-1B
These models are used with Stablediffusion base models configs/stable-diffusion-models.txt.
:exclamation: Currently no support for OpenVINO LCM-LoRA models.
How to add new LCM-LoRA models
To add new model follow the steps:
For example we will add wavymulder/collage-diffusion, you can give Stable diffusion 1.5 Or SDXL,SSD-1B fine tuned models.
- Open
configs/stable-diffusion-models.txtfile in text editor. - Add the model ID
wavymulder/collage-diffusionor locally cloned path.
Updated file as shown below :
Fictiverse/Stable_Diffusion_PaperCut_Model
stabilityai/stable-diffusion-xl-base-1.0
runwayml/stable-diffusion-v1-5
segmind/SSD-1B
stablediffusionapi/anything-v5
wavymulder/collage-diffusion
Similarly we can update configs/lcm-lora-models.txt file with lcm-lora ID.
How to use LCM-LoRA models offline
Please follow the steps to run LCM-LoRA models offline :
- In the settings ensure that "Use locally cached model" setting is ticked.
- Download the model for example
latent-consistency/lcm-lora-sdv1-5Run the following commands:
git lfs install
git clone https://huggingface.co/latent-consistency/lcm-lora-sdv1-5
Copy the cloned model folder path for example "D:\demo\lcm-lora-sdv1-5" and update the configs/lcm-lora-models.txt file as shown below :
D:\demo\lcm-lora-sdv1-5
latent-consistency/lcm-lora-sdxl
latent-consistency/lcm-lora-ssd-1bHow to use Lora models
Place your lora models in "lora_models" folder. Use LCM or LCM-Lora mode. You can download lora model (.safetensors/Safetensor) from Civitai or Hugging Face E.g: cutecartoonredmond
ControlNet support
We can use ControlNet in LCM-LoRA mode.
Download ControlNet models from ControlNet-v1-1.Download and place controlnet models in "controlnet_models" folder.
Use the medium size models (723 MB)(For example : https://huggingface.co/comfyanonymous/ControlNet-v1-1_fp16_safetensors/blob/main/control_v11p_sd15_canny_fp16.safetensors)
Installation
FastSD CPU on Windows
:exclamation:You must have a working Python installation.(Recommended : Python 3.10 or 3.11 )
To install FastSD CPU on Windows run the following steps :
- Clone/download this repo or download release.
- Double click
install.bat(It will take some time to install,depending on your internet speed.) - You can run in desktop GUI mode or web UI mode.
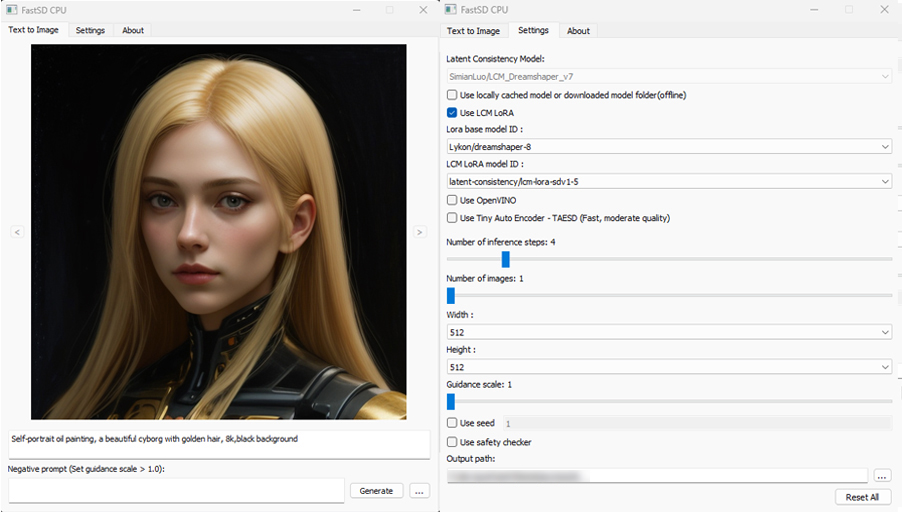
Desktop GUI
- To start desktop GUI double click
start.bat
Web UI
- To start web UI double click
start-webui.bat
FastSD CPU on Linux
:exclamation:Ensure that you have Python 3.9 or 3.10 or 3.11 version installed.
- Clone/download this repo or download release.
- In the terminal, enter into fastsdcpu directory
-
Run the following command
chmod +x install.sh./install.sh
To start Desktop GUI
./start.sh
To start Web UI
./start-webui.sh
FastSD CPU on Mac
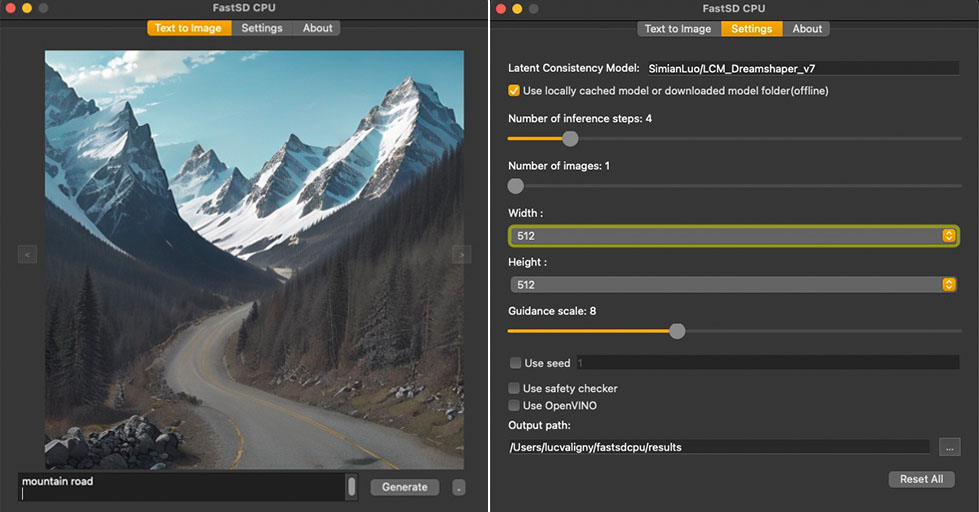
:exclamation:Ensure that you have Python 3.9 or 3.10 or 3.11 version installed.
Run the following commands to install FastSD CPU on Mac :
- Clone/download this repo or download release.
- In the terminal, enter into fastsdcpu directory
-
Run the following command
chmod +x install-mac.sh./install-mac.sh
To start Desktop GUI
./start.sh
To start Web UI
./start-webui.sh
Thanks Autantpourmoi for Mac testing.
:exclamation:We don't support OpenVINO on Mac (M1/M2/M3 chips, but does work on Intel chips).
If you want to increase image generation speed on Mac(M1/M2 chip) try this:
export DEVICE=mps and start app start.sh
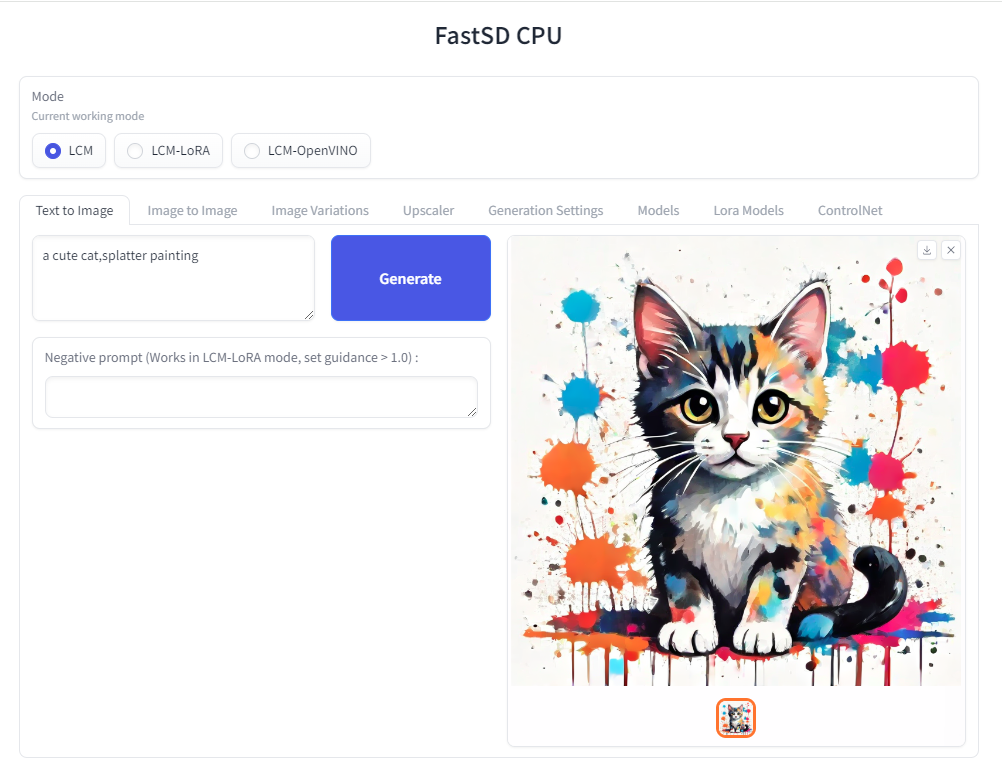
Web UI screenshot

Google Colab
Due to the limitation of using CPU/OpenVINO inside colab, we are using GPU with colab.
![]()
CLI mode (Advanced users)
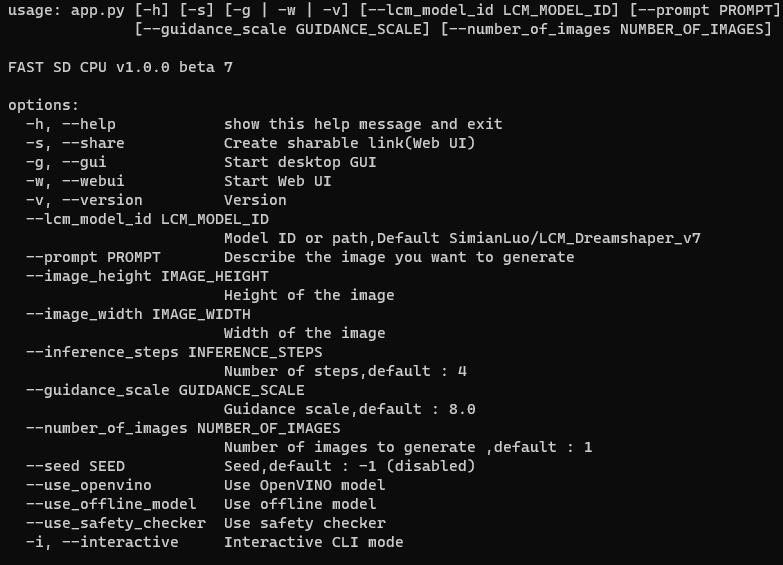
Open the terminal and enter into fastsdcpu folder. Activate virtual environment using the command:
Windows users
(Suppose FastSD CPU available in the directory "D:\fastsdcpu")
D:\fastsdcpu\env\Scripts\activate.bat
Linux users
source env/bin/activate
Start CLI src/app.py -h
Android (Termux + PRoot)
FastSD CPU running on Google Pixel 7 Pro.
![]()
1. Prerequisites
First you have to install Termux and install PRoot. Then install and login to Ubuntu in PRoot.
2. Install FastSD CPU
Run the following command to install without Qt GUI.
proot-distro login ubuntu
./install.sh --disable-gui
After the installation you can use WebUi.
./start-webui.sh
Note : If you get libgl.so.1 import error run apt-get install ffmpeg.
Thanks patienx for this guide Step by step guide to installing FASTSDCPU on ANDROID
Another step by step guide to run FastSD on Android is here
Raspberry PI 4 support
Thanks [WGNW_MGM] for Raspberry PI 4 testing.FastSD CPU worked without problems. System configuration - Raspberry Pi 4 with 4GB RAM, 8GB of SWAP memory.
Orange Pi 5 support
Thanks khanumballz for testing FastSD CPU with Orange PI 5. Here is a video of FastSD CPU running on Orange Pi 5.
API support
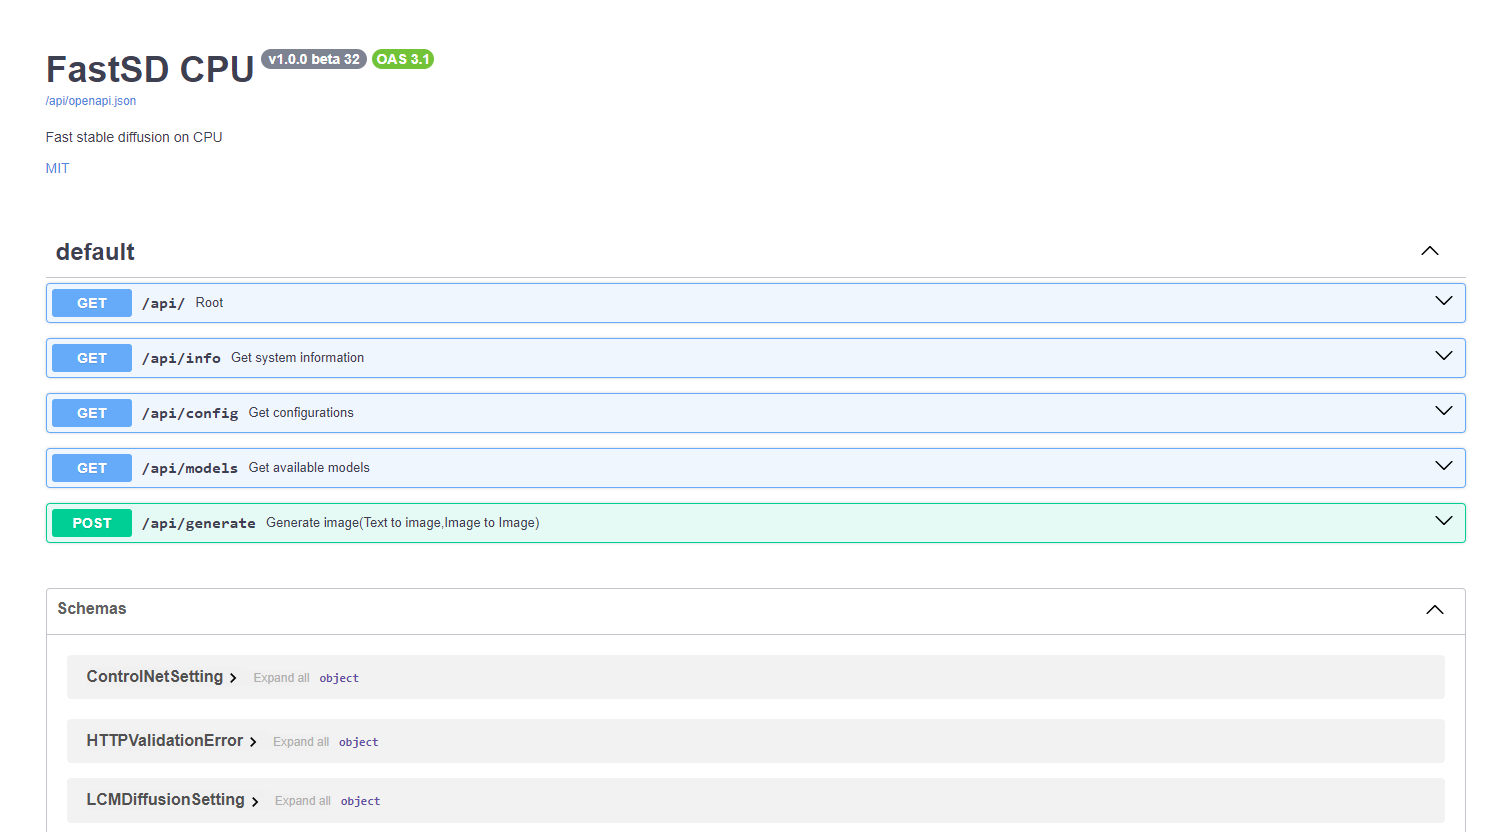
FastSD CPU supports basic API endpoints. Following API endpoints are available :
- /api/info - To get system information
- /api/config - Get configuration
- /api/models - List all available models
- /api/generate - Generate images (Text to image,image to image)
To start FastAPI in webserver mode run:
python src/app.py --api
or use start-webserver.sh for Linux and start-webserver.bat for Windows.
Access API documentation locally at http://localhost:8000/api/docs .
Generated image is JPEG image encoded as base64 string. In the image-to-image mode input image should be encoded as base64 string.
To generate an image a minimal request POST /api/generate with body :
{
    "prompt": "a cute cat",
    "use_openvino": true
}
Known issues
- TAESD will not work with OpenVINO image to image workflow
License
The fastsdcpu project is available as open source under the terms of the MIT license
Disclaimer
Users are granted the freedom to create images using this tool, but they are obligated to comply with local laws and utilize it responsibly. The developers will not assume any responsibility for potential misuse by users.
Thanks to all our contributors
Original Author & Maintainer - Rupesh Sreeraman
We thank all contributors for their time and hard work!