Making a VendingMachineApp
- Step 1
1. iOS 앱을 구성하는 핵심 객체들(UIKit Framework의 핵심 객체들)
-
UIApplication : 시스템으로부터 이벤트를 받아 Custom Objects로 이벤트를 전달하고 상위 레이어의 앱 동작을 조정
- 메인 이벤트 루프와 같은 것들을 담당하는 객체로 앱 상태 변화나 푸시 메세지 도착처럼 특수한 형태의 이벤트를 우리가 정의한 델리게이트 객체에 전달하여 사전에 정의된 메소드를 호출할 수 있도록 한다.
- 아래 App delegate 객체 내의 custom logic들은 UIApplication 객체와 상호작용한다.
-
App Delegate : App의 초기화, 상태변화, 다른 앱의 기타 이벤트를 핸들링
- custom 객체로서 앱 런칭시점에 UIApplicationMain 함수에 의해 생성된다.
-
View Controller : App의 Contents가 화면에 보이게 하는 역할
- 하나의 View Controller 객체는 하나의 뷰와 뷰의 서브뷰를 관리. View Controller 객체는 자신이 관리하는 뷰를 앱의 윈도우에 위치시킴으로써 뷰가 화면에 보여지도록 한다.
- UIViewController클래스는 여러 View Controller 객체들의 부모클래스이며, 기본적으로 뷰를 로딩하고, 화면에 뷰를 보여지게 하고, 뷰를 전환(디바이스 변화에 따른)하는 등의 기본적인 동작들을 지원
-
UIWindow : 화면에 보여지는 뷰 객체들을 조정
- 화면에 보여지는 Contents를 바꾸기 위해서는 View Controller 를 이용해야 한다. 자체로 Contents를 바꾸지 못함.
- UIApplication과의 상호작용을 통해 이벤트를 뷰와 View Controller에 전달
-
View & Control & layer : Contents의 시각적인 표현을 담당
2. App초기화(App Loading Process) 과정 단순화
- App 실행: main() 함수 실행됨
- main(): UIApplicationMain() 호출
- UIApplicationMain(): UIApplication 객체 생성
- UIApplication 객체: Info.plist 파일을 바탕으로 앱에 필요한 데이터와 객체 로드
- AppDelegate 객체 생성 및 UIApplication 객체와 연결
- 이벤트 루프 생성 등 실행에 필요한 준비 진행
- 실행 완료 직전, AppDelegate의
application(_:didFinishLaunchingWithOptions:)메시지 전송
3. iOS 메인 런루프 동작 이해
-
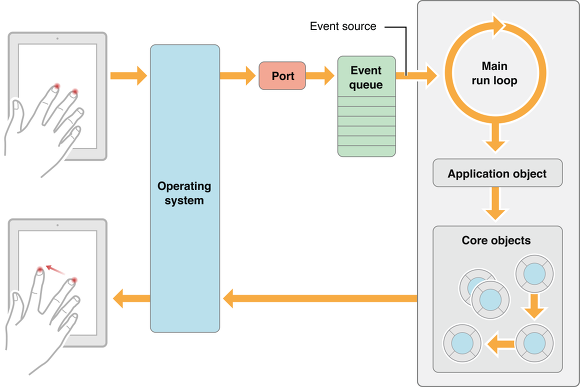
메인 런 루프 : 앱에 들어오는 이벤트들을 애플리케이션 객체가 처리할 수 있도록 계속해서 라우팅하고, 처리결과로 UI와 상태를 업데이트
-
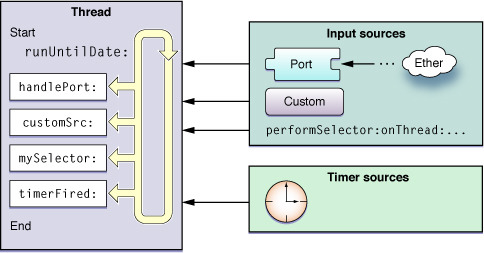
이벤트 처리를 위한 loop로 입력소스와 타이머소스를 주로 처리.
- 입력소스(input source): 다른 thread나 어플리케이션에서 전달되는 메시지 이벤트(비동기식)
- 타이머소스(timer source): 예정시간이나 반복수행간격에 따라 발생하는 이벤트(동기식)
-
사용자 이벤트 발생 및 처리과정
- 이벤트 발생(터치, 키보드 등)
- 시스템에서 port를 통해 앱으로 전달
- 이벤트 큐에 등록
- 이벤트에 맞는 메소드 실행
-
전달받은 이벤트를 앱의 run loop에서 처리하는 과정
- run loop 대기 중 이벤트 발생(주로 입력소스와 타이머소스 처리)
- 정해진 메소드 호출(타이머에서 설정한 시간데 따라)
- 메소드 완료 후 변경될 필요가 있는 사항 적용(뷰의 경우 setNeedsLayout, setNeedsDisplay)
- runUntil- 메소드에서 정한 시간까지 유지, 할일 없으면 suspend 상태.
-
- Step 2

1. IBOutlet Collection 기능에 대해 학습하고 중복되는 아웃렛을 제거한다.
- 중복되는 요소들 중 하나를 View Controller로 끌어서 IBOutletCollection 만듦
- 만든 IBOutletCollection 옆의 동그라미(+) 버튼을 Main.storyboard의 중복되는 요소들로 드래그하여 UI 객체배열 완성
- 각 요소를 구분하기 위한 tag 부여
- IBAction을 하나 만들어서 각 요소와 연결
- IBAction 내에서 IBOutletCollection으로 만든 배열 사용
2. UIImageView 에서 이미지를 표시할 때 사각형 코너를 둥글게하도록 변경해본다.
- Inspector - Drawing - View - clip to Bounds 클릭
- Identity Inspector > User Defined Runtime Attributes에 키 추가 :
- 테두리: layer.borderWidth (Number)
- 테두리색상: layer.borderUIColor (Color)
- 둥근테두리: layer.cornerRadius (Number)
3. Restoration ID (restorationIdentifier)
- restorationIdentifier란? ViewController가 상태복원을 지원할 것인지를 결정하는 식별자
- 용도 : 특정 뷰 컨트롤러와 뷰의 상태를 저장하고 복원하고자 할 때
- 사용방법
- 코드 :
myViewController.restorationIdentifier = "thiedViewController" - 인터페이스 빌더 사용 : 인스펙터 활용
- 코드 :
- Step3
0. Controller에서 AppDelegate 내부에 선언한 변수 접근하기
  //Controller 내부
  //해당 변수 선언
  var aVariable : object!

  //viewDidLoad() 함수 내부 : delegate할당 및 변수 할당
  let appDelegate = UIApplication.shared.delegate as! AppDelegate
  aVariable = appDelegate.value
1. 앱 생명주기(Application Life Cycle) /
- 3가지 실행모드, 5가지 상태, 홈 버튼을 통해 생기는 변화
-
상태변화 : Not running, Active, Inactive, Background, Suspended
-
not runnig : 실행중이지 않던 프로그램이 실행이 된다
-
foreground: 앱이 실행 된다
- (2-1) inactive 사용자 입력 받을 수 없는 상태 ex 알림 떴을때, 시스템 메세지 (베터리 부족합니다 등등)
- (2-2) active 사용자와 교류 가능 상태
-
background 홈버튼 눌러서 내리기 (끈거 x. 코드는 실행되고 있음)
-
suspended 상태 : background로 실행되는 앱은 일정한 이유에 따라 OS가 앱을 끈다. 코드 실행하지 않는 상태로 변경
-
2. 아카이브
- 모델 객체를 저장하는 방법 중 하나로, 객체의 아카이빙은 그 객체의 프로퍼티들을 모두 기록하고, 파일시스템에 그 내용을 저장하는 것을 포함한다.
- 언아카이빙 : 아카이브한 데이터로부터 객체를 다시 만든다.
- 인스턴스들을 아카이방/언아카이빙해야할 클래스들은 모두 NSCoding Protocol을 따라야 한다. 하지만, UIView와 UIViewController는 모두 NSCoding을 이미 따르고 있음.
- 필수 메서드인
encodeWithCoder(_:)와init(coder:)를 구현해야 한다.
3. 사용자 설정값을 저장하는 UserDefault 클래스와 UserDefault 클래스에 저장할 수 있는 데이터 타입
-
UserDefaults란?
- 사용자 설정을 저장하는 용도의 직렬화(plist)
- 저장: UserDefaults.standard.set(data, forKey: MachineStore.Key)
- 불러오기: let data = UserDefaults.standard.data(forKey: MachineStore.Key)
func saveChanges(_ machine : VendingMachine) { let encodedData = NSKeyedArchiver.archivedData(withRootObject: machine) userDefaults.set(encodedData, forKey : "vendingMachine") } func loadMachine() -> VendingMachine? { guard let encodedData = userDefaults.data(forKey: "vendingMachine") else { return nil } guard let archivedMachine = NSKeyedUnarchiver.unarchiveObject(with: encodedData) as? VendingMachine else { return nil } return archivedMachine } - UserDefault 클래스에 저장할 수 있는 데이터 타입
- UserDefaults 클래스는 float, double, 정수, 부울 값 및 URL과 같은 일반적인 유형에 액세스하기 위한 편리한 메소드를 제공한다.
- 기본 객체는 NSData, NSString, NSNumber, NSDate, NSArray 또는 NSDictionary의 인스턴스 (또는 컬렉션, 인스턴스의 조합)의 속성 목록이어야 한다.
- Step4
1. 싱글톤 패턴
-
싱글톤 패턴이란? 매번 똑같은 하나의 인스턴스만 반환하도록 하는 클래스 설계 방식
- 싱글톤 패턴(Singleton Pattern)은 단 하나의 인스턴스(객체 혹은 오브젝트)를 만들어 두고 이를 여러 곳에서 쉽게 액세스 할 수 있게 하는것이 목적이다.
- 특징 : 하나의 인스턴스가 만들어지는 지가 중요하기 때문에, 싱글톤인지 확인하는 과정이 꼭 필요하고 중요하다.
- 확인하는 방법 : 변수에 접근할 때마다 객체 인스턴스 주소값을 확인!
-
클래스 경우 싱글톤을 생성하는 방법
-
init에 private이 걸려있어 직접 선언과 동시 호출을 제한시킨다.
class VendingMachine {
static var instance: VendingMachine = VendingMachine()
private init(){

}
}
-
-
싱글톤 객체의 장점과 단점에 대해 학습한다.
- 장점
- 객체 생성 횟수를 줄일 수 있어 메모리 공간이 절약된다. (힙 메모리가 가벼워진다)
- 여러 개의 인스턴스를 생성하는 경우에 비해 인스턴스간의 간섭이 줄어든다.
- 단점
- 의존도를 높이게 되어 한 곳에서의 변경이 다른 부분에 영향을 미치게 될 확률이 높아진다. 즉, 여러 곳에서 참조가 가능하기 때문에 멀티 쓰레드 환경에서 데이터 변경 시 문제가 생길 수 있다.
- 장점
- Step5
1. 관찰자 패턴
-
관찰자 패턴이란? 객체 사이에 일 대 다의 의존 관계를 정의 해두어, 어떤 객체의 상태가 변할 때 그 객체에 의존성을 가진 다른 객체들이 그 변화를 통지 받고 자동으로 업데이트될 수 있게 만만드는 것
-
적용방법 :
-
ViewController : viewDidLoad() 함수 내 Observer 등록
NotificationCenter.default.addObserver(self, selector: #selector(updateInventoryLabels(notification:)), name: Notification.Name("didUpdateInventory"), object: nil) NotificationCenter.default.addObserver(self, selector: #selector(updateBalanceLabel(notification:)), name: Notification.Name("didUpdateBalance"), object: nil) -
Model(VendingMachine) : 해당 메서드 내부 Observer post 적용
NotificationCenter.default.post(name: Notification.Name("didUpdateInventory"), object: self, userInfo: [ "inventory" : inventory]) -
ViewController : 라벨 또는 버튼 관련 메서드 Notification 반영
@objc private func updateInventoryLabels(notification : Notification) {
  guard let userInfo = notification.userInfo as? [String : Inventory] else { return }
  guard let inventory = userInfo["inventory"] else { return }
  updateInventory(inventory)
}
-
-
왜 사용하는 것일까? (모델과 컨트롤러가 직접 참조하지 않고 느슨하게 연결된 (loosed coupled) 구조가 왜 좋은 것일까?)
- 상태 변화를 수신해야 하는 객체가 여러 개거나 전달 받아야 할 정보가 많을수록 객체들이 많아질 수 있고, 그렇게 되면 객체들의 연결이 복잡해지고 강하게 연결될 가능성이 크다. 때문에 옵저버 패턴을 이용하여 최대한 느슨하게 연결할 수 있도록 도와주기 때문이다.
- Step6
구매목록 View 코드
-
실행화면


-
실행이후 구매 목록을 화면 아래 이미지로 추가한다. : viewDidLoad() 내부 updateListOfPurchase() 메서드 추가
private func updateListOfPurchase() { guard let productsSold = vendingMachine?.generateListOfHistory() else { return } var xOfImage = 70 for oneProduct in productsSold { let productImg = UIImage(named : getImgSource(ObjectIdentifier(type(of : oneProduct)))) ?? UIImage() let imageView = UIImageView(image : productImg) imageView.frame = CGRect(x: xOfImage, y: 650, width: 150, height: 150) self.view.addSubview(imageView) xOfImage += 80 } } -
특정 제품을 구매할 때마다 해당 제품 이미지를 추가하도록 구현한다. : Notification 등록
NotificationCenter.default.addObserver(self, selector: #selector(updateListOfPurchase(notification:)), name: .didUpdateListOfPurchase , object: nil) NotificationCenter.default.post(name: .didUpdateListOfPurchase, object: self) -
뷰를 코드로 생성해서 추가하는 것과 스토리보드 상에서 미리 생성하는 것의 차이
- 코드 생성
- 조작 가능: 실행중간에 속성 등 변경 가능하다.
- 재사용 가능: 작성한 코드를 재사용하기 쉽다.
- 찾아보기 쉬움: 화면이 복잡할 때 IB에서는 특정 요소를 찾아서 선택하는 게 쉽지 않지만, 코드로 작성하면 찾기 쉽다.
- 머지 충돌 발생률 낮음: 협업 시 스토리보드에 작성한 사람이 있으면 머지 충돌이 일어날 확률이 높다.
- 뷰컨트롤러에 제네릭 사용 가능: IB로 작성한 뷰 컨트롤러 클래스에는 제네릭 제약조건을 줄 수 없지만, 코드로 작성하면 제네릭 제약조건이 있는 뷰 컨트롤러를 생성할 수 있다.
- 스토리보드 생성
- 사용이 쉽다: 코드로 작성하면 빼먹으면 안되는 코드가 있기도 하고, 코드 길이가 길어질 수 있다.
- 시각적이다: 눈으로 보고 확인하며 작성할 수 있다.
- 코드 생성
- Step 7
Frame과 Bounds
-
실행화면


-
주요개념
- Geometry: 뷰의 위치, 크기를 표시
- Frame: Superview(상위뷰)의 좌표시스템 내에서 view의 위치, 크기를 나타냄
- Center: Superview(상위뷰)의 좌표시스템 내에서 view의 중심 위치를 나타냄
- Bounds: 자기자신의 좌표시스템 내에서 view의 위치, 크기를 나타냄
- Bounds를 변경하는 것은 해당 위치에서 view를 다시 그리라는 의미가 된다. Bounds는 상위 뷰와 아무런 관련이 없으므로, view의 origin을 변경하더라도 내부의 subview가 움직이는 것처럼 보일 수 있다.
- Bounds는 Scroll View의 핵심이다.
-
swift view 데이터 통신
- A->B->C 형태의 뷰 컨트롤러로 진행
- A에서 B로 갈때 그리고 B에서 A로 갈때 스토리보드상 ctrl + 드래그를 통한 show를 이용할 경우 게속 스택 위에 뷰를 쌓는형태가 되므로 메모리에 매우 좋지않다 그러므로 A->B로 갈때 show를 사용한 후
- B에서 A로 돌아갈땐 dismiss를 이용하자.
dismiss(animated: true, completion: nil)in B ViewController - 세그웨이를 통하여 데이터를 넘길땐 prepare for segue를 이용한다.
override func prepare(for segue: UIStoryboardSegue, sender: Any?) {
guard let adminViewController = segue.destination as? AdminViewController else { return }
adminViewController.adminVendingMachine = self.vendingMachine as? AdminMode
}
- Step 8
코어 그래픽스(Core Graphics)
-
실행화면


-
setNeedsDisplay()
- 드로잉 사이클(next drawing cycle)동안 View를 업데이트해야 함을 시스템에 알리는 메서드.
- 드로잉 사이클 : 시스템이 현재 View의 스냅샷 캡쳐(업데이트 전) -> 컨텐츠가 변경되었다?(시스템에게 View업데이트 요청) -> 요청받았다고 바로 그리는게 아니라, 현재 실행루프를 끝날때까지 대기하고 == 다음 드로잉 사이클때까지 대기한다는 뜻 -> 다음 드로잉 사이클이 오면, 이때 View업데이트를 요청받은 View를 전부 업데이트함
- draw()는 View가 처음 표시될 때, 또는 View의 보이는 부분을 무효화하는 이벤트가 발생할 때 호출된다. 직접 이 메소드를 호출하면 안된다. View의 일부분을 무효화하고 해당 부분을 다시 그려지게 하려면 대신 setNeedsDisplay () 또는 setNeedsDisplay (_ :) 메서드를 호출해야한다.
- 참조 : http://zeddios.tistory.com/359
- Step9
터치 이벤트(Touch-event)
-
실행화면
- began

- moved

- began
-
구현방법
-
touch-status 설정
enum Status { case none case began case moved case ended } private var status : Status = .none { didSet { setNeedsDisplay() } } - draw() Status설정에 따른 적용
override func draw(_ rect: CGRect) { guard let ctx = UIGraphicsGetCurrentContext() else { return } switch status { case .none: drawPieGraph(ctx) case .began: drawCircle(ctx) case .moved: drawPieGraph(ctx) case .ended: drawPieGraph(ctx) } super.draw(rect) } -
touch-관련 메서드
override func touchesBegan(_ touches: Set<UITouch>, with event: UIEvent?) {
  status = .began
  super.touchesBegan(touches, with: event)
}

override func touchesMoved(_ touches: Set<UITouch>, with event: UIEvent?) {
  status = .moved
  guard let touch = touches.first else { return }
  let locationTouchedFirst = touch.location(in: self)
  let viewCenter = CGPoint(x: bounds.size.width * 0.5, y: bounds.size.height * 0.5)
  let xOfDistance = pow(viewCenter.x - locationTouchedFirst.x, 2)
  let yOfDistance = pow(viewCenter.y - locationTouchedFirst.y, 2)
  let distance = sqrt(xOfDistance + yOfDistance)
  graphRatio = Double(distance) / Double(viewCenter.y)
  super.touchesMoved(touches, with: event)
}

override func touchesEnded(_ touches: Set<UITouch>, with event: UIEvent?) {
  status = .ended
  super.touchesEnded(touches, with: event)
}
-
-
Responder-chain
- Responder Chain은 Responder객체들로 구성된다. 많은 유형의 event들은 event 전달을 위해 responder chain에 의존하고, Responder chain은 일련의 연결된 responder객체들이다. 첫 번째 responder로 시작하여 application객체로 끝난다. 첫 번째 responder가 event를 처리 할 수 없는 경우 event는 responder chain의 다음 responder에게 전달한다.
- Responder Chain 특정 전달 경로를 따른다. 초기 객체(hit-test view 또는 첫 번째 responder)가 event를 처리하지 않으면 UIKit은 event를 chain에 있는 다음 responder에게 전달한다. 각 responder들은 nextResponder 메소드를 호출하여 event를 처리할지 아니면 다음 responder에게 전달할지 결정한다.. 이 프로세스는 responder객체가 event를 처리하거나 responder가 더 이상 없을 때까지 계속된다.
-
참조 : https://medium.com/@audrl1010/event-handling-guide-for-ios-68a1e62c15ff


