BooruDatasetTagManager
A simple tag editor for a dataset created for training hypernetworks, embeddings, lora, etc. You can create a dataset from scratch using only images, or you can use a program to edit a dataset created using automatic tagging (wd14-tagger, stable-diffusion-webui, etc.) The editor is primarily intended for booru-style tagged data, but you can adapt it for other datasets as well.
Using
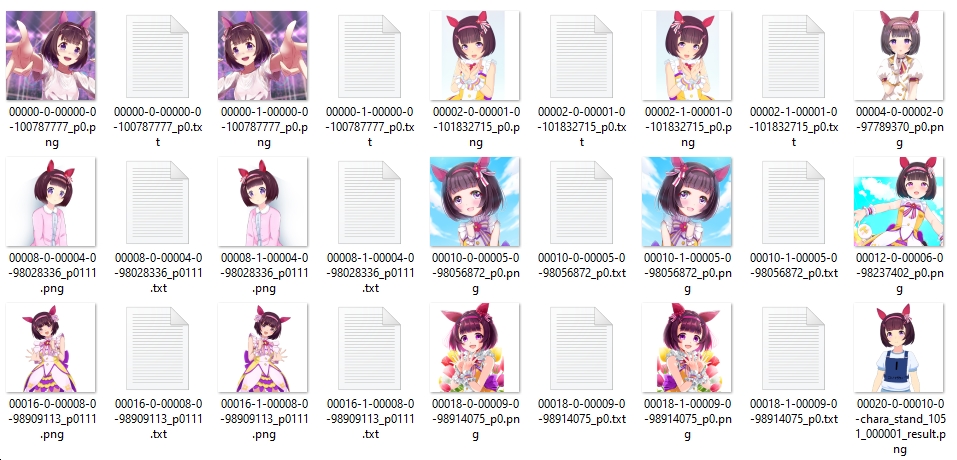
You need a dataset like the following:
You can also specify a dataset without text files if you want to create tags from scratch. In this case, text files will be created on save.

In the program, select "File->Load folder" and specify the directory with the dataset.
The left pane displays images from the dataset. The central panel displays tags for the selected images, which you can edit. The right panel has two tabs. The first tab displays all (or common) tags present in the dataset. In the second tab you can generate tags using the built-in service (interrogator_rpc).
After editing, you will select "File->Save all changes".
You can select multiple images at once in a dataset. This will allow you to easily edit tags for images of the same type.
Through the "Setting" menu, you can open the settings window to customize the application for yourself. Users who have Google Translate blocked can change the translation service to Chinese. On the "UI" tab, you can select a color scheme, and on the "Hotkeys" tab, configure the key layout that is convenient for you.
Tag translation
Before using tag translation, you need to select the translation language and translation service in the settings. From the "view" menu, select "Translate tags" to display columns with translated values. When displaying columns, all tags will be automatically translated into the language you selected. The translation is saved in the "Translations" folder with the name of the selected language. You can manually edit the translation in this file as the translation is taken from this file first. Manual translation is recommended to be marked with the "*" symbol.
Translation file example:
//Translation format: <original>=<translation>
black hair=÷åðíûå âîëîñû
*solo=Ñîëî
1girl=1 äåâóøêà
Currently, the manual translation filter can only be used in tag autocompletion (with the option enabled in the settings). But in the future, it can be used somewhere else.
Tag list for autocomplete
The application supports loading tags from csv files of the format used in "Booru tag autocompletion for A1111". You can also create your own txt files with a list of tags (line by line). But since loading data from these files takes a long time, the program converts them to its own format and loads data from it. Therefore, if you change the list of tags, be prepared to wait quite a long time. All files with tags are located in the "Tags" folder.
AutoTagger (interrogator_rpc)
You can generate tags for images directly in the program. To do this, you need to configure and run the "interrogator_rpc" service. Python must be installed for it to work. To configure interrogator_rpc, run the command:
pip install -r requirements.txtSince the latest version of onnxruntime requires msvc runtime 2015 version, it is recommended to install this package. If you use anaconda:
conda install conda-forge::vs2015_runtimeIf you install it normally with pip:
pip install msvc-runtimeTo start the service run
python main.pyIf you have problems running a service in pure python, try using anaconda or miniconda.
After installing anaconda, run the console, create a new conda environment and install the necessary dependencies.
#Creating new environment with python
conda create -n bdtm python=3.10.13
#Activating the created environment
conda activate bdtm
#Installing the necessary dependencies.
pip install -r requirements.txt
#Run service
python main.py
To start an already configured service, you need to launch the console and run the following commands
conda activate bdtm
python main.py
After launching the service, in the editor itself you can generate tags for all images using the "Tools" menu, generate tags for selected images using icon, and also generate tags in a separate tab "AutoTagger preview window". To configure generation parameters, you can use the corresponding generation menu item, or the "Settings" -> "Auto tagger settings..." menu.
The generator allows you to select several models at once and specify a method for combining the results.
Weighted tags
The editor supports working with weighted tags. When loading tags, brackets are automatically converted to weights. To change the weight of a tag, you need to select it and move the "weight" track bar to the required number of positions. One position equals one bracket.
Color scheme
Currently, the program offers two color schemes (Classic and Dark). You can create or change the color scheme yourself. There is no window-based color scheme editor yet, but you can open the ColorScheme.json file using a text editor and make the necessary changes.
Interface translation
All language files are located in the Languages folder. You can translate the application interface into the language you are interested in. To do this, you need to copy any xx-XX.txt file you like, rename it according to your language code and translate the contents after the = sign. You can create a topic in Issues or discussions and attach your translation. I will include your translation in the next release.
Build
This is a tool designed in C and you will need to run it in Visual Studio (not Visual Studio Code). Steps to achieve this are:
- Download visual Studio
- Clone this repo into a folder somewhere on your computer
- Open the repo using Visual Studio:
File>Open>Project/Solution> select theBooruDatasetTagManager.slnfile - Build the solution by selecting
Build>Build Solutionfrom the menu (or by pressing Ctrl+Shift+B. Run the Application)
Other
Using the "View" menu you can hide panels you don't need. In the "Tools" menu there is a function to automatically replace the transparent background with the color you need.