Migration of git repository.
Important! 02-Oct-2023
We are migrating all our projects to a selfhosted libre / opensource git forge at forge.swinet.net.
This repo will not receive any updates as it will soon become an archive project, we are sorry for any inconvenience.
You will be free to pull as usual from the new source.
Best regards
-- SwITNet Team
Quick Jibri Installer
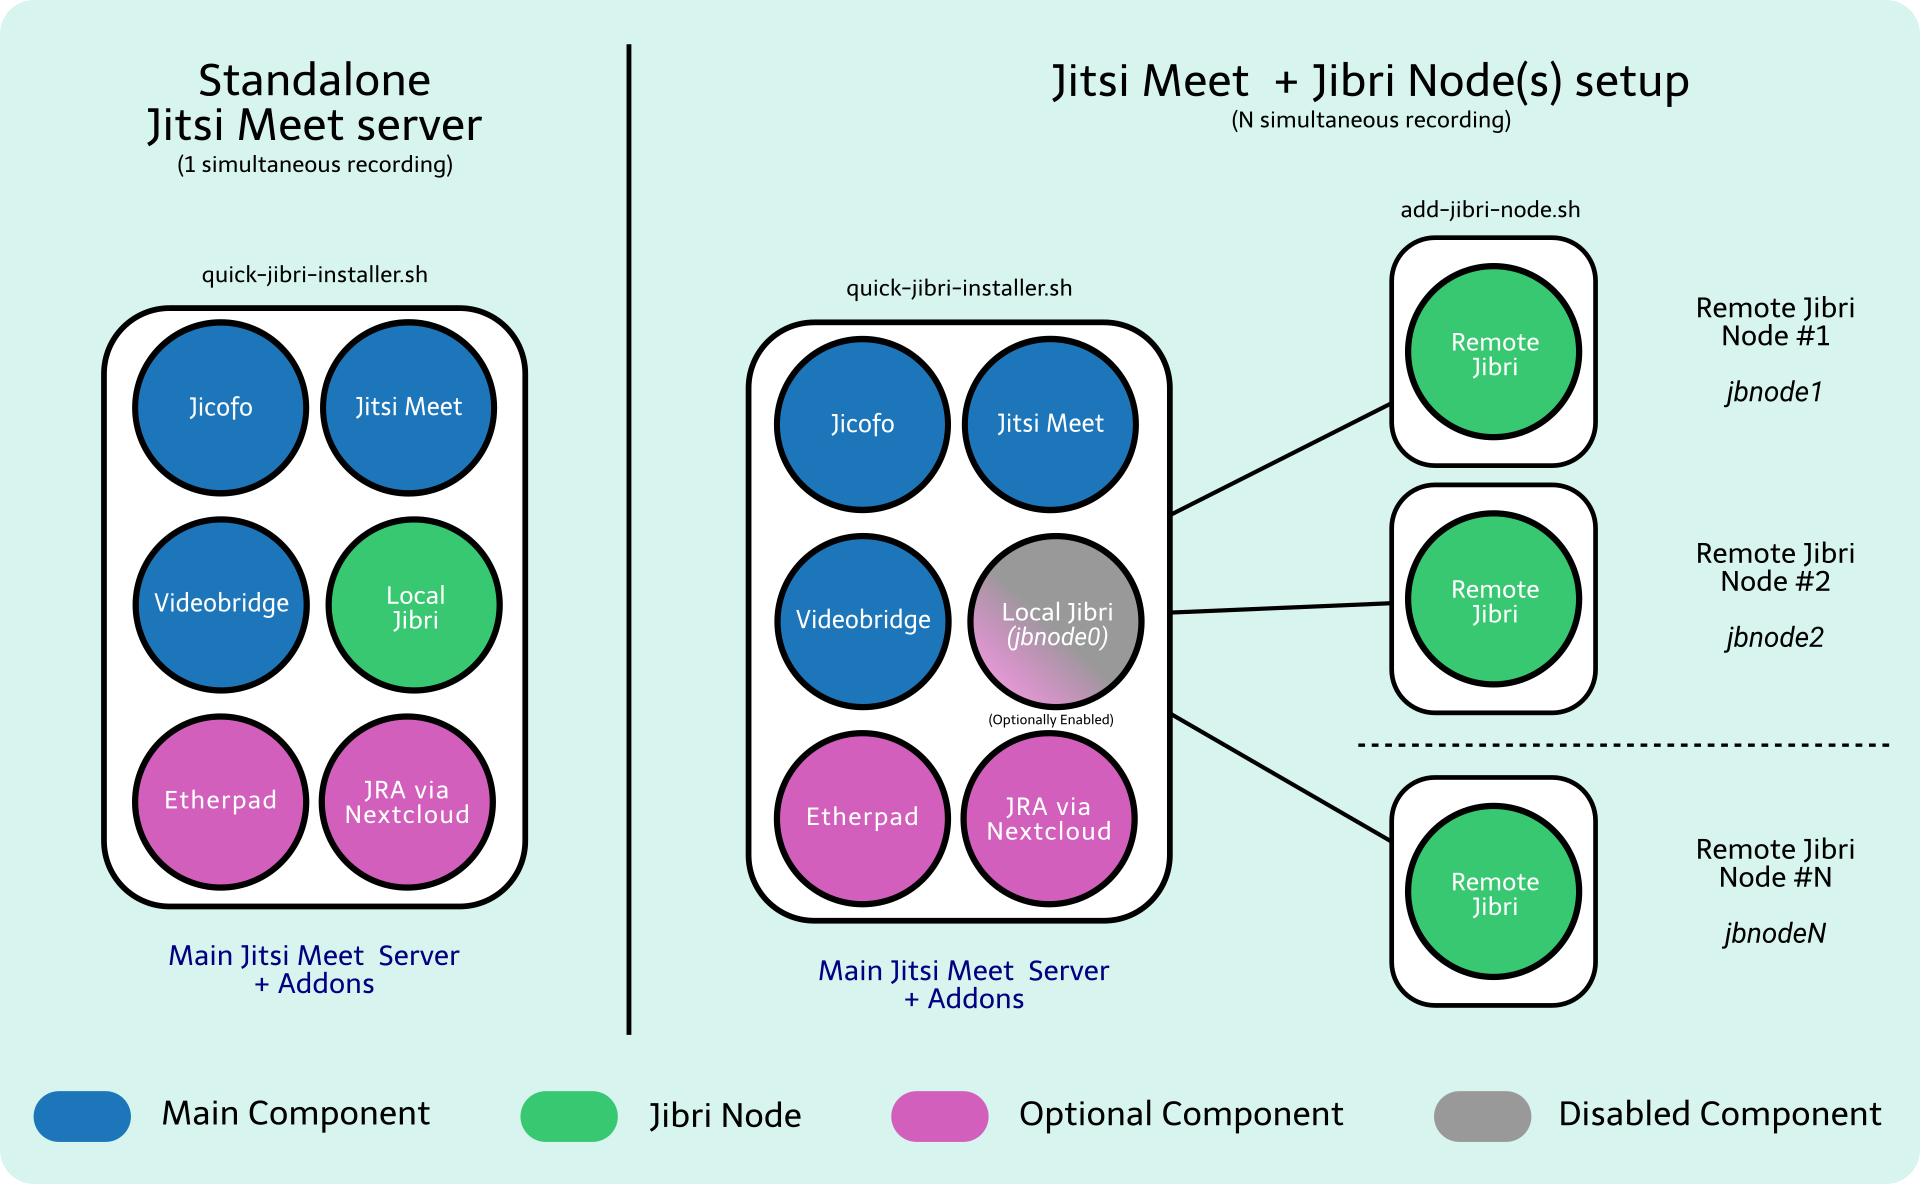
Bash installer for Jitsi Meet standalone along with Jibri on supported Ubuntu LTS based systems using nginx as default webserver.
Usage
As for our current latest release, as we have integrated more and more features, we highly recommend to use a purpose specific-newly spawn server to host the jitsi-meet framework, making sure you stick to the requirements and recommendations as much as possible, in order to avoid issues.
WARNING: Please, avoid using this installer on your everyday GNU/Linux system, as this is an unsupported use and it will likely BREAK YOUR SYSTEM, so please don't.
Main Server
Login into your clean server, clone git repository and run the installer,
git clone https://github.com/switnet-ltd/quick-jibri-installer
cd quick-jibri-installer
sudo bash quick_jibri_installer.sh
If your server meet the necessary resources, then at the end on the installer you should have a working Jitsi Meet Server along with a Jibri server ready to record.
Additional jibris need to be set on separate servers, only necesary on simultaneous recordings for that please use add-jibri-node.sh.
Add Jibri node
Copy the modified add-jibri-node.sh file from your early cloned installation directory once the installation is completed, to the new server meant to be a jibri node using your preferred method, then run it
WARNING: This file contains sensitive information from your setup, please handle with care.
bash add-jibri-node.shPlease remember that on newer versions, jibri will record on FHD (1920x1080) so please make sure your server have enough CPU power in orther to handle the encoding load.
Add JVB2 node
Copy the modified add-jvb2-node.sh file from your early cloned installation directory once the installation is completed, to the new server meant to be a jibri node using your preferred method, then run it
WARNING: This file contains sensitive information from your setup, please handle with care.
bash add-jvb2-node.shCheck more details on our wiki.
Requirements
- Clean VM/VPS/Server using a supported Ubuntu LTS
- Valid domain with DNS record, mandatory for SSL certs via Let's Encrypt.
- open ports for JMS interaction, see wiki.
- Starting at 8 GB RAM / 4 Cores @ ~3.0GHz
- Adding resources as your audience or features you require, so your experience don't suffer from the lack of resources.
- Webcam
Jibri Recodings Access via Nextcloud
- Valid domain with DNS record for Nextcloud SSL.
Jigasi Transcript (stalled)
- SIP account
- Google Cloud Account with Billing setup.
Kernel warning
For AWS users or any cloud service provider that might use their own kernel on their products (servers/vm/vps), might cause Jibri failure to start due not allowing snd_aloop module.
Make sure that you update your grub to boot the right one.
Feel free to use our test-jibri-env.sh tool to find some details on your current setup.
Features
-
Enabled Session Recording via Jibri
- Rename Jibri folder with name room + date.
- Jibri node network.
- Automatic Jibri nodes network sync (see more).
-
JRA (Jibri Recordings Access) via Nextcloud
-
Grafana Dashboard
-
Etherpad via docker install
-
Authentication
- Local
- JWT
- None
-
Lobby Rooms
-
Conference Duration
-
Customized brandless mode
- Setting up custom interface_config.js (to be deprecated by upstream)
-
JVB2 nodes network.
-
Enabled Jitsi Electron app detection server side.
-
Standalone SSL Certbot/LE implementation
-
Improved recurring updater
-
Jigasi Transcript - Speech to Text powered by Google API (stalled)
Tools
- Jibri Environment Tester
- Jibri Conf Upgrader (late 2020).
- Selenium Grid via Docker
- Start over, installation cleansing tool.
Optional custom changes
- Optional default language
- Option to enable Secure Rooms
- Option to enable Welcome page
- Option to enable Close page
- Option to set domain as hostname on JMS
Modes
- Custom High Performance config
Custom changes
- Start with video muted by default
- Start with audio muted but moderator
- Set pre-join screen by default.
Documentation
- Please check our wiki for further documentation.
Please note: This program is distributed in the hope that it will be useful, but WITHOUT ANY WARRANTY.
SwITNet Ltd © - 2022, https://switnet.net/