LLSpy: Lattice light-sheet post-processing utility
![]()
![]()

![]()

Copyright © 2019 Talley Lambert, Harvard Medical School.
LLSpy is a python library to facilitate lattice light sheet data processing. It extends the cudaDeconv binary created in the Betzig lab at Janelia Research Campus, adding features that auto-detect experimental parameters from the data folder structure and metadata (minimizing user input), auto-choose OTFs, perform image corrections and manipulations, and facilitate file handling. Full(er) documentation available at http://llspy.readthedocs.io/
There are three ways to use LLSpy:
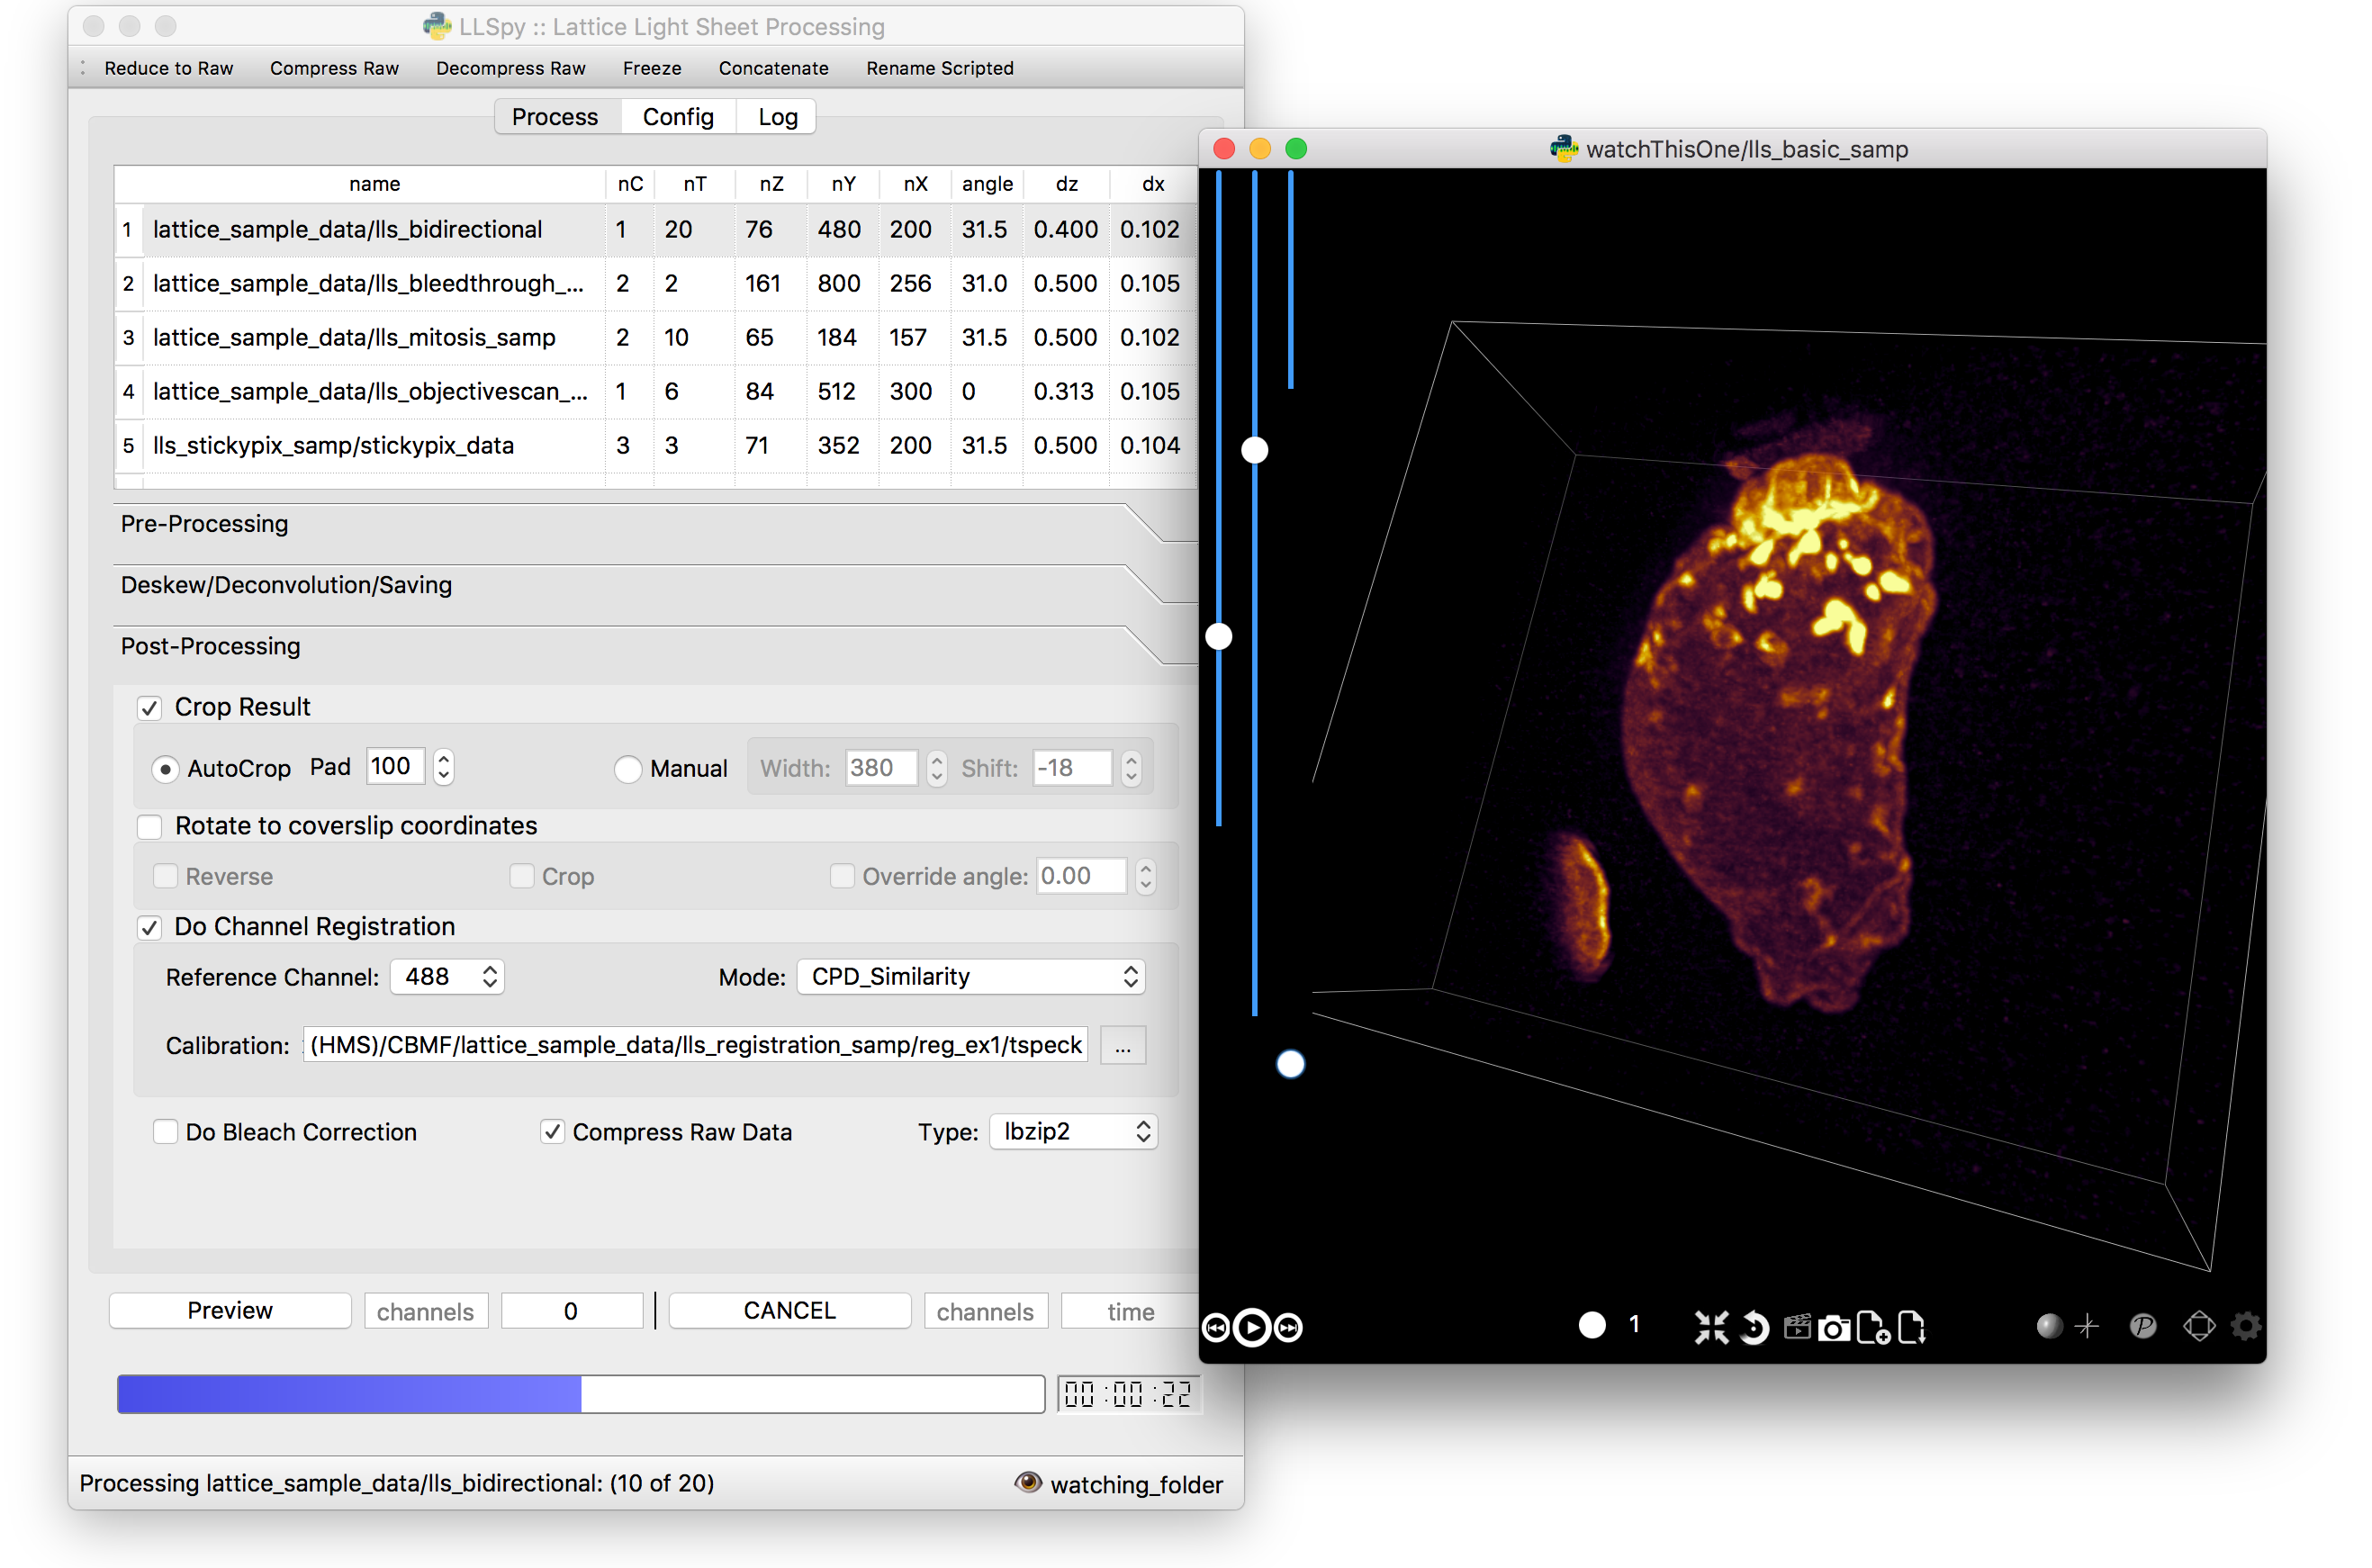
1. Graphical User Interface
The GUI provides access to the majority of functionality in LLSpy. It includes a drag-and drop queue, visual progress indicator, and the ability to preview data processed with the current settings using the (awesome) 4D-viewer, Spimagine, and experimental support for napari.
2. Command Line Interface
The command line interface can be used to process LLS data in a server environment (linux compatible).
$ lls --help

Usage: lls [OPTIONS] COMMAND [ARGS]...

  LLSpy

  This is the command line interface for the LLSpy library, to facilitate
  processing of lattice light sheet data using cudaDeconv and other tools.

Options:
  --version          Show the version and exit.
  -c, --config PATH  Config file to use instead of the system config.
  --debug
  -h, --help         Show this message and exit.

Commands:
  camera    Camera correction calibration
  clean     Delete LLSpy logs and preferences
  compress  Compression & decompression of LLSdir
  config    Manipulate the system configuration for LLSpy
  decon     Deskew and deconvolve data in LLSDIR.
  deskew    Deskewing only (no decon) of LLS data
  gui       Launch LLSpy Graphical User Interface
  info      Get info on an LLSDIR.
  install   Install cudaDeconv libraries and binaries
  reg       Channel registration

# process a dataset
$ lls decon --iters 8 --correctFlash /path/to/dataset

# change system or user-specific configuration
$ lls config --set otfDir path/to/PSF_and_OTFs

# or launch the gui
$ lls gui
3. Interactive data processing in a python console
>>> import llspy

# the LLSdir object contains most of the useful attributes and
# methods for interacting with a data folder containing LLS tiffs
>>> E = llspy.LLSdir('path/to/experiment_directory')
# it parses the settings file into a dict:
>>> E.settings
{'acq_mode': 'Z stack',
 'basename': 'cell1_Settings.txt',
 'camera': {'cam2name': '"Disabled"',
            'cycle': '0.01130',
            'cycleHz': '88.47 Hz',
            'exp': '0.01002',
    ...
}

# many important attributes are in the parameters dict
>>> E.parameters
{'angle': 31.5,
 'dx': 0.1019,
 'dz': 0.5,
 'nc': 2,
 'nt': 10,
 'nz': 65,
 'samplescan': True,
  ...
}

# and provides methods for processing the data
>>> E.autoprocess()

# the autoprocess method accepts many options as keyword aruguments
# a full list with descriptions can be seen here:
>>> llspy.printOptions()

              Name  Default                    Description
              ----  -------                    -----------
      correctFlash  False                      do Flash residual correction
flashCorrectTarget  cpu                        {"cpu", "cuda", "parallel"} for FlashCor
            nIters  10                         deconvolution iters
         mergeMIPs  True                       do MIP merge into single file (decon)
            otfDir  None                       directory to look in for PSFs/OTFs
            tRange  None                       time range to process (None means all)
            cRange  None                       channel range to process (None means all)
               ...  ...                        ...

# as well as file handling routines
>>> E.compress(compression='lbzip2')  # compress the raw data into .tar.(bz2|gz)
>>> E.decompress()  # decompress files for re-processing
>>> E.freeze()  # delete all processed data and compress raw data for long-term storage.
Note: The LLSpy API is currently unstable (subject to change). Look at
the llspy.llsdir.LLSdir class as a starting point for most of the
useful methods. Minimal documentation available in the docs. Feel free
to fork this project on github and suggest changes or additions.
Requirements
- Compatible with Windows (tested on 7/10), Mac or Linux (tested on Ubuntu 16.04)
- Python 3.6 (as of version 0.4.0, support for 2.7 and 3.5 ended)
- Most functionality assumes a data folder structure as generated by the Lattice Scope LabeView acquisition software written by Dan Milkie in the Betzig lab. If you are using different acquisition software (such as 3i software), it is likely that you will need to change the data structure and metadata parsing routines in order to make use of this software.
- Currently, the core deskew/deconvolution processing is based on cudaDeconv, written by Lin Shao and maintained by Dan Milkie. cudaDeconv is licensed and distributed by HHMI. It was open-sourced in Feb 2019, and is available here: https://github.com/dmilkie/cudaDecon
- CudaDeconv requires a CUDA-capable GPU
- The Spimagine viewer requires a working OpenCL environment
Installation
-
Install conda/mamba
-
Launch a
terminalwindow (Linux), orMiniforge Prompt(Windows) -
Install LLSpy into a new conda environment
conda create -n llsenv python=3.11 cudadecon
conda activate llsenv
pip install llspy
The
create -n llsenvline creates a virtual environment. This is optional, but recommended as it easier to uninstall cleanly and prevents conflicts with any other python environments. If installing into a virtual environment, you must source the environment before proceeding, and each time before using llspy.
Each time you use the program, you will need to activate the virtual
environment. The main command line interface is lls, and the gui can
be launched with lls gui. You can create a bash script or batch file
to autoload the environment and launch the program if desired.
# Launch Anaconda Prompt and type...
conda activate llsenv

# show the command line interface help menu
lls -h
# process a dataset
lls decon /path/to/dataset
# or launch the gui
lls gui
See complete usage notes in the documentation.
Features of LLSpy
- graphical user interface with persistent/saveable processing settings
- command line interface for remote/server usage (coming)
- preview processed image to verify settings prior to processing full experiment
- Pre-processing corrections:
- correct \"residual electron\" issue on Flash4.0 when using overlap synchronous mode. Includes CUDA and parallel CPU processing as well as GUI for generation of calibration file.
- apply selective median filter to particularly noisy pixels
- trim image edges prior to deskewing (helps with CMOS edge row artifacts)
- auto-detect background
- Processing:
- select subset of acquired images (C or T) for processing
- automatic parameter detection based on auto-parsing of Settings.txt
- automatic OTF generation/selection from folder of raw PSF files, based on date of acquisition, mask used (if entered into SPIMProject.ini), and wavelength.
- graphical progress bar and time estimation
- Post-processing:
- proper voxel-size metadata embedding (newer version of Cimg)
- join MIP files into single hyperstack viewable in ImageJ/Fiji
- automatic width/shift selection based on image content (\"auto crop to features\")
- automatic fiducial-based image registration (provided tetraspeck bead stack)
- compress raw data after processing
- Watched-folder autoprocessing (experimental):
- Server mode: designate a folder to watch for incoming finished LLS folders (with Settings.txt file). When new folders are detected, they are added to the processing queue and the queue is started if not already in progress.
- Acquisition mode: designed to be used on the acquisition computer. Designate folder to watch for new LLS folders, and process new files as they arrive. Similar to built in GPU processing tab in Lattice Scope software, but with the addition of all the corrections and parameter selection in the GUI.
- easily return LLS folder to original (pre-processed) state
- compress and decompress folders and subfolders with lbzip2 (not working on windows)
- concatenate two experiments - renaming files with updated relative timestamps and stack numbers
- rename files acquired in script-editor mode with
Iter_in the name to match standard naming with positions (work in progress) - cross-platform: includes precompiled binaries and shared libraries that should work on all systems.
Bug Reports, Feature requests, etc
Pull requests are welcome!
To report a bug or request a feature, please submit an issue on github
Please include the following in any bug reports:
- Operating system version
- GPU model
- CUDA version (type
nvcc --versionat command line prompt) - Python version (type
python --versionat command line prompt, withllsenvconda environment active if applicable)
The most system-dependent component (and the most likely to fail) is the OpenCL dependency for Spimagine. LLSpy will fall back gracefully to the built-in Qt-based viewer, but the Spimagine option will be will be unavailble and grayed out on the config tab in the GUI. Submit an issue on github for help.