Introduction

The IntelligentEdgeHOL walks through the process of deploying an IoT Edge module to an Nvidia Jetson Nano device to allow for detection of objects in YouTube videos, RTSP streams, Hololens Mixed Reality Capture, or an attached web cam. It achieves performance of around 10 frames per second for most video data.
The module ships as a fully self-contained docker image totalling around 5.5GB. This image contains all necessary dependencies including the Nvidia Linux for Tegra Drivers for Jetson Nano, CUDA Toolkit, NVIDIA CUDA Deep Neural Network library (CUDNN), OpenCV, and Darknet. For details on how the base images are built, see the included docker folder.
Object Detection is accomplished using YOLOv3-tiny with Darknet which supports detection of the following:
person, bicycle, car, motorbike, aeroplane, bus, train, truck, boat, traffic light, fire hydrant, stop sign, parking meter, bench, bird, cat, dog, horse, sheep, cow, elephant, bear, zebra, giraffe, backpack, umbrella, handbag, tie, suitcase, frisbee, skis, snowboard, sports ball, kite, baseball bat, baseball glove,skateboard, surfboard, tennis racket, bottle, wine glass, cup, fork, knife, spoon, bowl, banana, apple, sandwich, orange, broccoli, carrot, hot dog, pizza, donut, cake, chair, sofa, pottedplant, bed, diningtable, toilet, tv monitor, laptop, mouse, remote, keyboard, cell phone, microwave, oventoaster, sink, refrigerator, book, clock, vase, scissors, teddy bear, hair drier, toothbrush
Demos
- Yolo Object Detection with Nvidia Jetson and Hololens
- The Intelligent Edge on the IoT Show @ Microsoft Ignite 2019
Hands-On Lab Materials
- Presentation Deck
- Presentation Video
- Note: If you want to view a full walkthrough of this lab, skip to 38:00
Getting Started
This lab requires that you have the following:
Hardware:
- Nvidia Jetson Nano Device
- A cooling fan installed on or pointed at the Nvidia Jetson Nano device
- USB Webcam (Optional)
- Note: The power consumption will require that your device is configured to use a 5V/4A barrel adapter as mentioned here with an Open-CV compatible camera.
Development Environment:
- Visual Studio Code (VSCode)
- VSCode Extensions
- Git tool(s)
Git command line
Installing IoT Edge onto the Jetson Nano Device
Before we install IoT Edge, we need to install a few utilities onto the Nvidia Jetson Nano device with:
sudo apt-get install -y curl nano python3-pipARM64 builds of IoT Edge are currently being offered in preview and will eventually go into General Availability. We will make use of the ARM64 builds to ensure that we get the best performance out of our IoT Edge solution.
These builds are provided starting in the 1.0.8 release tag. To install the 1.0.8 release of IoT Edge, run the following from a terminal on your Nvidia Jetson device:
# You can copy the entire text from this code block and
# paste in terminal. The comment lines will be ignored.

# Install the IoT Edge repository configuration
curl https://packages.microsoft.com/config/ubuntu/18.04/multiarch/prod.list > ./microsoft-prod.list

# Copy the generated list
sudo cp ./microsoft-prod.list /etc/apt/sources.list.d/

# Install the Microsoft GPG public key
curl https://packages.microsoft.com/keys/microsoft.asc | gpg --dearmor > microsoft.gpg
sudo cp ./microsoft.gpg /etc/apt/trusted.gpg.d/

# Perform apt update
sudo apt-get update

# Install IoT Edge and the Security Daemon
sudo apt-get install iotedge
Provisioning the IoT Edge Runtime on the Jetson Nano Device
To manually provision a device, you need to provide it with a device connection string that you can create by registering a new IoT Edge device in your IoT hub. You can create a new device connection string to accomplish this by following the documentation for Registering an IoT Edge device in the Azure Portal or by Registering an IoT Edge device with the Azure-CLI.
Once you have obtained a connection string, open the configuration file:
sudo nano /etc/iotedge/config.yamlFind the provisioning section of the file and uncomment the manual provisioning mode. Update the value of device_connection_string with the connection string from your IoT Edge device.
provisioning:
  source: "manual"
  device_connection_string: "<ADD DEVICE CONNECTION STRING HERE>"

# provisioning:
#   source: "dps"
#   global_endpoint: "https://global.azure-devices-provisioning.net"
#   scope_id: "{scope_id}"
#   registration_id: "{registration_id}"
After you have updated the value of device_connection_string, restart the iotedge service with:
sudo service iotedge restartYou can check the status of the IoT Edge Daemon using:
systemctl status iotedgeExamine daemon logs using:
journalctl -u iotedge --no-pager --no-fullAnd, list running modules with:
sudo iotedge listConfiguring the YoloModule Video Source
Clone or download a copy of this repo and open the IntelligentEdgeHOL folder in Visual Studio Code. Next, press F1 and select Azure IoT Hub: Select IoT Hub. Next, choose the IoT Hub you created when provisioning the IoT Edge Runtime on the Jetson Nano Device and follow the prompts to complete the process.
In VS Code, navigate to the .env file and modify the following value:
CONTAINER_VIDEO_SOURCE
To use a youtube video, provide a Youtube URL, ex: https://www.youtube.com/watch?v=YZkp0qBBmpw
For an rtsp stream, provide a link to the rtsp stream in the format, rtsp://
To use a HoloLens video stream, see this article to enable a user account in the HoloLens Web Portal, once this is configured, provide the url to the HoloLens video streaming endpoint, ex: https://[USERNAME]:[PASSWORD]@[HOLOLENS_IP]/api/holographic/stream/live_high.mp4?holo=true&pv=true&mic=true&loopback=true
If you have an attached USB web cam, provide the V4L device path (this can be obtained from the terminal with ls -ltrh /dev/video*, ex: /dev/video0 and open the included deployment.template.json and look for:
{
    "PathOnHost": "/dev/tegra_dc_ctrl",
    "PathInContainer":"/dev/tegra_dc_ctrl",
    "CgroupPermissions":"rwm"
}
Then, add the following (including the comma), directly beneath it
 ,
{
    "PathOnHost": "/dev/video0",
    "PathInContainer":"/dev/video0",
    "CgroupPermissions":"rwm"
}
Deploy the YoloModule to the Jetson Nano device
Create a deployment for the Jetson Nano device by right-clicking deployment.template.json and select Generate IoT Edge Deployment Manifest. This will create a file under the config folder named deployment.arm32v7.json, right-click that file and select Create Deployment for Single Device and select the device you created when provisioning the IoT Edge Runtime on the Jetson Nano Device.
It may take a few minutes for the module to begin running on the device as it needs to pull an approximately 5.5GB docker image. You can check the progress on the Nvidia Jetson device by monitoring the iotedge agent logs with:
sudo docker logs -f edgeAgentExample output:
2019-05-15 01:34:09.314 +00:00 [INF] - Executing command: "Command Group: (
  [Create module YoloModule]
  [Start module YoloModule]
)"
2019-05-15 01:34:09.314 +00:00 [INF] - Executing command: "Create module YoloModule"
2019-05-15 01:34:09.886 +00:00 [INF] - Executing command: "Start module YoloModule"
2019-05-15 01:34:10.356 +00:00 [INF] - Plan execution ended for deployment 10
2019-05-15 01:34:10.506 +00:00 [INF] - Updated reported properties
2019-05-15 01:34:15.666 +00:00 [INF] - Updated reported properties
Verify the deployment results
Confirm the module is working as expected by accessing the web server that the YoloModule exposes.
You can Open this Web Server using the IP Address or Host Name of the Nvidia Jetson Device.
Example :
or
http://<ipAddressOfJetsonNanoDevice>
You should see an unaltered video stream depending on the video source you configured. In the next section, we will enable the object detection feature by modifying a value in the associated module twin.

Monitor the YoloModule logs with:
sudo docker logs -f YoloModuleExample output:
toolboc@JetsonNano:~$ sudo docker logs -f YoloModule
[youtube] unPK61Hz3Rw: Downloading webpage
[youtube] unPK61Hz3Rw: Downloading video info webpage
[download] Destination: /app/video.mp4
[download] 100% of 43.10MiB in 00:0093MiB/s ETA 00:00known ETA
Download Complete
===============================================================
videoCapture::__Run__()
   - Stream          : False
   - useMovieFile    : True
Camera frame size    : 1280x720
       frame size    : 1280x720
Frame rate (FPS)     : 29

device_twin_callback()
   - status  : COMPLETE
   - payload :
{
    "$version": 4,
    "Inference": 1,
    "VerboseMode": 0,
    "ConfidenceLevel": "0.3",
    "VideoSource": "https://www.youtube.com/watch?v=tYcvF8o5GXE"
}
   - ConfidenceLevel : 0.3
   - Verbose         : 0
   - Inference       : 1
   - VideoSource     : https://www.youtube.com/watch?v=tYcvF8o5GXE

===> YouTube Video Source
Start downloading video
WARNING: Assuming --restrict-filenames since file system encoding cannot encode all characters. Set the LC_ALL environment variable to fix this.
[youtube] tYcvF8o5GXE: Downloading webpage
[youtube] tYcvF8o5GXE: Downloading video info webpage
[download] Destination: /app/video.mp4
[download] 100% of 48.16MiB in 00:0080MiB/s ETA 00:00known ETA
Download Complete
Monitor the GPU utilization stats
On the Jetson device, you can monitor the GPU utilization by installing jetson-stats with:
sudo -H pip3 install jetson-statsOnce, installed run:
sudo jtopUpdate the Video Source by modifying the Module Twin
While in VSCode, select the Azure IoT Hub Devices window, find your IoT Edge device and expand the modules sections until you see the YoloModule entry.
Right click on YoloModule and select Edit Module Twin
A new window name azure-iot-module-twin.json should open.
Edit properties -> desired -> VideoSource with the URL of another video.
Right click anywhere in the Editor window, then select Update Module Twin
It may take some time depending on the size of video, but the new video should begin playing in your browser.
Controlling/Managing the Module
You can change the following settings via the Module Twin after the container has started running.
ConfidenceLevel : (float)
Confidence Level threshold. The module ignores any inference results below this threshold.
Verbose : (bool) Allows for more verbose output, useful for debugging issues
Inference : (bool) Allows for toggling object detection via Yolo inference
VideoSource : (string)
Source of video stream/capture source
Pushing Detected Object Data into Azure Time Series Insights
Azure Time Series Insights is built to store, visualize, and query large amounts of time series data, such as that generated by IoT devices. This service can allow us to extract insights that may allow us to build something very interesting. For example, imagine getting an alert when the mail truck is actually at the driveway, counting wildlife species using camera feeds from the National Park Service, or being able to tell that people are in a place that they should not be or counting them over time!
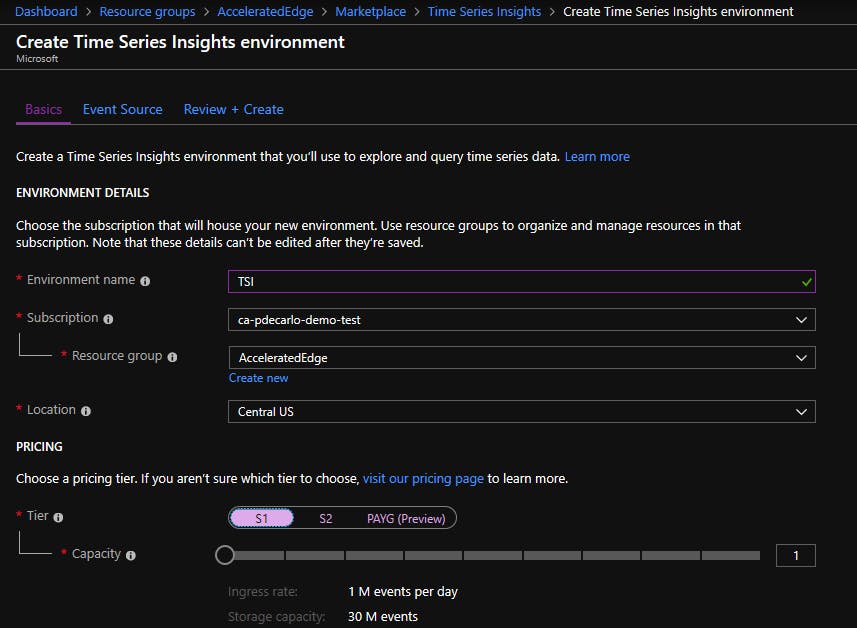
To begin, navigate to the resource group that contains the IoT Hub that was created in the previous steps. Add a new Time Series Insights environment into the Resource Group and select S1 tier for deployment. Be sure to place the Time Series Insights instance into the same Geographical region which contains your IoT Hub to minimize latency and egress charges.

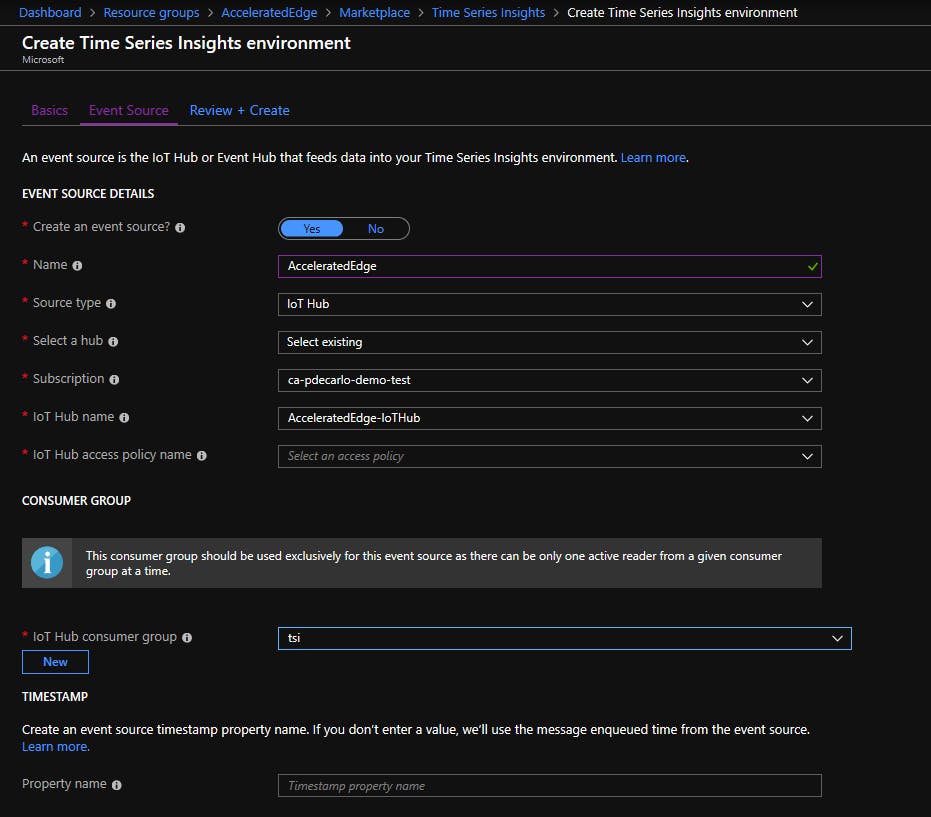
Next, choose a unique name for your Event Source and configure the Event Source to point to the IoT Hub you created in the previous steps. Set the IoT Hub Access Policy Name to "iothubowner", be sure to create a new IoT Hub Consumer Group named "tsi", and leave the TimeStamp Propery Name empty as shown below:

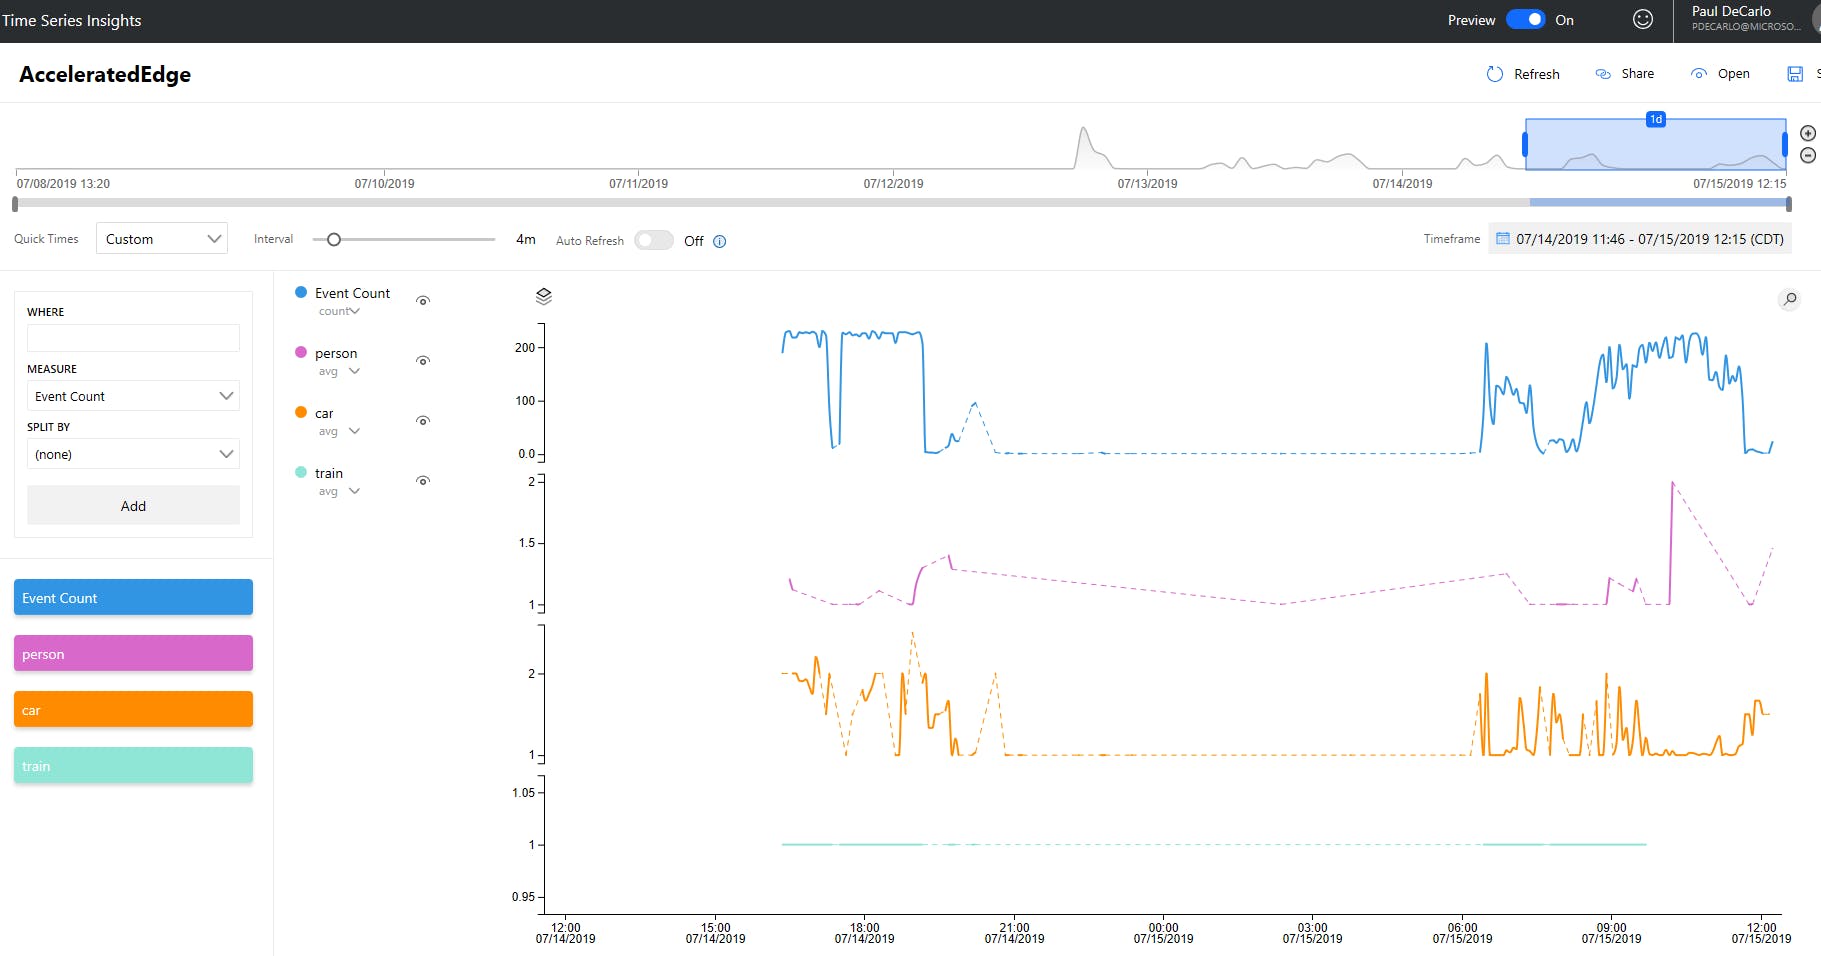
Complete the steps to "Review and Create" your deployment of Time Series Insights. Once the instance has finished deploying, you can navigate to the Time Insights Explorer by viewing the newly deployed Time Series Insights Environment resource, selecting "Overview" and clicking the "Time Series Insights explorer URL". Once you have clicked the link, you may begin working with your detected object data.
For details on how to explore and query your data in the Azure Time Series Insights explorer, you may consult the Time Series Insights documentation.
