Puppetboard


![]()
![]()
![]()
Puppetboard is a web interface to PuppetDB aiming to replace the reporting functionality of Puppet Enterprise console (previously: Puppet Dashboard) for the open source Puppet.
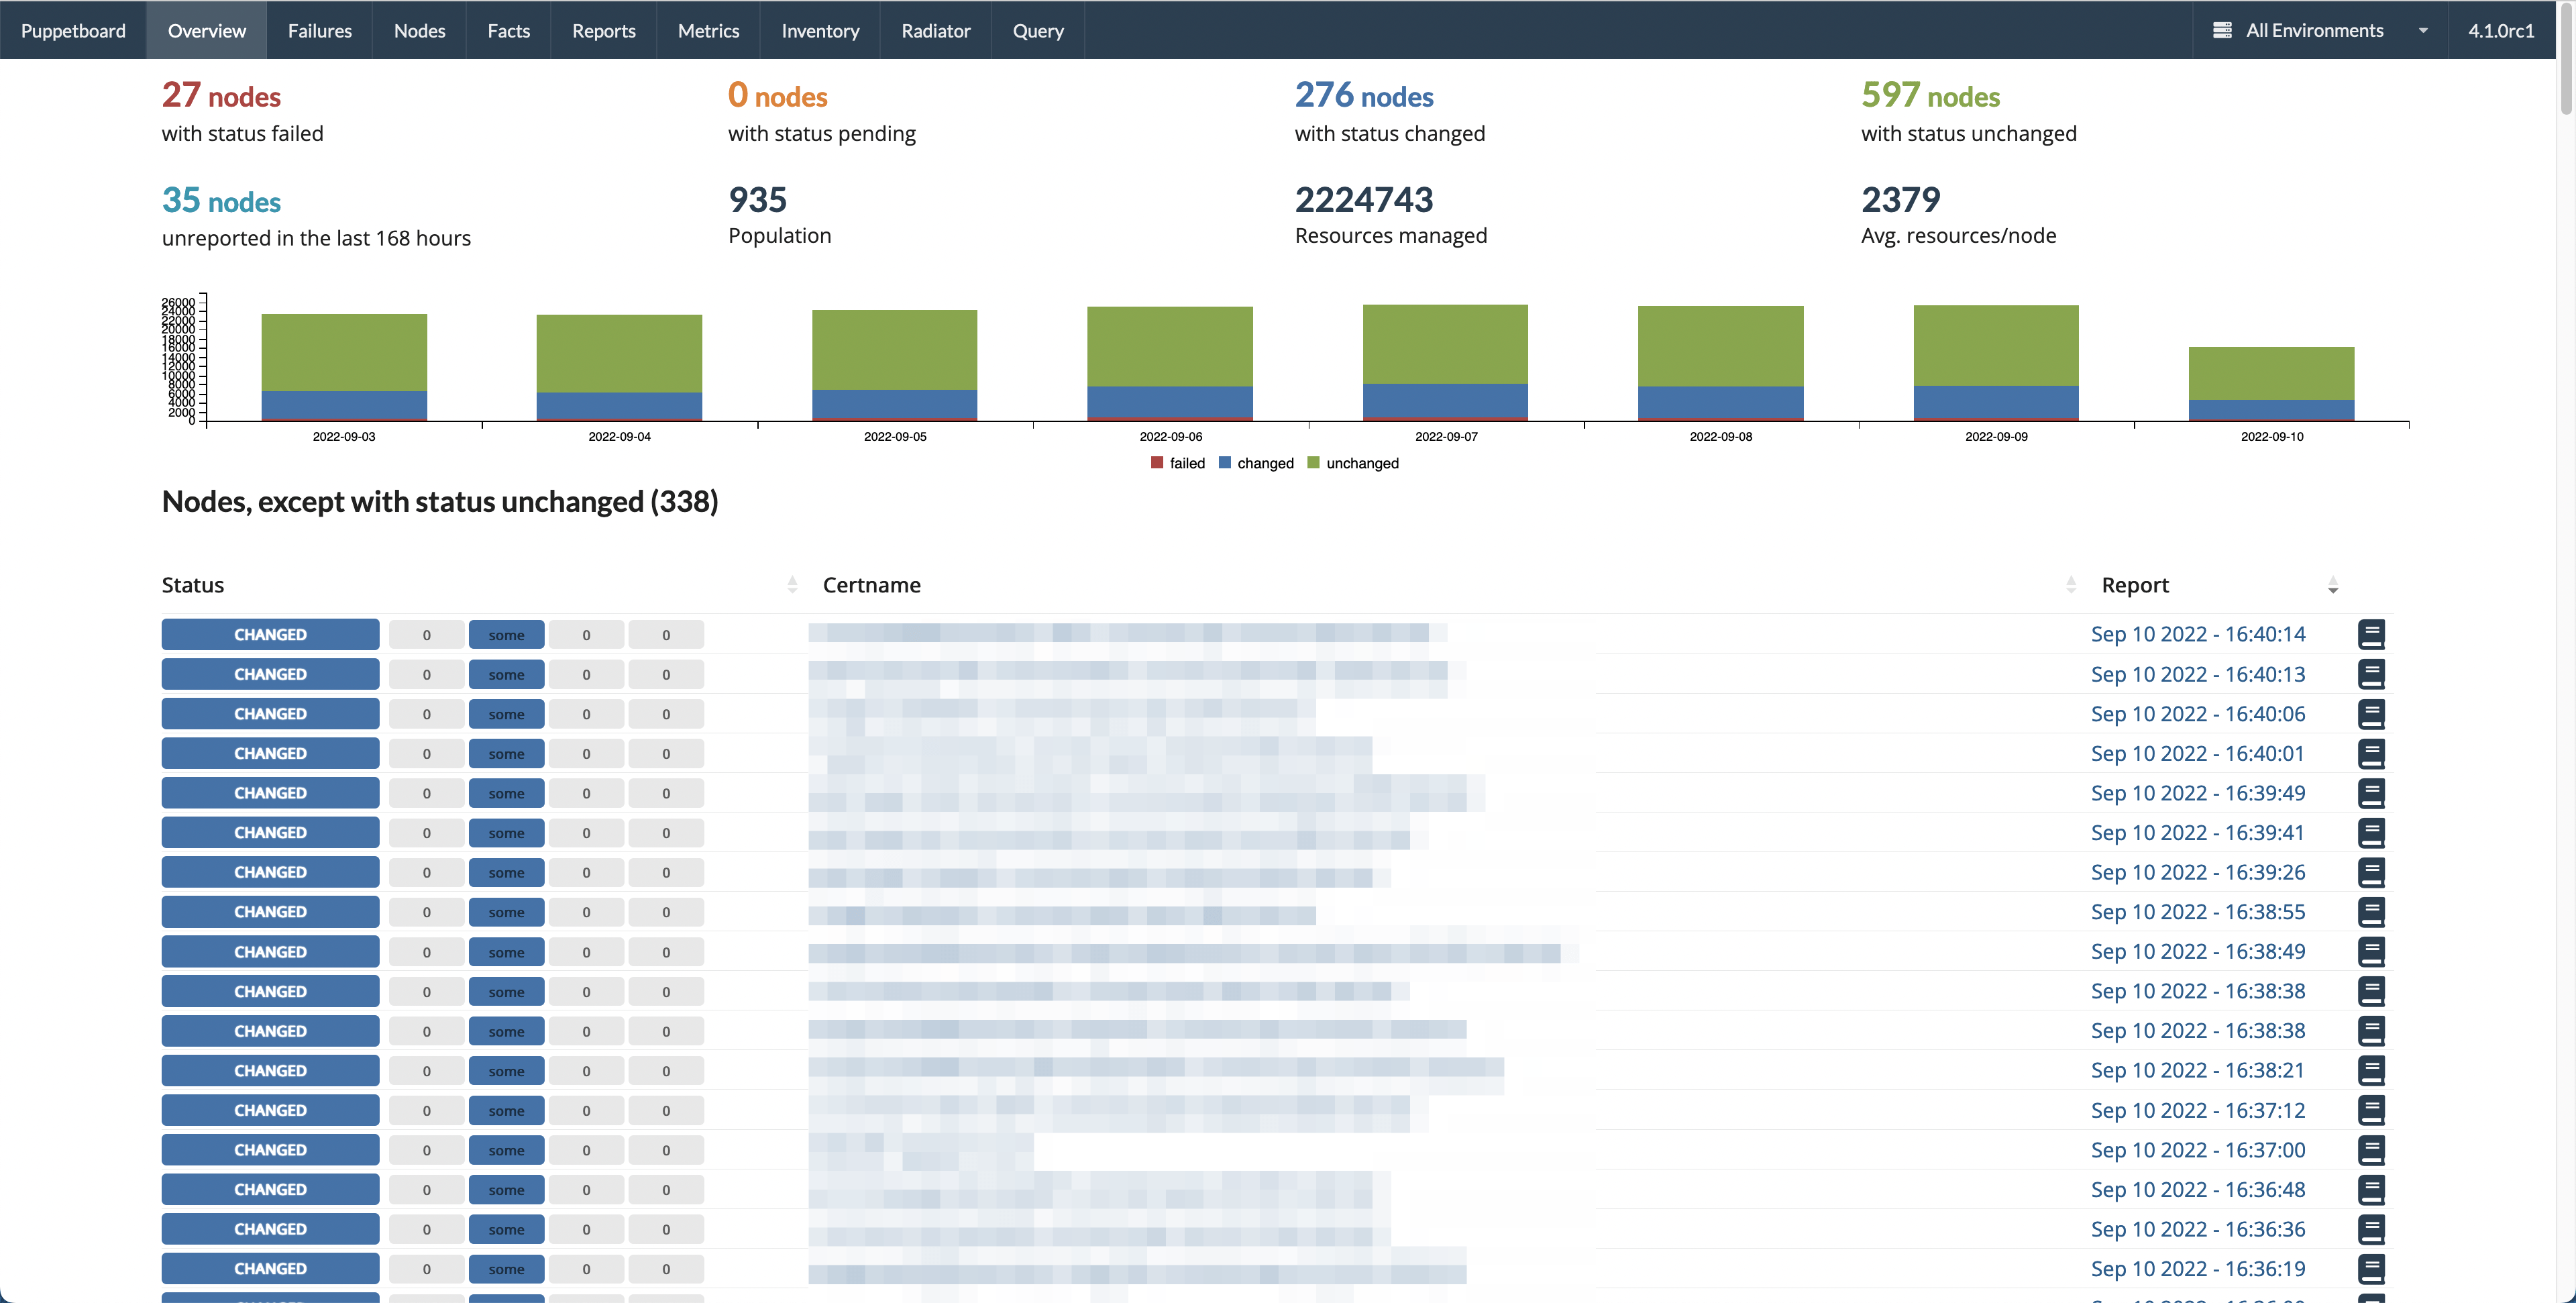
Table of Contents
Requirements
- PuppetDB v. 5.2-8.*
- (Note: PuppetDB 8.1.0 is not supported because of this bug. Please update to 8.1.1+.)
- Python 3.9-3.13 or Docker
Installation
Puppetboard is packaged and available on PyPI.
With Puppet module
There is a Puppet module originally written by Spencer Krum and currently maintained by Voxpupuli that takes care of installing the Puppetboard for you.
To see how to get it working with RedHat/Centos 7 check out these docs.
Using Docker
We provide an official Docker image in:
You can run the app on your PuppetDB host with this command:
docker run -it \
  -e PUPPETDB_HOST=localhost \
  -e PUPPETDB_PORT=8080 \
  -e SECRET_KEY=XXXXXXXX \
  --net=host \
  ghcr.io/voxpupuli/puppetboard
Note: you must provide a secret key! Generate one for example by running ruby -e "require 'securerandom'; puts SecureRandom.hex(32)".
Optionally you can set PUPPETBOARD_URL_PREFIX env variable to a value like /puppetboard to run the app under a URL prefix.
You can use the following Puppet Code to have Puppetboard managed by Puppet:
include docker

docker::image { 'ghcr.io/voxpupuli/puppetboard': }

docker::run { 'puppetboard':
  image => 'ghcr.io/voxpupuli/puppetboard',
  env   => [
    'PUPPETDB_HOST=127.0.0.1',
    'PUPPETDB_PORT=8080',
    'PUPPETBOARD_PORT=8088',
    'SECRET_KEY=XXXXXXXX',
  ],
  net   => 'host',
}
If you want to have all features enabled, you must use SSL talking to PuppetDB:
file { '/etc/puppetboard':
  ensure => directory,
}
file { '/etc/puppetboard/key.pem':
  ensure => file,
  mode   => '0644',
  source => "/etc/puppetlabs/puppet/ssl/private_keys/${facts['networking']['fqdn']}.pem",
}
file { '/etc/puppetboard/cert.pem':
  ensure => file,
  mode   => '0644',
  source => "/etc/puppetlabs/puppet/ssl/certs/${facts['networking']['fqdn']}.pem",
}

include docker

docker::image { 'ghcr.io/voxpupuli/puppetboard': }

docker::run { 'puppetboard':
  image   => 'ghcr.io/voxpupuli/puppetboard',
  volumes => ['/etc/puppetboard:/etc/puppetboard:ro'],
  env     => [
    'PUPPETDB_HOST=puppet', # this must be the certname or DNS_ALT_NAME of the PuppetDB host
    'PUPPETDB_PORT=8081',
    'PUPPETBOARD_PORT=8080',
    'ENABLE_CATALOG=true',
    'PUPPETDB_SSL_VERIFY=false',
    'PUPPETDB_KEY=/etc/puppetboard/key.pem',
    'PUPPETDB_CERT=/etc/puppetboard/cert.pem',
    'SECRET_KEY=XXXXXXXX',
    'DEFAULT_ENVIRONMENT=*',
  ],
  net     => 'host',
}
Within an air gapped environment you want to load all content from your local puppetboard web service.
Add: 'OFFLINE_MODE=true', to the env parameter list of the docker::run Puppet type.
We also provide the Dockerfile, so you can build the image yourself:
docker build -t puppetboard .From a package
Actively maintained packages:
- FreeBSD maintained by Romain Tartière
- OpenBSD maintained by Sebastian Reitenbach
Manually
You can also install the package from PyPI and configure a WSGI-capable application server to serve it.
We recommend using virtualenv to provide a separate environment for the app.
virtualenv -p python3 venv
. venv/bin/activate
pip install puppetboard
Please see an article about more deployment setups here.
Configuration
Puppet agents
The default value of usecacheonfailure = true configuration setting for Puppet agents causes Puppet runs to always succeed,
event if there are catalog compilation failures f.e. because of a syntax error in your code. This is because in such
cases with this setting Puppet will just use a cached working catalog and report the run to PuppetDB as successful.
(Although with an error visible in the Puppet run log.)
Therefore, to show the nodes with a catalog compilation as failed in Puppetboard you need to set
usecacheonfailure = false in your nodes' puppet.conf.
PuppetDB
Of course you need to configure your Puppet Server to store the Puppet run reports in PuppetDB. If you haven't done that already please follow the PuppetDB documentation about this.
If you run Puppetboard on a different host than PuppetDB then you may want to configure the certificate allow-list for which certificates are allowed to access data from PuppetDB. Please read more about this feature in the PuppetDB documentation here.
App settings
Puppetboard will look for a file pointed at by the PUPPETBOARD_SETTINGS environment variable.
The file has to be identical to
default_settings.py
but should only override the settings you need changed.
If you run PuppetDB and Puppetboard on the same machine the default settings provided will be enough to get you started and you won't need a custom settings file.
Assuming your webserver and PuppetDB machine are not identical you will at least have to change the following settings:
PUPPETDB_HOSTPUPPETDB_PORT
By default PuppetDB requires SSL to be used when a non-local client wants to connect. Therefore you'll also have to supply the following settings:
PUPPETDB_SSL_VERIFY = TruePUPPETDB_KEY = /path/to/private/keyfile.pemPUPPETDB_CERT = /path/to/public/keyfile.crt
When using the Puppetboard Docker image, you may also pass Puppetboard it's certificate contents via these environment variables, either as a multiline string or pre-base64 encoded. This can be useful where the certificate is stored in a secrets store i.e. AWS SSM Parameter Store.
PUPPETDB_CERT="-----BEGIN CERTIFICATE-----
...
-----END CERTIFICATE-----"PUPPETDB_CERT=LS0tLS1CRUdJTiBSU0EgUFJJVkFURSBLRVktLS0tLQouLi4KLS0tLS1FTkQgQ0VSVElGSUNBVEUtLS0tLQ==For information about how to generate the correct keys please refer to the
pypuppetdb documentation. Alternatively it is possible
to explicitly specify the protocol to be used setting the PUPPETDB_PROTO variable.
Other settings that might be interesting, in no particular order:
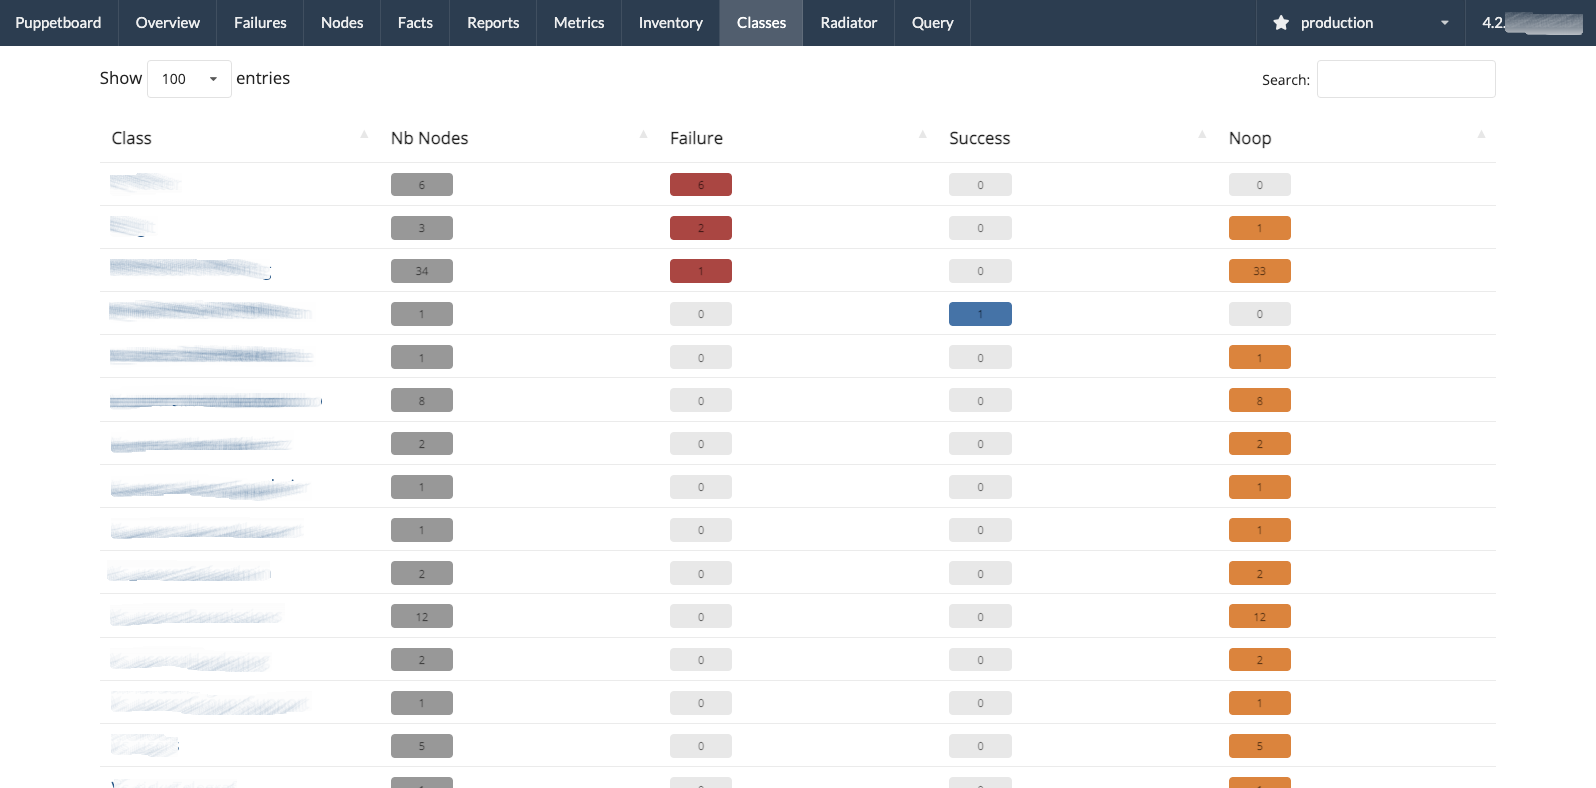
SECRET_KEY: set this to a long string, the same for each application replica, and keep it secret. Refer to Flask documentation, section "How to generate good secret keys" for more info. Cannot be an empty string, which is the default.FAVORITE_ENVS: an ordered list of Puppet environment names that will be shown immediately after "All Environments" and before other environments (which are sorted by name) in the dropdown for choosing the environment shown in the top-right of the UI. Environments listed here that do not really exist in your deployment are silently ignored.SHOW_ERROR_AS:friendlyorraw. The former makes Puppet run errors in Report and Failures views shown in a modified, (arguably) more user-friendly form. The latter shows them as they are. Defaults tofriendly.CODE_PREFIX_TO_REMOVE: what code path that should be shortened in "Friendly errors" to "…" for readability. A regexp. Defaults to/etc/puppetlabs/code/environments(/.*?/modules)?.PUPPETDB_TIMEOUT: Defaults to 20 seconds, but you might need to increase this value. It depends on how big the results are when querying PuppetDB. This behaviour will change in a future release when pagination will be introduced.UNRESPONSIVE_HOURS: The amount of hours since the last check-in after which a node is considered unresponsive.LOGLEVEL: A string representing the loglevel. It defaults to'info'but can be changed to'warning'or'critical'for less verbose logging or'debug'for more information.ENABLE_QUERY: Defaults toTruecausing a Query tab to show up in the web interface allowing users to write and execute arbitrary queries against a set of endpoints in PuppetDB. Change this toFalseto disable this. SeeENABLED_QUERY_ENDPOINTSto fine-tune which endpoints are allowed.ENABLED_QUERY_ENDPOINTS: IfENABLE_QUERYisTrue, allow to fine tune the endpoints of PuppetDB APIs that can be queried. It must be a list of strings of PuppetDB endpoints for which the query is enabled. See theQUERY_ENDPOINTSconstant in thepuppetboard.appmodule for a list of the available endpoints.GRAPH_TYPE: Specify the type of graph to display. Default is pie, other good option is donut. Other choices can be found here: C3.js documentationGRAPH_FACTS: A list of fact names to tell PuppetBoard to generate a pie-chart on the fact page. With some fact values being unique per node, like ipaddress, uuid, and serial number, as well as structured facts it was no longer feasible to generate a graph for everything.INVENTORY_FACTS: A list of tuples that serve as the column header and the fact name to search for to create the inventory page. If a fact is not found for a node thenundefis printed.INVENTORY_FACT_TEMPLATES: A mapping between fact name and jinja template to customize displayENABLE_CATALOG: If set toTrueallows the user to view a node's latest catalog. This includes all managed resources, their file-system locations and their relationships, if available. Defaults toFalse.REFRESH_RATE: Defaults to30the number of seconds to wait until the index page is automatically refreshed.DEFAULT_ENVIRONMENT: Defaults to'production', as the name suggests, load all information filtered by this environment value.REPORTS_COUNT: Defaults to10the limit of the number of reports to load on the node or any reports page.OFFLINE_MODE: If set toTrueload static assets (jquery, semantic-ui, etc) from the local web server instead of a CDN. Defaults toFalse.DAILY_REPORTS_CHART_ENABLED: Enable the use of daily chart graphs when looking at dashboard and node view.DAILY_REPORTS_CHART_DAYS: Number of days to show history for on the daily report graphs.DISPLAYED_METRICS: Metrics to show when displaying node summary. Example:'resources.total','events.noop'.TABLE_COUNT_SELECTOR: Configure the dropdown to limit number of hosts to show per page.LITTLE_TABLE_COUNT: Default number of reports to show when when looking at a node.NORMAL_TABLE_COUNT: Default number of nodes to show when displaying reports and catalog nodes.LOCALISE_TIMESTAMP: If set toTruethen timestamps are shown using your browser's timezone. Otherwise UTC is used. Defaults toTrue.WITH_EVENT_NUMBERS: If set toTruethen Overview and Nodes list shows exact number of changed resources in the last report. Otherwise shows only 'some' string if there are resources with given status. Setting this toFalsegives performance benefits, especially in big Puppet environments (more than few hundreds of nodes). Defaults toTrue.ENABLE_CLASS: If set toTrueallows the user to view the number of resource events (number of changed resources in the last report) grouped by class. The resource events are grouped by their status ('failure', 'success', 'noop').CLASS_EVENTS_STATUS_COLUMNS: A mapping between the status of the resource events and the name of the columns of the table to display.CACHE_TYPE: Specifies which type of caching object to use whenSCHEDULER_ENABLEDis set toTrue. The cache is used for the classes view (ENABLE_CLASSis set toTrue) which requires parsing the events of all the latest reports to group them by Puppet class. If the last report is present in the cache, we do not parse the events, which avoids unnecessary processing. If you configure more than one worker, you must use a shared backend (e.g.MemcachedCache) to allow the sharing of the cache between the processes. Indeed, theSimpleCachetype does not allow sharing the cache between processes, it uses the process memory to store the cache. Defaults toSimpleCache.CACHE_DEFAULT_TIMEOUT: Cache lifetime in second. Defaults to3600.SCHEDULER_ENABLED: If set toTruethen a scheduler instance is created in order to execute scheduled jobs. Defaults toFalse.SCHEDULER_JOBS: List of the scheduled jobs to trigger within a worker. A job can for example be used to compute a result to be cached. This is the case for the classes view which uses a job to pre-compute at regular intervals the results to be displayed. Each scheduled job must contain the following fields:id,func,trigger,seconds.SCHEDULER_LOCK_BIND_PORT: Specifies an available port that allows a single worker to listen on it. This allows to configure scheduled jobs in a single worker. Defaults to49100.
Getting Help
For questions or bug reports you can file an issue.
Contributing
Development
Puppetboard relies on the pypuppetdb library to fetch data from PuppetDB and is built with the help of the Flask microframework.
If you wish to hack on Puppetboard you should fork/clone the Github repository and then install the requirements through:
pip install --upgrade wheel setuptools
python setup.py develop
pip install --upgrade -r requirements-test.txt
mypy --install-types --non-interactive puppetboard/ test/
You're advised to do this inside a virtualenv specifically created to work on Puppetboard as to not pollute your global Python installation.
You can run the tests with:
pytest --cov=. --cov-report=xml --strict-markers --mypy puppetboard test
pylint --errors-only puppetboard test
You can run the app it in development mode by simply executing:
flask runYou can specify listening host and port with environment variables or command line otions:
export FLASK_RUN_HOST=0.0.0.0
export FLASK_RUN_PORT=8000

flask run
or
flask run --host '0.0.0.0' --port '8000'Use PUPPETBOARD_SETTINGS to change the different settings or patch default_settings.py directly.
Take care not to include your local changes on that file when submitting patches for Puppetboard.
Place a settings.py file inside the base directory of the git repository that will be used, if the environment
variable is not set.
We welcome contributions to this project. However, there are a few ground rules contributors should be aware of.
License
This project is licensed under the Apache v2.0 License. As such, your contributions, once accepted, are automatically covered by this license.
Commit messages
Write decent commit messages. Don't use swear words and refrain from uninformative commit messages as 'fixed typo'.
The preferred format of a commit message:
docs/quickstart: Fixed a typo in the Nodes section.

If needed, elaborate further on this commit. Feel free to write a
complete blog post here if that helps us understand what this is
all about.

Fixes #4 and resolves #2.
If you'd like a more elaborate guide on how to write and format your commit messages have a look at this post by Tim Pope.
Build a release
please see: RELEASE.md
More Screenshots
- Overview / Index / Homepage
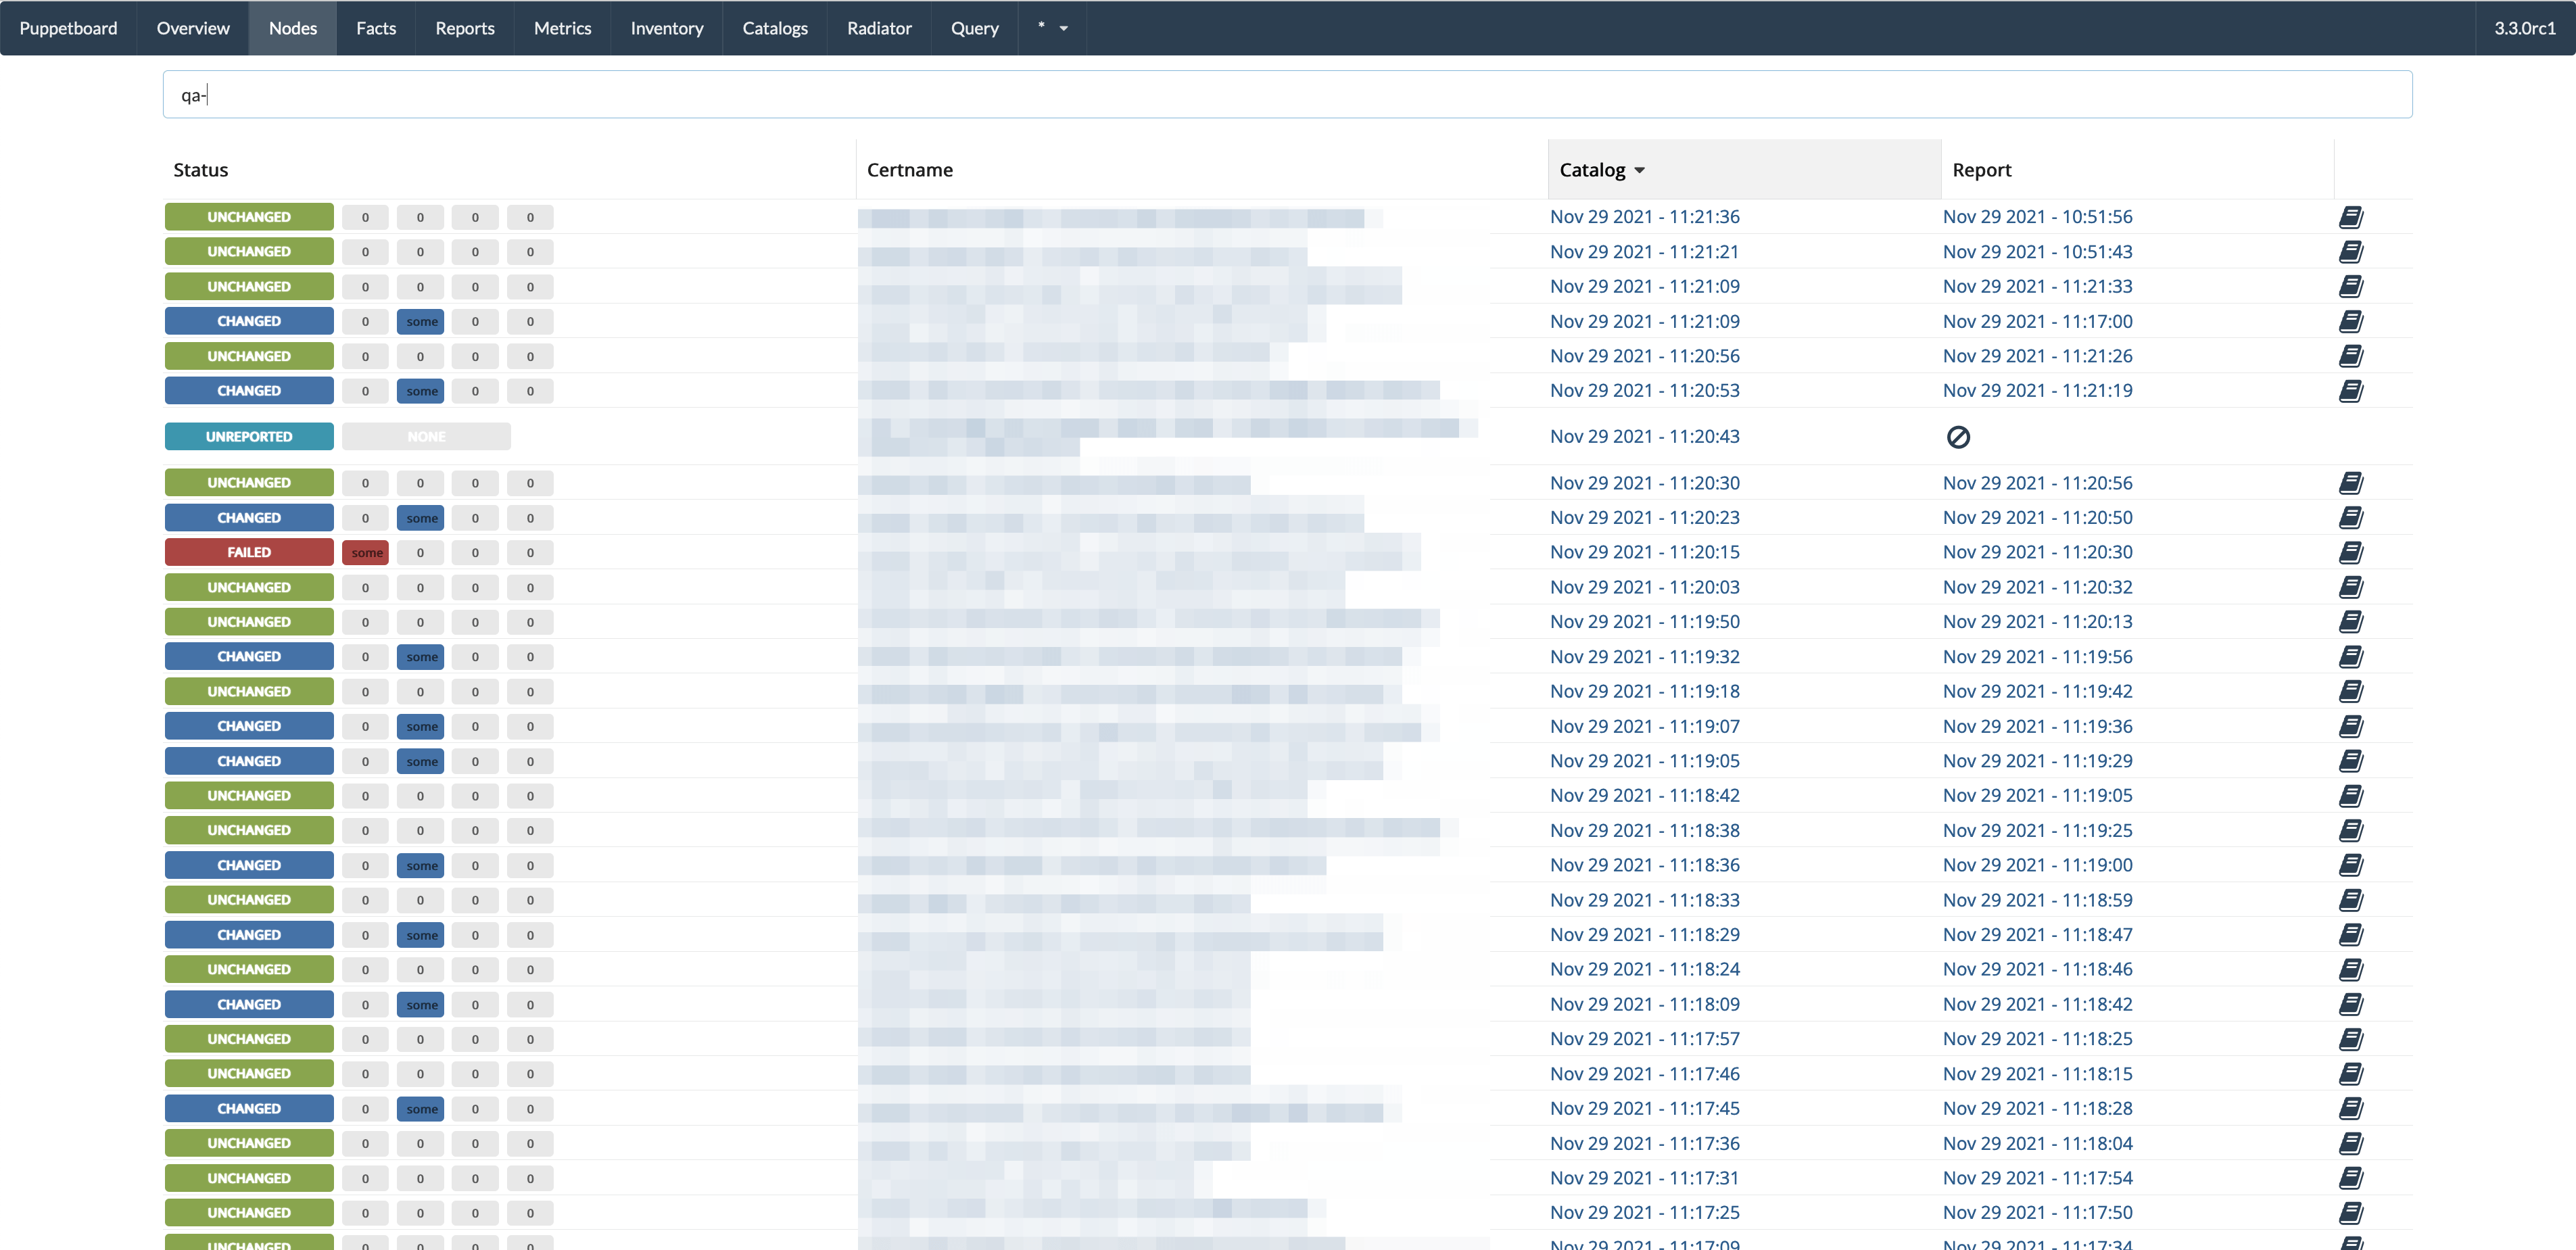
- Nodes view, all active nodes
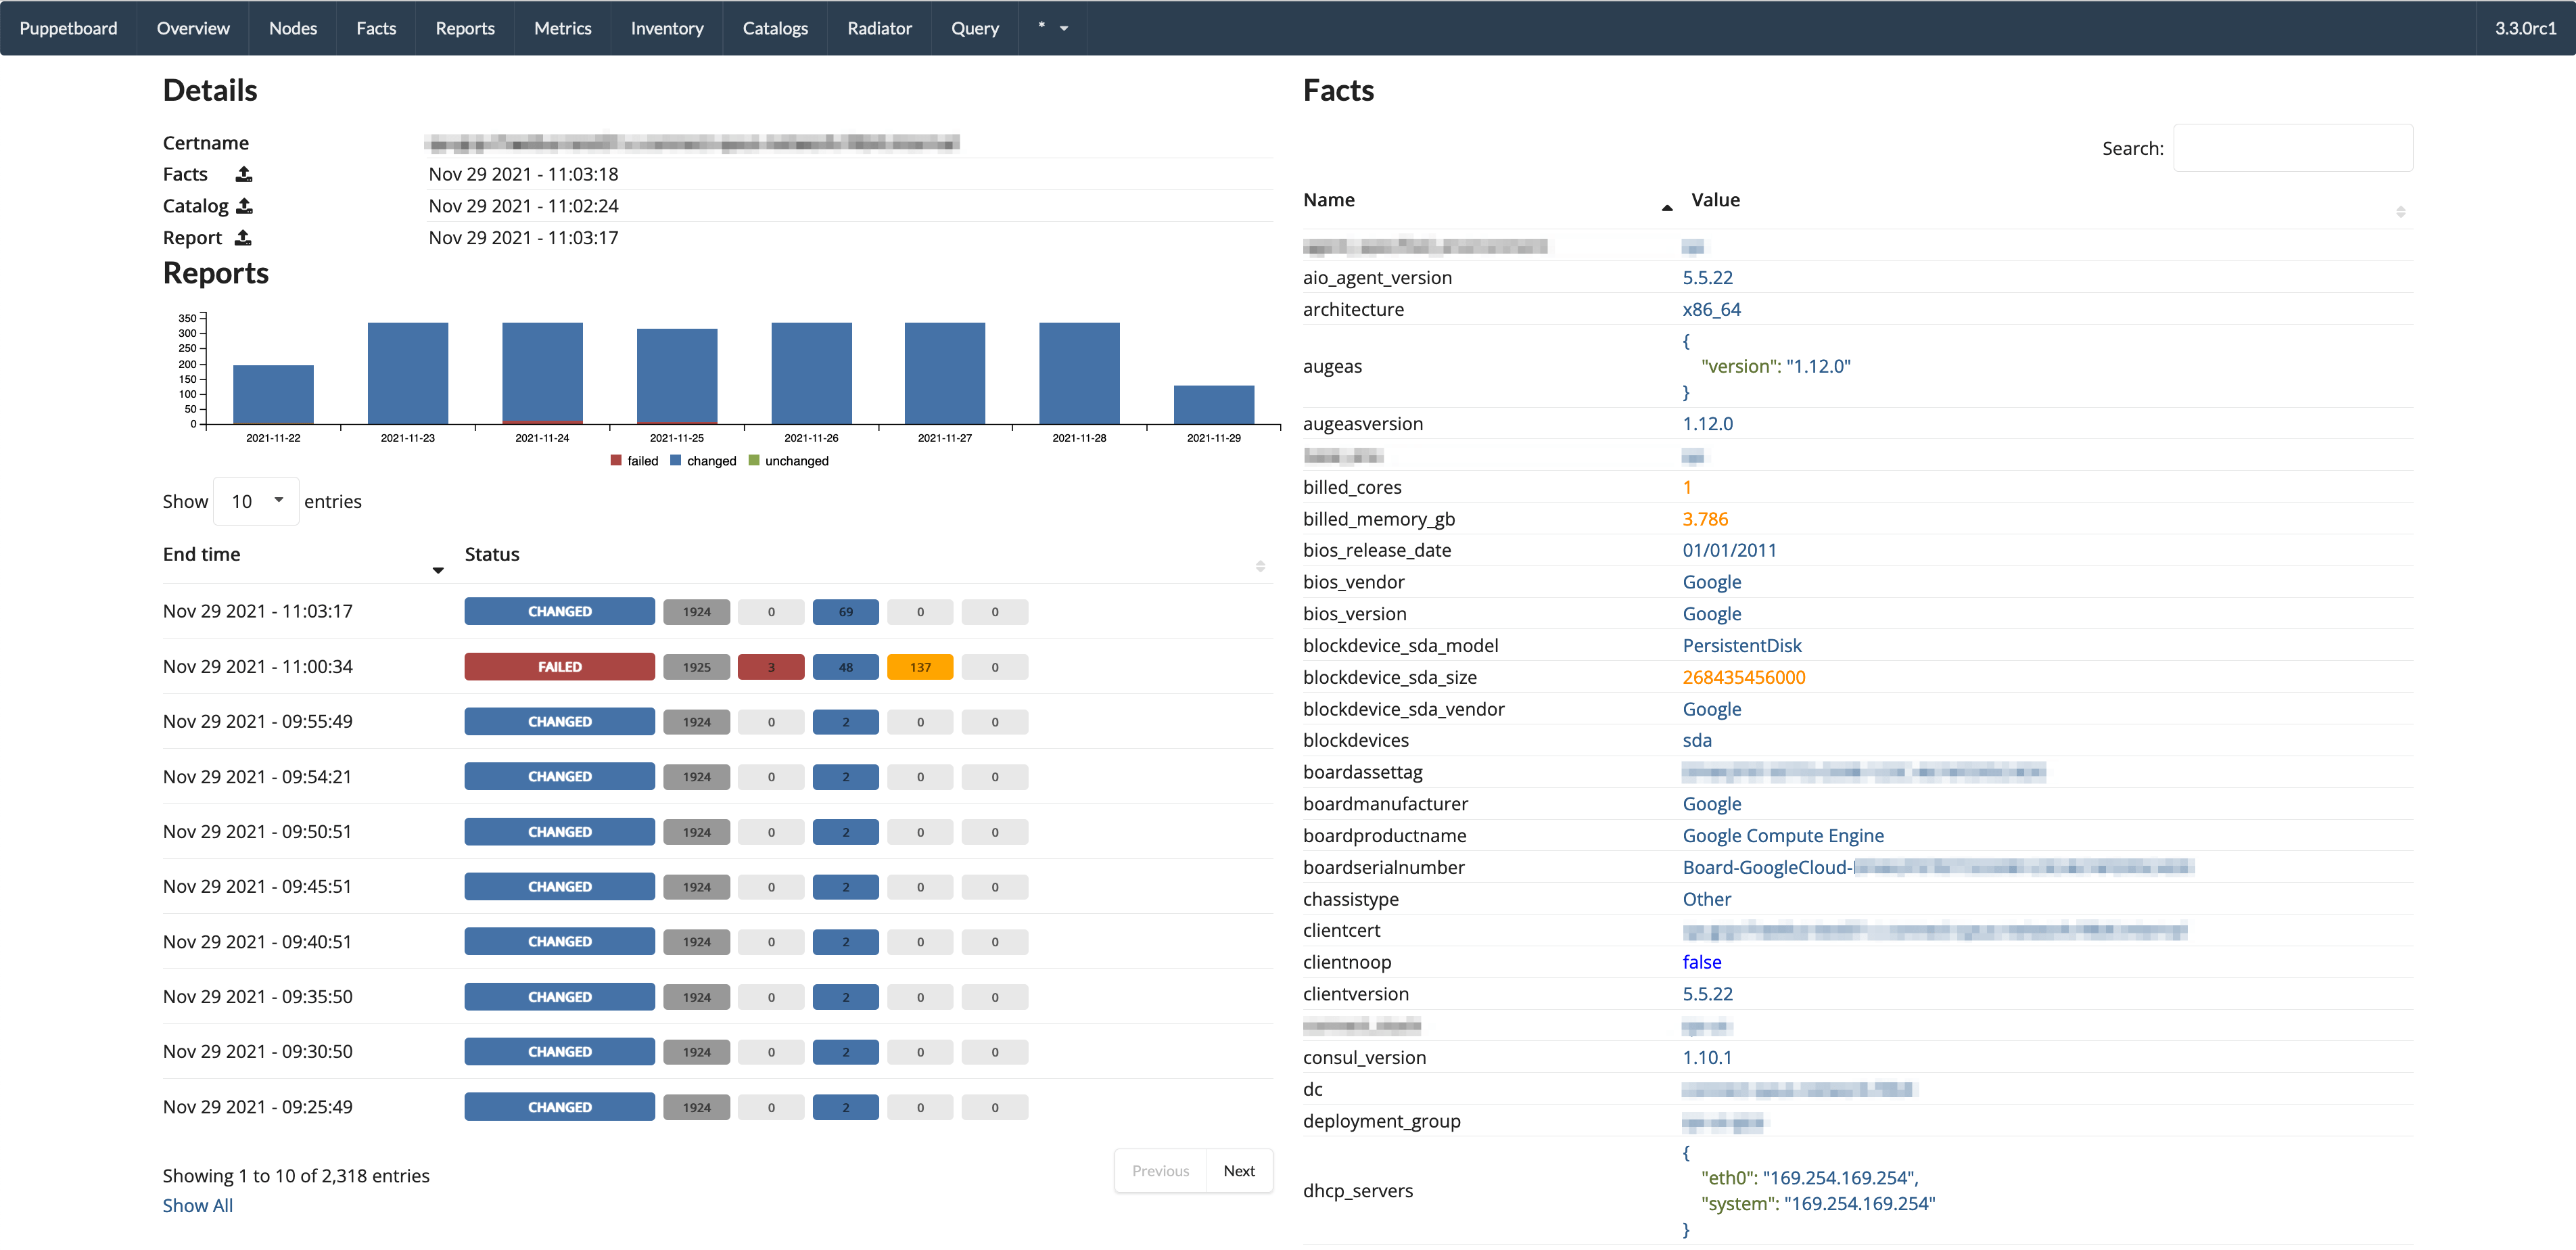
- Single node page / overview
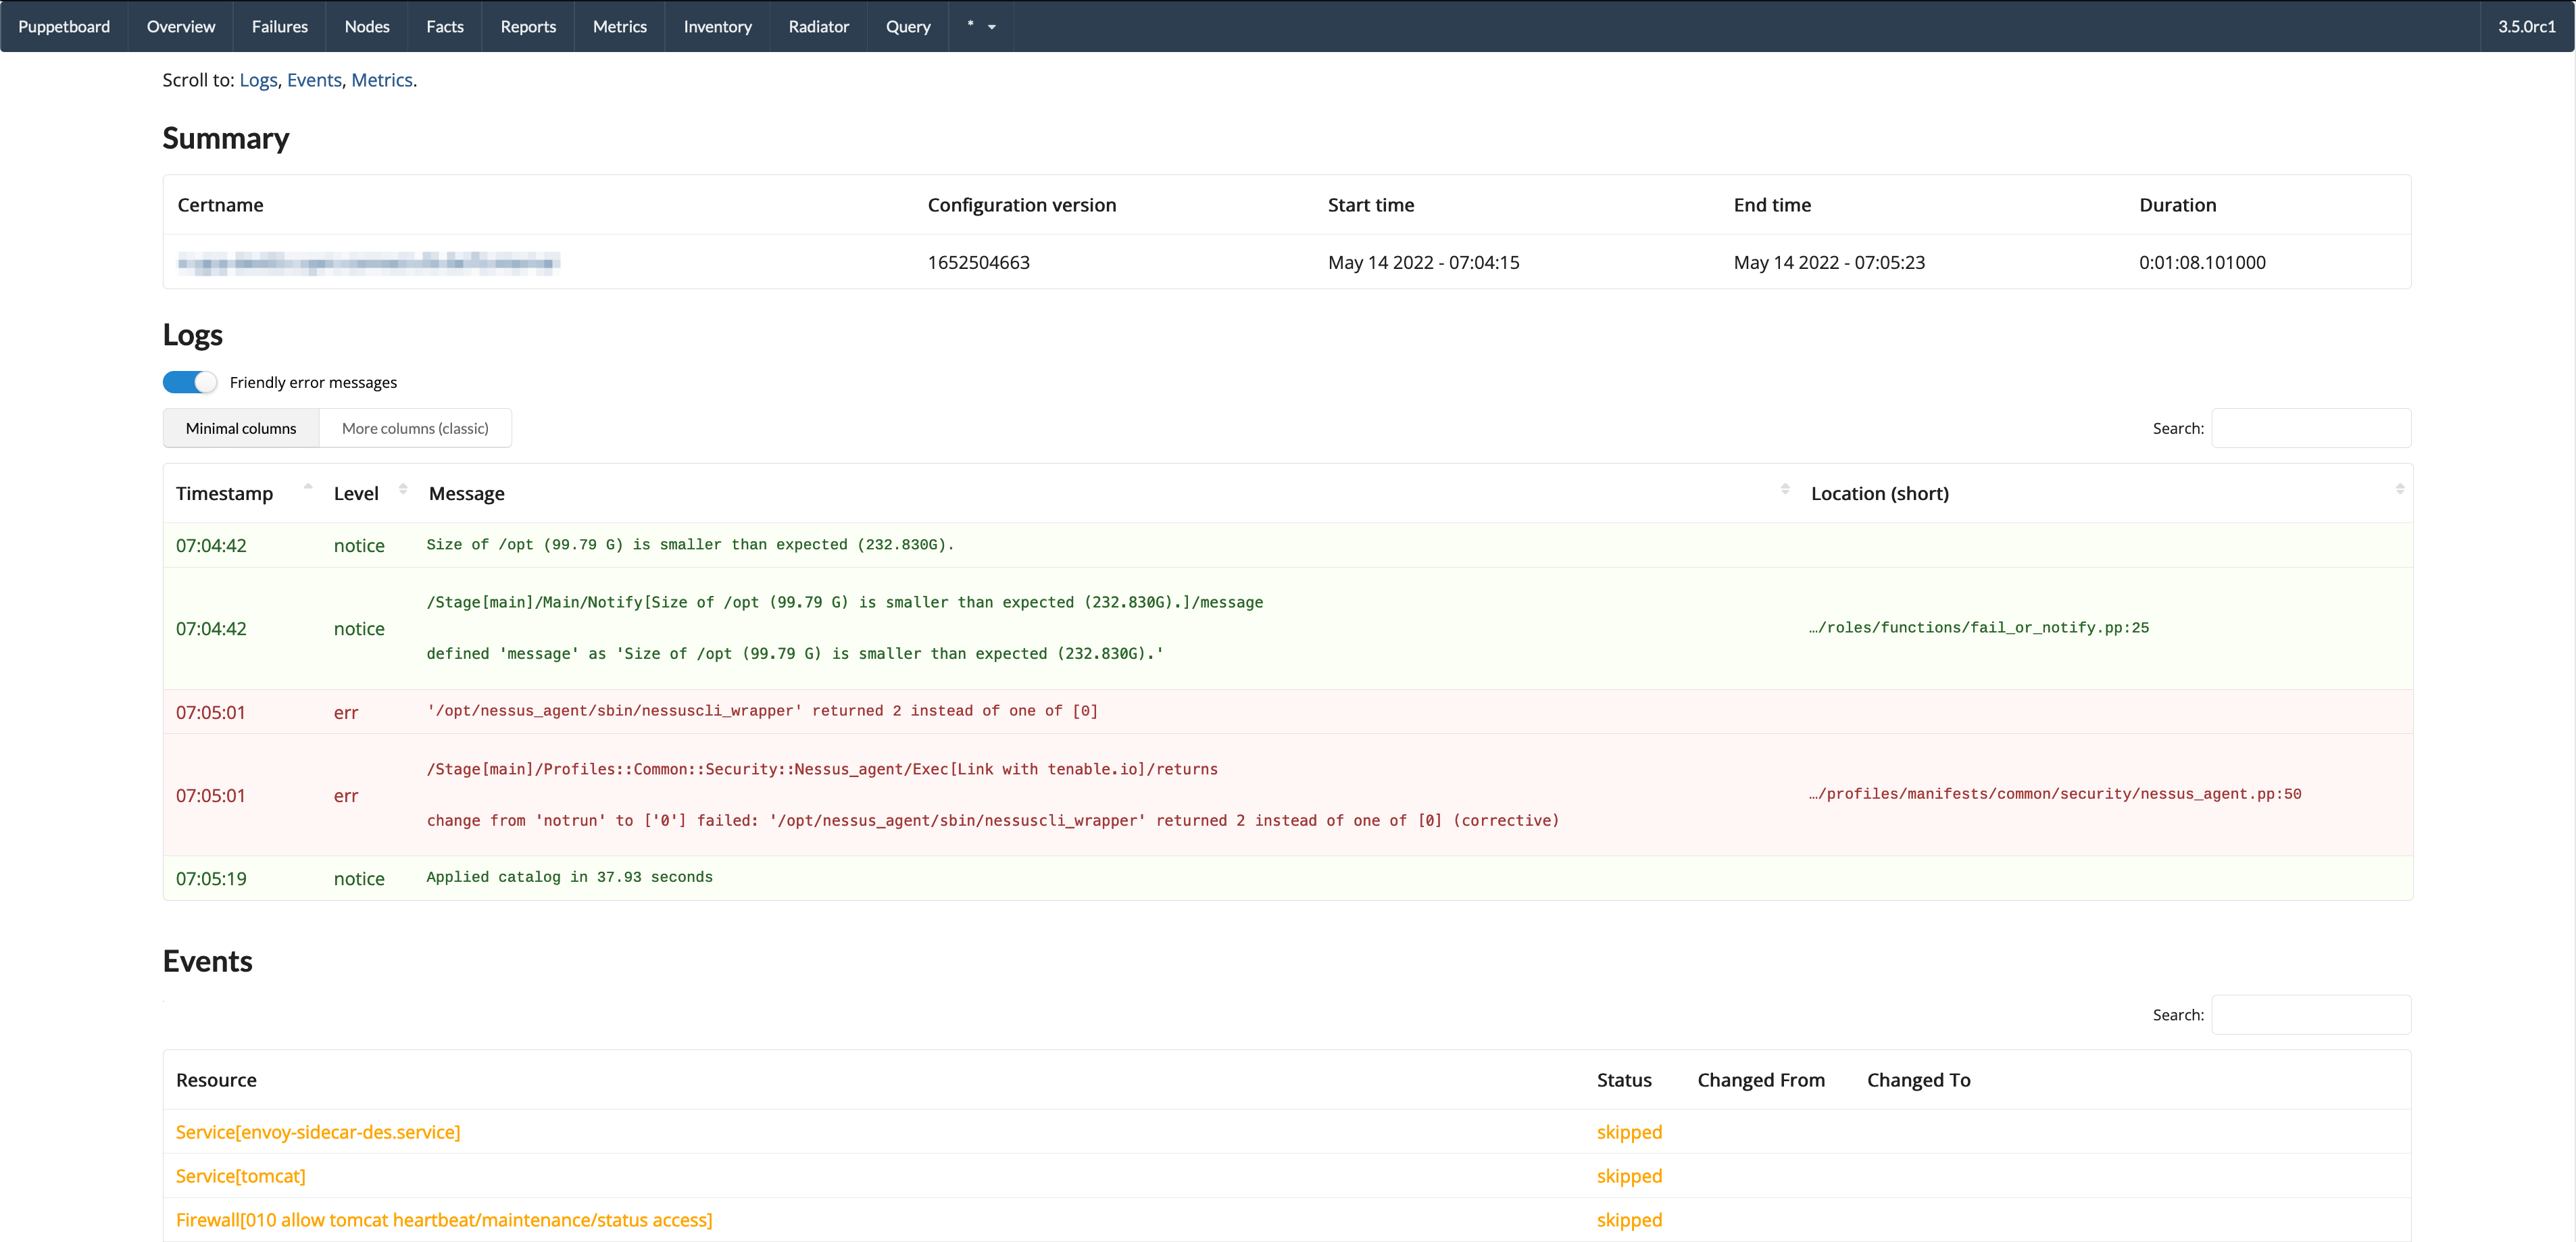
- Report view
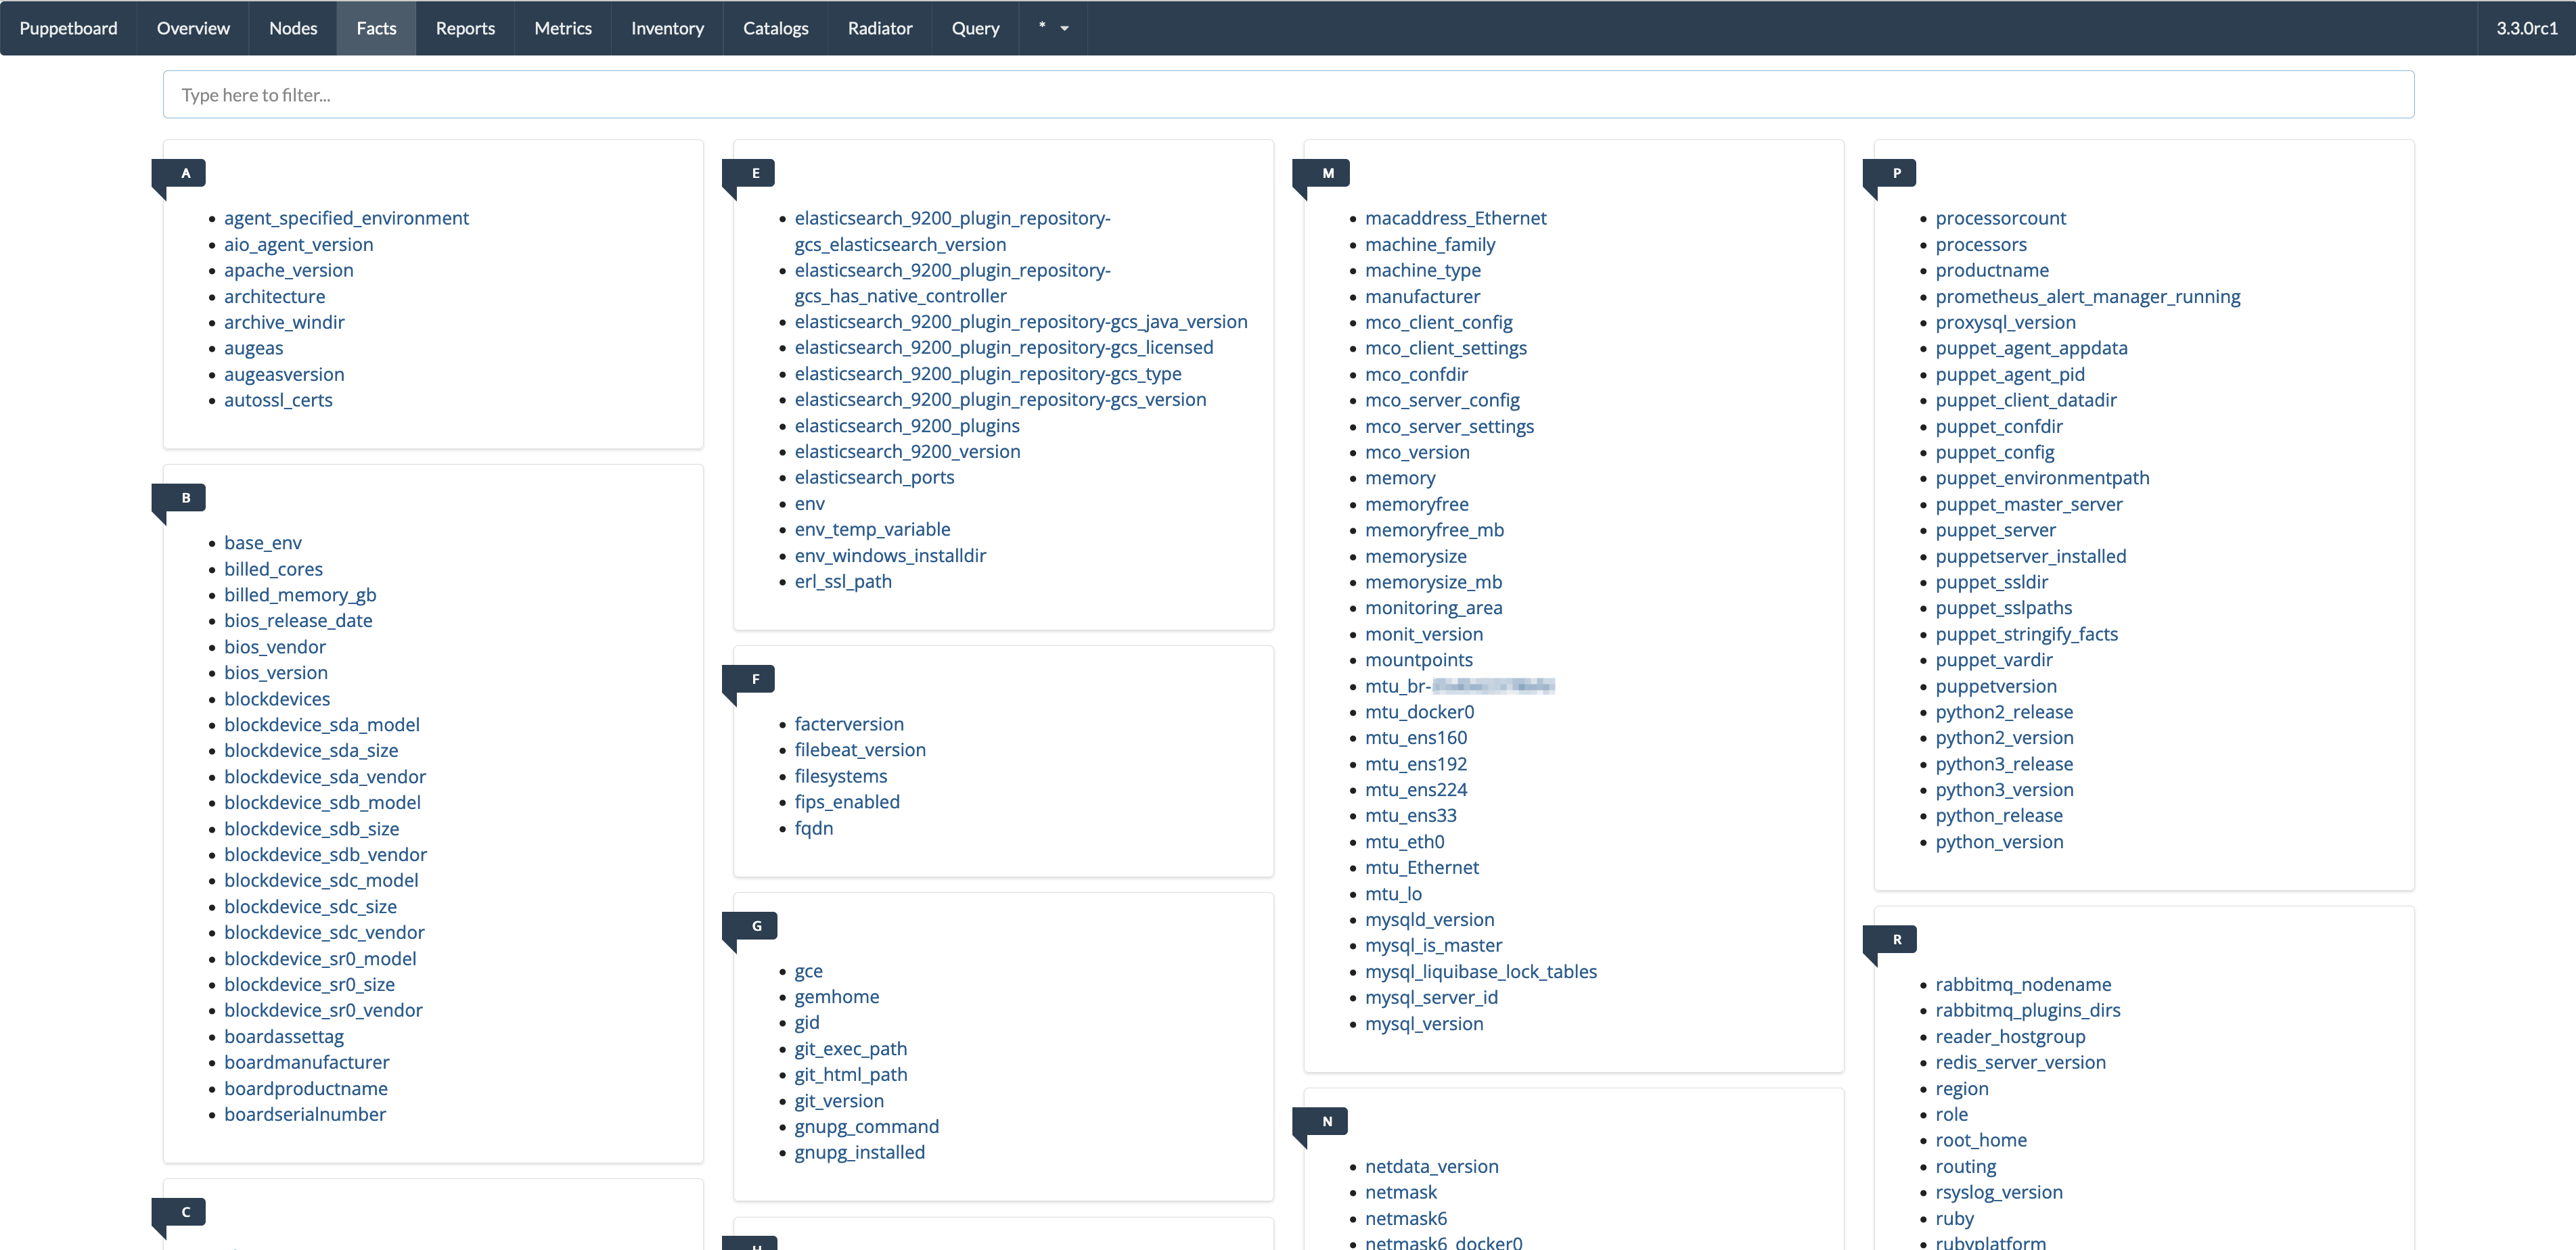
- Facts view
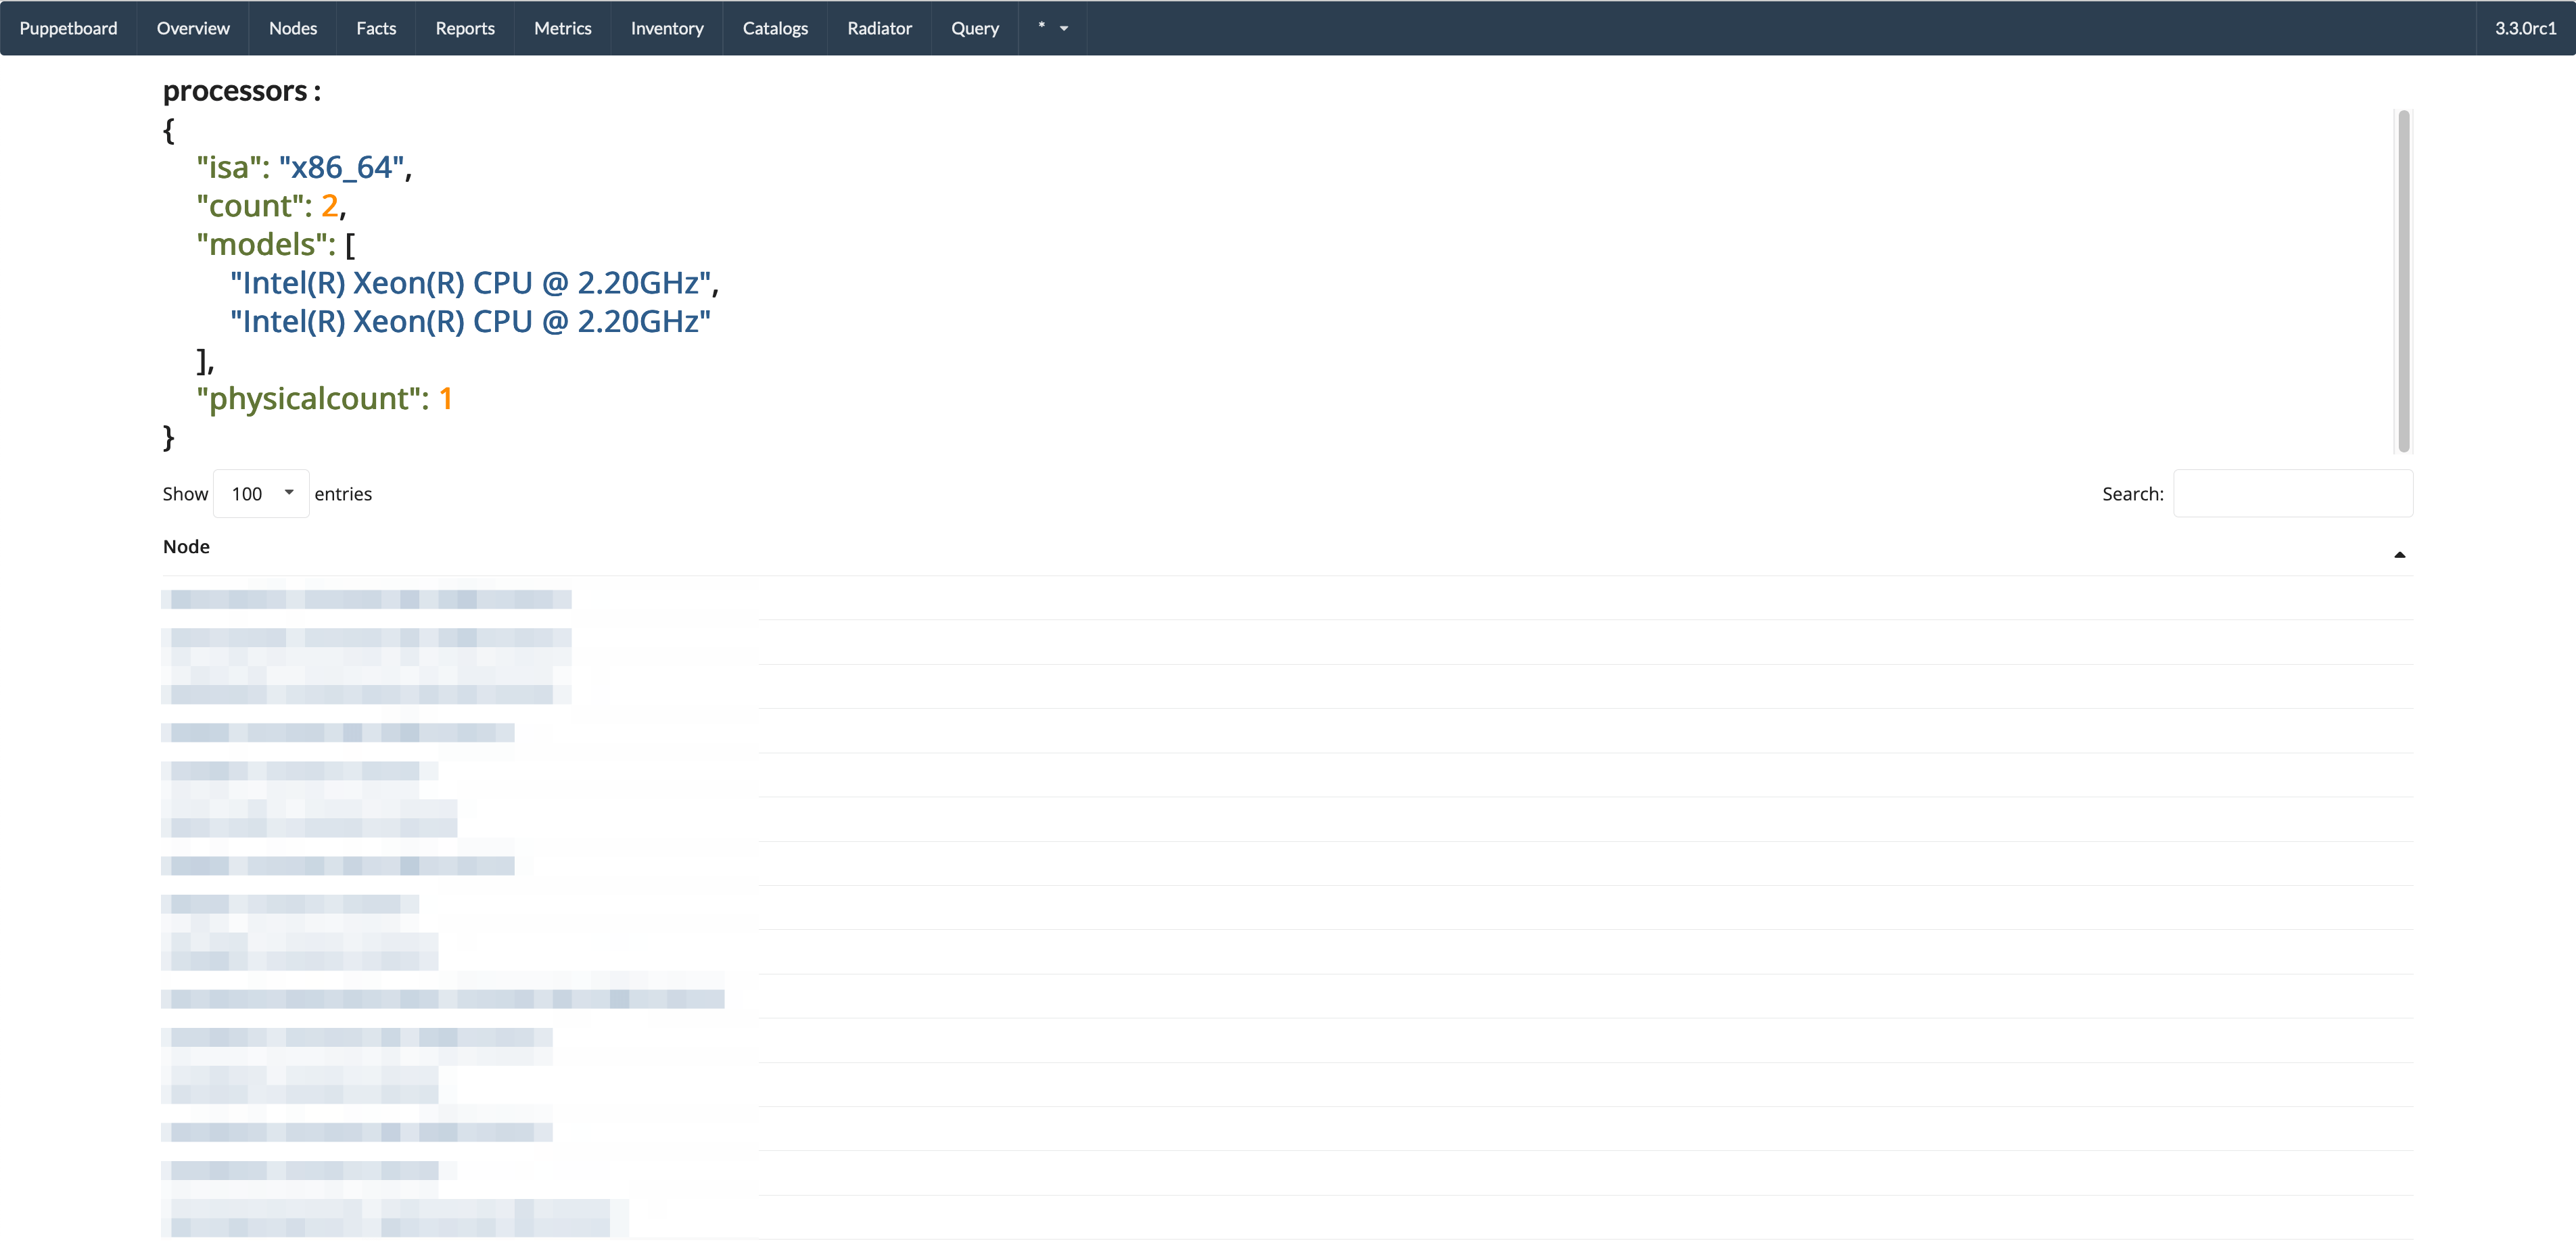
- Single fact, with graphs
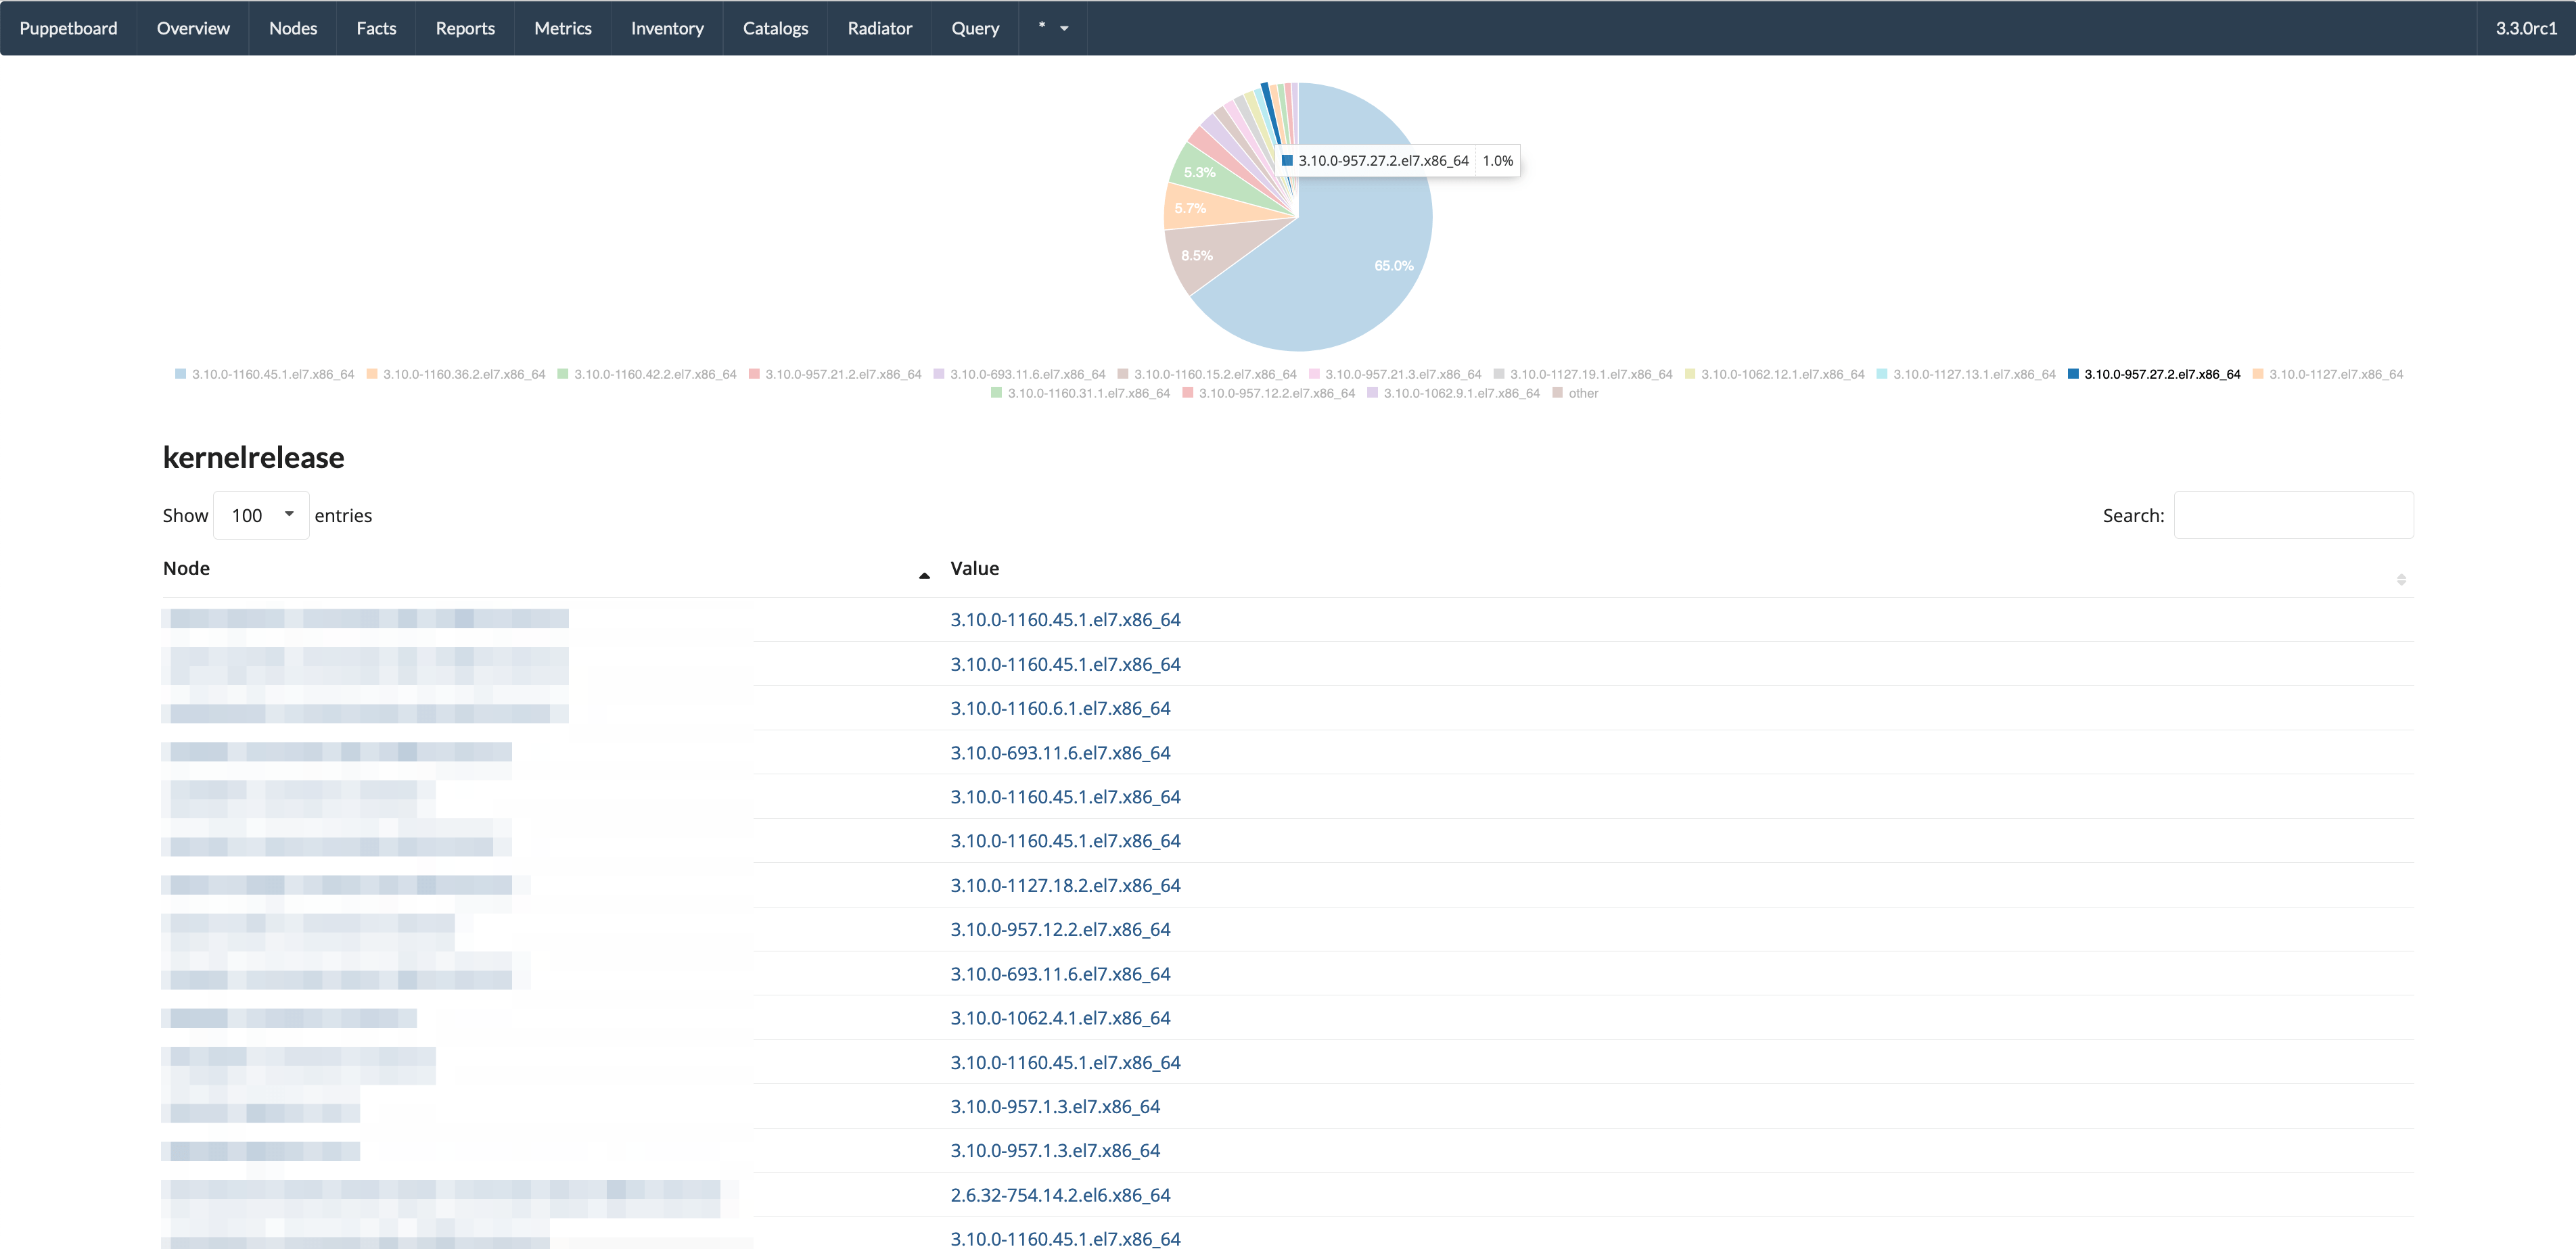
- All nodes that have this fact with that value
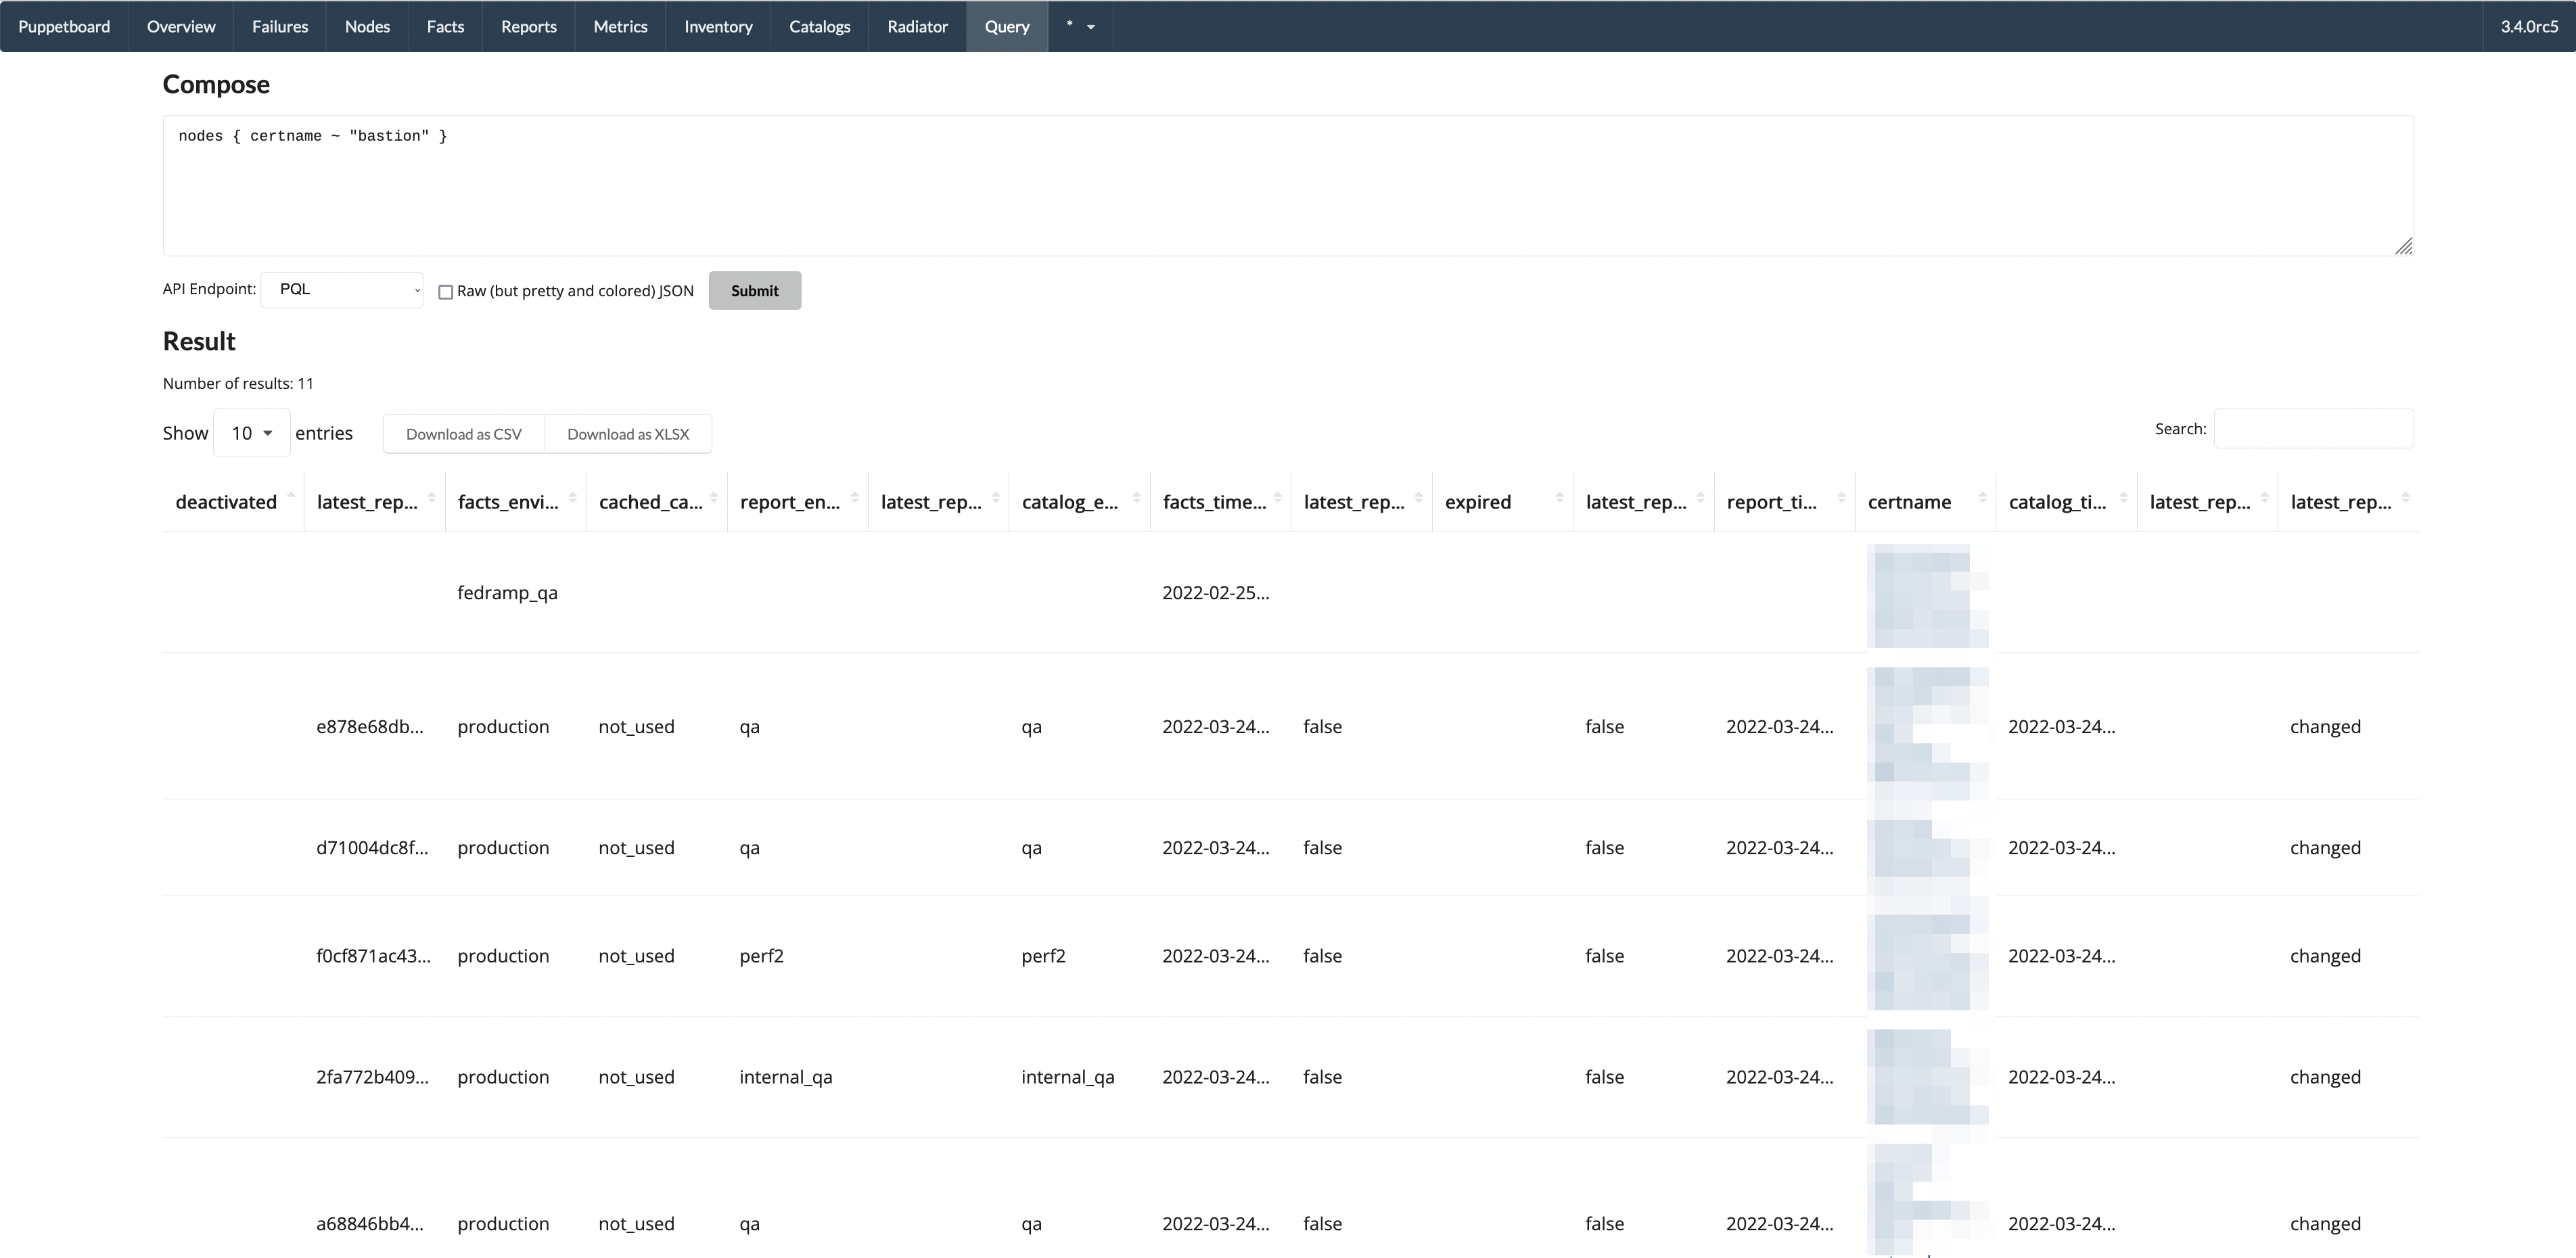
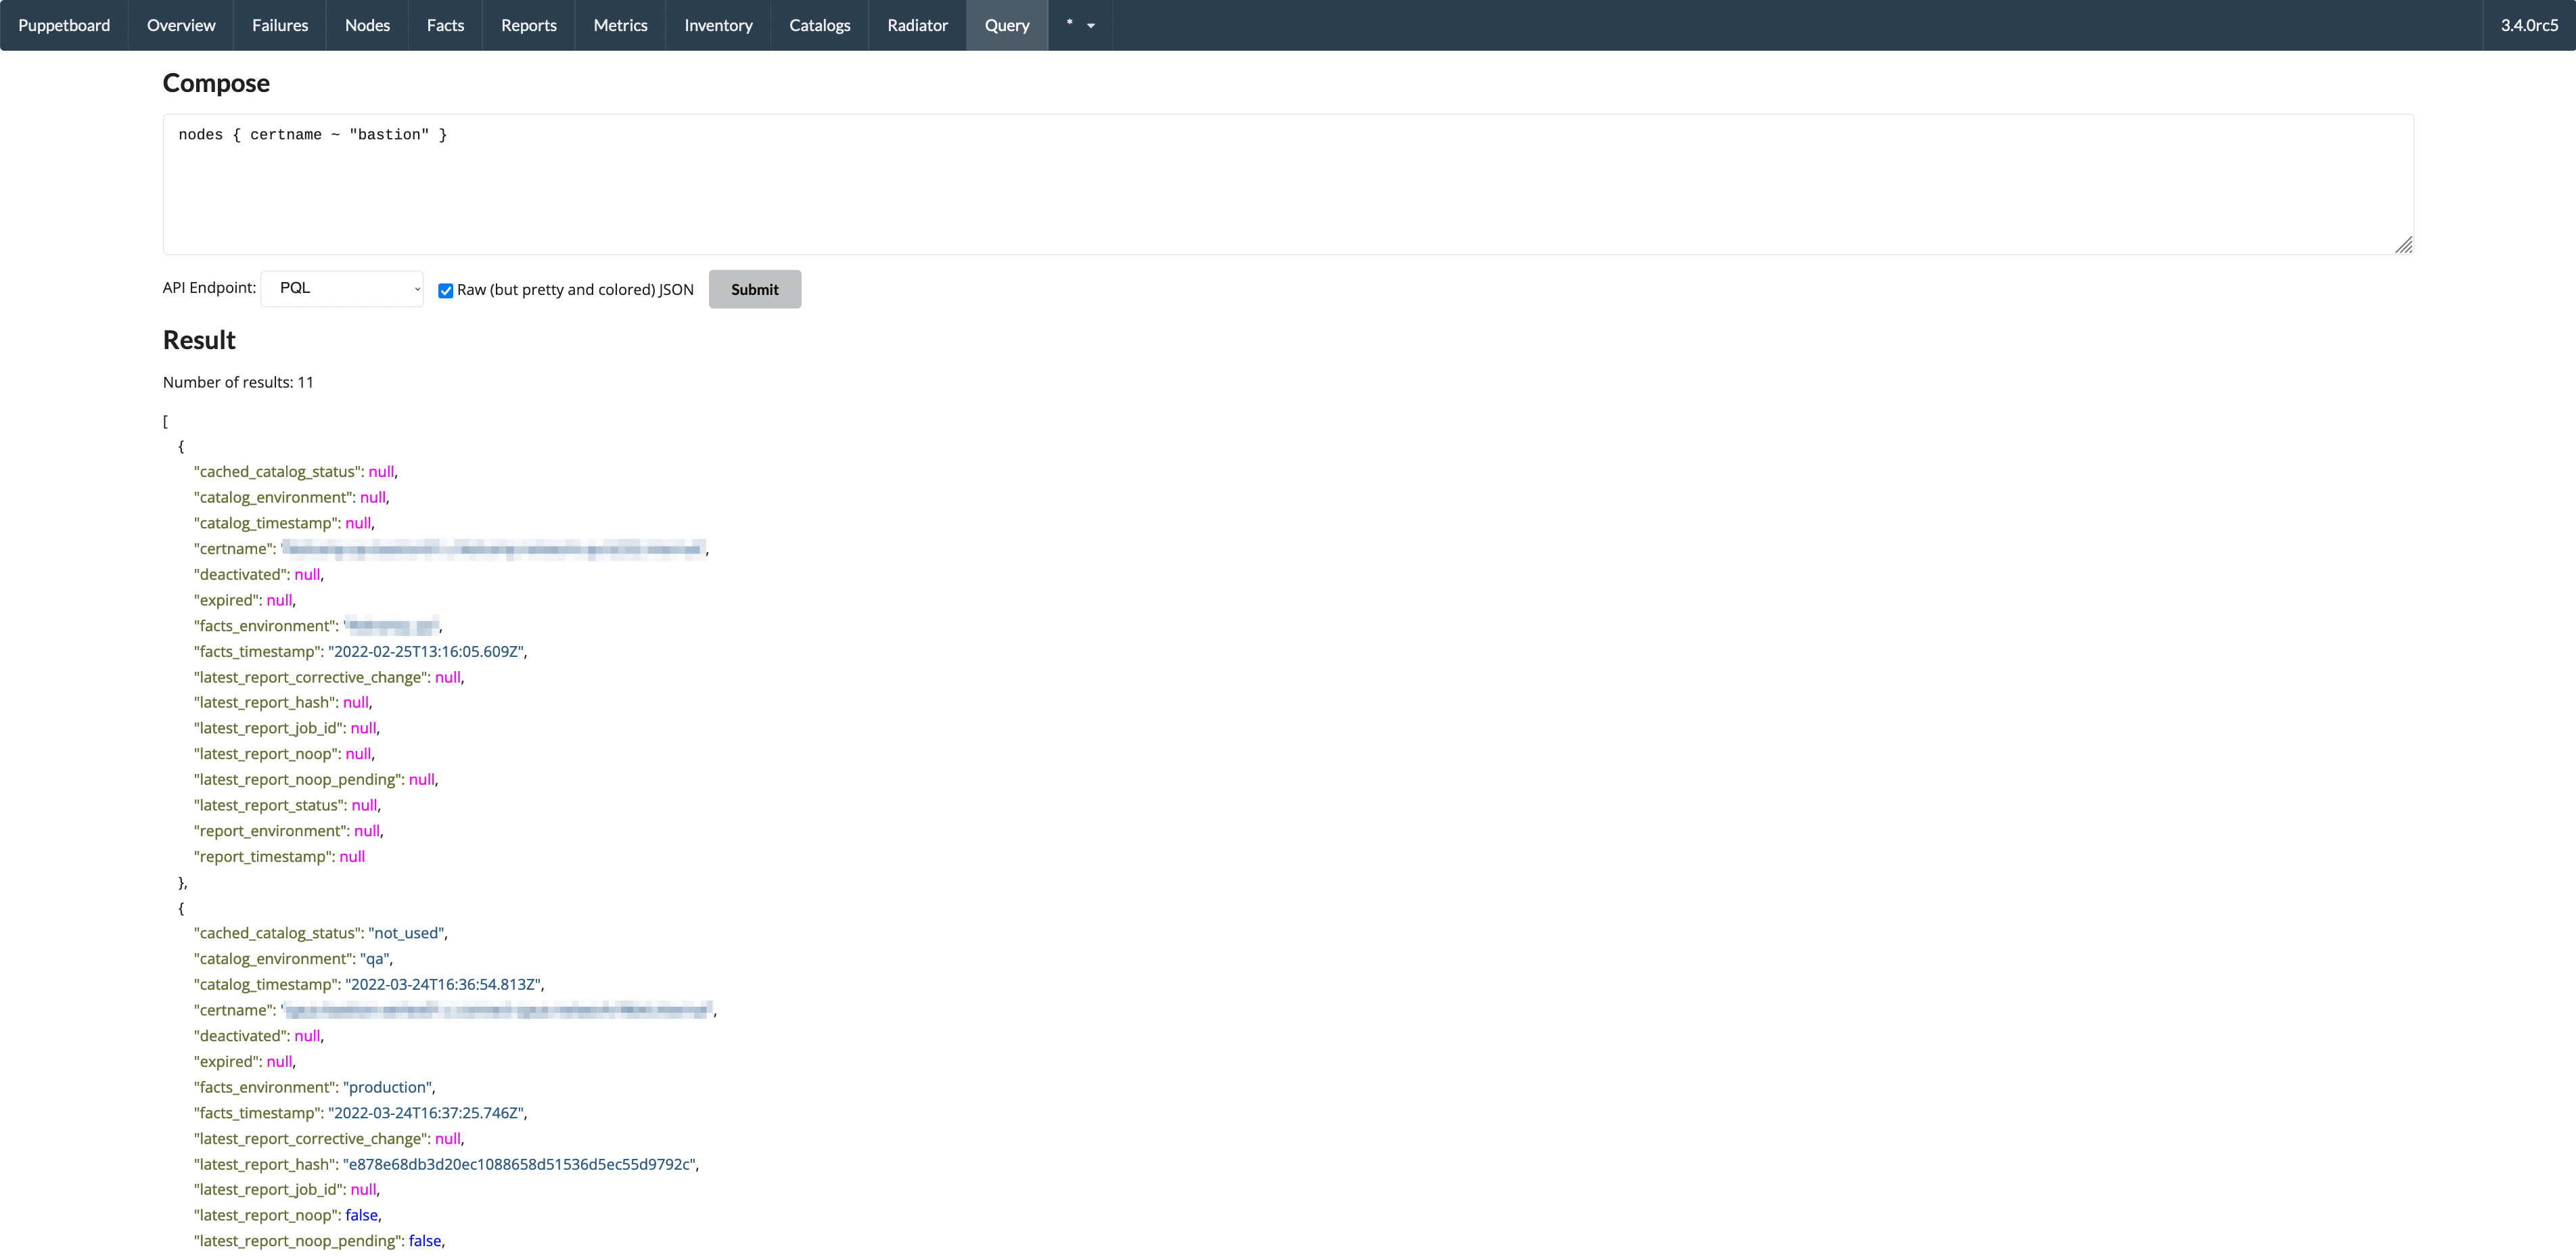
- Query view - results as table
- Query view - results as JSON
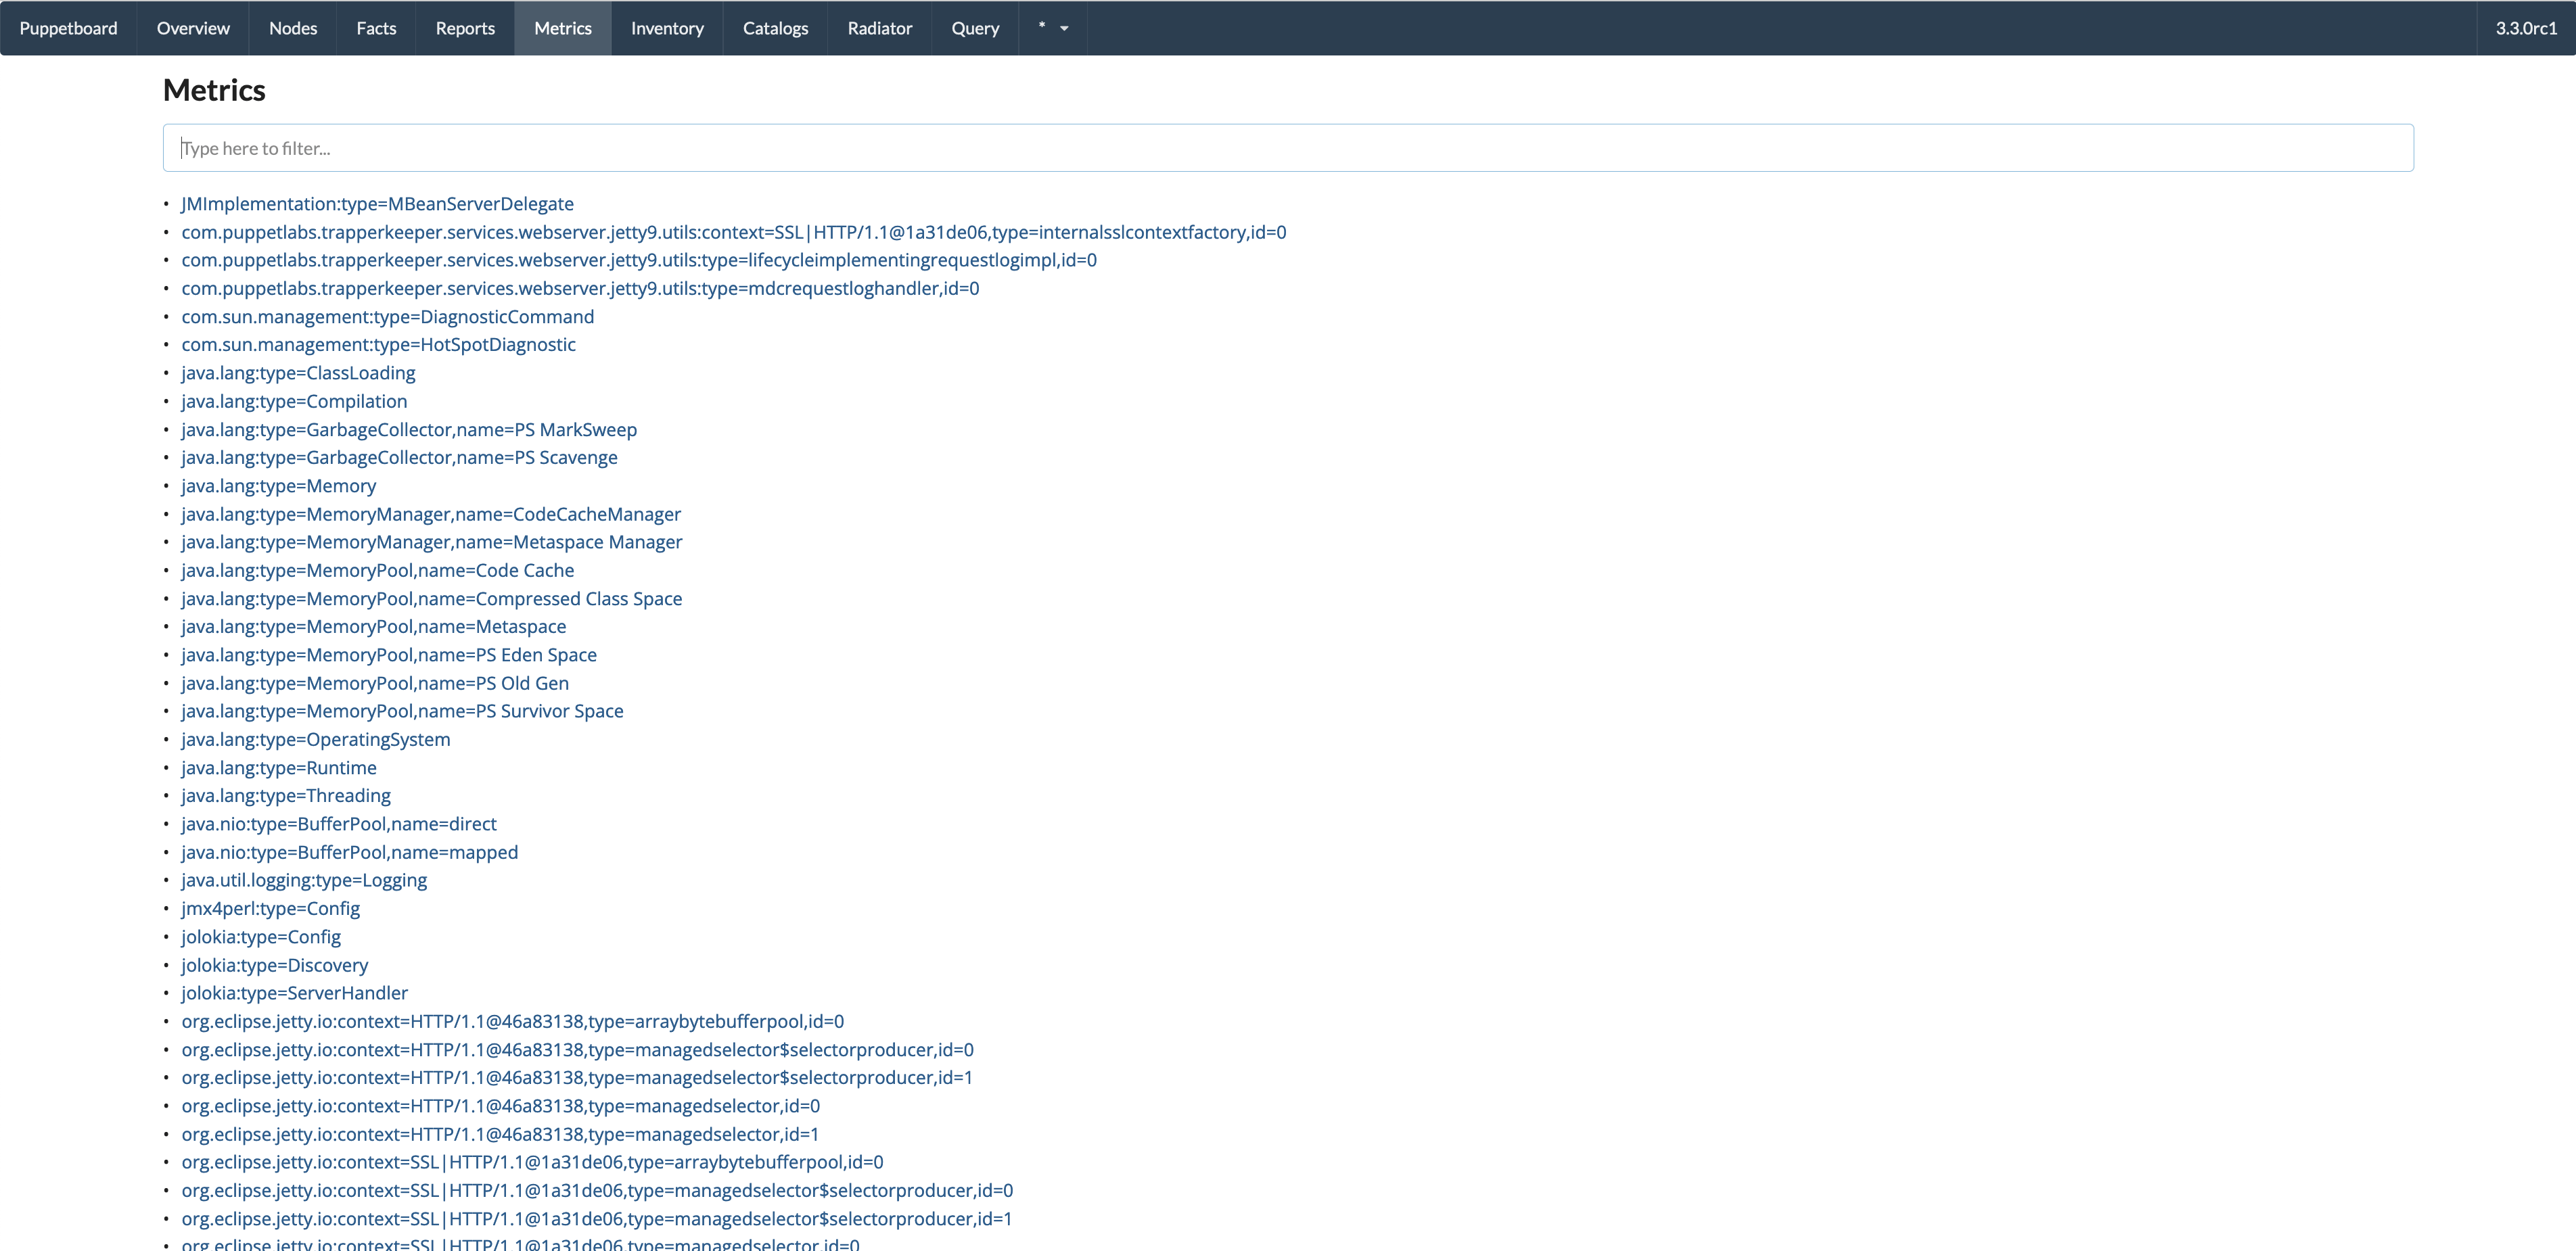
- Metrics view
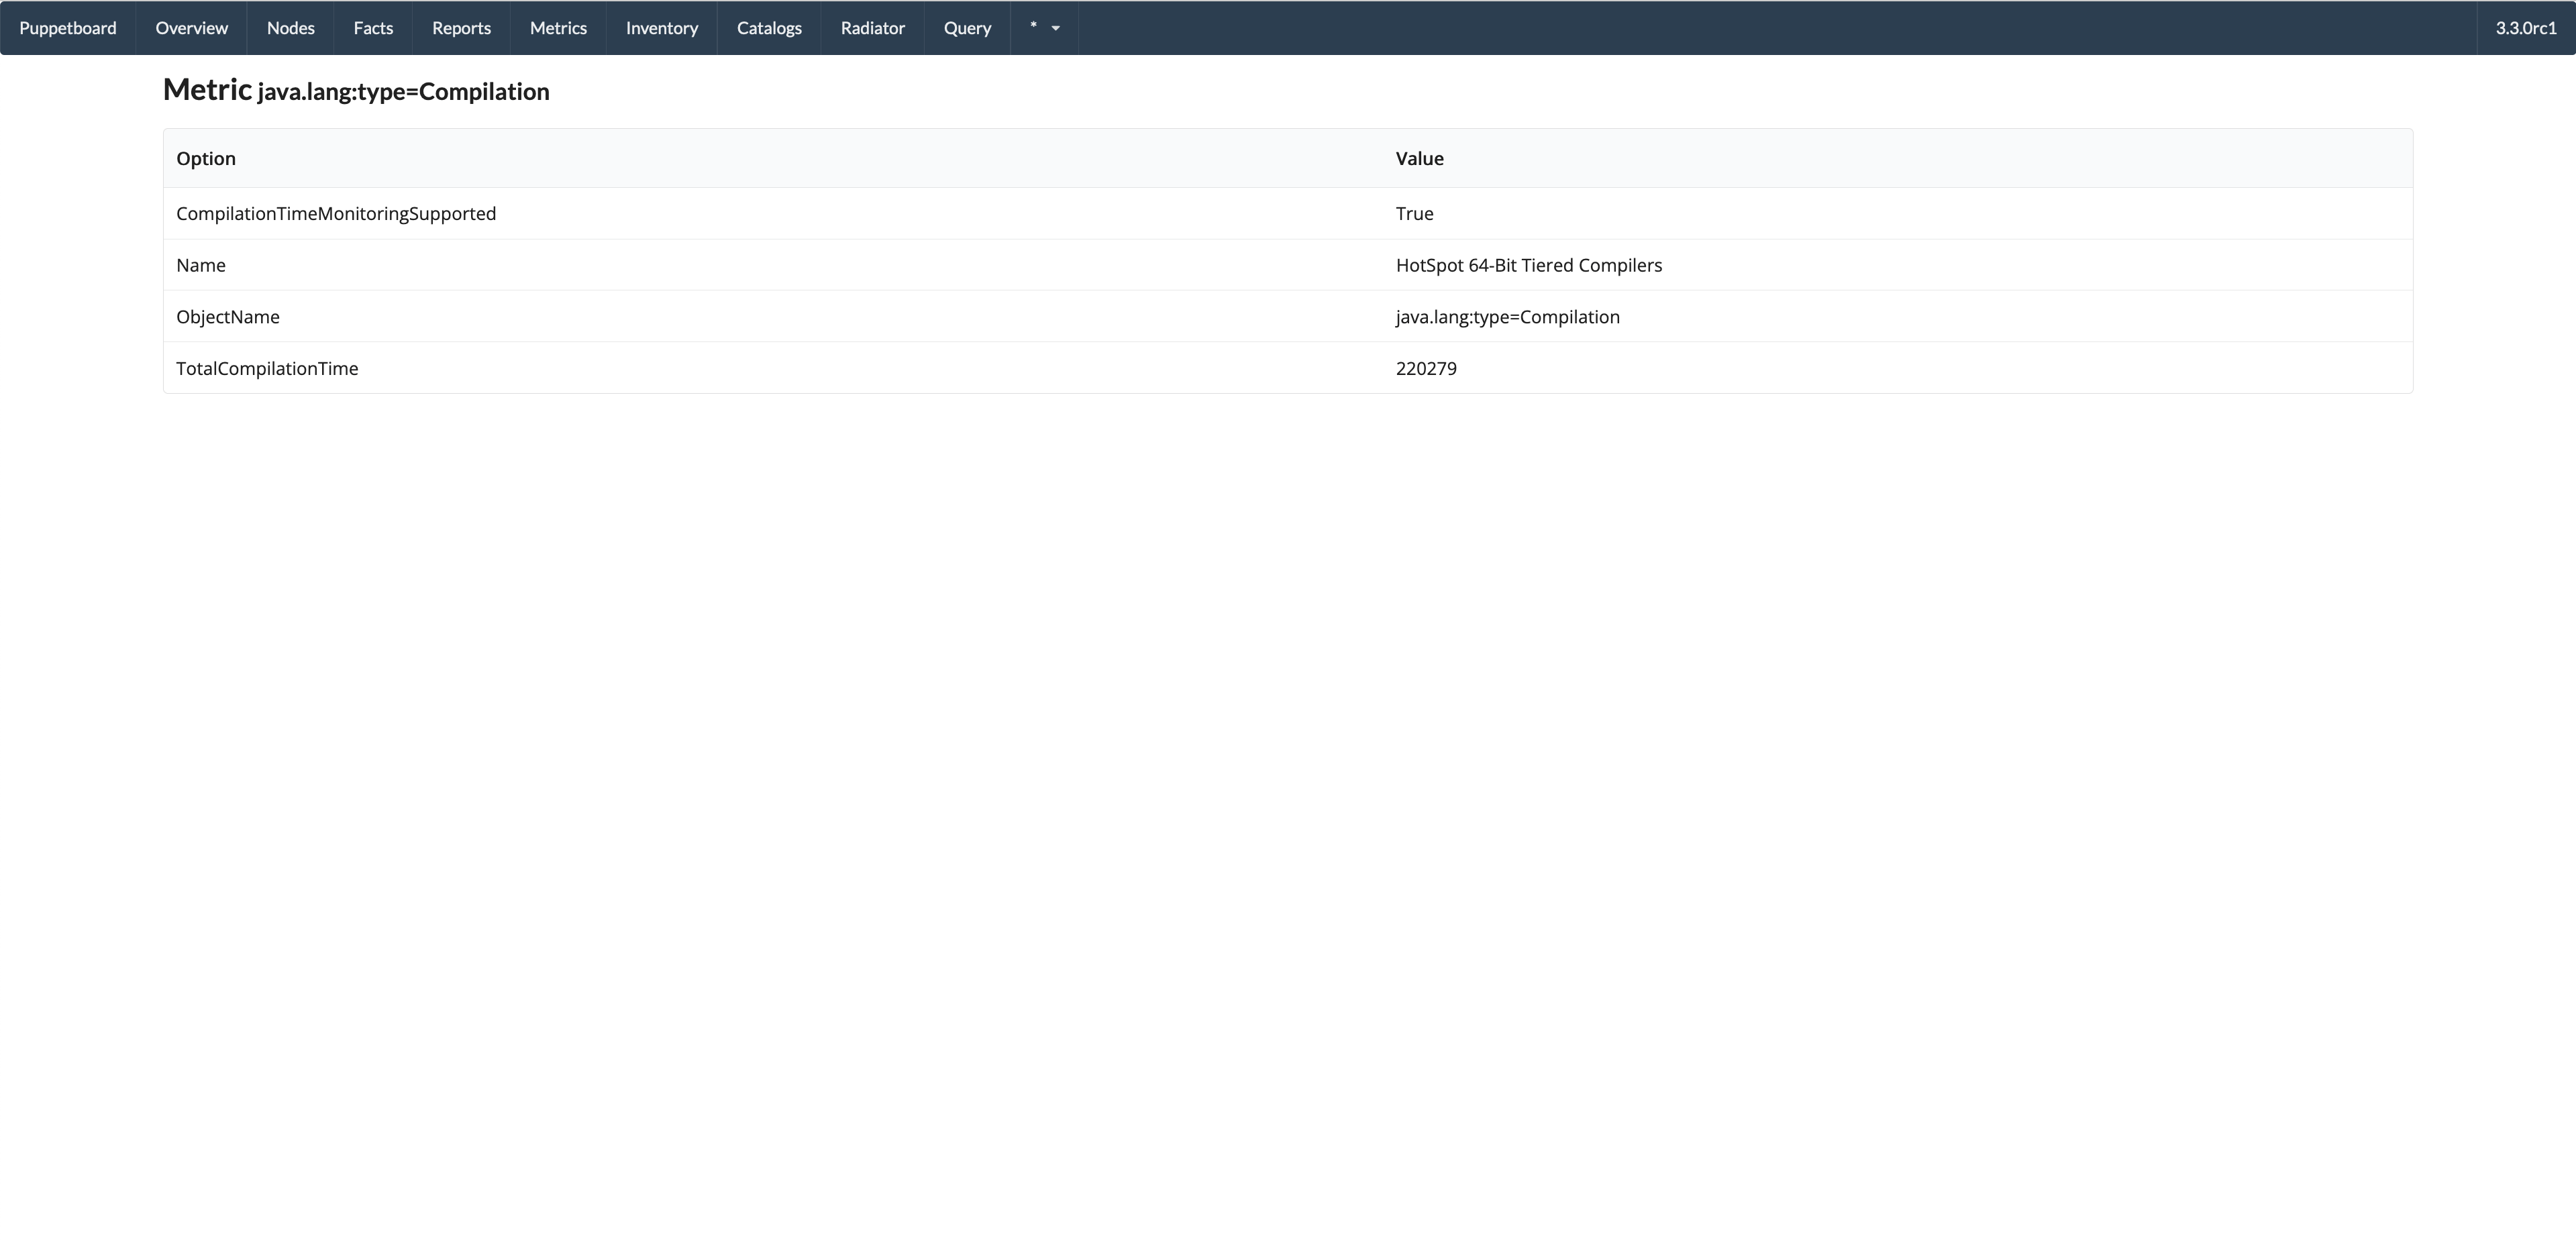
- Single metric
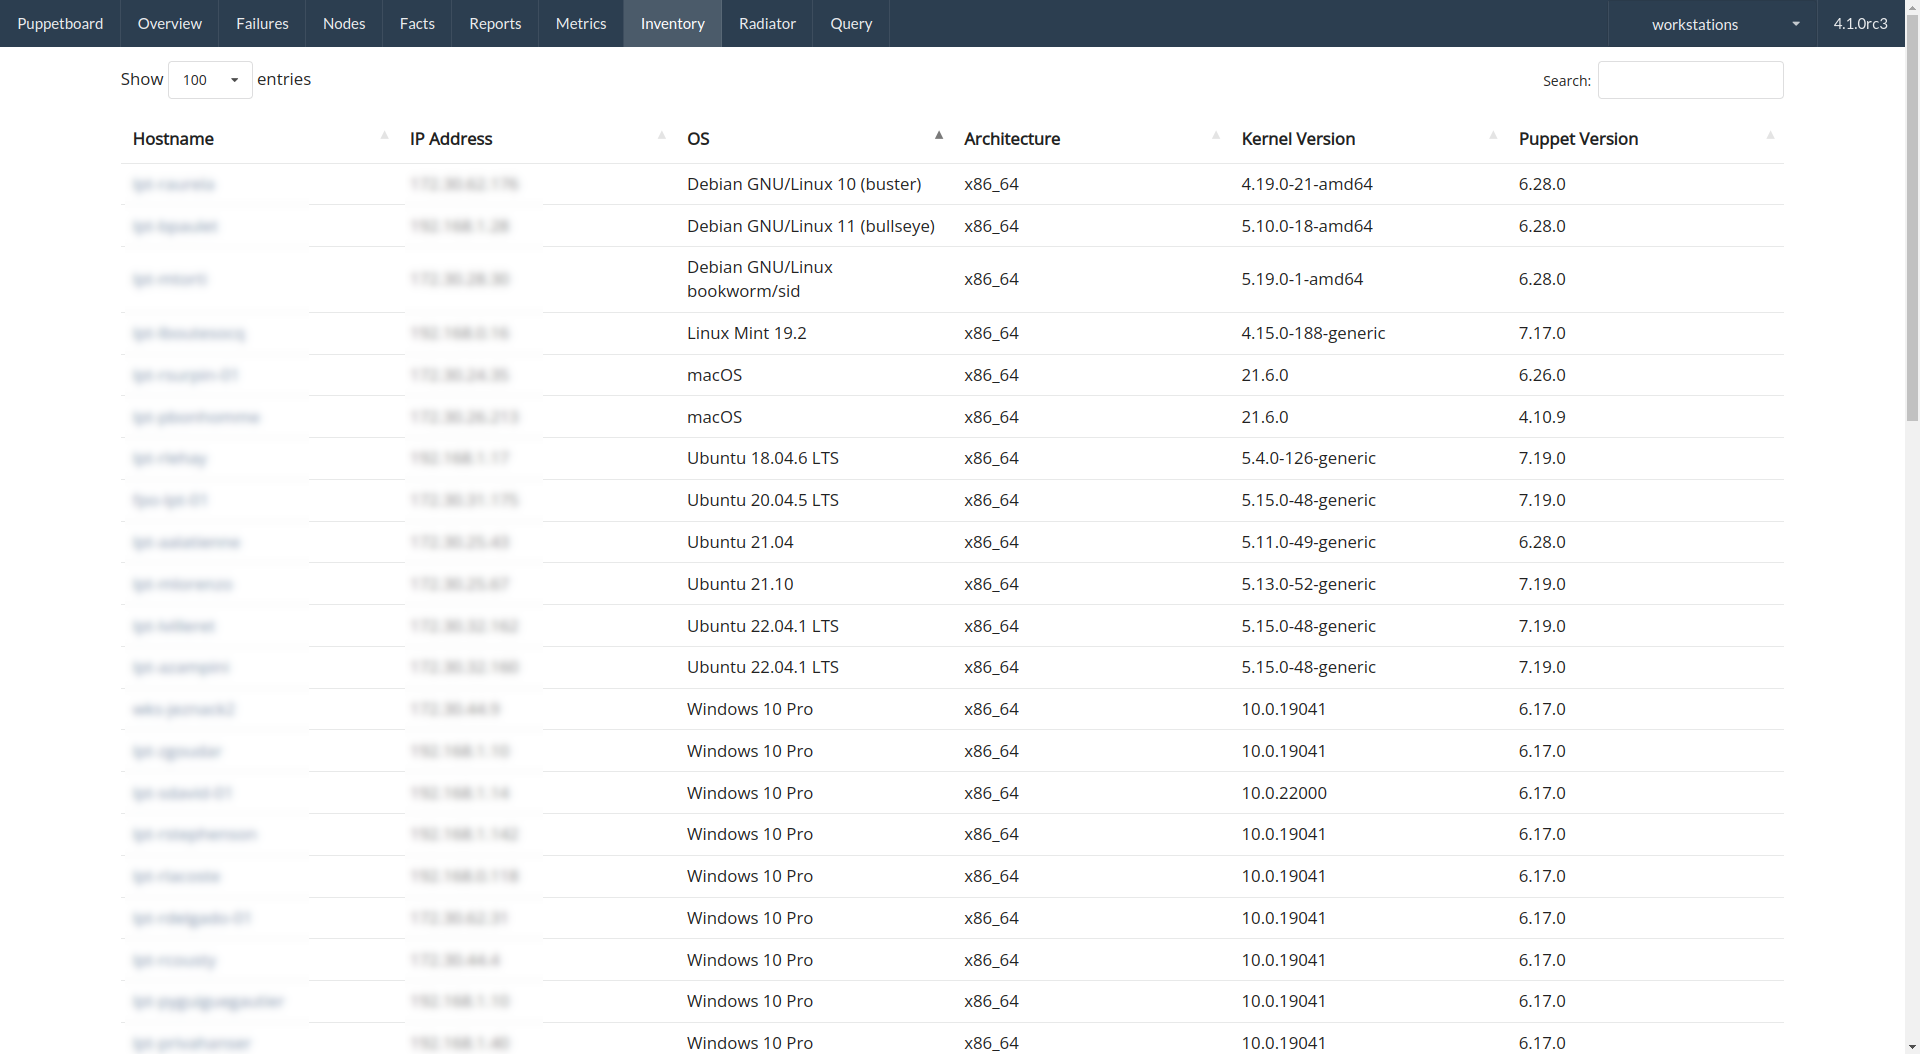
- Inventory view
- Classes view, group the resource events of the last reports by Puppet class
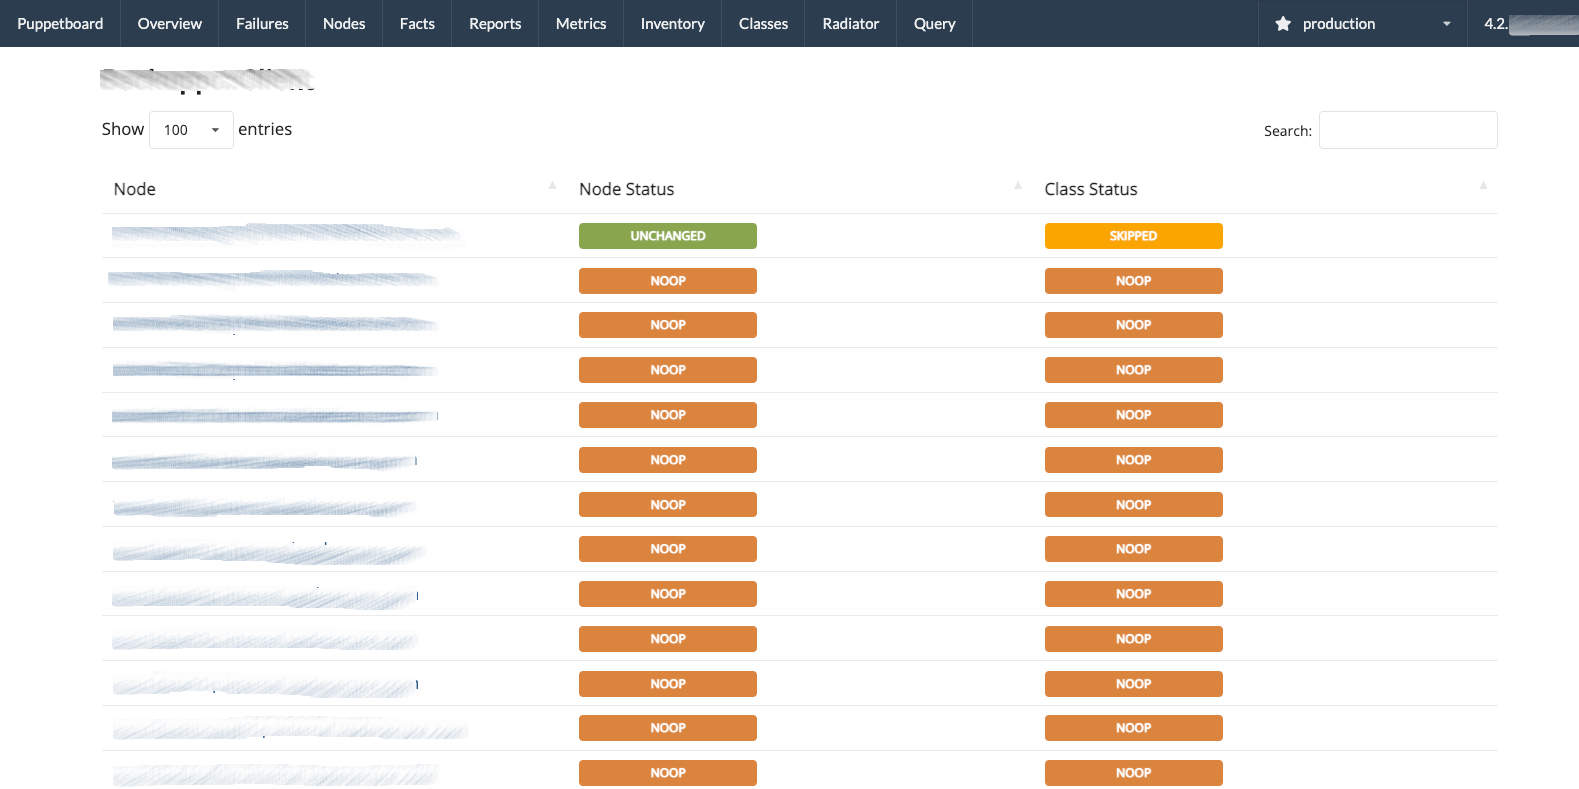
- Class view, list the nodes with almost one resource event for a given class
Legal
The app code is licensed under the Apache License, Version 2.0.
The favicon has been created based on the icon created by Jonathan Coutiño under the Attribution 3.0 Unported (CC BY 3.0) license, downloaded from the Noun Project.