BrickyEditor jQuery plugin
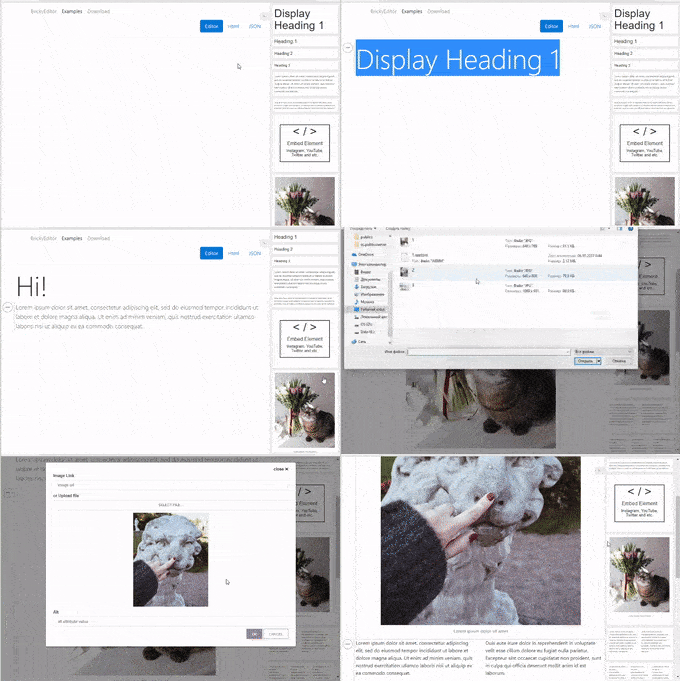
BrickyEditor is the simple WYSIWYG editor, based on block templates system.
Usually, editors without any frontend background makes a lot of mistakes in html code. On the other side - there is a lot of WYSIWYG editors, that brings them too much freedom, which leads to different appearence of publications.
BrickyEditor solve this problems: editors can use only prepared blocks of content and don't need to write any code. Your longrids and articles will be in one clean style.
Since BrickyEditor can save blocks as JSON, not only in rendered HTML, you can easily deliver your content to mobile platforms and render it natively, without

Demo page
Installation
Bower
bower install brickyeditor
NPM
npm istall brickyeditor
Yarn
yarn add brickyeditor
important: jquery is not included as dependency in npm and yarn packages. Add it by yourself, if you don't use it in global scope.
CDNs
jsDelivr
<script src="https://cdn.jsdelivr.net/npm/brickyeditor/dist/jquery.brickyeditor.min.js"></script>
<link rel="stylesheet" href="https://cdn.jsdelivr.net/npm/brickyeditor/dist/jquery.brickyeditor.min.css">
Basic templates url: https://cdn.jsdelivr.net/npm/brickyeditor/dist/templates/bootstrap4.html
unpkg
<script src="https://unpkg.com/brickyeditor/dist/jquery.brickyeditor.min.css"></script>
<link rel="stylesheet" href="https://unpkg.com/brickyeditor/dist/jquery.brickyeditor.min.js">
Basic templates url: https://unpkg.com/brickyeditor/dist/templates/bootstrap4.html
Basic usage
- If you don't want to use CDN or package manager, just copy files from brickyeditor\dist to your site folder.
- Add script to your page:
<script src="https://cdn.jsdelivr.net/npm/brickyeditor/dist/jquery.brickyeditor.min.js"></script>. - Add css to your page:
<link rel="stylesheet" href="https://cdn.jsdelivr.net/npm/brickyeditor/dist/jquery.brickyeditor.min.css">. - If you don't have link to fontawesome, add it too (http://fontawesome.io/)
- Call init code, when document is loaded
$(function(){
$("#editor").brickyeditor({
    templatesUrl: "path/to/base/templates/template.html" // by default it's "/templates/bootstrap4.html";
});
});
Options
There is a list of options, you could pass to init: $("#editor").brickyeditor(options);
| Option | Description |
|---|---|
| templatesUrl | Url to templates file. Default is "templates/bootstrap4.html". |
| blocks | Initial blocks json data. |
| blocksUrl | Url to fetch initial blocks json, overrides initial blocks property. |
| ignoreHtml | Ignore blocks html field, if you need only json with block data. Default is false. |
| compactTools | Show blocks selector in compact mode. Default is false. |
| compactToolsWidth | Max screen width to show tools in compact mode. By default it will show tools in compact mode for devices with screen width less than 768. |
| htmlToolsButtons | Custom buttons for inline html editing. |
| formSelector | Form selector to bind form submit event. Use it in pair with inputSelector. Editor will put blocks data to field with inputSelector on form submit. |
| inputSelector | Input selector to put json to on form submit. |
| Callbacks: | |
| onLoad(editor) | Callback, which called after brickyeditor initialization. |
| onChange(blocksJson, blocksHtml) | Callback, which called when any change happened with blocks (add/remove/content changed). |
| onBlockAdd(block, idx) | Callback, which called when new block added. |
| onBlockDelete(block, idx) | Callback, which called when block removed. |
| onBlockMove(block, from, to) | Callback, which called when block moved (up/down). |
| onBlockSelect(block) | Callback, which called when block selected. |
| onBlockDeselect(block) | Callback, which called when block desected. |
| onBlockUpdate(block, property, oldValue, newValue) | Callback, which called when block updated. |
Template system
There are 4 base types of fields you can use inside your templates:
- Html Field - Any html tag with possibility to edit content with base formatting (bold, italic, links, lists).
- Image Field - Div or img tag, that allows to upload image in base64 format.
- Embed Field - Embed field for instagram, youtube, twitter and other providers. Based on https://noembed.com service.
- Container Field - Container tag, that allows to put other templates inside. It's useful if you want to use layout templates.
Fields tags should be marked with attribute data-bre-field="{ 'name' : 'caption', 'type' : 'html'}", with field settings inside it.
All templates should be placed inside <div class="bre-template" data-name="Template Name"></div>.
If you want custom preview for your template, you could wrap preview html inside block <div class="bre-template-preview"></div>. BrickyEditor will render block with default values as preview if you don't add this block.
Sample template
<div class="bre-template" data-name="Image with caption">
  <div class="bre-template-preview"><img src="https://github.com/yakovlevga/brickyeditor/raw/master/templates/image-with-caption.jpg"/></div>

  <img data-bre-field="{ 'name' : 'image', 'type' : 'image', 'src' : 'assets/photo.jpg'}" />
  <figcaption data-bre-field="{ 'name' : 'caption', 'type' : 'html'}">Lorem ipsum dolor sit amet</figcaption>
</div>
In this sample two editable fields - img (field type - image) and figcaption (field type = html).
Editor will get templates/image-with-caption.jpg image as preview to render block inside tools panel.
You could find more examples in build/templates folder.
Template groups
You could use template grouping inside your template file for better semantics. Put templates inside div with class='bre-template-group' and set 'title' attribute to name the group.
<div class="bre-template-group" title="Containers">
    <div class="bre-template" data-name="Columns-2">
        <div class="row">
            <div class="col-md-6" data-bre-field='{ "name" : "col1", "type": "container" }'></div>
            <div class="col-md-6" data-bre-field='{ "name" : "col2", "type": "container" }'></div>
        </div>
    </div>

    <div class="bre-template" data-name="Columns-3">
        <div class="row">
            <div class="col-md-4" data-bre-field='{ "name" : "col1", "type": "container" }'></div>
            <div class="col-md-4" data-bre-field='{ "name" : "col2", "type": "container" }'></div>
            <div class="col-md-4" data-bre-field='{ "name" : "col3", "type": "container" }'></div>
        </div>
    </div>
</>