Alfred 2 Workflow Ruby Template
A template for Ruby-based Alfred 2 workflow development.
Example Projects
Main features:
- Use standard bundler to easily package, manage, and update ruby gems in the workflow.
- Friendly exception and debug output to the Mac OS X Console
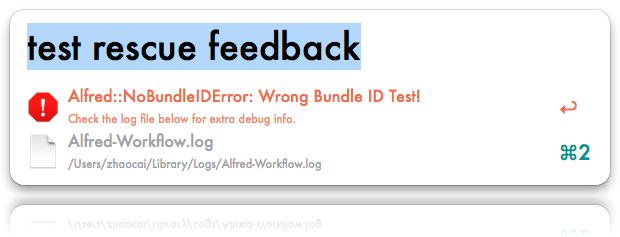
- Automate rescue feedback items to alfred when something goes wrong.
- Automate saving and loading cached feedback
Alfred workflow and feedback related functions are located in a separate alfred-workflow gem which can be easily installed by adding
gem "alfred-workflow"in the Gemfile.
- Functions to easily load and save user configuration (in YAML)
- Functions for smart case query filter of feedback results.
- Functions for finding the bundle ID, cache and storage paths, and query arguments.
- Functions for reading and writing plist files.
- Functions to simplify generating feedback XML for Alfred.
Quick Example
require 'rubygems' unless defined? Gem
require "bundle/bundler/setup"
require "alfred"

Alfred.with_friendly_error do |alfred|
  fb = alfred.feedback

  fb.add_file_item(File.expand_path "~/Applications/")

  puts fb.to_alfred(ARGV)
end
Main code are wrapped in Alfred.with_friendly_error block. Exceptions and debug messages are logged to Console log file ~/Library/Logs/Alfred-Workflow.log.
One more example with rescue feedback automatically generated!
require 'rubygems' unless defined? Gem
require "bundle/bundler/setup"
require "alfred"

def my_code_with_something_goes_wrong
  true
end

Alfred.with_friendly_error do |alfred|
  alfred.with_rescue_feedback = true

  fb = alfred.feedback

  if my_code_with_something_goes_wrong
    raise Alfred::NoBundleIDError, "Wrong Bundle ID Test!"
  end
end
Quick Start Guide
You may directly download the alfred2-ruby-template workflow here, install, and play with the keywords: test feedback and test rescue feedback.
Step 1: Clone or Fork
Clone or fork this repo to your local directory:
git clone https://github.com/zhaocai/alfred2-ruby-template.git
Step 2: Config.yml
Update domain and id in the config.yml file.
# bundle_id = "domain.id"
# path is the relative path to the workflow in the project root
---
path: workflow
domain: your.domain
id: alfred2-ruby-template
# If you are using Alfred's advanced Dropbox sync, indicate the path shown in
# Alfred Preferences > Advanced > Syncing:
dropbox: ~/Dropbox/Alfred
Step 3: Install (with System Ruby /usr/bin/ruby)
If you use rvm or rbenv, switch to the system ruby.
sudo gem install plistif you have not installed the plist gem.
Run rake install to install the workflow or rake dbxinstall if you are using Alfred's advanced Dropbox sync. Now you can see the workflow loaded in the
Alfred workflow interface.
Step 4: Add Ruby Gems
Edit workflow/Gemfile. Add some gems.
source "https://rubygems.org"

gem "plist"
gem "alfred-workflow"
# gem "your-gem-required"
Run rake bundle:install to pull the gems into workflow/bundle/ folder.
Step 5: Your Code
Now you are good to add your own code based on the previous example.
More Examples:
1. Automate saving and loading cached feedback
require 'rubygems' unless defined? Gem
require "bundle/bundler/setup"
require "alfred"

Alfred.with_friendly_error do |alfred|
  alfred.with_rescue_feedback = true
  alfred.with_cached_feedback do
    # expire in 1 hour
    use_cache_file :expire => 3600
    # or define your own cache file
    # use_cache_file(
    #   :file   => File.join(alfred.volatile_storage_path ,"this_workflow.alfred2feedback") ,
    #   :expire => 3600
    # )

  end

  # prepend ! in query to refresh
  is_refresh = false
  if ARGV[0] == '!'
    is_refresh = true
    ARGV.shift
  end

  if !is_refresh and fb = alfred.feedback.get_cached_feedback
    # cached feedback is valid
    puts fb.to_alfred
  else
    fb = alfred.feedback
    # ... generate_feedback as usually
    fb.put_cached_feedback
  end
end
Troubleshooting
- System bundler version is too old.
sudo gem install bundler
Reference
LICENSE:
Copyright (c) 2013 Zhao Cai caizhaoff@gmail.com
This program is free software: you can redistribute it and/or modify it under the terms of the GNU General Public License as published by the Free Software Foundation, either version 3 of the License, or (at your option) any later version.
This program is distributed in the hope that it will be useful, but WITHOUT ANY WARRANTY; without even the implied warranty of MERCHANTABILITY or FITNESS FOR A PARTICULAR PURPOSE. See the GNU General Public License for more details.
You should have received a copy of the GNU General Public License along with this program. If not, see http://www.gnu.org/licenses/.