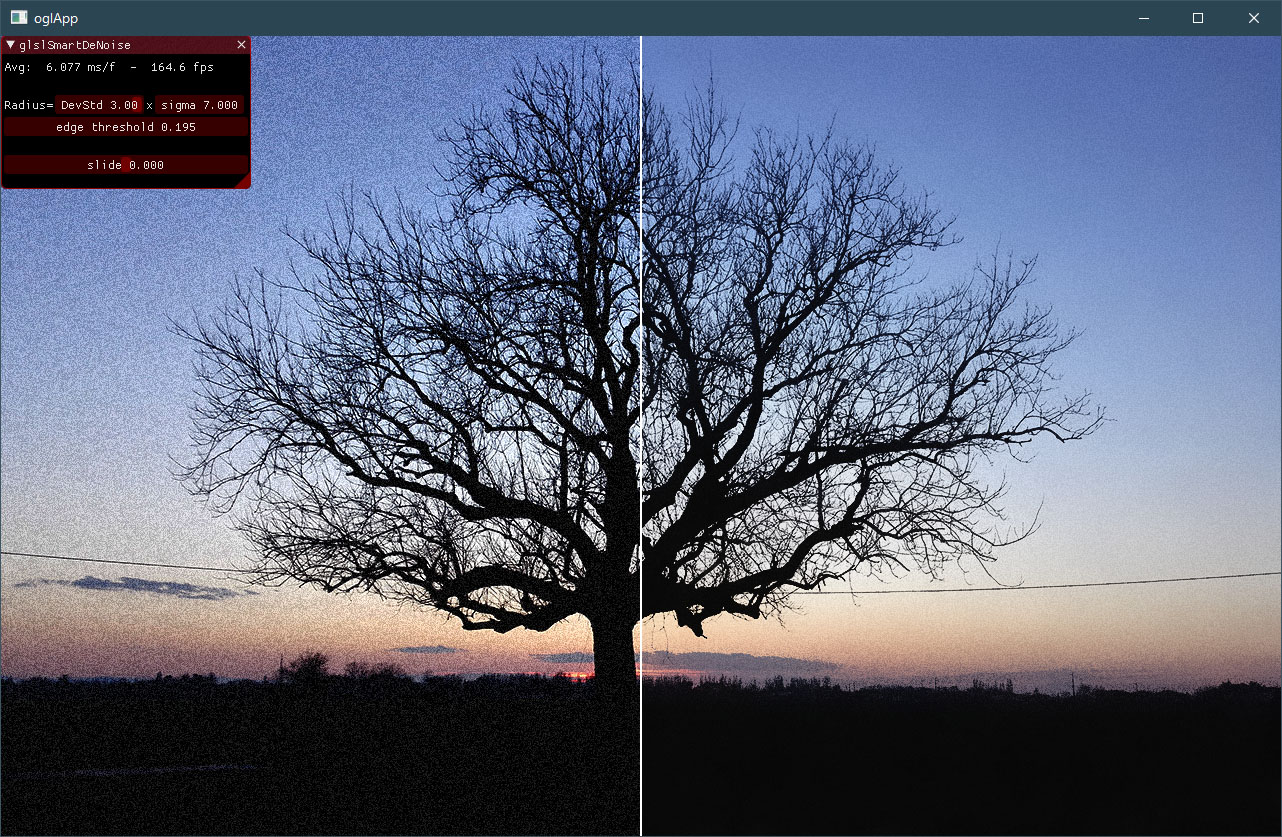
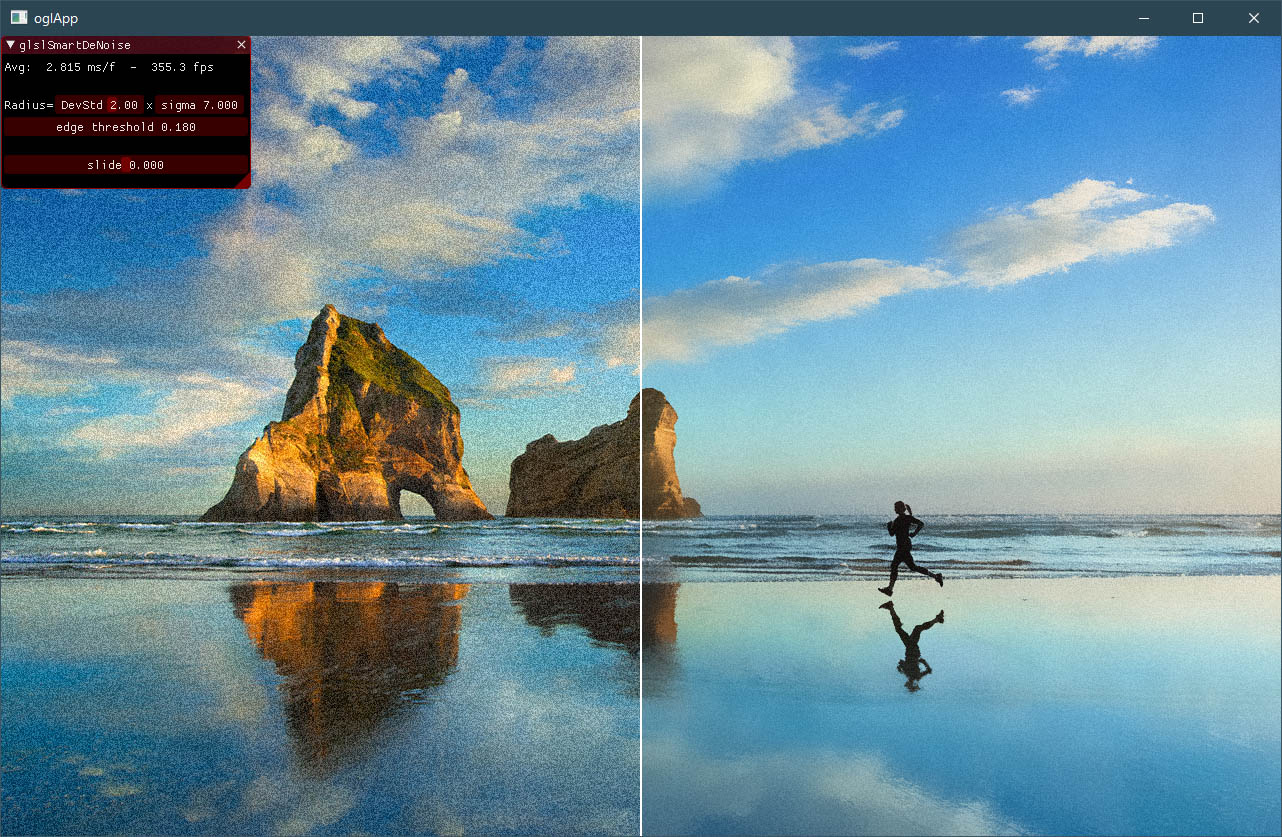
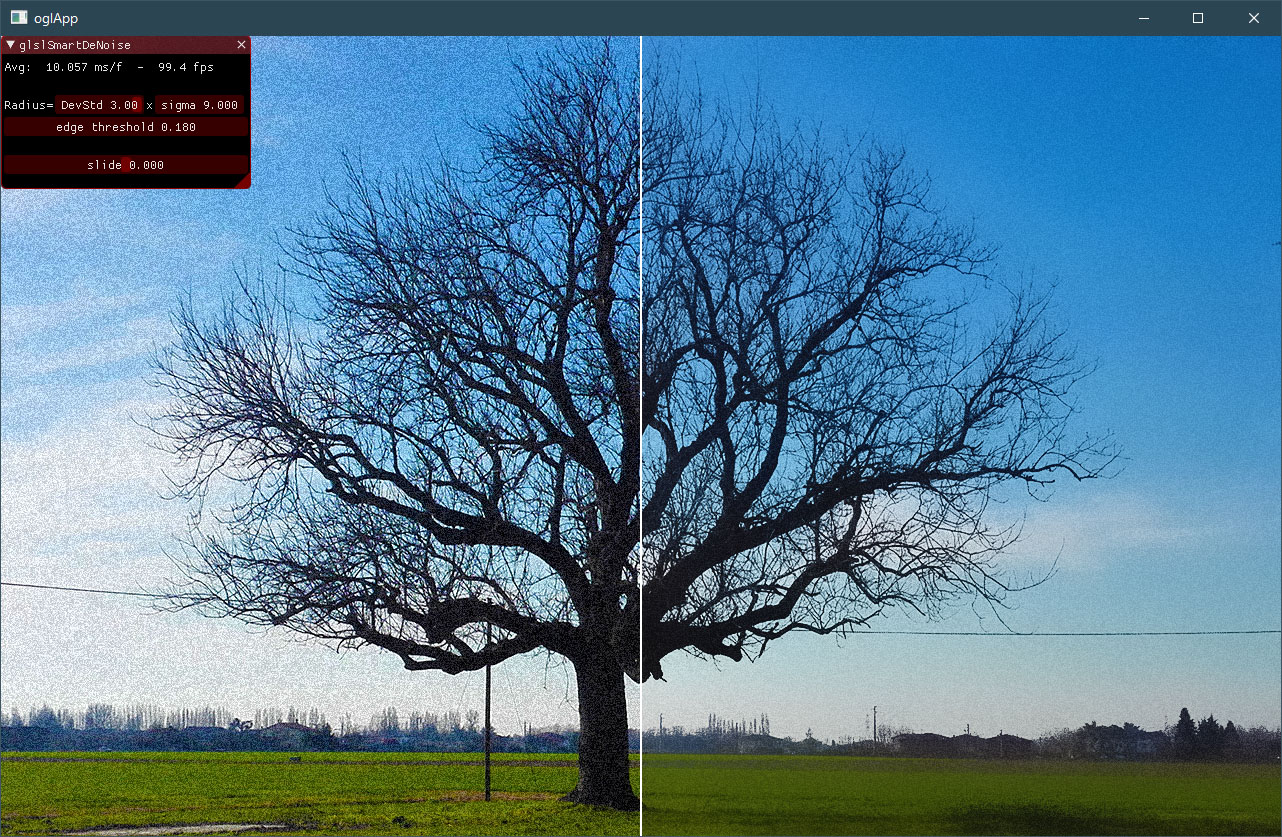
glslSmartDeNoise
Fast glsl spatial deNoise filter, with circular gaussian kernel and smart/flexible/adaptable -> full configurable:
- Standard Deviation sigma radius
- K factor sigma coefficient
- Edge sharpening threshold
*result depends on settings and input signal
Enhancements
Some enhancements can be obtained using "other color spaces" on noise evaluation (not on final image), to emphasize pixel differences/threshold.
- sRGB with gamma correction.
- Luminance
- HSL using HL components and leaving out S (saturation)
- ... other possibles (write me)
All this can lead to better results, under certain circumstances, but at the expense of performance, so these are not inserted in the main filter: use live WebGL demo to try they.
*full source is provided in example folder - main filter variants are contained in Shaders/frag.glsl file
| Live WebGL2 demo -> glslSmartDeNoise |
|---|
| Tree - Sunset |
|---|
 |
| Runner - on the beach |
|---|
 |
| Tree - Daylight |
|---|
 |
About live WebGL2 demos
You can run/test WebGL 2 examples of glslSmartDeNoise also from following links:
- glslSmartDeNoise
- ShaderToy Example - porting to ShaderToy *no interaction with parameters: need change them in the code
It works only on browsers with WebGl 2 and webAssembly support (FireFox/Opera/Chrome and Chromium based)
Test if your browser supports WebGL 2, here: WebGL2 Report
glslSmartDeNoise is used in glChAoS.P poroject to produce a effect like a "stardust" or "particle-dust" (it's the "bilinear threshold" filter in GLOW section) You can watch a graphical example at glChAoS.P glow threshold effect link
glslSmartDeNoise filter
Below there is the filter source code with parameters description: this is everything you need.
To view its use you can also examine the Shader\frag.glsl file (all other files are only part of the C++ examples)
//~~~~~~~~~~~~~~~~~~~~~~~~~~~~~~~~~~~~~~~~~~~~~~~~~~~~~~~~~~~~~~~~~~~~~~~~~~~~~~
//  Copyright (c) 2018-2019 Michele Morrone
//  All rights reserved.
//
//  https://michelemorrone.eu - https://BrutPitt.com
//
//  me@michelemorrone.eu - brutpitt@gmail.com
//  twitter: @BrutPitt - github: BrutPitt
//
//  https://github.com/BrutPitt/glslSmartDeNoise/
//
//  This software is distributed under the terms of the BSD 2-Clause license
//~~~~~~~~~~~~~~~~~~~~~~~~~~~~~~~~~~~~~~~~~~~~~~~~~~~~~~~~~~~~~~~~~~~~~~~~~~~~~~

#define INV_SQRT_OF_2PI 0.39894228040143267793994605993439  // 1.0/SQRT_OF_2PI
#define INV_PI 0.31830988618379067153776752674503

//  smartDeNoise - parameters
//~~~~~~~~~~~~~~~~~~~~~~~~~~~~~~~~~~~~~~~~~~~~~~~~~~~~~~~~~~~~~~~~~~~~~~~~~~~~~~
//
//  sampler2D tex     - sampler image / texture
//  vec2 uv           - actual fragment coord
//  float sigma  >  0 - sigma Standard Deviation
//  float kSigma >= 0 - sigma coefficient
//      kSigma * sigma  -->  radius of the circular kernel
//  float threshold   - edge sharpening threshold

vec4 smartDeNoise(sampler2D tex, vec2 uv, float sigma, float kSigma, float threshold)
{
    float radius = round(kSigma*sigma);
    float radQ = radius * radius;

    float invSigmaQx2 = .5 / (sigma * sigma);      // 1.0 / (sigma^2 * 2.0)
    float invSigmaQx2PI = INV_PI * invSigmaQx2;    // 1/(2 * PI * sigma^2)

    float invThresholdSqx2 = .5 / (threshold * threshold);     // 1.0 / (sigma^2 * 2.0)
    float invThresholdSqrt2PI = INV_SQRT_OF_2PI / threshold;   // 1.0 / (sqrt(2*PI) * sigma^2)

    vec4 centrPx = texture(tex,uv);

    float zBuff = 0.0;
    vec4 aBuff = vec4(0.0);
    vec2 size = vec2(textureSize(tex, 0));

    vec2 d;
    for (d.x=-radius; d.x <= radius; d.x++) {
        float pt = sqrt(radQ-d.x*d.x);       // pt = yRadius: have circular trend
        for (d.y=-pt; d.y <= pt; d.y++) {
            float blurFactor = exp( -dot(d , d) * invSigmaQx2 ) * invSigmaQx2PI;

            vec4 walkPx =  texture(tex,uv+d/size);
            vec4 dC = walkPx-centrPx;
            float deltaFactor = exp( -dot(dC, dC) * invThresholdSqx2) * invThresholdSqrt2PI * blurFactor;

            zBuff += deltaFactor;
            aBuff += deltaFactor*walkPx;
        }
    }
    return aBuff/zBuff;
}
Below there are considerations about parameters utilization and the optimizations description.
//  About Standard Deviations (watch Gauss curve)
//~~~~~~~~~~~~~~~~~~~~~~~~~~~~~~~~~~~~~~~~~~~~~~~~~~~~~~~~~~~~~~~~~~~~~~~~~~~~~~
//
//  kSigma = 1*sigma cover 68% of data
//  kSigma = 2*sigma cover 95% of data - but there are over 3 times
//                   more points to compute
//  kSigma = 3*sigma cover 99.7% of data - but needs more than double
//                   the calculations of 2*sigma

//  Optimizations (description)
//~~~~~~~~~~~~~~~~~~~~~~~~~~~~~~~~~~~~~~~~~~~~~~~~~~~~~~~~~~~~~~~~~~~~~~~~~~~~~~
//
//  fX = exp( -(x*x) * invSigmaSqx2 ) * invSigmaxSqrt2PI;
//  fY = exp( -(y*y) * invSigmaSqx2 ) * invSigmaxSqrt2PI;
//  where...
//      invSigmaSqx2     = 1.0 / (sigma^2 * 2.0)
//      invSigmaxSqrt2PI = 1.0 / (sqrt(2 * PI) * sigma)
//
//  now, fX*fY can be written in unique expression...
//
//      e^(a*X) * e^(a*Y) * c*c
//
//      where:
//        a = invSigmaSqx2, X = (x*x), Y = (y*y), c = invSigmaxSqrt2PI
//
//           -[(x*x) * 1/(2 * sigma^2)]             -[(y*y) * 1/(2 * sigma^2)]
//          e                                      e
//  fX = -------------------------------    fY = -------------------------------
//                ________                               ________
//              \/ 2 * PI  * sigma                     \/ 2 * PI  * sigma
//
//      now with...
//        a = 1/(2 * sigma^2),
//        X = (x*x)
//        Y = (y*y) ________
//        c = 1 / \/ 2 * PI  * sigma
//
//      we have...
//              -[aX]              -[aY]
//        fX = e      * c;   fY = e      * c;
//
//      and...
//                 -[aX + aY]    [2]     -[a(X + Y)]    [2]
//        fX*fY = e           * c     = e            * c
//
//      well...
//
//                    -[(x*x + y*y) * 1/(2 * sigma^2)]
//                   e
//        fX*fY = --------------------------------------
//                                        [2]
//                          2 * PI * sigma
//
//      now with assigned constants...
//
//          invSigmaQx2   = 1/(2 * sigma^2)
//          invSigmaQx2PI = 1/(2 * PI * sigma^2) = invSigmaQx2 * INV_PI
//
//      and the kernel vector
//
//          k = vec2(x,y)
//
//      we can write:
//
//          fXY = exp( -dot(k,k) * invSigmaQx2) * invSigmaQx2PI
//
*can find it also in Shader/frag.glsl file
Building Example
The C++ example shown in the screenshot is provided. To build it you can use CMake (3.15 or higher) or the Visual Studio solution project (for VS 2017/2019) in Windows. You need to have installed GLFW (v.3.3 or above) in your compiler search path (LIB/INCLUDE). Other tools: ImGui, lodePNG and glad are attached, and already included in the project.
To build example with CMake in Linux / MacOS / Windows uses follow command:
# cmake -DBuildTarget:String=<BuildVer> -G <MakeTool> -B<FolderToBuild>
#   where:
#       <BuildVer> must be one of follow strings:
#           OpenGL_45
#           OpenGL_41
#           OpenGL_ES
#       <MakeTool> is your preferred generator like "Unix Makefiles" or "Ninja"
#       <FolderToBuild> is the folder where will be generated Makefile, move in it and run your generator
#       - Default build is "Release" but it can be changed via CMAKE_BUILD_TYPE definition:
#           command line: -DCMAKE_BUILD_TYPE:STRING=<Debug|Release|MinSizeRel|RelWithDebInfo>
#           cmake-gui: from combo associated to CMAKE_BUILD_TYPE var
#
# Example:
#   to build example compliant to OpenGL 4.5, with "make" utility, in "./build" folder, type:
#
#       > cmake -DBuildTarget:String=OpenGL_45 -G Unix\ Makefiles -B./build
#       > cd build
#       > make
#
The CMake file is able to build also an EMSCRIPTEN version, obviously you need to have installed EMSCRIPTEN SDK on your computer (1.38.10 or higher):
# To build example with EMSCRIPTEN uses follow command:
# cmake cmake -DCMAKE_TOOLCHAIN_FILE:STRING=<EMSDK_PATH>/upstream/emscripten/cmake/Modules/Platform/Emscripten.cmake -DBuildTarget:String=<BuildVer> -G "Unix Makefiles"|"ninja" -B<FolderToBuild>
#   where:
#       <EMSDK_PATH> is where was installed EMSCRIPTEN: you need to have it in EMSDK environment variable
#       <BuildVer> must be one of follow strings:
#           WebGL
#       <MakeTool> is your preferred generator like "Unix Makefiles" or "ninja"
#           Windows users need to use MinGW-make utility (by EMSCRIPTEN specification): ninja or othe can not work.
#       <FolderToBuild> is the folder where will be generated Makefile, move in it and run your generator
#       - Default build is "MinSizeRel" but it can be changed via CMAKE_BUILD_TYPE definition:
#           command line: -DCMAKE_BUILD_TYPE:STRING=<Debug|Release|MinSizeRel|RelWithDebInfo>
#           cmake-gui: from combo associated to CMAKE_BUILD_TYPE var
To build the EMSCRIPTEN version, in Windows, with CMake, need to have mingw32-make.exe in your computer and search PATH (only the make utility is enough): it is a condition of EMSDK tool to build with CMake in Windows.