RP-VIO: Robust Plane-based Visual-Inertial Odometry for Dynamic Environments
Karnik Ram, Chaitanya Kharyal, Sudarshan S. Harithas, K. Madhava Krishna.
[arXiv]
[Project Page]
In IROS 2021
RP-VIO is a monocular visual-inertial odometry (VIO) system that uses only planar features and their induced homographies, during both initialization and sliding-window estimation, for increased robustness and accuracy in dynamic environments.
Setup
Our evaluation setup is a 6-core Intel Core i5-8400 CPU with 8GB RAM and a 1 TB HDD, running Ubuntu 18.04.1. We recommend using a more powerful setup, especially for heavy datasets like ADVIO or OpenLORIS.
Pre-requisites
ROS Melodic (OpenCV 3.2.0, Eigen 3.3.4-4)
Ceres Solver 1.14.0
EVO
The versions indicated are the versions used in our evaluation setup, and we do not guarantee our code to run on newer versions like ROS Noetic (OpenCV 4.2).
Build
Run the following commands in your terminal to clone our project and build,
    cd ~/catkin_ws/src
    git clone https://github.com/karnikram/rp-vio.git
    cd ../
    catkin_make -j4
    source ~/catkin_ws/devel/setup.bash
Evaluation
We provide evaluation scripts to run RP-VIO on the RPVIO-Sim dataset, and select sequences from the OpenLORIS-Scene, ADVIO, and VIODE datasets. The output errors from your evaluation might not be exactly the same as reported in our paper, but should be similar.
RPVIO-Sim Dataset
Download the dataset files to a parent folder, and then run the following commands to launch our evaluation script. The script runs rp-vio on each of the six sequences once and computes the ATE error statistics.
    cd ~/catkin_ws/src/rp-vio/scripts/
    ./run_rpvio_sim.sh <PATH-TO-DATASET-FOLDER>
To run the multiple planes version (RPVIO-Multi), checkout the corresponding branch by running git checkout rpvio-multi, and re-run the above script.
Real-world sequences
We evaluate on two real-world sequences: the market1-1 sequence from the OpenLORIS-Scene dataset and the metro station sequence (12) from the ADVIO dataset. Both of these sequences along with their segmented plane masks are available as bagfiles for download here. After downloading and extracting the files run the following commands for evaluation,
    cd ~/catkin_ws/src/rp-vio/scripts/
    ./run_ol_market1.sh <PATH-TO-EXTRACTED-DATASET-FOLDER>
    ./run_advio_12.sh <PATH-TO-EXTRACTED-DATASET-FOLDER>
Own data
To run RP-VIO on your own data, you need to provide synchronized monocular images, IMU readings, and plane masks on three separate ROS topics. The camera and IMU need to be properly calibrated and synchronized as there is no online calibration. A plane segmentation model to segment plane masks from images is provided below.
A semantic segmentation model can also be used as long as the RGB labels of the (static) planar semantic classes are provided. As an example, we evaluate on a sequence from the VIODE dataset (provided here) using semantic segmentation labels which are specified in the config file. To run,
    cd ~/catkin_ws/src/rp-vio/scripts
    git checkout semantic-viode
    ./run_viode_night.sh <PATH-TO-EXTRACTED-DATASET-FOLDER>
Plane segmentation
We provide a pre-trained plane instance segmentation model, based on the Plane-Recover model. We retrained their model, with an added inter-plane constraint, on their SYNTHIA training data and two additional sequences (00,01) from the ScanNet dataset. The model was trained on a single Titan X (maxwell) GPU for about 700K iterations. We also provide the training script.
We run the model offline, after extracting and processing the input RGB images from their ROS bagfiles. Follow the steps given below to run the pre-trained model on your custom dataset (requires CUDA 9.0),
Create Environment
Run the following commands to create a suitable conda environemnt,
cd plane_segmentation/
conda create --name plane_seg --file requirements.txt
conda activate plane_seg
Run inference
Now extract images from your dataset to a test folder, resize them to (192,320) (height, width), and run the following,
python inference.py --dataset=<PATH_TO_DATASET> --output_dir=<PATH_TO_OUTPUT_DIRECTORY> --test_list=<TEST_DATA_LIST.txt FILE> --ckpt_file=<MODEL> --use_preprocessed=true TEST_DATA_LIST.txt is a file that points to every image within the test dataset, an example can be found here. PATH_TO_DATASET is the path to the parent directory of the test folder.
The result of the inference would be a stored in three folders that are named as plane_sgmts (predicted masks in grayscale), plane_sgmts_vis (predicted masks in color), plane_sgmts_modified (grayscale masks but suitable for visualization (feed this output to the CRF inference)).
Run CRF inference
We also use a dense CRF model (from PyDenseCRF) to further refine the output masks. To run,
python crf_inference.py <rgb_image_dir> <labels_dir> <output_dir>where the labels_dir is the path to the plane_sgmts_modified folder.
We then write these outputs mask images back into the original bagfile on a separate topic for running with RP-VIO.
RPVIO-Sim Dataset

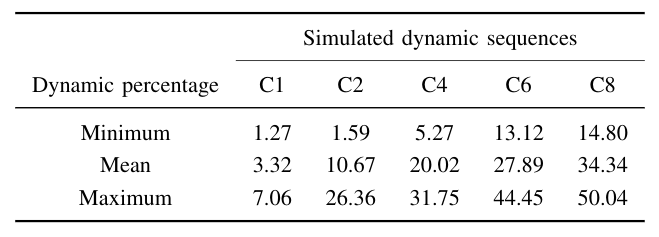
For an effective evaluation of the capabilities of modern VINS systems, we generate a highly-dynamic visual-inertial dataset using AirSim which contains dynamic characters present throughout the sequences (including initialization), and with sufficient IMU excitation. Dynamic characters are progressively added, keeping everything else fixed, starting from no characters in the static sequence to eight characters in the C8 sequence. All the generated sequences (six) in rosbag format, along with their groundtruth files, have been made available via Zenodo.
Each rosbag contains RGB images published on the /image topic at 20 Hz, imu measurements published on the/imu topic at ~1000 Hz (which we sub-sample to 200Hz for our evaluations), and plane-instance mask images published on the/mask topic at 20 Hz. The groundtruth trajectory is saved as a txt file in TUM format. The parameters for the camera and IMU used in our dataset are as follows,

To quantify the dynamic nature of our generated sequences, we compute the percentage of dynamic pixels out of all the pixels present in every image. We report these values in the following table,

TO-DO
- [ ] Provide Unreal Engine environment
- [ ] Provide AirSim recording scripts
Acknowledgement
Our code is built upon VINS-Mono. Its implementations of feature tracking, IMU preintegration, IMU state initialization, the reprojection factor, and marginalization are used as such. Our contributions include planar features tracking, planar homography based initialization, and the planar homography factor. All these changes (corresponding to a slightly older version) are available as a git patch file.
For our simulated dataset, we imported several high-quality assets from the FlightGoggles project into Unreal Engine before integrating it with AirSim. The dynamic characters were downloaded from Mixamo.
