git-graph
A command line tool to visualize Git history graphs in a comprehensible way, following different branching models.
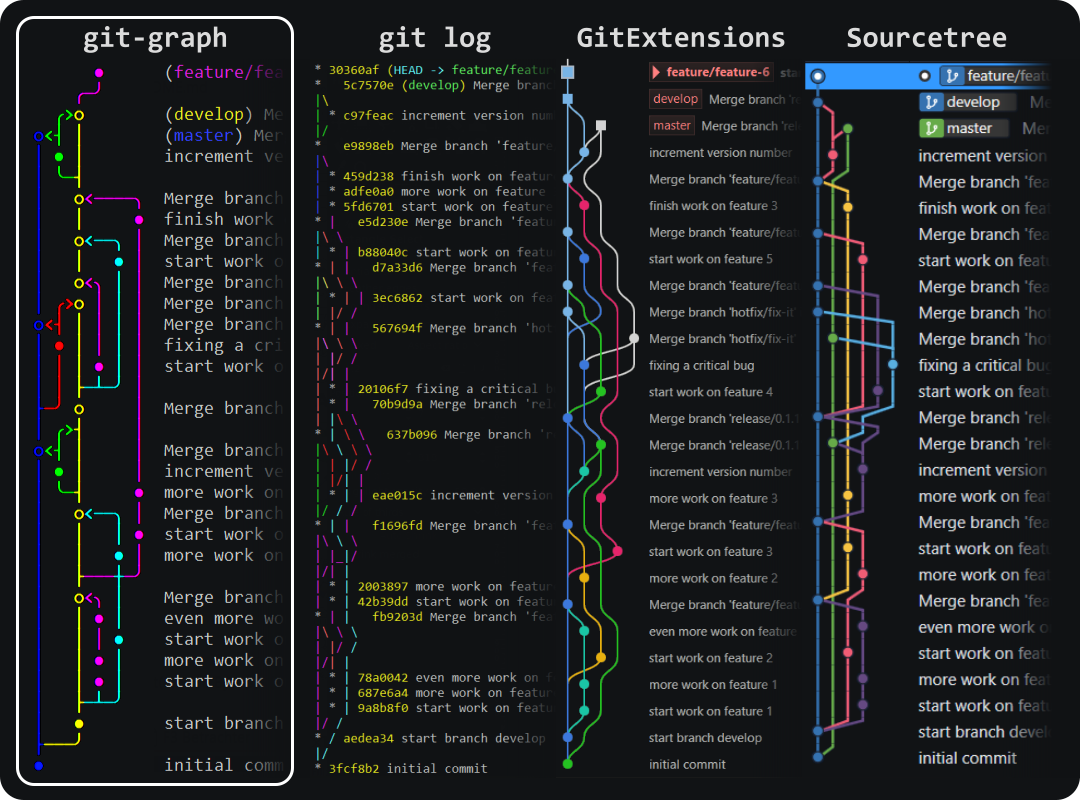
The image below shows an example using the GitFlow branching model for a comparison between graphs generated by git-graph (far left) versus other tools and Git clients.
GitFlow was chosen for its complexity, while any other branching model is supported, including user-defined ones.

Decide for yourself which graph is the most comprehensible. :sunglasses:
If you want an interactive Git terminal application, see git-igitt, which is based on git-graph.
Features
- View structured graphs directly in the terminal
- Pre-defined and custom branching models and coloring
- Different styles, including ASCII-only (i.e. no "special characters")
- Custom commit formatting, like with
git log --format="..."
Installation
Pre-compiled binaries
- Download the latest binaries for your platform
- Unzip somewhere
- Optional: add directory
git-graphto yourPATHenvironmental variable
Using cargo
In case you have Rust installed, you can install with cargo:
cargo install git-graphUsage
For detailed information, see the manual.
For basic usage, run the following command inside a Git repository's folder:
git-graphNote: git-graph needs to be on the PATH, or you need use the full path to git-graph:
C:/path/to/git-graph/git-graph
Branching models
Run git-graph with a specific model, e.g. simple:
git-graph --model simpleAlternatively, set the model for the current repository permanently:
git-graph model simpleGet help
For the full CLI help describing all options, use:
git-graph -h
git-graph --help
For styles and commit formatting, see the manual.
Custom branching models
Branching models are configured using the files in APP_DATA/git-graph/models.
- Windows:
C:\Users\<user>\AppData\Roaming\git-graph - Linux:
~/.config/git-graph - OSX:
~/Library/Application Support/git-graph
File names of any .toml files in the models directory can be used in parameter --model, or via sub-command model. E.g., to use a branching model defined in my-model.toml, use:
git-graph --model my-modelFor details on how to create your own branching models see the manual, section Custom branching models.
Limitations
- Summaries of merge commits (i.e. 1st line of message) should not be modified! git-graph needs them to categorize merged branches.
- Supports only the primary remote repository
origin. - Does currently not support "octopus merges" (i.e. no more than 2 parents)
- On Windows PowerShell, piping to file output does not work properly (changes encoding), so you may want to use the default Windows console instead
Contributing
Please report any issues and feature requests in the issue tracker.
Pull requests are welcome. For major changes, please open an issue first to discuss what you would like to change.


