Broadlink Control - Broadlink Device nodes for Node-RED
![]()


A set of Node-RED nodes to manage the Broadlink RM series of IR Controllers and for home automation. A cost effective way to control Air Conditioners, TV's, Audio equipment and many more like a universal remote control unit.
This is a fork of the work by VladimirSFilippov https://github.com/VladimirSFilippov/node-red-contrib-broadlink with some enhancements and additions I was looking for, including documentation. I don't have that much time to maintain this, so feel free to fork and submit a PR if you do any updates. It will help a lot.
If you would like to donate to purchasing some testing hardware or want to buy me a coffee or beer, click here: https://www.paypal.me/mlfunston
Supported Devices
- RM-Mini 3
- RM-Pro
- RM 4 and newer mini devices
- MP1 - 4 Outlet Power Strip
- SP2 - WiFi Smart Socket
- SC1 - WiFi Smart Socket - Use the SP2 node
Note: There are other nodes included per below list, however, I have not tested them as I don't have those devices. So let me know if you've had success using them.
- A1 - Environment Sensor
- S1C - SmartONE Alarm Kit
The TC2 device is not directly supported as it communicates via RF to the RM-Pro. However, if you have an RM Pro unit, you can pull the RF codes from the phone app after you have configured it and use those to control the switch. Note that you may need to send them multiple times to ensure it meets the requirements of being divisible by 16. Refer to this thread for similar process.
Installing and Setting up
Add the Broadlink node to Node-RED through the manage palette tab or command line.
Discover your Broadlink device by using the Discover node. This will reveal MAC Address, IP Address and Type Code needed to setup the config node.
You can either learn commands directly from the RM unit using the node, or from the Broadlink e-control app and export them. In the latter case, you will need the SharedData folder exported from the app as a starting point.
Catalog folder (SharedData) is not needed if you plan to learn every command you will use, but using the sample broadlinkDB folder as the catalog might help since the RM Node expects IR data to be formatted a certain way.
Community How-Tos, Videos & Articles
If you find good content related to this set of nodes please share it below:
- Broadlink Control Discussion Forum
- Video Tutorial: Broadlink RM4 Pro: Node-RED and Home Assistant setup
- Article: Broadlink RM4 Pro: Node-RED and Home Assistant setup
Broadlink e-control App Method
First, configure the Broadlink device through the Broadlink e-control app on your smartphone. You will need to copy some files from your device after setup.
For Apple devices use this app: https://itunes.apple.com/us/app/broadlink-e-control/id793152994?mt=8
Note: The newer Broadlink IHC / Intelligent Home Center app is not compatible with this method at present. Only the e-control app files work with this node at present. If someone wants to have a go at developing this, please fork and submit a pull request. I will not have time to look at this for a bit.
Secondly, newer firmware / devices may not work with the older e-control app, so you may need to use the database files I have included in the brodlinkDB directory and learn the IR codes directly with the example code.
New Broadlink App and Cloud mode - Troubleshooting
The latest Broadlink app may confiure the device in cloud mode which means that it will no longer function locally with this library. This is common for RM4 and RM3 Mini newer devices (e.g. device type 5f36 or 2737). If you can discover the device but cannot learn or send, then you likely have this issue.
To reverse this, you will need to reset the device.
Suggested process is as follows:
- Remove any existing configured devices or control in the Broadlink app.
- Reset device by long press (~6 seconds) the reset button with a pin or paperclip until the LED rapidly flashes.
- Use the BroadLink app to connect to WiFi (keep your phone close to RM). AND STOP!!
- Do nothing more, dont't add anything more in the app, quit the app and now use the broadlink nodes in Node Red.
If you have a locked device, you can also unlock it from the Broadlink app now. Try the instructions here https://github.com/mlfunston/node-red-contrib-broadlink-control/issues/91
Configuring the Broadlink App
The app itself is not that intuitive, but after you add the RM device you will need to add a user defined device (eg an air conditioner or tv) and buttons. If you use one of the built in devices the remote commands aren't recorded in the files, so make sure to use user defined.
- Swipe left on the home screen to reveal your devices.
- Select the device
- Select the :gear: icon and add remote
- Click the
+sign and add the buttons or functions you want to be able to use in Node-RED - The app will ask you to point the remote at it and press the appropriate button
- Complete the process to add the buttons you need
- Click the :gear: icon and create shortcut if you want the device to be visible on the app home screen
- Return to the home screen and swipe right and click share and
Share to other phones in WLAN
Now you are ready to copy the config files from the device to use in the node!
Copying the files from an iPhone
- Use an app like iExplorer and connect your iPhone to your computer and do a backup using the tool
- Explore the backup and open the Apps section of the backup
- Find the
cn.com.broadlink.e-Controlfolder and export it to your computer - Put the folder into a location where Node-RED can see it. You will need the path to the
cn.com.broadlink.e-Control.new/Documents/SharedData/folder later
Copying files from and Android phone
I don't have one, but it should be simpler to find the folder on it and extract it. I did find the below instructions somewhere that you could try. Perhaps someone can contribute here?
Connect your Android device to your computer and browse the SD card/External Storage folder /broadlink/newremote/SharedData/.
Configuring Node-RED nodes
Assuming you have added the Broadlink nodes and configured as above, you will need the MAC address of the device, IP address and the path to the SharedData folder above. For device type, if you have an older device you can set the default value to 272a. Newer RM3 devices or RM4 requires the correct device type to be entered. You can find your device type via the discover node. Check the example nodes below.
- Add the RM node and double click it
- Select device and
add new rmdevice - Fill in the MAC address of the device, IP address, device type and the full path to the SharedData folder in the
Catalogfield and clickAdd - You will then need to save the node and click
Deployso that you can see the buttons you created in the Broadlink app in the node. - Double click on the node again and you should be now able to select Action -> Send and then pick the remote and button you wish to send.
- Save node, add an inject node on the front and link them together and deploy.
Now you should be able to click on the inject node and fire a signal to your device!
Start adding extra nodes to fire out the functions you need or inject messages to the node to drive it.
Sending data via msg.payload
Data needs to be formatted as a buffer object, or as a Base64 data string (eg as used by Home Assistant or others).
An example of a function node containing the sample data is shown below.
//Insert learned data object here
var data = [38,0,140,0,77,21,18,22,38,21,17,22,17,22,38,21,18,21,18,22,37,22,17,22,18,21,18,22,17,0,3,99,77,21,18,22,38,21,17,22,18,21,38,21,18,22,17,22,38,21,18,21,18,22,17,22,17,0,3,99,77,21,18,22,37,22,17,22,18,21,38,21,18,22,17,22,37,22,18,21,18,22,17,22,18,0,3,100,76,22,18,21,38,21,18,22,17,22,37,22,18,21,18,22,37,22,17,22,18,21,18,22,17,0,3,101,76,22,18,21,39,20,18,22,17,22,37,22,18,21,18,22,37,22,17,22,18,21,18,22,17,0,13,5,0,0,0,0,0,0,0,0,0,0,0,0];
// or Base64 encoded format from other source
//var data = "JgBMAnM3ECkQKRANEAwRDQ8pEAwQDRApDyoQDQ8pEA0QDRAoECkQDRAoEigQDBEMECkRDBAMECkQDRAMEA0QDRAMEA0QDRANDw4PDQ8NEA0PDRANEA0RDA8NEAwRDBAMESgQDRAMEA0QDRAMESgQKRANEAwRDBApDyoQDBApEA4PDBILEQwQDRAoESgRDBApECkQDBANECkQDBANECgRDBANECkQDBEoEQwQKQ8NEA0QKQ8qEAwQDRAMEA0QDQ8NEA0QDBEMEAwRDQ8ODwwRDBAMEA0QDRAMEA0QDBANEQwQDRAMEA4PDRANEAwQDBANEA0QDBEMEAwQDRAMEA4PDBEMEA0PDRANEAwRDQ4OEAwRDBEMEAwQDRANECgQKRApECkQDBEMEAACMnc4ECgQKRANEQwQDQ8pEQwQDQ8qECgQDRApEA0QDBEoECkQDBEoECkQDRAMECkQDRAMECkQDRANEAwQDRANDw0QDQ8NEQwQDBEMEA0PDRENDw0QDBANDw0QDRANECgRDBAMEA0QDRAMECkRKBANEAwRDBApECkQDBEoEQwQDRAMEA0QDBApECkQDRApECgQDRANECgRDBANECgRDBANECgRDBApEAwQKRANEAwRKBApEQwQDBEMEA0QDBEMEA0QDQ8NDw0RDBAMEQwQDRAMEA0QDBEMEA0QDBANEAwQDRANEAwQDRANEAwQDRAMEA0QDRAMEA0QDBANEA0RCxILEQwQDBEMEA0QDBEMEA0QDQ8NEQwQDBANECkPKhApECkQDBANEAANBQAAAAAAAAAAAAAAAA=="

msg.payload={
    //"mac":"MAC address of your broadlink rm",  // Optional if configured in the RM node
    //"host":"IP address of your broadlink rm",  // Optional if configured in the RM node
    "action":"send",
    "data":data,
    "repeat":2
};

return msg;
This should then be connected to the RM node to send the data.
Examples
There are example flows to provide some additional functions / templates to use. You can get the example flows from the Node-RED hamburger menu (top right corner), choose Import -> Examples -> broadlink-control and pick your example.
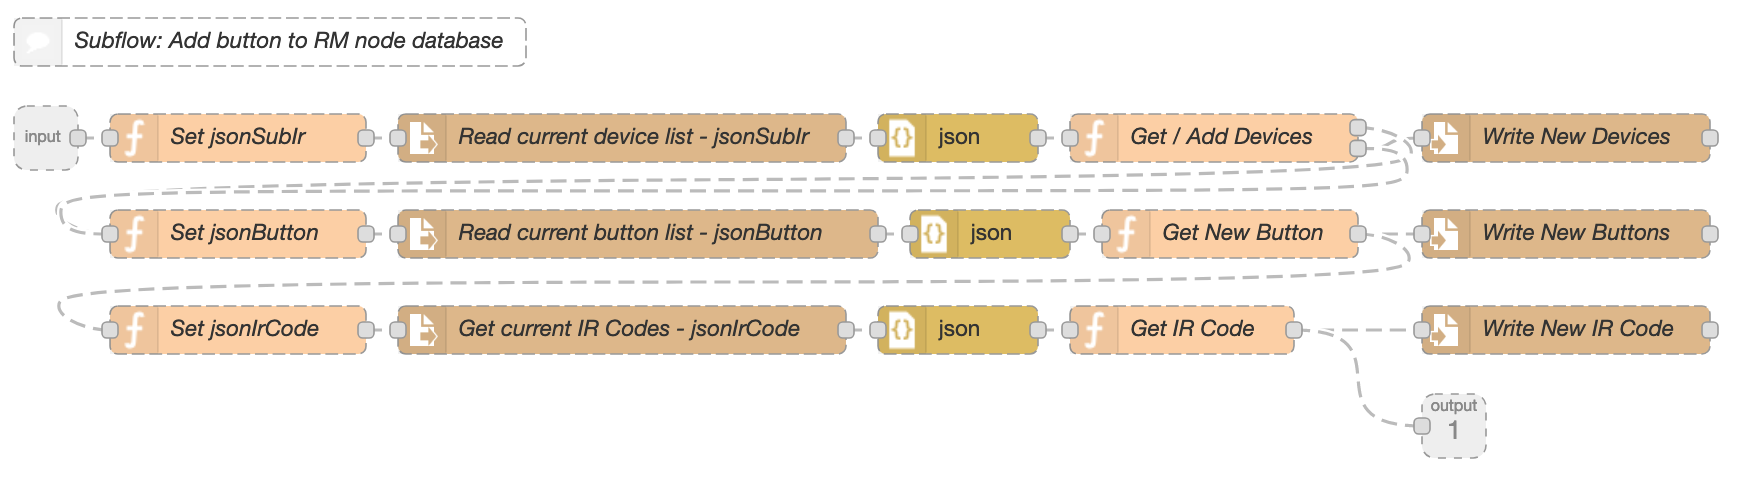
Example 1: Add new button to the RM node database
This example allows modification of the RM node database files (jsonSubIr, jsonButton and jsonIrCode) so you can add new buttons and IR codes without having to re-import from the Broadlink App. New Devices and Buttons can also be added here.
Set your data file location and new device, button name and IR codes in the Config node in the example.

Note: If your Broadlink files contain any non standard characters eg the degree symbol then it will not load the file correctly. Also I noted that the e-control app put the incorrect quotation marks around some of the parameters, so this may need to be fixed in your file first before using this script. I have supplied some example database files in the broadlinkDB directory.
Example:

The " marks are incorrect at the end of name, start and end of OFF and start of index in the example above. Check to make sure yours are correct. This is also what causes "undefined" to be displayed in the button list.
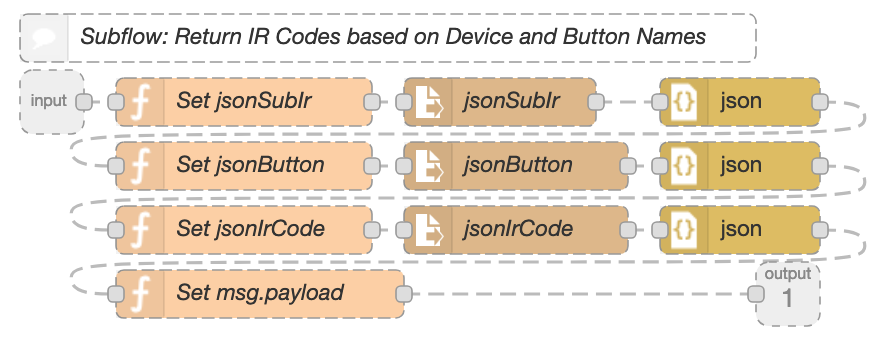
Example 2: Return IR Codes based on Device and Button Names
This example allows you to pull the IR code out from the data files based on the device and button name. You can then directly send them with the RM node. This allows programmatic selection of the device and button.
Set your data file location and device and button name and the IR codes will be returned in the msg.payload.

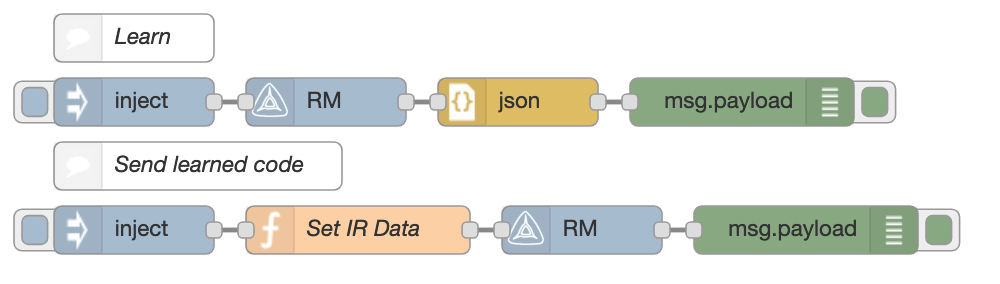
Example 3: Learn and Send Data
This example allows you to Learn an IR code with the RM device and then Send those out directly.
Set your RM device details in the RM nodes in the example and the data string in the function node in the send example. You can use this as an example to programmatically learn and send data from and to the RM device.
To Do
- [x] Create GUI Tool or Example in the Node-RED Dashboard to Learn and Send IR Codes - Check out the example nodes
- [ ] Create function to read the newer DB from the Broadlink IHC App
Authors & Contributors
- Vladimir Filippov - Author for the Initial build - VladimirSFilippov
- Mark Funston - Documentation and enhancements - mlfunston
- Bouni - fixed get_energy for SP3S devices - Bouni
- ivog1 - fix for UDP close port bug - ivog1
- neroxps - fix for MP1 S1 status error bug - neroxps
- deadly667 - fix for newer device headers RM4, etc deadly667
Feel free to fork this and provide updates and new features! Don't forget to submit a pull request.
License
This project is licensed under the MIT License - see the LICENSE file for details
Acknowledgments
This Node-RED module is based on the great work of VladimirSFilippov - VladimirSFilippov, using his node-red-contrib-broadlink libraries. Also thanks to the python-broadlink repository from Matthew Garrett.
Changelog
v2.1.6 (latest)
- Enhancement: Fix some content in the readme and broken links.
Note - RF learn and send may not be working yet on the RM Pro 4 series but should be working in the earlier RM Pro units, although I don't have either to test with.
v2.1.5
- Enhancement: Added RM4Pro typeid 0x5213. Issue #108.
- Enhancement: Added SP04 typeid 0xa56c. Issue #107. (Note - May need further work - I cannot test this)
- Enhancement: Added RM4Pro typeid 0x520b. Issue #105.
- Enhancement: Added RM4c Mini typeid 0x520d. Issue #104.
- Enhancement: Added RM4c Mini typeid 0x648a. Issue #94, #93.
- Enhancement: Added RM4c Mini typeid 0x5209. Issue #86.
- Enhancement: Fix some content in the readme and broken links.
Note - RF learn and send may not be working yet on the RM Pro 4 series but should be working in the earlier RM Pro units, although I don't have either to test with.
v2.1.4
- Enhancement: Added RM4C Mini Device Type 0x653a. Issue #67.
- Enhancement: Added RM4 Pro Device Type 0x653c. Issue #68.
- Enhancement: Added RM4 Pro Device Type 0x649b. Issue #71.
Note - RF learn and send may not be working yet on the RM Pro 4 series but should be working in the earlier RM Pro units, although I don't have either to test with.
v2.1.3
- Enhancement: Added GitHub Discussions to provide a community forum: Discussion Forum.
- Enhancement: Added cloud based device identification in the Discover node with additional diagnostic data. Issue #42.
- Enhancement: Added RM4C Mini Device Type 0x6539. Issue #62.
- Enhancement: Added RM4 Pro Device Type 0x649b. Issue #59.
- BUGFIX: Fix deprecated buffer.
Note - RF learn and send may not be working yet on the RM Pro 4 series but should be working in the earlier RM Pro units, although I don't have either to test with.
v2.1.2
- Enhancement: Updated confirmation for SC1 devices working with SP2 node.
- Enhancement: Added cloud based device identification in the Discover node with additional diagnostic data. Issue #42.
- Enhancement: Added RM4 Mini Device Type 0x648d. Issue #53.
- BUGFIX: Fixes for issues related to: issue #57.
Note - RF learn and send may not be working yet on the RM Pro 4 series but should be working in the earlier RM Pro units, although I don't have either to test with.
v2.1.1
- Enhancement: Added new RM4 device types 61a2 and 62bc. Issues #44 & #45.
- Enhancement: Added cloud based device identification in the Discover node with additional diagnostic data. Issue #42.
Note - RF learn and send may not be working yet on the RM Pro 4 series but should be working in the earlier RM Pro units, although I don't have either to test with.
v2.1.0
Note - Version 2.0.0 introduced a new field in the device configuration which required a manual change to each RM device configuration in Node-RED.
- Enhancement: Add Base64 Decoding to the RM Node. Data can now be sent in Base64 format. Issue #32
Note - RF learn and send may not be working yet on the RM Pro 4 series but should be working in the earlier RM Pro units, although I don't have either to test with.
v2.0.1
Note - Version 2.0.0 introduced a new field in the device configuration which required a manual change to each RM device configuration in Node-RED.
- Enhancement: Add support for RM4Pro device type 6026. Issue #28 & #30.
- Enhancement: Remove requirement for catalog field to be populated in RM nodes (if sending codes directly instead of using the catalog files from eControl app) issue #34.
- Enhancement: Remove default value requirement for device type and leave as default 272a if older hardware used. Only newer RM4+ type units need the device type inserted. Issue #31.
- Enhancement: Change Timeout message to info only. The terminology here was incorrect. Refer issue #33.
- Enhancement: Improved node status messaging on RM Nodes
Note - RF learn and send may not be working yet on the RM Pro 4 series but should be working in the earlier RM Pro units, although I don't have either to test with.
v2.0.0
Note - This version introduces a new field in the device configuration which will require a manual change to each device configuration.
- Enhancement: Add support for newer devices and fix header issues for them.
- BUGFIX: Fixes for issues related to newer devices: issues #25, #23, #22, #20.
v1.0.8
- Enhancement: Add new device ID's for RM Pro 4 - Needs testing. May need additional headers for RM4
- BUGFIX: Possible fix for issue #7 for incorrect energy reading on SP2 - Needs testing from users
v1.0.7
- Enhancement: Readme Updated to fix image links
- Enhancement: [ALPHA] Added RM IR Receiver Node for issue #15
- Enhancement: Improve error handling in RMNode for issue #12
- BUGFIX: Improve error handling in MP1Node for issue #11 and add improved help text
- BUGFIX: Improve error handling in RMNode for data timeouts - issue #14
- BUGFIX: Fix typo on msg.payload.fix that is returned on send of data to RMNode
v1.0.6
- Enhancement: Readme Updated for Broadlink IHC app vs e-control app
- Enhancement: Updated Example code and documentation for each
v1.0.5
- BUGFIX: jairo-futurasmus - #10 time out error on discover function after 3 seconds. Extended to 30 seconds.
- Enhancement: Added additional device types to the discover logic.
v1.0.4
- BUGFIX: sergiocntr - #8 time out error on learn function after 3 seconds. Extended to 30 seconds.
v1.0.3
- BUGFIX: neroxps - #5 MP1 S1 status error
v1.0.2
- Updates to readme and supported devices
- Added details on TC2 support in readme
- BUGFIX: ivog1 - #4 UDP Ports not being closed
v1.0.1
- Production v1 Release Fork of VladimirSFilippov's Broadlink node as he seems to have stopped development on it.
- Updated docs & node info
- Improvements to device discovery
v0.2.8
- Updated various documentation
- Included code fixes to SP2.js for SP3s devices from Bouni
v0.2.7
- Forked from VladimirSFilippov/node-red-contrib-broadlink
- Included new instructional content and additional translations
v0.2.5
- Original VladimirSFilippov/node-red-contrib-broadlink version