News
Note to All Users
This extension is now published and supported under the name workspace-explorer. If you have vscode-workspace-explorer please install this version instead, as vscode-workspace-explorer is no longer supported.
Release 2.3.0
This release formalizes support for opening workspaces from within Command Palette. Check out the docs at Open Workspaces with Command Palette for more details. Icons have been added to the Command Palette in several places to make the options more clear.
Introduction
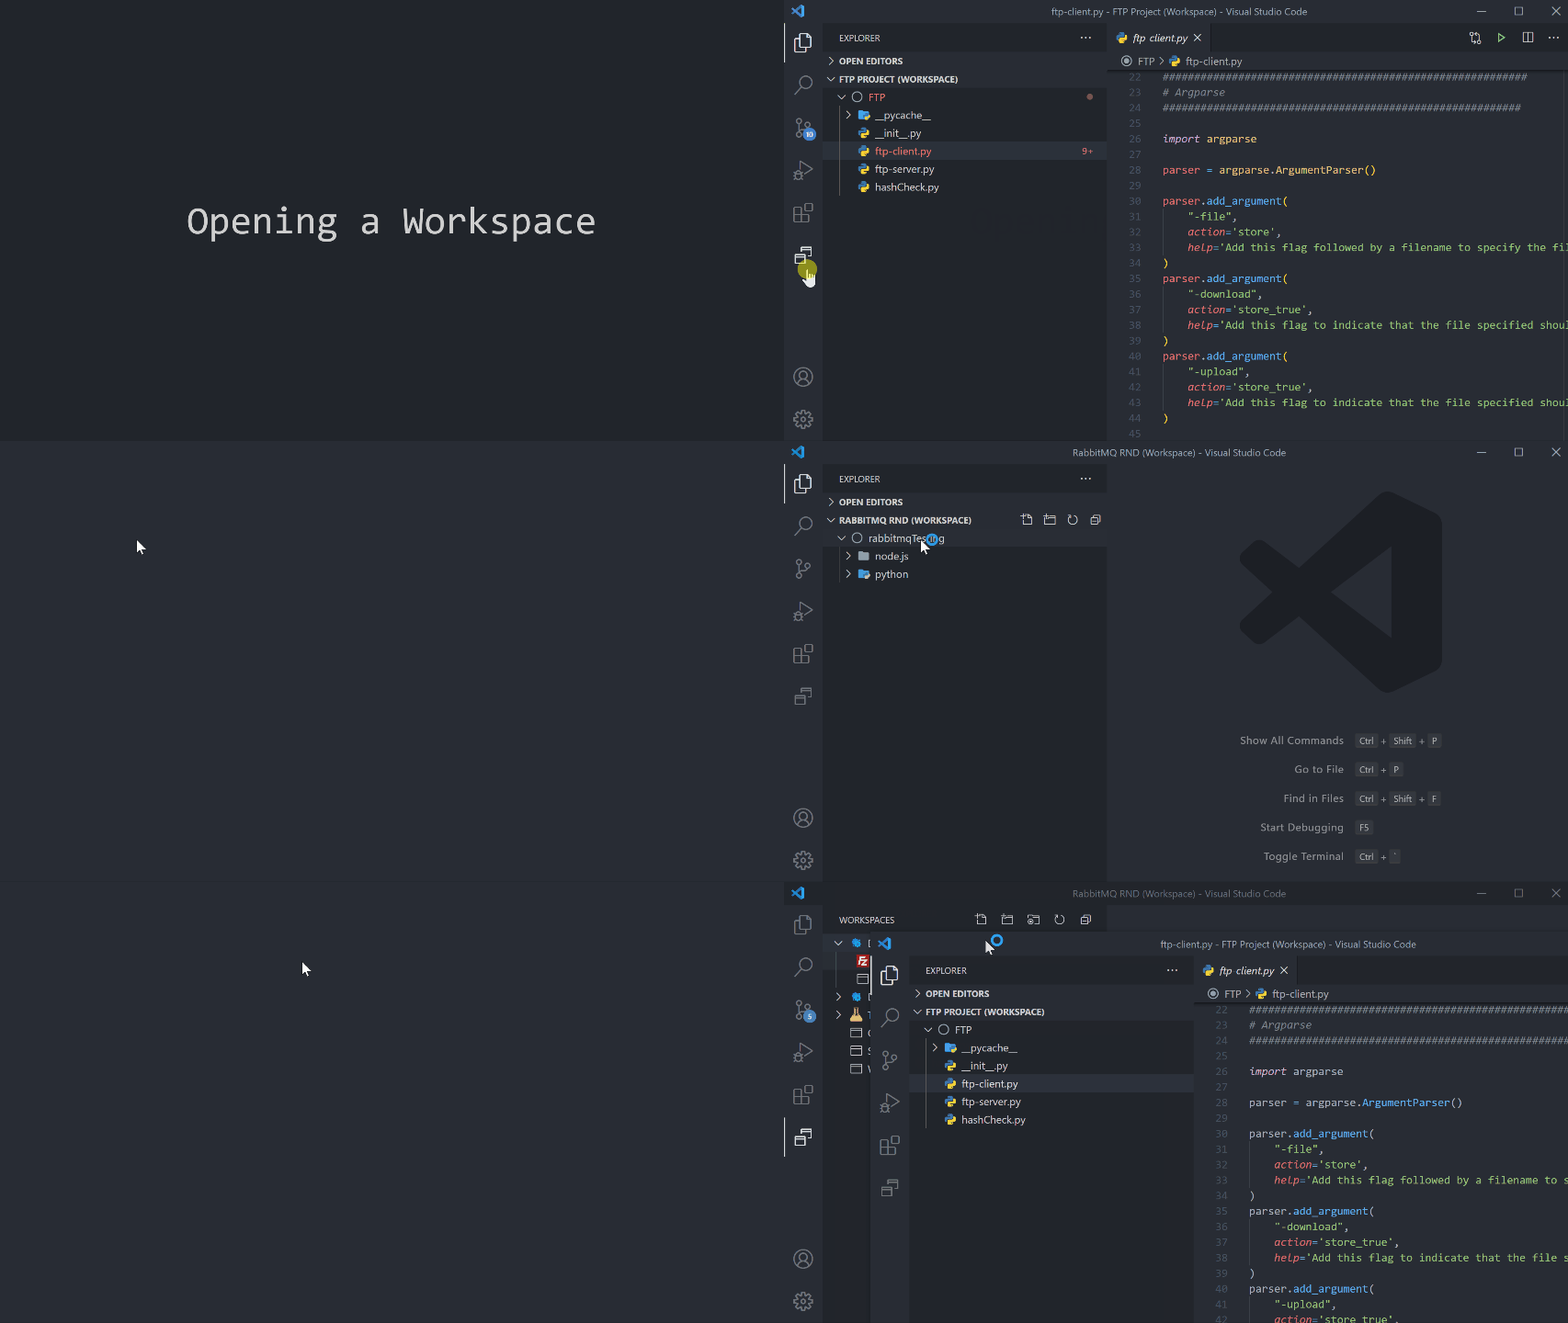
Workspace Explorer provides a convenient UI to quickly switch your workspace or open a workspace in a new window.
Getting Started
I should note before we dive into setup, VSCode currently allows you to only have one instance of a workspace open at a time, i.e. your node.code-workspace can only be open in one window of VSCode.
Five quick steps to get you up and running:
- Install the Workspace Explorer extension.
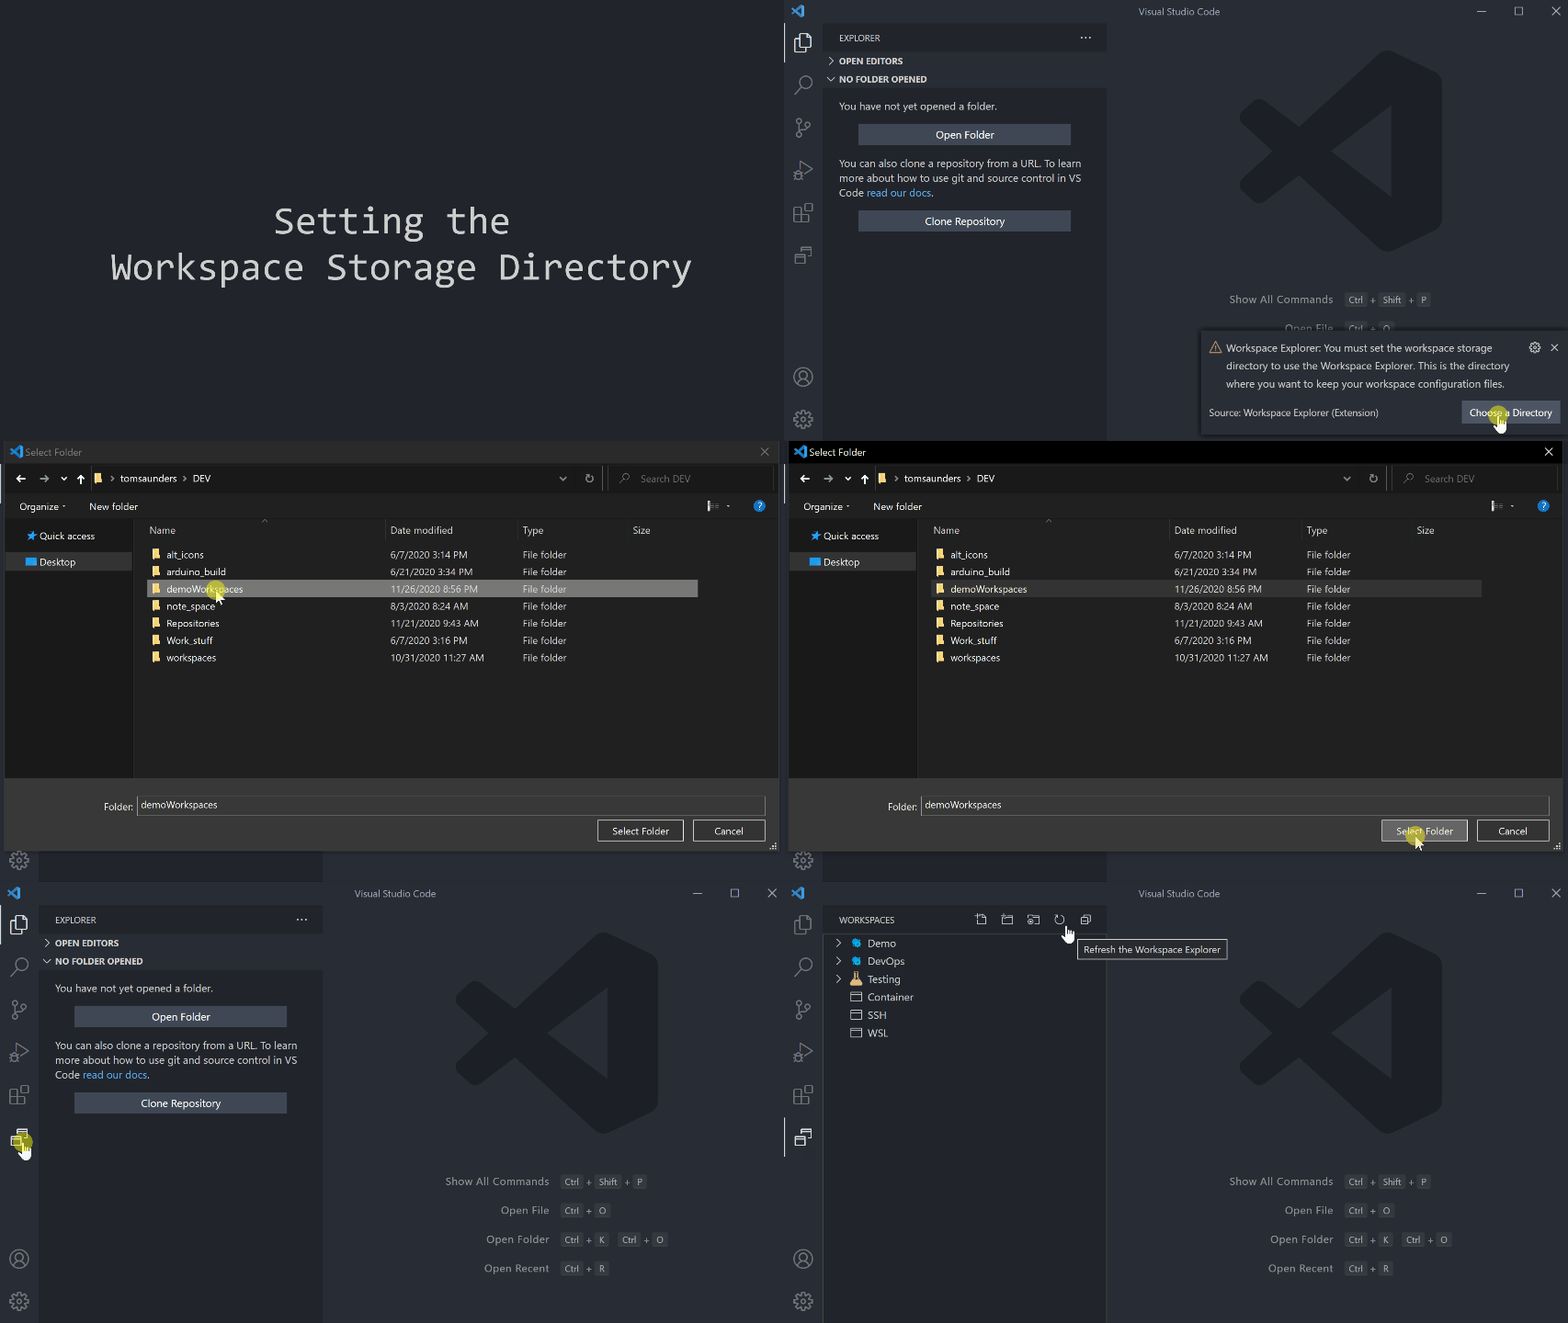
- Add a directory to the Workspace Explorer: Workspace Storage Directory setting.
- On Windows/Linux - File > Preferences > Settings > search "Workspace Explorer".
- On Mac - Code > Preferences > Settings > search "Workspace Explorer".
- Environment variables are supported in paths, see Using Variables in Config Paths.
- Add your existing .code-workspace files or save a new workspace to the Workspace Storage Directory.
- Open the Workspace Explorer by clicking on the WORKSPACES (two windows) icon on the VSCode activity bar, typically far left or right of the window.
- Hit the refresh icon that appears when you hover over the WORKSPACES title.
Features
Workspace Explorer allows you to have quick access to all your workspaces in one convenient UI.
- Sub-Folders
- Workspaces
- Custom Icons
Creating Sub-folders
Organize your .code-workspace files as much as you want within the Workspace Explorer: Workspace Storage Directory. Sub-folders will be listed in the Workspace Explorer. Click on the arrow to expand the directory and reveal any deeper sub-folders or workspaces.
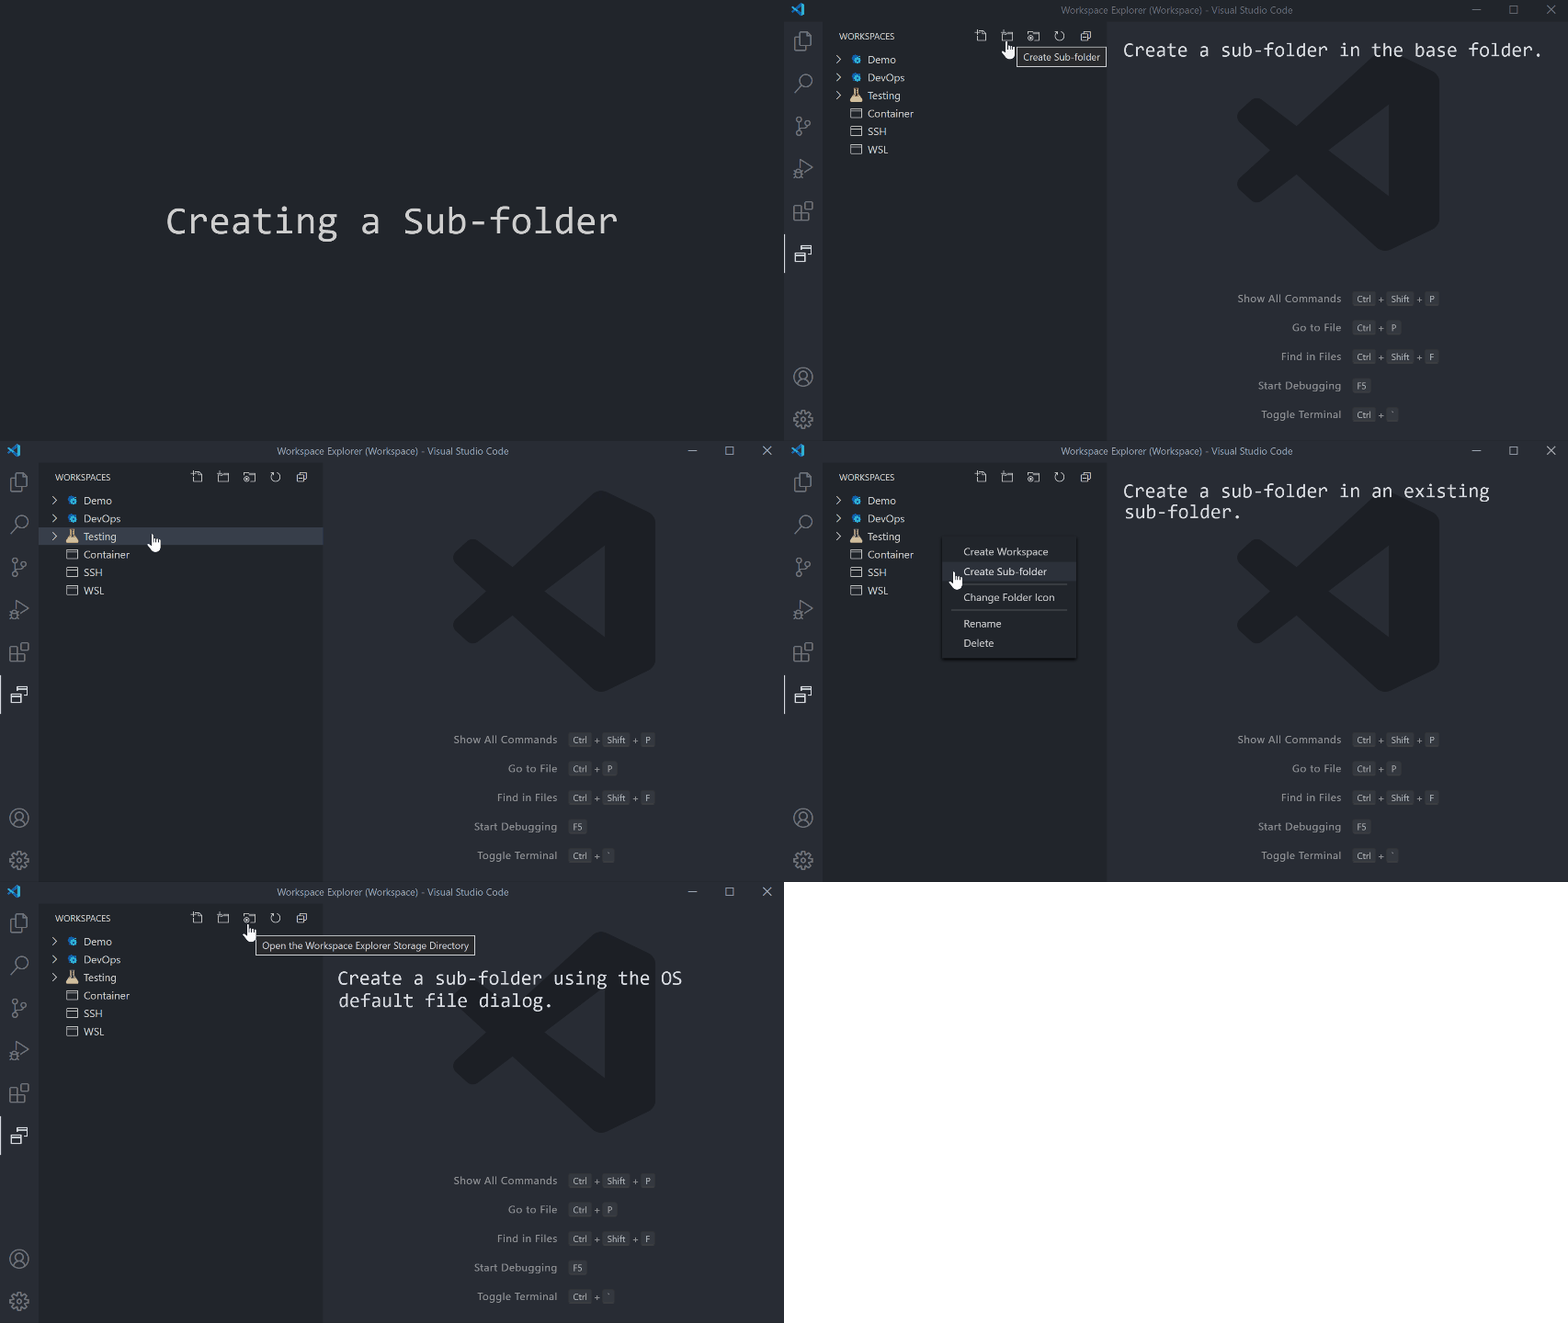
There are at least three ways to create a sub-folder:
- Clicking on the Create Sub-folder button on the Workspace Explorer title menu (right next to where it says WORKSPACES). This will create one directly in the Workspace Storage Directory.
- Right clicking on a folder in the Workspace Explorer > Create Sub-folder.
- Through the Open Workspace Storage Directory button where you can then create a sub-folder using the standard OS menus.
Deleting Folders
Workspace Explorer also allows you to remove unwanted sub-folders.
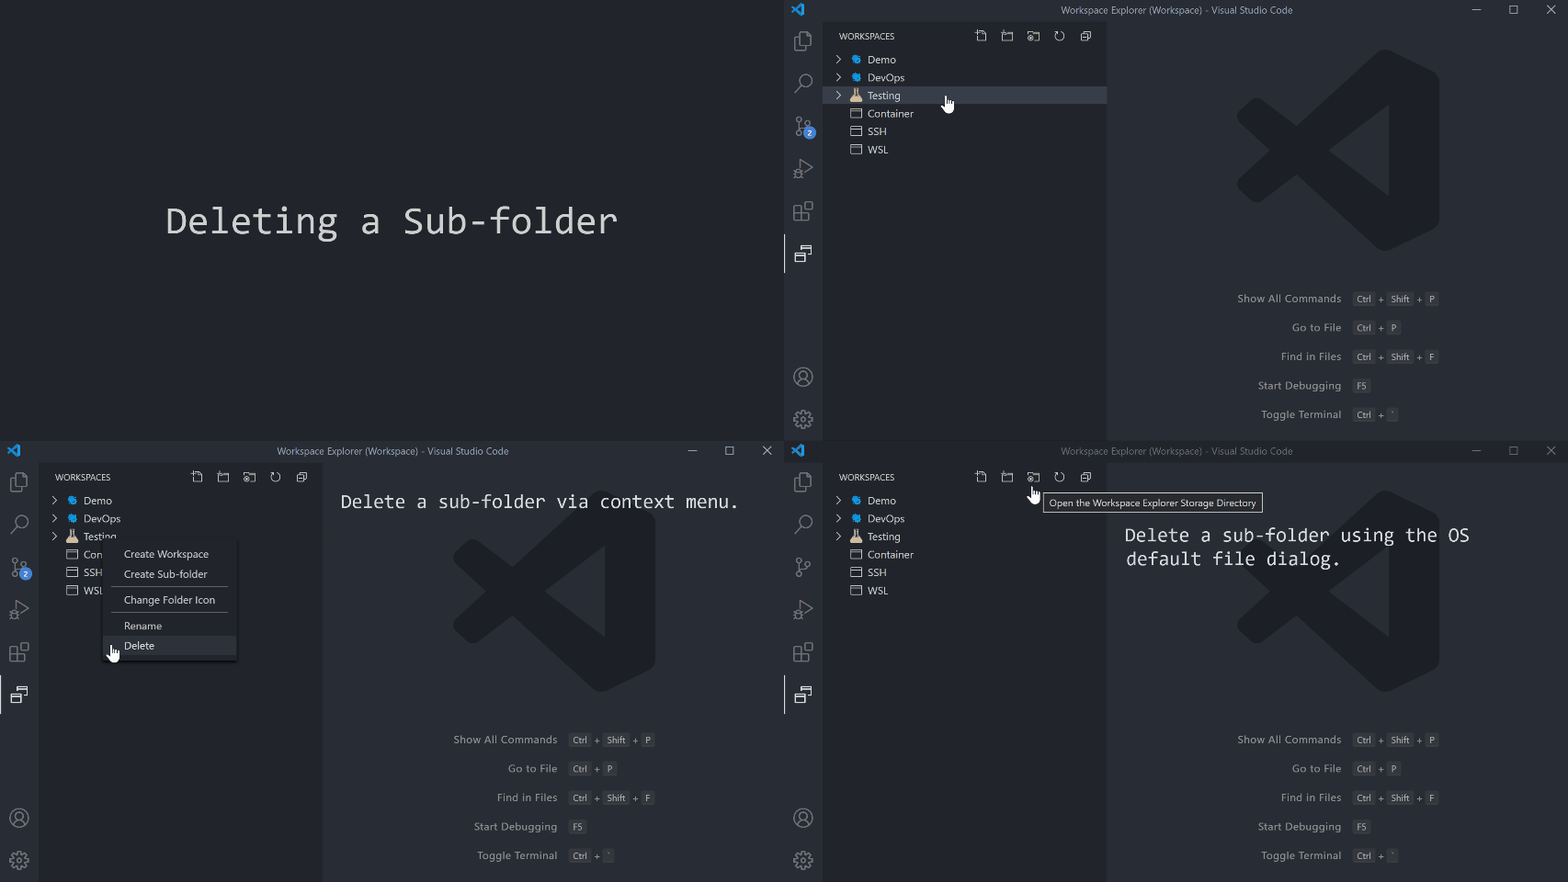
There are at least two ways to remove a sub-folder:
- Right clicking on a folder in the Workspace Explorer > Delete.
- Through the Open Workspace Storage Directory button where you can then remove a folder using the standard OS menus.
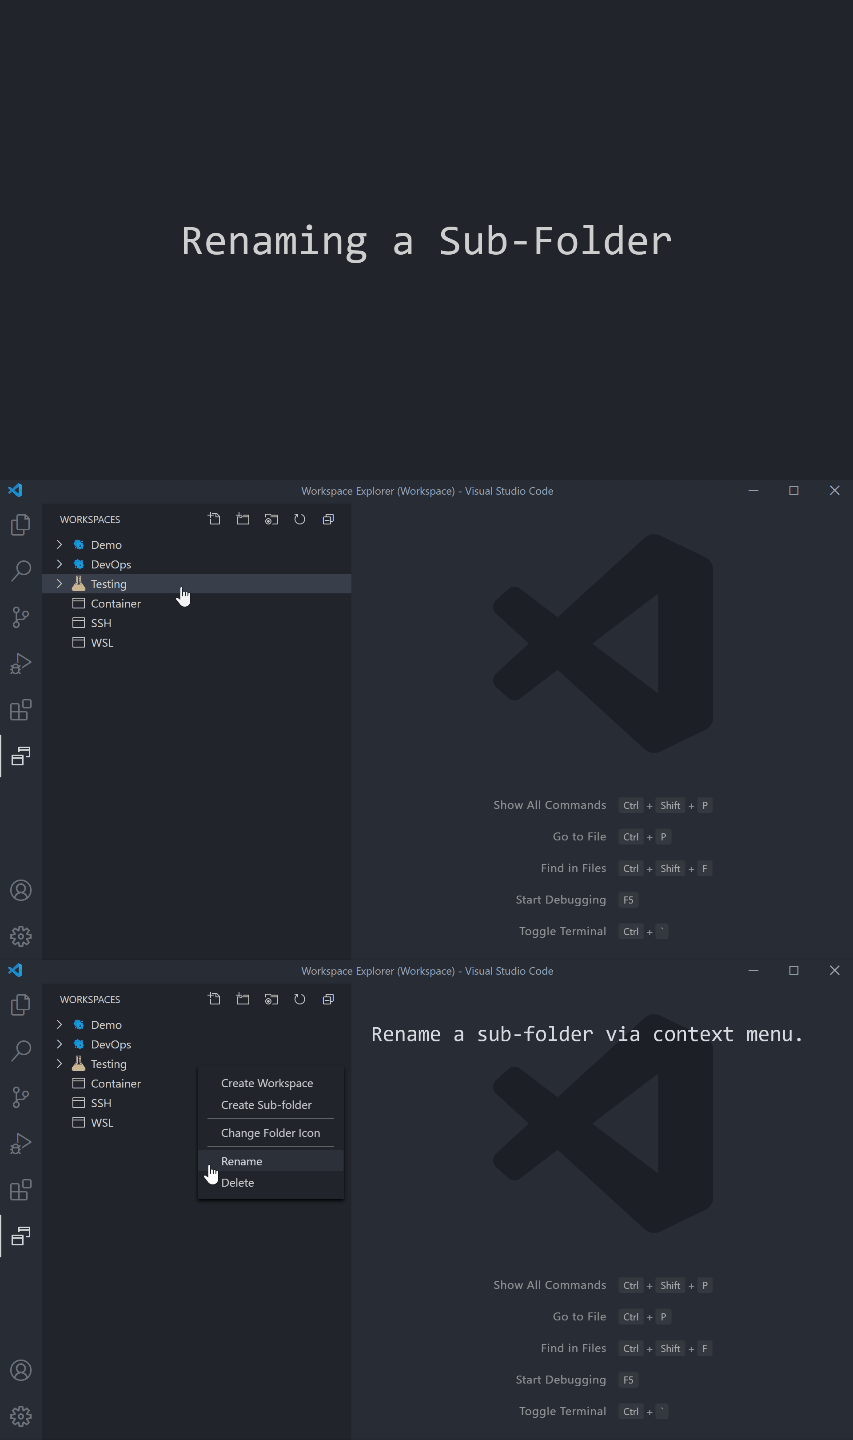
Renaming Folders
Workspace Explorer also allows you to rename sub-folders.
There are at least two ways to rename a sub-folder:
- Right clicking on a folder in the Workspace Explorer > Rename.
- Through the Open Workspace Storage Directory button where you can then rename a folder using the standard OS menus.
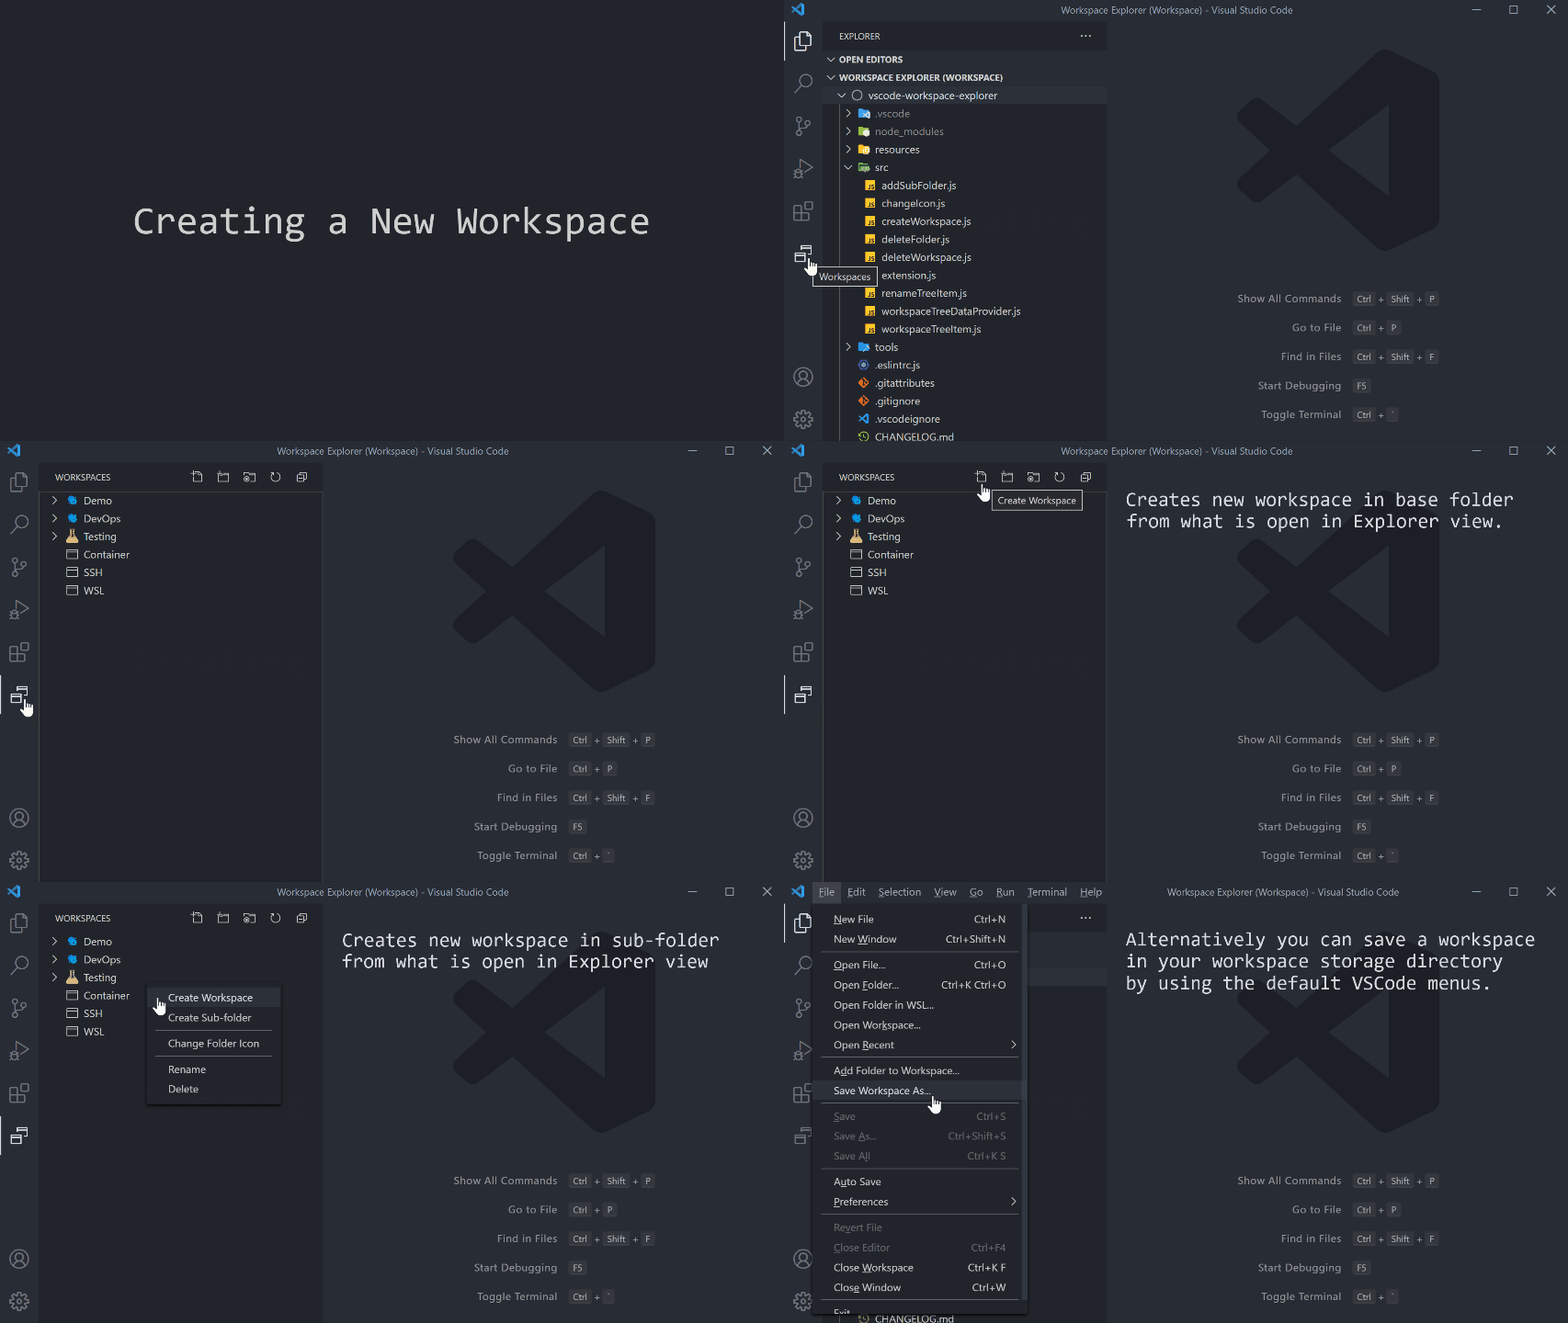
Creating a Workspace
Create a new workspace from the contents of your Explorer panel or choose folders to build a workspace from scratch.
- Root: Create a workspace at the root of your Workspace Storage Directory by clicking on the Create Workspace button on the Workspace Explorer navigation bar.
- Subfolder: Create a workspace in a sub-folder of your Workspace Storage Directory by right clicking on the sub-folder and choosing Create Workspace.
- Anywhere: Save a workspace in you Workspace Storage Directory using VSCode's File or Code menu > Save Workspace As
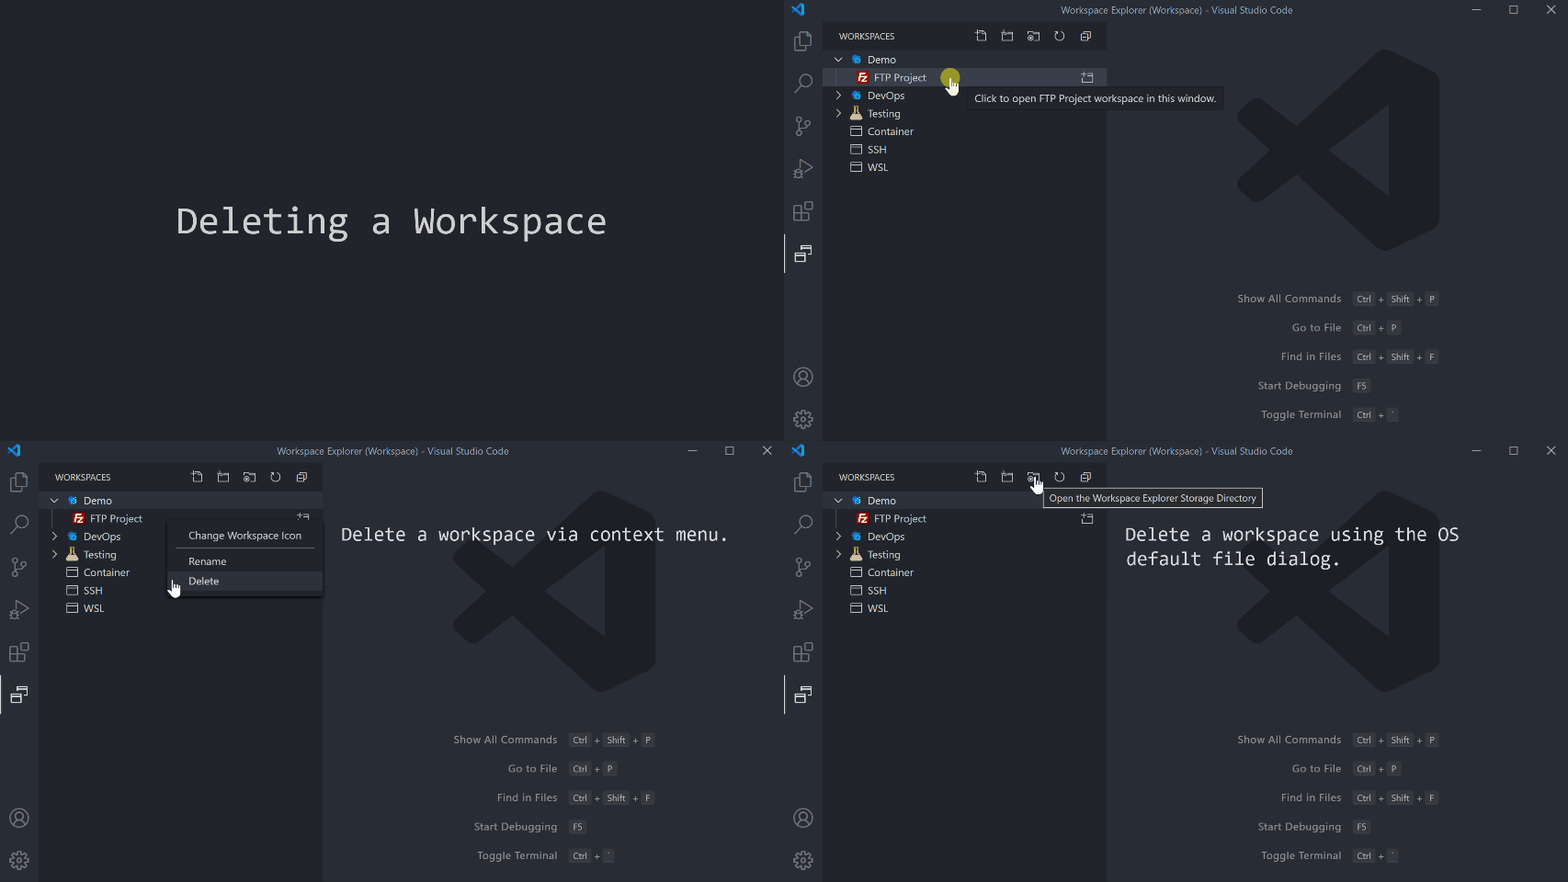
Deleting a Workspace
Remove a workspace simply by right clicking on it in the Workspace Explorer and choosing Delete.
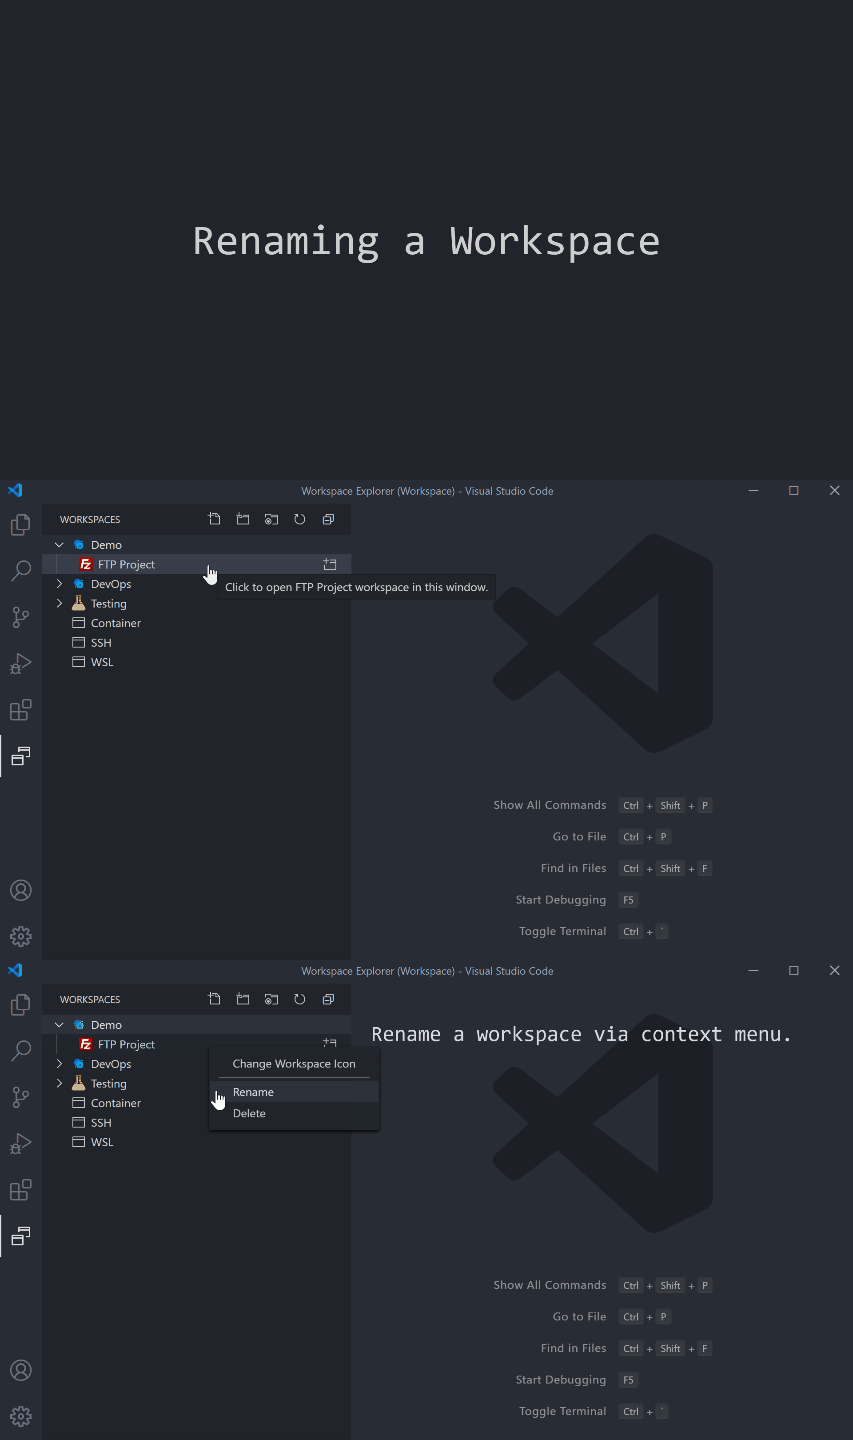
Renaming a Workspace
Workspace Explorer also allows you to rename workspaces.
There are at least two ways to rename a workspace:
- Right clicking on a workspace in the Workspace Explorer > Rename.
- Through the Open Workspace Storage Directory button where you can then rename a workspace using the standard OS menus.
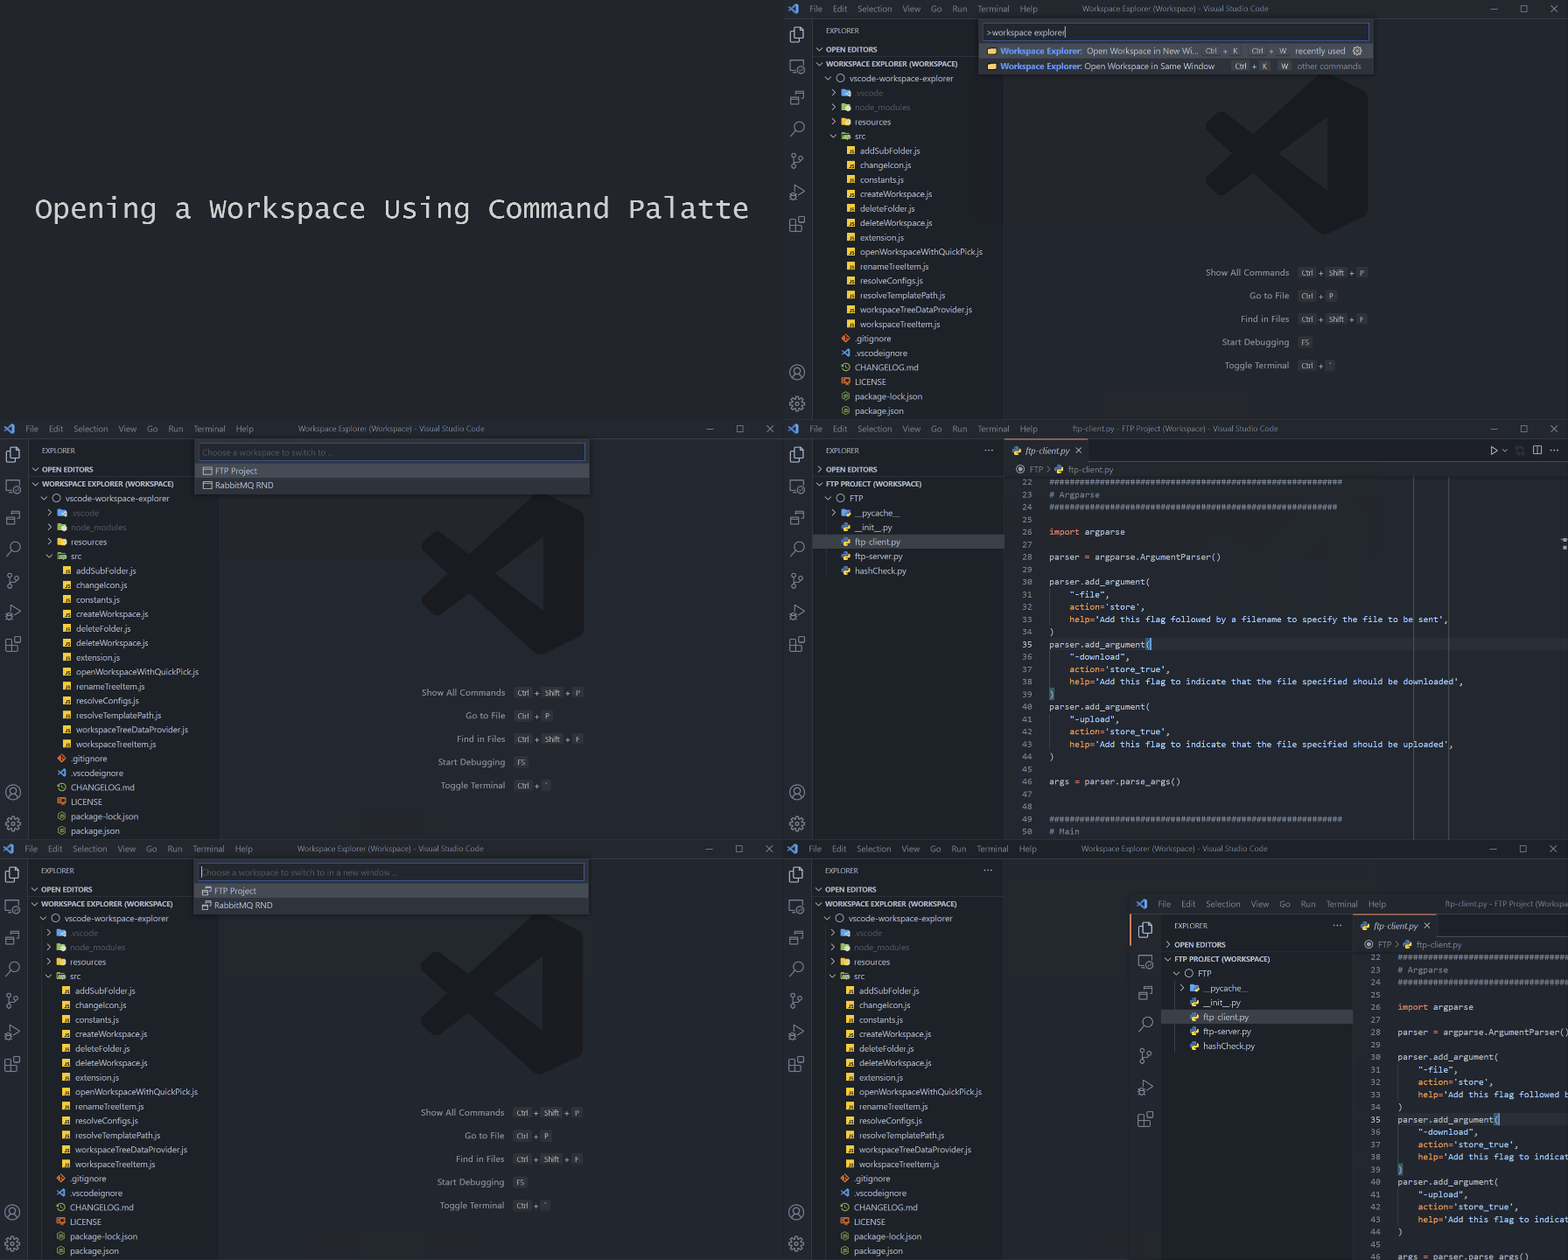
Opening a Workspace Using Command Palette
Workspace Explorer allows you to open a workspace in the existing window or a new window using the Command Palette.
Search the Command Palette
- Open Command Palette with
CTRL+SHIFT+P - Search for 🗂️ Workspace Explorer: Open Workspace In New Window or 🗂️ Workspace Explorer: Open Workspace In Same Window
- Choose the desired option and navigate the folder structure with mouse or up and down arrows.
- Hit enter to go into a folder or to select a workspace.
Keyboard Shortcuts
You can jump straight to the workspace list using keyboard shortcuts.
- Open Workspace in Same Window ->
CTRL+k + w - Open Workspace in New Window ->
CTRL+k + CTRL+w
Setting Custom Icons
Workspace Explorer comes with two default icons. One for sub-folders and one for workspaces. Adding custom icons is a great way to further organize and quickly recognize your workspaces/sub-folders.
You can add icons in one of three ways:
- Right clicking on a workspace or folder in Workspace Explorer and choosing Change Folder Icon or Change Workspace Icon.
- Through the Open Workspace Storage Directory button
- Click the button
- Copy the desired .png or .jpg into the same directory as your folder or workspace that you want the icon for. Ex: "Webserver Configs.code-workspace" ==> "Webserver Configs.png".
- Rename the icon to the name of the workspace or folder.
- Refresh the Workspace Explorer using the Refresh button
- Use an additional icons folder (See Additional Custom Icons Directory)
Additional Custom Icons Directory
Workspace Explorer also allows you to add an additional custom icons directory. It first searches the Workspace Storage Directory. If it then cannot find the image file (see Option One for how to name images and where to put them) then it will search the Additional Custom Icon Directory. It will only search one level of the directory (no sub-directories). If no icon is found at that point, default icons are used.
Enabling the Additional Custom Icon Directory
- Ensure the Workspace Explorer: Enable Custom Icon Search setting is enabled. It is enabled by default.
- Add a path to the Workspace Explorer: Additional Custom Icon Directory setting. Environment variables are supported, see Using Variables in Config Paths.
- Hit the refresh icon on the Workspace Explorer.
Extension Settings
Workspace Explorer contributes the following settings:
-
workspaceExplorer.workspaceStorageDirectoryThe root directory containing your .code-workspace files. Workspace Explorer will show you any .code-workspace's in this directory and will also display any sub-folders. This will allow you to organize your workspaces into categories by sub-folder. Ex: C:\Users\appuser\workspaces
-
workspaceExplorer.enableCustomIconSearchAllow Workspace Explorer to search for .png and .jpg files with the same name as your workspaces and folders. Then to use those as icons in the Workspace Explorer. The search path defaults to the same location as your workspace file. An additional search directory can be added in the Workspace Explorer: Additional Custom Icon Directory setting.
-
workspaceExplorer.additionalCustomIconDirectoryGive Workspace Explorer an additional search directory for .png and .jpg files with the same name as your workspaces and folders. Then use those as icons in the Workspace Explorer. Workspace Explorer will first look in the Workspace Storage Directory and then will look in the Additional Custom Icon Directory. Ex: C:\Users\appuser\icons
Using Variables in Config Paths
Workspace Explorer supports environment variables in your workspace storage directory and in your additional custom icon directory paths. Here's the supported syntax, note the environment variable(s) can be placed where ever you like in the path and you can have more than one.
${env:NAME_OF_ENV_VAR}/remainder/of/your/path

/root/of/my/path/${env:NAME_OF_ENV_VAR}/remainder/of/your/path

${env:USERPROFILE}\my\windows\path
Support for Remote SSH, Remote WSL, and Remote Containers Extensions
Workspace Explorer will continue to display a list of workspaces for users of the desktop version of VSCode when using the remote extensions. If you installed Workspace Explorer both on your local and remote machine, to take advantage of this feature you'll need to uninstall Workspace Explorer from the remote machine.
Using Workspace Explorer Remote Only
If you intend to work AND store your workspaces on a remote machine/container you can do so by updating the following values in your VSCode config. This will ensure the extension runs on the remote host rather than locally. This is automatically set for you if you are running in Codespaces. Check out issue #14 for more information.
{
  "remote.extensionKind": {
    "tomsaunders-code.workspace-explorer": ["workspace"]
  },
  ...
}
Release Notes
2.3.0
- Opening of workspaces via command palette is now no longer experimental
- Icons have been added for folders and workspaces within the command palette to assist in navigation
2.2.0
- Updated extension config for remote development workflows. VSCode will first try to run the extension locally and fallback to the remote extension host. This enables desktop VSCode users to continue seeing their workspaces while using remote extensions
- Patched a bug where folder creation would not work when running a remote extension
- Patched a bug where workspace creation would not work when running a remote extension
2.1.0
- Added experimental support for opening workspaces via command palette. PR by @fhemberger.
- Migrated Git repo from GitLab to GitHub
2.0.0
- Removed support for
.svgicons. - Added support for
.jpgicons. - Added support for environment variables in config paths, using template syntax.
- Added clearer workspace save prompt.
- Removed all command palette commands. These were unsupported.
1.7.0
- Moved Workspaces view inside a new Workspaces view container. This move increases usability for large collections of workspaces and subfolders. Additionally, moving the view frees up space in the Explorer view container to allow developers to access other Explorer views that are more relevant to active development in the editor panels. https://gitlab.com/tomsaunders-tools/vscode-workspace-explorer/-/issues/14
- Updated Docs and doc gifs to reflect the new location of the Workspaces view.
1.6.2
- Patched workspaceExplorer.openWorkspaceInSameWindow and workspaceExplorer.openWorkspaceInNewWindow commands to use existing VSCode internal commands. This fixes an issue in the browser version of VSCode. This also removes the dependency
on having
codein your system$PATH.
1.6.1
- Updated docs with information about new marketplace name
1.6.0
- When workspace storage directory has not been entered the notification dialog will now provide an option to choose the workspace by opening a file dialog.
- Updated Change Icon to force reload icons that are overwritten by the user
1.5.0
- Added Experimantal Create Workspace right click option.
- Added Experimental Create Workspace button on the Workspace Explorer navigation menu.
- Added Delete right click option. Works for both folders and workspaces.
- Added Create Sub-folder right click option.
- Added Create Sub-folder button on the Workspace Explorer navigation menu.
- Added Rename right click options. Works for both folders and workspaces.
- Updated Enable Custom Icon Search Configuration to be enabled by default
1.4.1
- Fix for POSIX style pathing on extension load that would prevent the extension from finding its version. Thanks to @CugeDe for finding the source of the issue.
1.4.0
- Added Open workspace storage directory button.
- Added Collapse All button
- Add Change Icon option in right click menu
- Removed Settings button.
- Updated Requirements Section of README
- Fixed support for VSCodium to call codium when changing workspace.
1.3.0
- Updated default icon sets to use default icons from VSCode.
1.2.2
- Migrated repository to new home.
1.2.1
- Additional Docs update for version 1.2
1.2.0
- Added support for additional versions of VSCode.
- VSCodium
- VSCode OSS
Contributed by @stripedpajamas
1.1.0
- Added support for symlinked directories.
Workspace Explorer will now follow symlinked directories to find .code-workspace files and image files. Thanks to @Xaryphon for providing the initial version of the code for this feature.
1.0.3
- Updated .vscodeignore to not include animations.
1.0.2
- Updated Documentation with proper animations.
1.0.0
- Initial Release
0.0.1 to 1.0.0 Pre-release
- Beta versions
Contributors
- Tom Saunders (original author, primary maintainer)
- @xaryphon
- @stripedpajamas
- @CugeDe
- @betterthanclay
- @shadowbq
- @fhemberger
Testers
Special thanks to the project testers.
- Renaud Talon
- Robert Tomcik
- Ryan Gold
