

![]() master
master
![]() develop
develop
![]()
![]()
![]()
Introduce
Wireless debugging with only one ESP Chip !
Realized by USBIP and CMSIS-DAP protocol stack.
👉 5m range, 100kb size firmware(Hex) earse and download test:

For Keil users, we now also support elaphureLink. No need for usbip to start your wireless debugging!
Feature
-
SoC Compatibility
- [x] ESP8266/8285
- [x] ESP32
- [x] ESP32C3
- [x] ESP32S3
-
Debug Communication Mode
- [x] SWD
- [x] JTAG
-
USB Communication Mode
- [x] USB-HID
- [x] WCID & WinUSB (Default)
-
Debug Trace (Uart)
- [x] Uart TCP Bridge
-
More..
- [x] SWD protocol based on SPI acceleration (Up to 40MHz)
- [x] Support for elaphureLink, fast Keil debug without drivers
- [x] Support for elaphure-dap.js, online ARM Cortex-M firmware flash
- [x] Support for OpenOCD/pyOCD
- [x] ...
Link your board
WIFI
The default connected WIFI SSID is DAP or OTA , password 12345678
Support for specifying multiple possible WAP. It can be added here: wifi_configuration.h
You can also specify your IP in the above file (We recommend using the static address binding feature of the router).

There is built-in ipv4 only mDNS server. You can access the device using dap.local.
The mDNS in ESP8266 only supports ipv4.

Debugger
ESP8266
| SWD | | |----------------|--------| | SWCLK | GPIO14 | | SWDIO | GPIO13 | | TVCC | 3V3 | | GND | GND | -------------- | JTAG | | |--------------------|---------| | TCK | GPIO14 | | TMS | GPIO13 | | TDI | GPIO4 | | TDO | GPIO16 | | nTRST \(optional\) | GPIO0\* | | nRESET | GPIO5 | | TVCC | 3V3 | | GND | GND | -------------- | Other | | |--------------------|---------------| | LED\_WIFI\_STATUS | GPIO15 | | Tx | GPIO2 | | Rx | GPIO3 (U0RXD) | > Rx and Tx is used for uart bridge, not enabled by default.ESP32
| SWD | | |----------------|--------| | SWCLK | GPIO14 | | SWDIO | GPIO13 | | TVCC | 3V3 | | GND | GND | -------------- | JTAG | | |--------------------|---------| | TCK | GPIO14 | | TMS | GPIO13 | | TDI | GPIO18 | | TDO | GPIO19 | | nTRST \(optional\) | GPIO25 | | nRESET | GPIO26 | | TVCC | 3V3 | | GND | GND | -------------- | Other | | |--------------------|---------------| | LED\_WIFI\_STATUS | GPIO27 | | Tx | GPIO23 | | Rx | GPIO22 | > Rx and Tx is used for uart bridge, not enabled by default.ESP32C3
| SWD | | |----------------|--------| | SWCLK | GPIO6 | | SWDIO | GPIO7 | | TVCC | 3V3 | | GND | GND | -------------- | JTAG | | |--------------------|---------| | TCK | GPIO6 | | TMS | GPIO7 | | TDI | GPIO9 | | TDO | GPIO8 | | nTRST \(optional\) | GPIO4 | | nRESET | GPIO5 | | TVCC | 3V3 | | GND | GND | -------------- | Other | | |--------------------|---------------| | LED\_WIFI\_STATUS | GPIO10 | | Tx | GPIO19 | | Rx | GPIO18 | > Rx and Tx is used for uart bridge, not enabled by default.ESP32S3
| SWD | | |----------------|--------| | SWCLK | GPIO12 | | SWDIO | GPIO11 | | TVCC | 3V3 | | GND | GND | -------------- | JTAG | | |--------------------|--------| | TCK | GPIO12 | | TMS | GPIO11 | | TDI | GPIO10 | | TDO | GPIO9 | | nTRST \(optional\) | GPIO14 | | nRESET | GPIO13 | | TVCC | 3V3 | | GND | GND |Hardware Reference
Only a hardware reference for the ESP8266 is currently available.
Here we provide a simple example for reference:

Alternatively, you can connect directly with wires as we gave at the beginning, without additional circuits.
In addition, a complete hardware reference design is available from contributors, see circuit
Build And Flash
You can build locally or use Github Action to build online and then download firmware to flash.
Build with Github Action Online
General build and Flash
ESP8266
1. Get ESP8266 RTOS Software Development Kit The SDK is already included in the project. Please don't use other versions of the SDK. 2. Build & Flash Build with ESP-IDF build system. More information can be found at the following link: [Build System](https://docs.espressif.com/projects/esp-idf/en/latest/api-guides/build-system.html "Build System") The following example shows a possible way to build on Windows: ```bash # Build python ./idf.py build # Flash python ./idf.py -p /dev/ttyS5 flash ```ESP32/ESP32C3
1. Get esp-idf For now, please use esp-idf v4.4.2 : https://github.com/espressif/esp-idf/releases/tag/v4.4.2 2. Build & Flash Build with ESP-IDF build system. More information can be found at the following link: [Build System](https://docs.espressif.com/projects/esp-idf/en/latest/api-guides/build-system.html "Build System") The following example shows a possible way to build: ```bash # Set build target idf.py set-target esp32 # Build idf.py build # Flash idf.py -p /dev/ttyS5 flash ``` > The `idf.py` in the project root directory is only applicable to the old ESP8266 target. Don't use it in ESP32.We also provided sample firmware for quick evaluation. See Releases
Usage
- Get USBIP project
- Windows: usbip-win .
- Linux: Distributed as part of the Linux kernel, but we have not yet tested on Linux platform, and the following instructions are all under Windows platform.
-
Start ESP chip and connect it to the device to be debugged
-
Connect it with usbip:
# HID Mode only
# for pre-compiled version on SourceForge
# or usbip old version
.\usbip.exe -D -a <your-esp-device-ip-address>  1-1

# 👉 Recommend
# HID Mode Or WinUSB Mode
# for usbip-win 0.3.0 kmdf ude
.\usbip.exe attach_ude -r <your-esp-device-ip-address> -b 1-1
If all goes well, you should see your device connected.

Here, we use MDK for testing:

FAQ
Keil is showing a "RDDI-DAP ERROR" or "SWD/JTAG Communication Failure" message.
- Check your line connection. Don't forget the 3v3 connection cable.
- Check that your network connection is stable.
DAP is slow or often abnormal.
Note that this project is sensitive to the network environment. If you are using a hotspot on your computer, you can try using network analyzer such as wireshark to observe the status of your AP network. During the idle time, the network should stay silent, while in the working state, there should be no too much packet loss.
Some LAN broadcast packets can cause serious impact, including:
- DropBox LAN Sync
- Logitech Arx Control
- ...
For ESP8266, this is not far from UDP FLOOD...😰
It is also affected by the surrounding radio environment, your AP situation (some NICs have terrible AP performance), distance, etc.
Document
Speed Strategy
The maximum rate of esp8266 pure IO is about 2MHz. When you select max clock, we will take the following actions:
clock < 2Mhz: Similar to the clock speed you choose.2MHz <= clock < 10MHz: Use the fastest pure IO speed.clock >= 10MHz: SPI acceleration using 40MHz clock.
Note that the most significant speed constraint of this project is still the TCP connection speed.
For OpenOCD user
This project was originally designed to run on Keil, but now you can also perform firmware flash on OpenOCD.
> halt
> flash write_image [erase] [unlock] filename [offset] [type]
pyOCD is now supported.
System OTA
When this project is updated, you can update the firmware over the air.
Visit the following website for OTA operations: online OTA
For most devices, you don't need to care about flash size. However, improper setting of the flash size may cause the OTA to fail. In this case, please change the flash size with idf.py menuconfig, or modify sdkconfig:
# Choose a flash size.
CONFIG_ESPTOOLPY_FLASHSIZE_1MB=y
CONFIG_ESPTOOLPY_FLASHSIZE_2MB=y
CONFIG_ESPTOOLPY_FLASHSIZE_4MB=y
CONFIG_ESPTOOLPY_FLASHSIZE_8MB=y
CONFIG_ESPTOOLPY_FLASHSIZE_16MB=y

# Then set a flash size
CONFIG_ESPTOOLPY_FLASHSIZE="2MB"
If flash size is 2MB, the sdkconfig file might look like this:
CONFIG_ESPTOOLPY_FLASHSIZE_2MB=y
CONFIG_ESPTOOLPY_FLASHSIZE="2MB"
For devices with 1MB flash size such as ESP8285, the following changes must be made:
CONFIG_PARTITION_TABLE_FILENAME="partitions_two_ota.1MB.csv"
CONFIG_ESPTOOLPY_FLASHSIZE_1MB=y
CONFIG_ESPTOOLPY_FLASHSIZE="1MB"
CONFIG_ESP8266_BOOT_COPY_APP=y
The flash size of the board can be checked with the esptool.py tool:
esptool.py -p (PORT) flash_idUart TCP Bridge
This feature provides a bridge between TCP and Uart:
Send data   ->  TCP  ->  Uart TX -> external devices

Recv data   <-  TCP  <-  Uart Rx <- external devices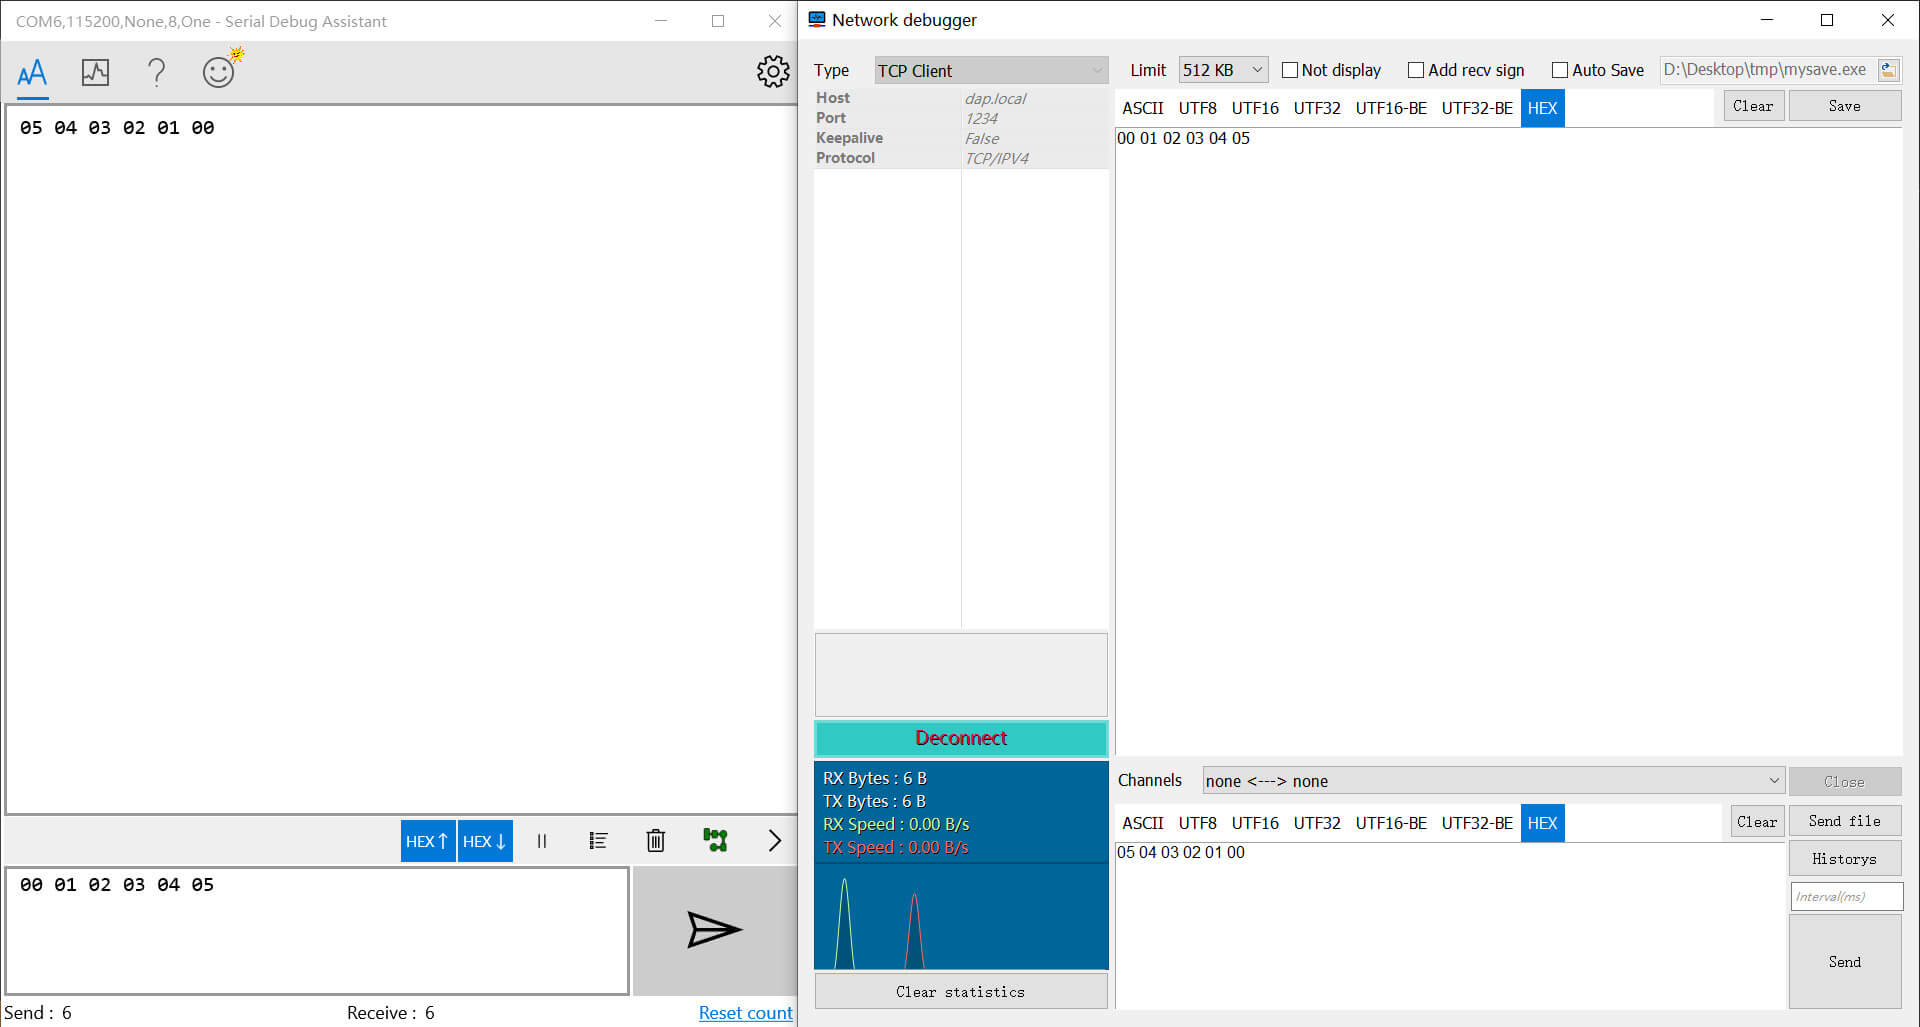
When the TCP connection is established, bridge will try to resolve the text sent for the first packet. When the text is a valid baud rate, bridge will switch to it.
For example, sending the ASCII text 115200 will switch the baud rate to 115200.
For performance reasons, this feature is not enabled by default. You can modify wifi_configuration.h to turn it on.
elaphure-dap.js
For the ESP8266, this feature is turned off by default. You can turn it on in menuconfig:
CONFIG_USE_WEBSOCKET_DAP=yDevelop
Check other branches to know the latest development progress.
Any kind of contribute is welcome, including but not limited to new features, ideas about circuits, documentation.
You can also ask questions to make this project better.
Issue
2020.12.1
TCP transmission speed needs to be further improved.
2020.11.11
Winusb is now available, but it is very slow.
2020.2.4
Due to the limitation of USB-HID (I'm not sure if this is a problem with USBIP or Windows), now each URB packet can only reach 255 bytes (About 1MBps bandwidth), which has not reached the upper limit of ESP8266 transmission bandwidth.
I now have an idea to construct a Man-in-the-middle between the two to forward traffic, thereby increasing the bandwidth of each transmission.
2020.1.31
At present, the adaptation to WCID, WinUSB, etc. has all been completed. However, when transmitting data on the endpoint, we received an error message from USBIP. This is most likely a problem with the USBIP project itself.
Due to the completeness of the USBIP protocol document, we have not yet understood its role in the Bulk transmission process, which may also lead to errors in subsequent processes.
We will continue to try to make it work on USB HID. Once the USBIP problem is solved, we will immediately transfer it to work on WinUSB
Credit
Credits to the following project, people and organizations:
- https://github.com/thevoidnn/esp8266-wifi-cmsis-dap for adapter firmware based on CMSIS-DAP v1.0
- https://github.com/ARM-software/CMSIS_5 for CMSIS
- https://github.com/cezanne/usbip-win for usbip windows