ESP32 Sniffer


![]()

This project is using Espressif IoT Development Framework (ESP-IDF) and has been tested on ESP-WROOM-32 module and esp-idf v3.2.
An overview of the full project (i.e. ESP32 firmware, server and GUI) can be found here.
This firmware is written with the purpose to sniff Probe Request packets sent by smartphones that are looking for Wi-Fi connection. When the Wi-Fi connection is active on a smartphone, it will send in broadcast (in all channels frequencies) a probe request messagge asking if there are any free Wi-Fi or some known ones (i.e. the smartphone knows the password for that Wi-Fi). The ESP32 will sniff it and extract different types of information.
The following information is taken from each sniffed packet:
- MAC of the smartphone that has sent the request
- SSID of the wifi to which the request is sent
- The Timestamp of when the request was sent
- Received Signal Strength Indicator (RSSI)
- Sequence Number (SN)
- HT Capabilities Info
After each minute these informations are sent to a server and processed. Finally, it is possible to see the processed informations (smartphones real time location, smartphone frequency, etc.) through a GUI.
Demo
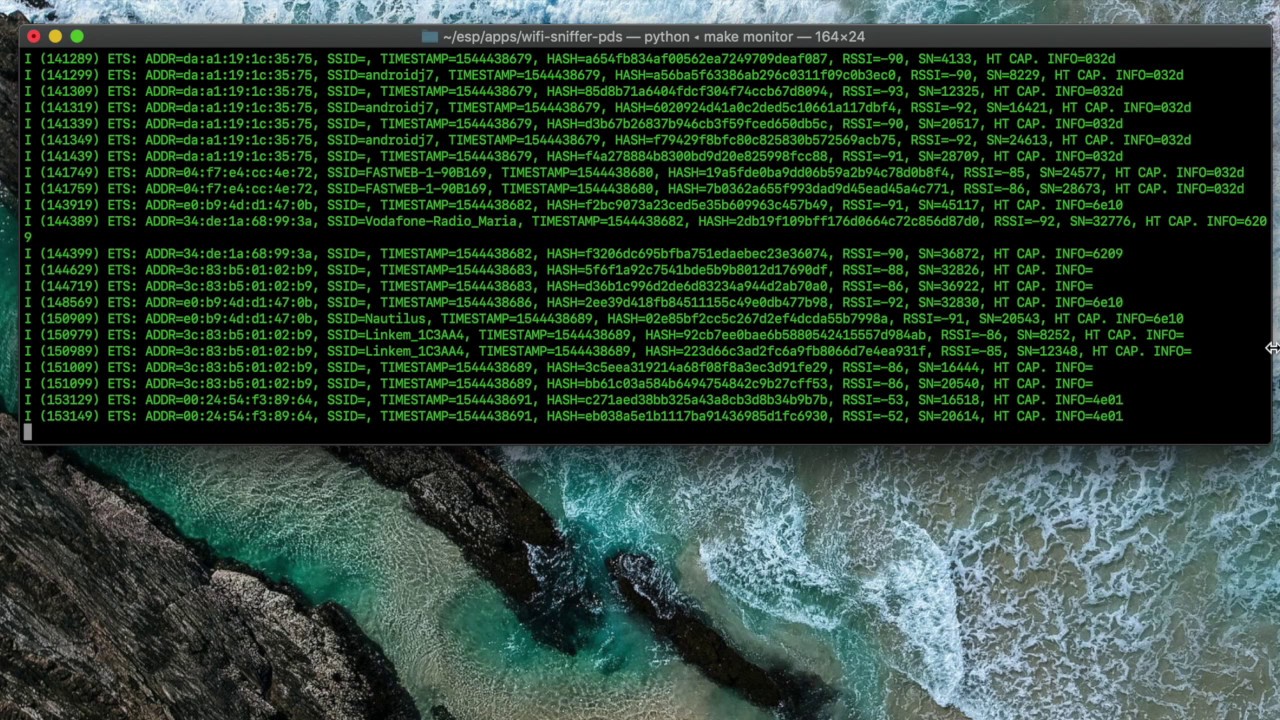
Table of Contents
Firmware Overview
The firmware consits in two main threads/tasks:
-
Sniffer Task
- Sniff Probe Request packet and save infomation described above into a file.
-
Wi-Fi Task
- Each minute, take the information saved by the Sniffer Task and send it to the server.
- A
lockis used in order to manage critical section for I/O operations in the file.
The ESP32 is configured in WIFI_MODE_APSTA mode: i.e. it creates "soft-AP and station control block" and starts "soft-AP and station". Thanks to this, the ESP32 is able to sniff and send informations to the server at the same time avoiding to lose packets information while sending data.
Here is the full list of information fields that can be in a Probe Request (source IEEE 802.11-2012):

And here below a packet sniffed with Wireshark in which you can see, for each field, the number of bits and their position within the packet:

ESP-IDF Environment Configuration
This section might be outdated, checkout the official site for more info and for the latest guide on how to get started with ESP-IDF.
-
Setup Toolchain
-
Get ESP-IDF
Besides the toolchain (that contains programs to compile and build the application), you also need ESP32 specific API / libraries.
cd ~/esp git clone --recursive https://github.com/espressif/esp-idf.git
-
Checkout to version
v3.xcd esp-idf git checkout release/v3.2
-
Setup path to ESP-IDF
The toolchain programs access ESP-IDF using
IDF_PATHenvironment variable. This variable should be set up on your PC, otherwise projects will not build. -
Install the Required Python Packages
python -m pip install --user -r $IDF_PATH/requirements.txt
Usage
-
Make sure you have exported the path
export IDF_PATH=~/esp/esp-idf export PATH=$PATH:$HOME/esp/xtensa-esp32-elf/bin
-
Clone the repo
git clone https://github.com/ETS-PoliTO/esp32-sniffer.git cd esp32-sniffer
-
Establish serial connection between ESP32 and your PC
make menuconfig
Go to
Serial flasher config, thenDefault serial portand set the port in which ESP32 is connectedNote that, if you are using a bridge, probably you need to download some driver:
-
Build code and flash the ESP32
make all && make flash
-
See logs
make monitor
File Configuration
The file /main/Kconfig.projbuild contains two different menus:
-
SPIFFS (SPI Flash File System)
It contains some important information about the SPIFFS partion:
- SPIFFS Base address
- SPIFFS Size
- SPIFFS Logical block size
- SPIFFS Logical page size
SPIFFS is a file system that supports wear leveling, file system consistency checks and more.
-
Configurations
It contains different variables:
ESP32_ID: ID of the ESP32WIFI_SSID: SSID of WiFi (network name)WIFI_PASS: WiFi password (WPA or WPA2)BROKER_ADDR: IP of the MQTT brokerBROKER_PSW: password of the MQTT brokerBROKER_PORT: port of the MQTT brokerCHANNEL: channel in which ESP32 will sniff PROBE REQUESTSNIFFING_TIME: time of sniffing- etc...
Variables Configuration
In order to configure the variables above:
-
Open your terminal within the project folder and run
make menuconfig
-
Select the menu you want to modify
-
Edit variables as you like
Add Customised Menu
You can also add different menus with different variables:
-
Open
Kconfig.projbuild -
Start a new menu
menu YOUR_MENU_NAME
-
Add the variables you need
-
End menu
endmenu
Components
-
SPIFFS
You need to create a partition table.
-
ESP32 MQTT
It has been used ESP32 MQTT Library.
-
MD5
Hash function used on sniffed packets in order to get a unique identifier.
Resources
- Official esp-idf git repo to see some examples and information about the used data structure.
- Latest Documentation version for Espressif IoT Development Framework.
- ESP32 forum to ask questions and find community resources.
- ESP32-IDF Documentation for browseable modules, namespaces, data structures and files.
Check also this demonstration video to see how ESP32 works.
Seneca
Longum iter est per praecepta, breve et efficax per exempla