HoloMagnet3
Physics education app visualizes Magnetic Field for HoloLens
Any teacher can use this app in your classrooms, and any researcher can use this app to write your paper.
We are very welcome to your contribution for education including porting to other platforms (such as Magic Leap One, Oculus Quest, iPad, Pixel3, and many others).


Overview
This code is published to help understanding sessions of HoloLens app development in IT Tech conference which is held once a year by Microsoft Japan.
The reason why I published this open-source app is, because I was one of 17 personal sponsors who have Microsoft MVP Award (The Microsoft Most Valuable Professional award is given by Microsoft to "technology experts who passionately share their knowledge with the community.")
- Made by feedbacks of 300 experienced people in 5 countries at 11 schools
- Physics education app for headset with mixed reality technology (very new technology).
- Objective is experience education for:
- student in junior high school, high school, college, university, night school
- visitor in science museum, event
- You can see invisible phenomena, magnetic field, which can not be seen in real world.
- Rare education app for mixed reality headset.
- Anyone can get app via Microsoft Store
-
Free
TOC
Characteristics
Light Load

The app executes the Physics calculation of each of 500 compasses on every frame, and the FPS is 58.
Specifically, it does not instantiate it's Shader. It executes Physics calculation in the single Shader. As a result, the load is very light.
Furthermore, the reason why the light weight is needed is explained in next subject "UI / Expression".
Does not instantiate shader
As the following codes, the Material is not operated by a Script. Valuables are set in the Shader which accept external valuables. They are assigned directly to the Shader by a Script.
CompassesManagedlySimultaneouslyUpdater.cs
void AssignMagnetPosition()
    {
        var np = barMagnet01NorthPole.transform.position;
        var sp = barMagnet01SouthPole.transform.position;
        var nv4 = new Vector4(np.x, np.y, np.z, 0);  // Convert to Vector4
        var sv4 = new Vector4(sp.x, sp.y, sp.z, 0);  // Convert to Vector4

        // Set coordinates to Shader of Material of NORTH side of compass
        CompassesModel.Instance.MatNorth.SetVector("_NorthPolePos", nv4);
        CompassesModel.Instance.MatNorth.SetVector("_SouthPolePos", sv4);
        // Set coordinates to Shader of Material of SOUTH side of compass
        CompassesModel.Instance.MatSouth.SetVector("_NorthPolePos", nv4);
        CompassesModel.Instance.MatSouth.SetVector("_SouthPolePos", sv4);
    }
As a result, the Shader is not instantiated and processed as a single Shader. That significantly reduces the calculation load.
Execute Physics calculation in Shader
As the following codes, Physics calculation is executed in a Shader.
// Define position vector of self (compass) as vecP
float3 vecP;
vecP = IN.worldPos;

// Define position vector of NORTH Pole as vecN
float3 vecN;
vecN.x = _NorthPolePos.x;
vecN.y = _NorthPolePos.y;
vecN.z = _NorthPolePos.z;

// Define position vector of SOUTH Pole as vecS
float3 vecS;
vecS.x = _SouthPolePos.x;
vecS.y = _SouthPolePos.y;
vecS.z = _SouthPolePos.z;

// Define displacement vector from self to bar magnet as vecDisN, vecDisS
float3 vecDisN, vecDisS;
vecDisN = vecP - vecN;
vecDisS = vecP - vecS;

// Get magnetic force vectors from two poles as vecF_N, vecF_S
float3 vecF_N, vecF_S;
vecF_N =        vecDisN / pow(length(vecDisN), 3);
vecF_S = -1.0 * vecDisS / pow(length(vecDisS), 3);

// Get resultant magnetic force vector as vecF
float3 vecF;
vecF = vecF_N + vecF_S;
As a result, Physics calculation is completed in GPU. It significantly reduces CPU load. Since the CPU power of HoloLens is very weak, it's important to transfer necessary processes to GPU.
UI / Expression

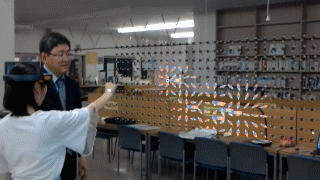
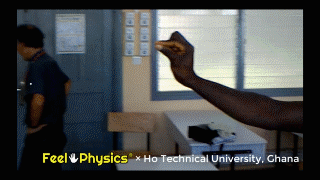
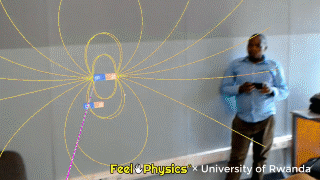
More than 300 people in 5 countries at places including 11 schools were practically taken experience lessons / sessions with this app. Learning tests were taken in 3 schools, and all of them gave questionaires (both quantitative and qualitative). These results made the app experience better, and made the learning efficience and satisfaction degree increase. The devices are as followings:
UI
- Unstable operation (for example, Focus or marker tracking runs off) makes user feel dissatisfaction. It's desirable to provide very simple operation for a user who experience for the first time.
- Slowness makes user feel dissatisfaction. It's desirable to make it as fast as possible.
- Although Sharing provides a experience of higher level, it takes a few minutes to recover. Thus, it's not suitable for a lesson which is severe on time such as 40 students classroom.
Expression
- Objects to display should be big in order to show for many people with a projector or a big TV
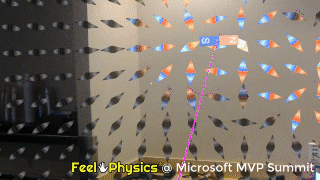
- It's difficult to understand old abstract expression (such as Lines of Magnetic Force) for beginner. Thus, devices of expression to help understanding (such as compasses arranged in grid) are important.
- Static expression is more understandable than dynamic expression. Satisfaction and comprehension degrees are higher if an user can move his/her body to experience contents.
Lesson Scenes
The followings are lesson / session scenes. Appearance of the app was changing, because we improved step by step.


Paper
We were asked by The Physics Education Society of Japan to write a paper about these knowledge. We already posted. The detail is going to be put on the journal. We are going to add the link to the paper on publication.
Structure
This is the structure figure of the app.

(Drawn with Qt Visual Graph Editor)
We drew simple original structure figure in order to express both class relations and activity flows.
- Large circle means Prefab, Middle size circle means class, Small circle means method.
- Arrows means paths of process from user
Rolls of classes against a Prefab is followings:
- Handler class is over the Prefab
- Model class is on the right of the Prefab
- Controller class is under the Prefab
A beginner developer of HoloLens tends to create classes disorderly.
However, when you distinguish handler, model and controller classes against each Prefab, you can design with good prospect easily.
How to Build
Environment
- Unity 2017.4.26f1 (2017.4.x seems to work)
- Visual Studio 2017.15 (Check all Windows 10 SDKs)

Procedure
- Clone this repository
- Open the project with Unity
- Build into target folder (normally named "UWP")
- When the build finished, file explorer opens the project folder. Open the target folder.
- Open "HoloMagnet3.sln" with Visual Studio.
- Build -> Deploy to HoloLens
- Start app named "HoloMagnet3" in HoloLens
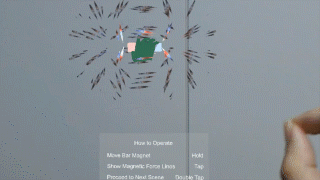
Usage
- Move Bar Magnet Hold and move your arm, then the bar magnet moves
- Show Magnetic Force Lines Tap
- Proceed to Next Scene
Double tap
- There are four scenes
- You can return to the first scene by double tap in the last scene
- Introduction scene in which you can grow accustomed to movement of a bar magnet
- One compass scene which shows the magnetic field
- Arranged in 2-Dimension compasses scene
- Arranged in 3-Dimension compasses scene
Acknowledgements
- Susuka High School, Teacher Masaki Tabata
- Mie High School, Teacher Ryosuke Murata and Teacher Hiroki Kawada
- Prefectural Aichi High School of Technology and Engineering, Teacher Daisuke Kawada
- Tokyo Gakugei University Senior High School, Teacher Takuya Ohnishi
- Tsu Higashi High School, Teacher Tetsuya Sano
- St. Giles Cambridge School, Teacher Philip
- Japan International Cooperation Agency (JICA) volunteer, Dr. Norihiro Sugimoto
- Japan International Cooperation Agency (JICA) volunteer, Mr. Akihiro Sakai
- Kobe City Africa Business Mission Coordinator, Samuel IMANISHIMWE
- Kobe Institute of Computing Business Development Director, Dr. Nick Barua
- Integrated Polytechnic Regional College (IPRC) Tumba, Principal MUTABAZI Rita Clémence
- University of Rwanda Dept of Computer Engineering Associate Professor, Dr. Santhi Kumaran
- Tomoki Hayashi
- Koji Matsui
- All staffs in share office BizSquare Yokkaichi
- 300 students who gave me their feedbacks in Japan, UK, Ghana, Rwanda, US
Contact
Email, Homepage, Facebook, Twitter, LinkedIn
日本語
本アプリは、「de:code 2019」(マイクロソフト社の開発者をはじめとするITに携わるすべてのエンジニアのための年に一度のテクニカルカンファレンス)において、
「Microsoft MVP アワード」(マイクロソフトの製品やテクノロジーに関する豊富な知識や経験を他者と共有することで、すべてのユーザーが最大限に製品を活用できるよう多大なサポートをおこなったコミュニティのリーダーに、マイクロソフトが感謝の意を表して授与する賞)の受賞者として、
セッション内容をより深く理解し実践するのに役に立つコード「パターンを用い、シンプルな UI を提供する、初心者でもできる HoloLens アプリ開発と Microsoft ストアへの登録方法~実際のソースコードと構成図を見ながら~」という位置づけで公開したものです。
- このアプリは 5カ国10の学校300人の体験者 のフィードバックにより作られました。
- 最先端の複合現実ヘッドセット 「HoloLens」 用の理科(物理)学習アプリです。
- このアプリの目的は教育です。対象は中学生、高校生、専門学校生、大学生です。
- このアプリを使って、現実世界では目で見ることのできない磁界について学習することができます。
- 数少ない教育用HoloLensアプリです。
- 誰でも Microsoft ストアで無料で入手して体験することができます。
目次
特徴
軽量化
500個の方位磁針の個々の物理計算を毎フレームおこないながら、FPS 58を実現しています。
具体的には、シェーダをインスタンス化せずに、シェーダ内で物理計算をおこなって負荷を大幅に減らしています。
なお、軽量化が必要な理由については次項の「UI・表現」で説明します。
シェーダをインスタンス化しない
以下のように、マテリアルをスクリプトから操作せずに、シェーダに外部変数を受け取る変数を設定し、スクリプトからマテリアルを介さずにシェーダに直接値を代入しています。
CompassesManagedlySimultaneouslyUpdater.cs
void AssignMagnetPosition()
    {
        var np = barMagnet01NorthPole.transform.position;
        var sp = barMagnet01SouthPole.transform.position;
        var nv4 = new Vector4(np.x, np.y, np.z, 0);  //Vector4 に変換
        var sv4 = new Vector4(sp.x, sp.y, sp.z, 0);  //Vector4 に変換

        // 方位磁針の N 極側のマテリアルのシェーダに座標をセット
        CompassesModel.Instance.MatNorth.SetVector("_NorthPolePos", nv4);
        CompassesModel.Instance.MatNorth.SetVector("_SouthPolePos", sv4);
        // 方位磁針の S 極側のマテリアルのシェーダに座標をセット
        CompassesModel.Instance.MatSouth.SetVector("_NorthPolePos", nv4);
        CompassesModel.Instance.MatSouth.SetVector("_SouthPolePos", sv4);
}これによりシェーダがインスタンス化されず、単一のシェーダとして処理されるため、計算負荷を大幅に減らすことができます。
シェーダ内で物理計算を行う
以下のように、シェーダ内で物理計算を行っています。
// 自身(方位磁針)の位置ベクトルvecPを作成
float3 vecP;
vecP = IN.worldPos;

// N極の位置ベクトルvecNを作成
float3 vecN;
vecN.x = _NorthPolePos.x;
vecN.y = _NorthPolePos.y;
vecN.z = _NorthPolePos.z;

// S極の位置ベクトルvecSを作成
float3 vecS;
vecS.x = _SouthPolePos.x;
vecS.y = _SouthPolePos.y;
vecS.z = _SouthPolePos.z;

// 自身から棒磁石に対する変位ベクトルvecDisN、vecDisSを作成
float3 vecDisN, vecDisS;
vecDisN = vecP - vecN;
vecDisS = vecP - vecS;

// 極からの磁力ベクトルvecF_N, vecF_Sを求める
float3 vecF_N, vecF_S;
vecF_N =        vecDisN / pow(length(vecDisN), 3);
vecF_S = -1.0 * vecDisS / pow(length(vecDisS), 3);

// 磁力の合力ベクトルvecFを求める
float3 vecF;
vecF = vecF_N + vecF_S;
これにより、物理計算をGPU内で完結させることができ、CPUへの負荷を大幅に減らすことができます。HoloLensのCPUはとても非力なため、必要な処理をどれだけGPUに回せるかが重要です。
UI・外見
本アプリを用いた授業は、5カ国の10の学校で300人が体験しました。全員のアンケート(定量および定性)を収集し、それらを元に、アプリ体験をより良くし学習効果と満足度を上げるために、以下の工夫をおこないました。
-
操作が安定していない(例えばフォーカスが外れる、マーカートラッキングがしばしば途切れる)と、体験者は不満を感じます。初めて体験するユーザに対するHoloLensアプリは、極めて簡易な操作方法を提供することが望ましいです。
-
動作が遅いと、体験者は不満を感じるため、動作を可能な限り速くすることが望ましいです。
-
シェアリングは高次元の体験を提供することができますが、途中で接続が切れた場合の復旧に時間がかかるため、時間にタイトな授業(40人の場合、3分のロスも許されません)には適しません。
表現
- プロジェクターで多人数に見せるためには、表示するオブジェクトは大きくするべきです。
- 理解を妨げるため、体験とプロジェクターに映された映像のあいだのタイムラグは短くするべきです。
- 従来の抽象的な表現(磁力線など)だけでは初学者にとって分かりにくいため、別の理解を助ける表現の工夫(例えば格子状に配置された方位磁針)が必要です。
- 静的な表現よりも動的な表現の方が理解しやすく、身体を動かしてコンテンツを体験することができるとユーザの理解度と満足度は高くなります。
論文
これらの知見については日本物理教育学会から研究報告の執筆を依頼され、すでに投稿しました。学会誌に詳細が掲載される予定です。公開され次第リンクに変えます。
構成図
本アプリの構成図です。
クラス関係とアクティビティフローを両方表現するために、シンプルな独自の構成図を描きました。
- 大きな円がプレハブ、中くらいの円がクラス、小さい円がメソッドを表しています。
- 矢印が、ユーザからのアクションがどのような経路をたどって処理されるかを表しています。
プレハブに対するクラスの役割は以下の通りです。
- プレハブの上部にあるクラスがプレハブのハンドラ
- プレハブの右側にあるクラスがプレハブのモデル
- プレハブの下側にあるクラスがプレハブのコントローラ
HoloLensアプリを作成する際は、最初はどうしても無秩序にプレハブやクラスを作ってしまいがちです。
しかし、プレハブごとにハンドラ、モデル、コントローラクラスを作成すると、見通しの良い設計を手軽におこなうことができます。
ビルド方法
環境
- Unity 2017.4.26f1(2017.4系列なら動くでしょう)
- Visual Studio 2017.15 (すべての Windows 10 SDK にチェックして下さい)
- このリポジトリをクローンします
- Unityで、プロジェクトを開きます
- ビルド先フォルダ(「UWP」とするのが一般的)を指定してビルドします
- ビルドが終わるとプロジェクトフォルダがエクスプローラによって開かれるので、先ほど指定したフォルダを開きます
- 「HoloMagnet3.sln」ファイルを開きます
- Visual Studio を使って HoloLensに配置します
- 「HoloMagnet3」を起動します
操作
- 棒磁石を動かす ホールドしながら腕を動かすことで棒磁石を動かすことができます
- 磁力線を表示 タップします
- 次のシーンに進む
ダブルタップする
- シーンは4つあります
- 最後のシーンでダブルタップすると最初のシーンに戻ります
- 棒磁石の移動に慣れてもらうためのシーン(棒磁石しかない)
- 1つの磁界を表すコンパスのあるシーン
- 平面グリッド上にコンパスが並んでいるシーン
- 立体グリッド上にコンパスが並んでいるシーン
謝辞
- 鈴鹿高校 田畑雅基先生
- 三重高校 村田了祐先生、川田博基先生
- 愛知総合工科高校 川田大介先生
- 学芸大附属高校 大西啄也先生
- 津東高校 佐野哲也先生
- St. Giles Cambridge 校 Philip 先生
- JICA ボランティア 杉本憲広博士
- JICA ボランティア 酒井章宏先生
- 神戸市アフリカビジネスミッションコーディネーター Samuel IMANISHIMWE 様
- 神戸情報大学院大学 Business Development 学部長 Nick Barua 博士
- トゥンバ工科大学 MUTABAZI Rita Clémence 校長
- ルワンダ大学理工学部情報工学科 Santhi Kumaran 助教
- 林知樹様
- 松井幸治様
- シェアオフィス「ビズスクエアよっかいち」のスタッフの皆様
- 日本・イギリス・ガーナ・ルワンダ・US の 300 人以上のフィードバックを下さった生徒たち
連絡先
Email, Homepage, Facebook, Twitter, LinkedIn
© 2019 Feel Physics® All rights reserved.