Point Cloud Visualizer 2.0+

Supported, maintained and updated to work in latest Blender versions. Many, many more features.
Available here: https://www.blendermarket.com/products/pcv
Full documentation is here: https://jakubuhlik.com/docs/pcv/docs.html
All addons available in this repository are unmaintained and unsupported, some may work in recent Blender versions some may not, some are obsolete.
Addons for blender 2.80 and 2.81 (maybe up to 2.83)
- Point Cloud Visualizer
- Color Management Presets
- Tube UV Unwrap
- Fast Wavefront^2
- Import Agisoft PhotoScan Cameras
- Carbon Tools
- Time Tracker
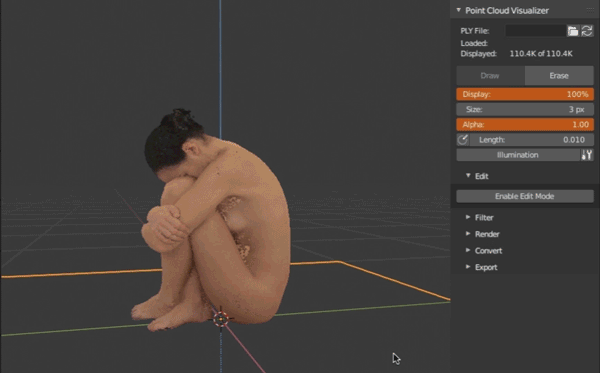
Point Cloud Visualizer 0.9.x (for blender 2.80)
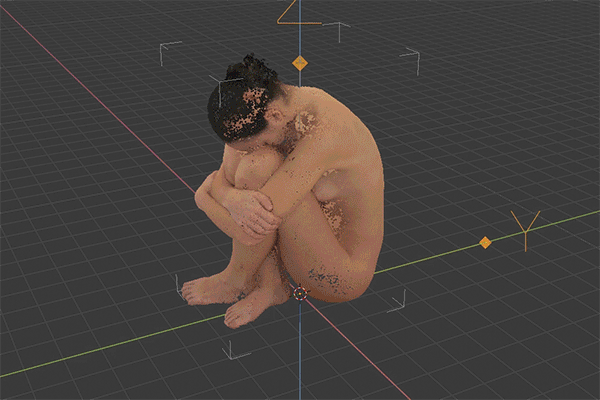
Display, edit, filter, render, convert, generate and export colored point cloud PLY files.
Works with any PLY file with 'x, y, z, nx, ny, nz, red, green, blue' vertex values. Vertex normals and colors are optional.
This is old, unmaintained and unsupported version
This version fully works only in Blender 2.81
General info
Basic Usage:
- Install and activate addon in a usual way.
- Add any object type to scene.
- Go to 3d View Sidebar (N) >
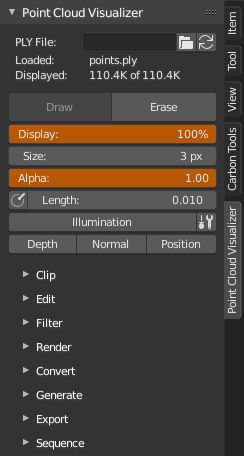
Point Cloud Visualizertab, click file browser icon, select ply file, clickLoad PLY.Reloadbutton next to it reloads ply from disk. - Click
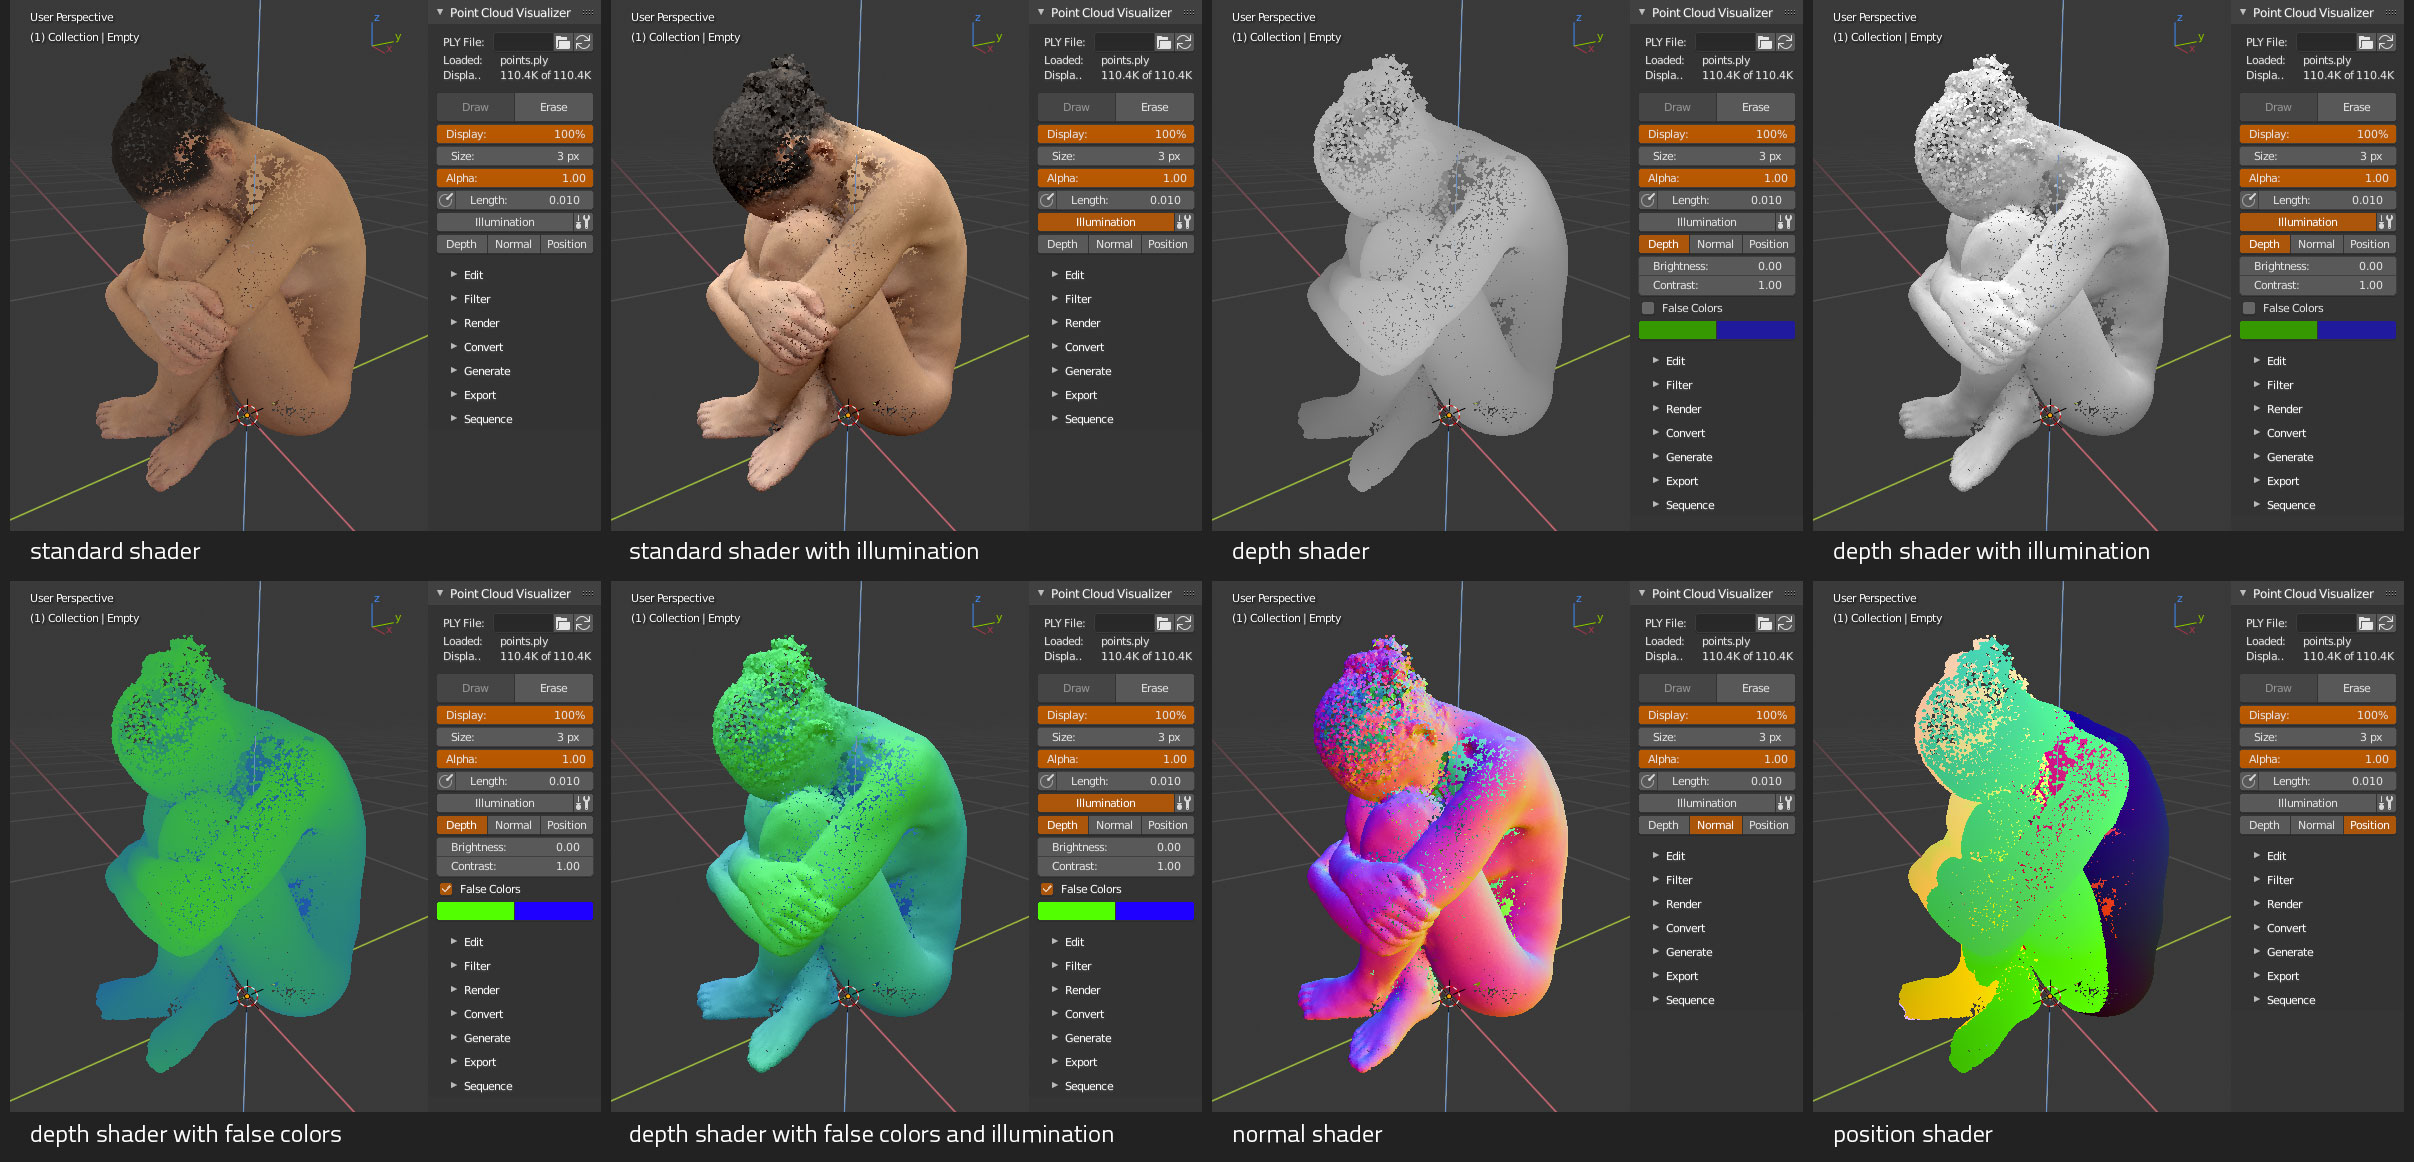
Drawbutton to display point cloud,Eraseto hide point cloud. Adjust percentage of displayed points withDisplay, point size withSizeand point transparency withAlpha. - Display point normals as lines - click
Normalicon, adjust line length withLengthnext to it. - Transforming parent object transforms point cloud as well.
Illumination'adds' single artificial light on points, you can edit its direction and strength. Works only when vertex normals are present.- When vertex colors are missing, cloud will be displayed in uniform gray, in that case you can enable
Illuminationto have better cloud view
Display Options:
Display- percentage of displayed pointsSize- point size in pixelsAlpha- global points alphaNormals- display point normals as lines, adjust line length withLengthnext to itIllumination- enable extra illumination, works only when vertex normals can be loadedLight Direction- illumination light directionLight Intensity- illumination light intensityShadow Intensity- illumination shadow intensityDepth- enable depth debug shaderBrightness- depth shader color brightnessContrast- depth shader color contrastFalse Colors- display depth shader in false colorsColor A- depth shader false colors front colorColor B- depth shader false colors back colorNormal- enable normal debug shaderPosition- enable position debug shader
Shaders
Clip
Shader with 6 clipping planes. Planes can be enabled/disabled independently with eye icon, first 3 values are plane normal (x, y, z), last value is plane distance from origin. These can be set from different object bounding box, choose object from scene in Object and hit Set Clip Planes From Object Bounding Box, object can then be hidden/deleted, set values will stay until operator is executed again. X reset all the settings to their defaults.

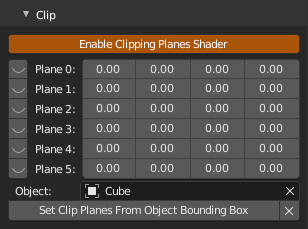
Enable Clipping Planes Shader- enable shaderPlane 0- plane 0 normal (x, y, z), plane 0 distance from originPlane 1- plane 1 normal (x, y, z), plane 1 distance from originPlane 2- plane 2 normal (x, y, z), plane 2 distance from originPlane 3- plane 3 normal (x, y, z), plane 3 distance from originPlane 4- plane 4 normal (x, y, z), plane 4 distance from originPlane 5- plane 5 normal (x, y, z), plane 5 distance from originObject- object to use as bounding box sourceSet Clip Planes From Object Bounding Box- set planes from selected object bounding boxX- reset all the settings to their defaults
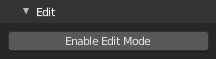
Edit
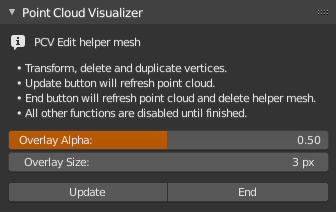
Quasi point cloud Edit Mode. Hit Start and all points are converted to helper mesh with vertices and entered to mesh edit mode. You can transform, delete and duplicate vertices using regular Blender's tools. If you want update displayed points, hit Update, when you are finished editing hit End to update points for a last time and delete helper mesh. If something went wrong, select main object with cloud and hit Cancel to reload original points, return interface to regular mode and attempt to clean helper mesh if it is still available.
- To save edited point cloud, you have to use
Exportfeature and checkUse Viewport Pointsbecause edits are only in memory, if you close Blender, edits will be lost. - Point normals are not changed (at this time), if you rotate points, normals will be still oriented as before.
- New points can be reliably (for now) created by duplicating existing points. If you create new points, they will all have the same random normal and random color.
Start - Start edit mode, create helper object and switch to it
Overlay Alpha - Overlay point alpha
Overlay Size - Overlay point size
Update - Update displayed cloud from edited mesh
End - Update displayed cloud from edited mesh, stop edit mode and remove helper object
Cancel - Stop edit mode, try to remove helper object and reload original point cloud
Filter
Filter current point cloud, all changes are only temporary, original data are still intact. To keep changes, you have to export cloud as ply file.
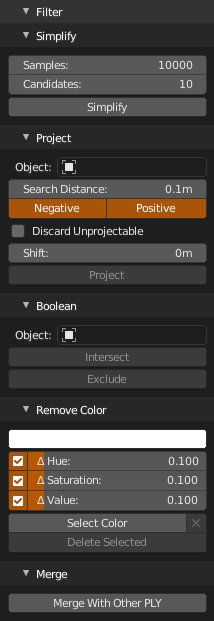
Simplify
Simplify point cloud to exact number of evenly distributed samples. All loaded points are processed. Higher samples counts may take a long time to finish. Surely there are better (and faster) tools for the job, but.. Basically it takes some random point and set as accepted sample, then another set of random candidates, measure distance from already accepted samples and stores the one that is most distant as another accepted, repeat until number of samples is reached.
Samples- Number of points in simplified point cloud, best result when set to less than 20% of points, when samples has value close to total expect less points in resultCandidates- Number of candidates used during resampling, the higher value, the slower calculation, but more evenSimplify- run operator
Project
Project points on mesh (or object convertible to mesh) surface. Projects point along their normals until it hit surface or Search Distance is reached. You can choose between Positive (along normal direction), Negative (vice versa) or both. Optionally you can Discard Unprojectable points that was not possible to project and after projection Shift points a fixed distance along normal (positive value) or the other way around (negative value). Projected points can be optionally colorized by vertex colors, uv texture and vertex group from target mesh.
Object- Mesh or object convertible to meshSearch Distance- Maximum search distance in which to search for surfacePositive- Search along point normal forwardsNegative- Search along point normal backwardsDiscard Unprojectable- Discard points which didn't hit anythingColorize- Colorize projected pointsSource- Color source for projected point cloudVertex Colors- Use active vertex colors from targetUV Texture- Use colors from active image texture node in active material using active UV layout from targetVertex Group Monochromatic- Use active vertex group from target, result will be shades of greyVertex Group Colorized- Use active vertex group from target, result will be colored from red (1.0) to blue (0.0) like in weight paint viewport
Shift- Shift points after projection above (positive value) or below (negative value) surfaceProject- execute operator
Boolean
Intersect or Exclude points with mesh object. Mesh have to be non-manifold.
Object- Mesh or object convertible to meshIntersect- Keep points inside mesh, remove points outsideExclude- Keep points outside mesh, remove points inside
Remove Color
Remove points with exact/similar color as chosen in color picker (Eyedropper works too). Currently i can't get to match sampled color from viewport with color in loaded cloud. Floating point error, incorrectly handled Gamma (at my side for sure), color management in Blender's viewport or any combination of all, or something else.. Anyway, if you leave at least one delta at hue/saturation/value (whatever works best for given cloud) it should remove the color you picked.
Color- Color to remove from point cloudΔ Hue- Delta hueΔ Saturation- Delta saturationΔ Value- Delta valueSelect Color- Run operator and display selected points in viewport for reviewX- DeselectDelete Selected- Delete selected points
Merge
Load another ply and merge with currently displayed. Hit Merge With Other PLY, select ply file and load. New point will be appended to old, shuffled if shuffle is enabled in preferences.
Merge With Other PLY- run operator
Join
Join current active point cloud with another on different object. Object transformations are applied to clouds to look the same as before joining.
Object- select object with another point cloud to joinJoin- run operator
Color Adjustment
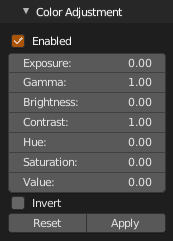
Adjust exposure, gamma, brightness, contrast, hue, saturation, value or invert colors. Click Enable to enable color adjustment shader, adjust values as needed, click Apply to apply colors to points. Click Reset to set all to default value. Shader can be disabled without changes anytime unchecking Enable. When color adjustment shader is enabled, all other shaders are disabled.
Enabled- Enable color adjustment shader, other shaders will be overrided until disabledExposure- formula: color = color * (2 ** value)Gamma- formula: color = color ** (1 / value)Brightness- formula: color = (color - 0.5) * contrast + 0.5 + brightnessContrast- formula: color = (color - 0.5) * contrast + 0.5 + brightnessHue- formula: color.h = (color.h + (value % 1.0)) % 1.0Saturation- formula: color.s += valueValue- formula: color.v += valueInvert- formula: color = 1.0 - colorReset- Reset color adjustment valuesApply- Apply color adjustments to points, reset and exit
Render
Currently only sigle point cloud per render/frame is supported. Output image is RGBA 8bit PNG - transparent background with colored point cloud, which can be composed over something else later.
Usage:
- Blend file has to be saved
- Load and display ply first.
- Make a camera and adjust as needed.
- Select cloud parent object, set point size with
Sizeor percentage of rendered points withCount - Set render path in
Output. - Set render image size with
Resolution X,Resolution YandResolution %. - At default resolution settings are taken from scene, to make them independent, click chain icon next to properties, correct aspect ratio is not calculated, if you link properties again, values are copied from scene.
- If
Illuminationis enabled it will be rendered as well - If one of debug shaders is enabled, it will be rendered instead of regular shader
- Hit
RenderorAnimation
Render options:
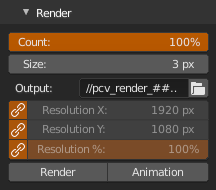
Count- percentage of rendered pointsSize- point render size in pixelsSupersampling- Render larger image and then resize back to anti-alias, 1 - disabled, 2 - render 200%, 3 - render 300%, etc.Smooth Circles- Currently works only for basic shader with/without illumination and generally is much slower than Supersampling, use only when Supersampling failsOutput- path where to save rendered images,#characters defines the position and length of frame numbers, image is always saved, filetype is always png, accepts relative paths, upon hittingRenderpath is validated, changed to absolute and written backResolution X- image width in pixelsResolution Y- image height in pixelsResolution %- percentage scale for resolutionResolution Linked- when enabled, settings are taken from scene, if not they are independent on scene, but aspect ratio is not calculated
Render smoothing/anti-aliasing notes:
Use Supersampling for most of the time with lowest value (to be exact, 2 works great) that look still good. If you run into problems due to very large supersampled image sizes Blender or hardware cannot handle, you can try to disable Supersampling and use Smooth Circles to draw smooth points directly in target resolution, but you are limited to basic shader and points before drawing have to be depth sorted manually which can be very slow with large point counts.
Convert
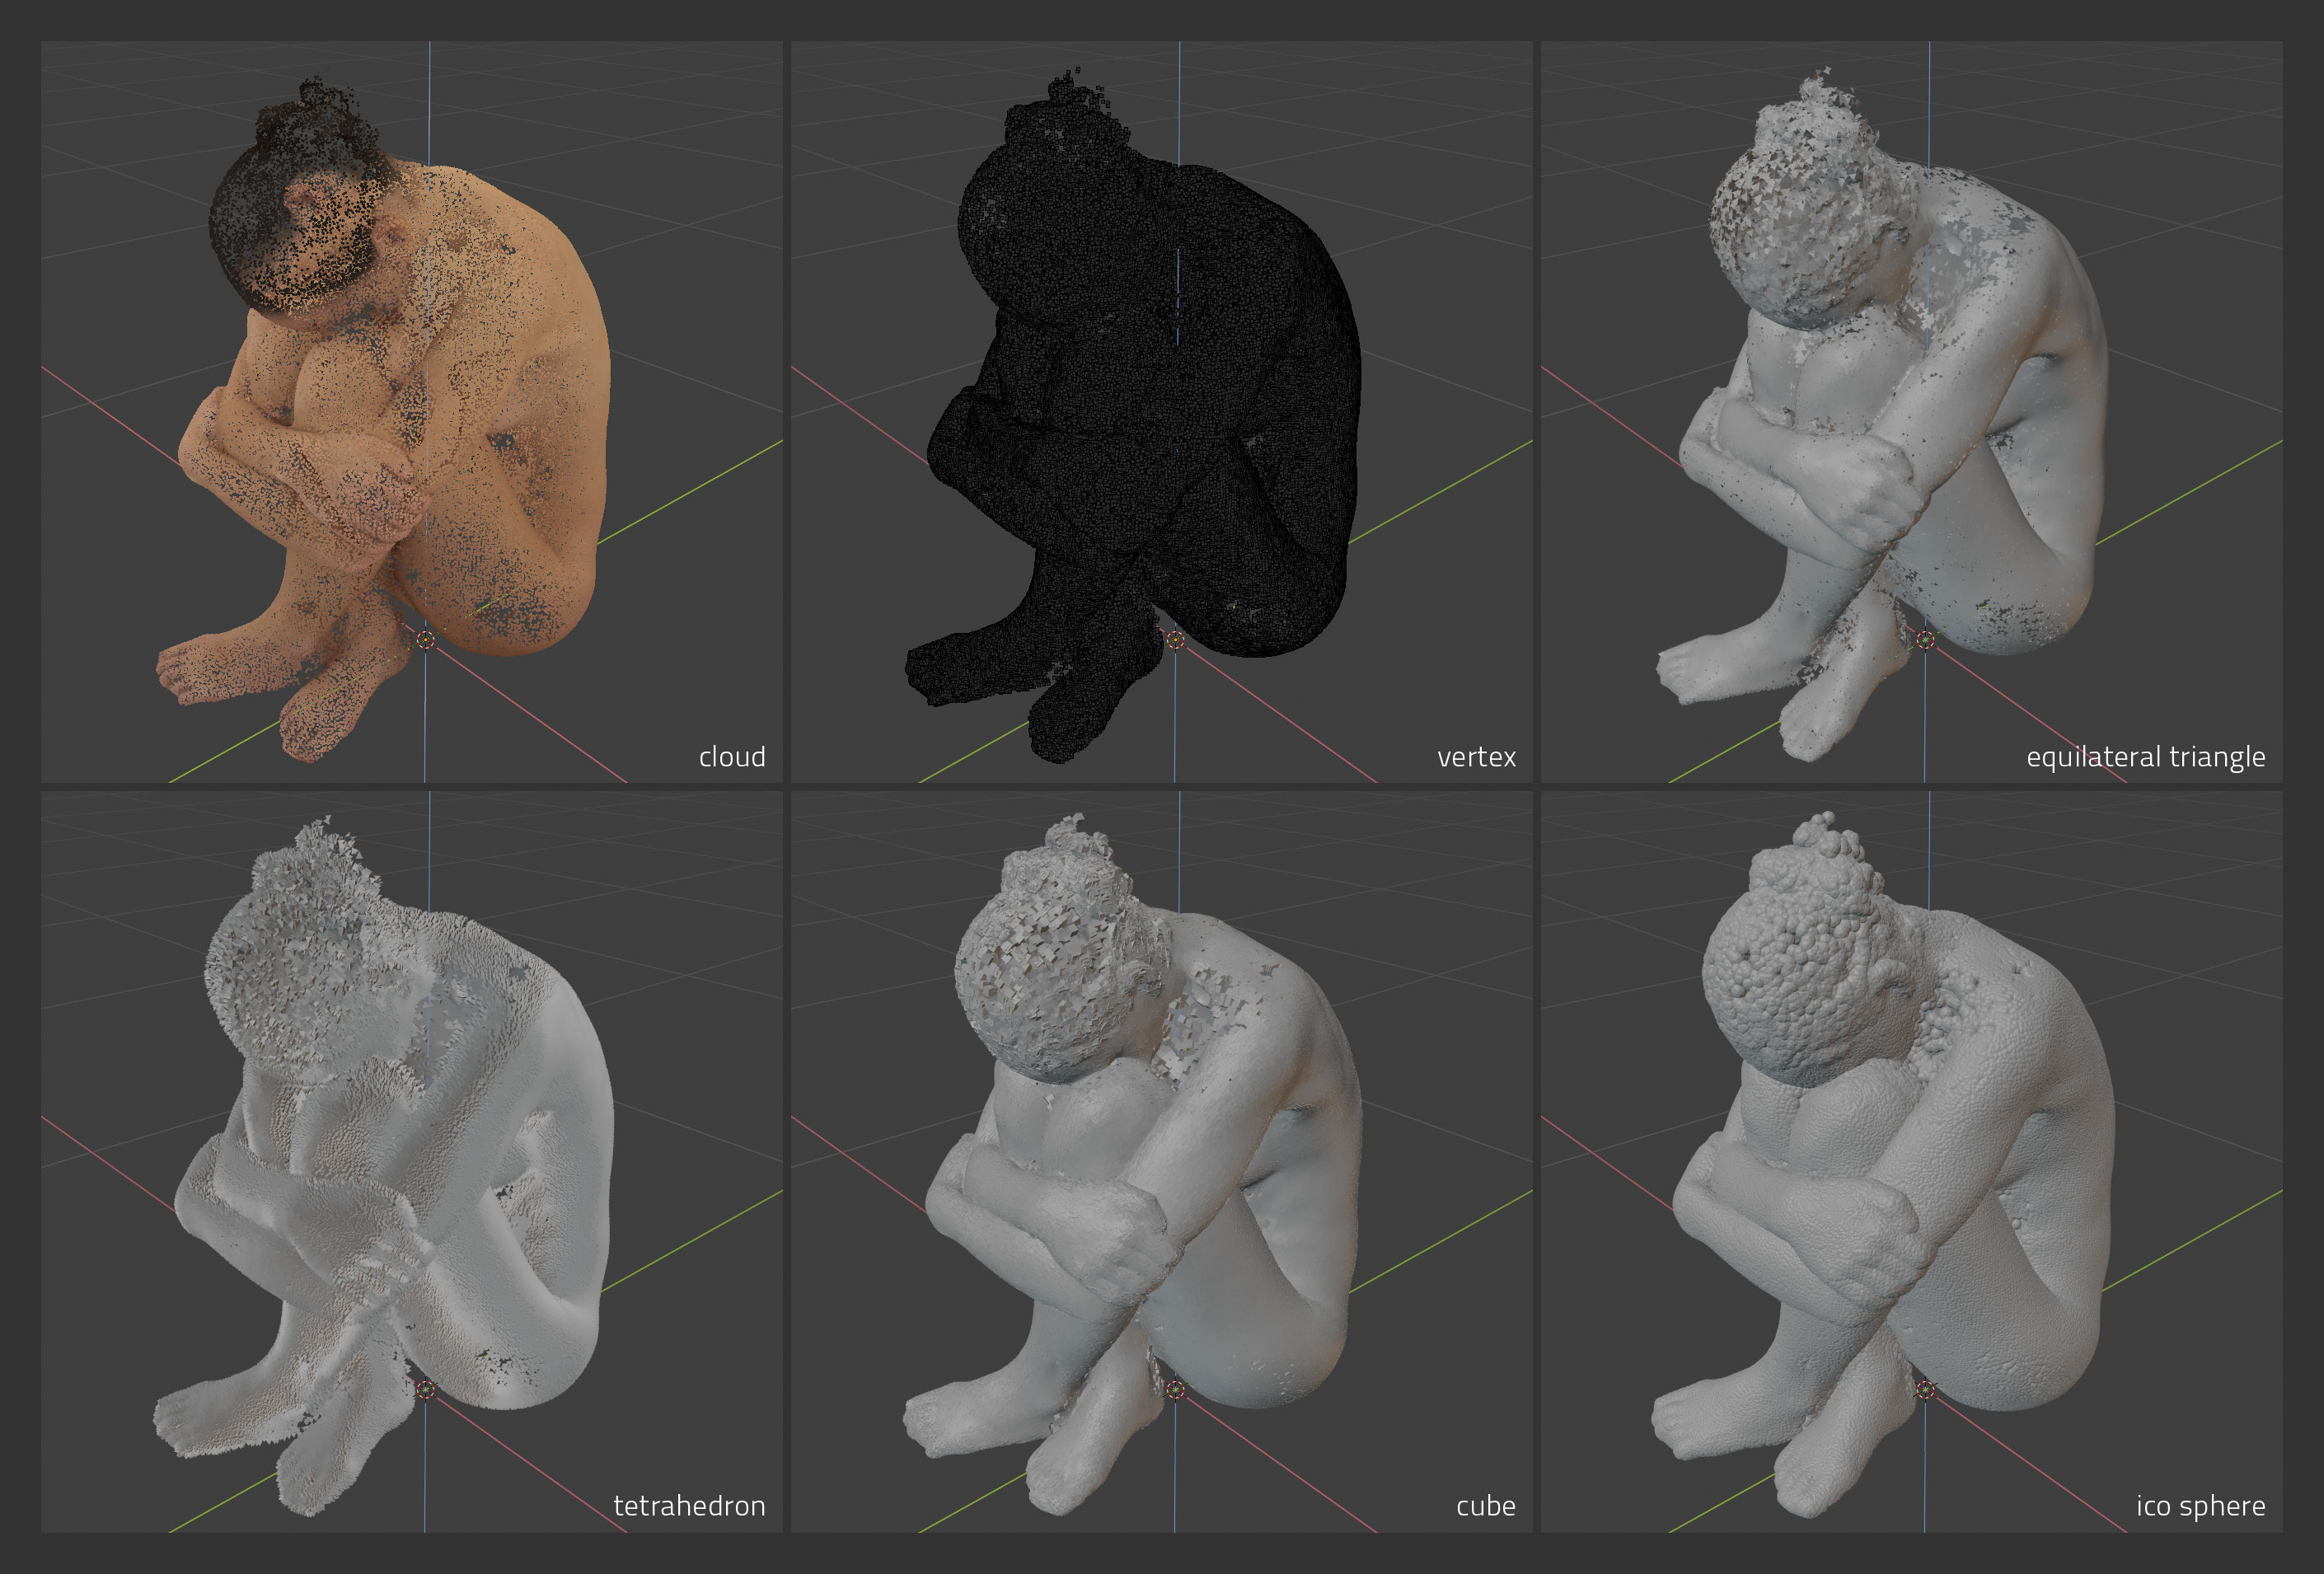
Convert point cloud to mesh. May result in very large meshes, e.g. 1m point cloud to cubes = 8m poly mesh. Depending on what point cloud data is available and desired mesh type, some options may not be enabled.
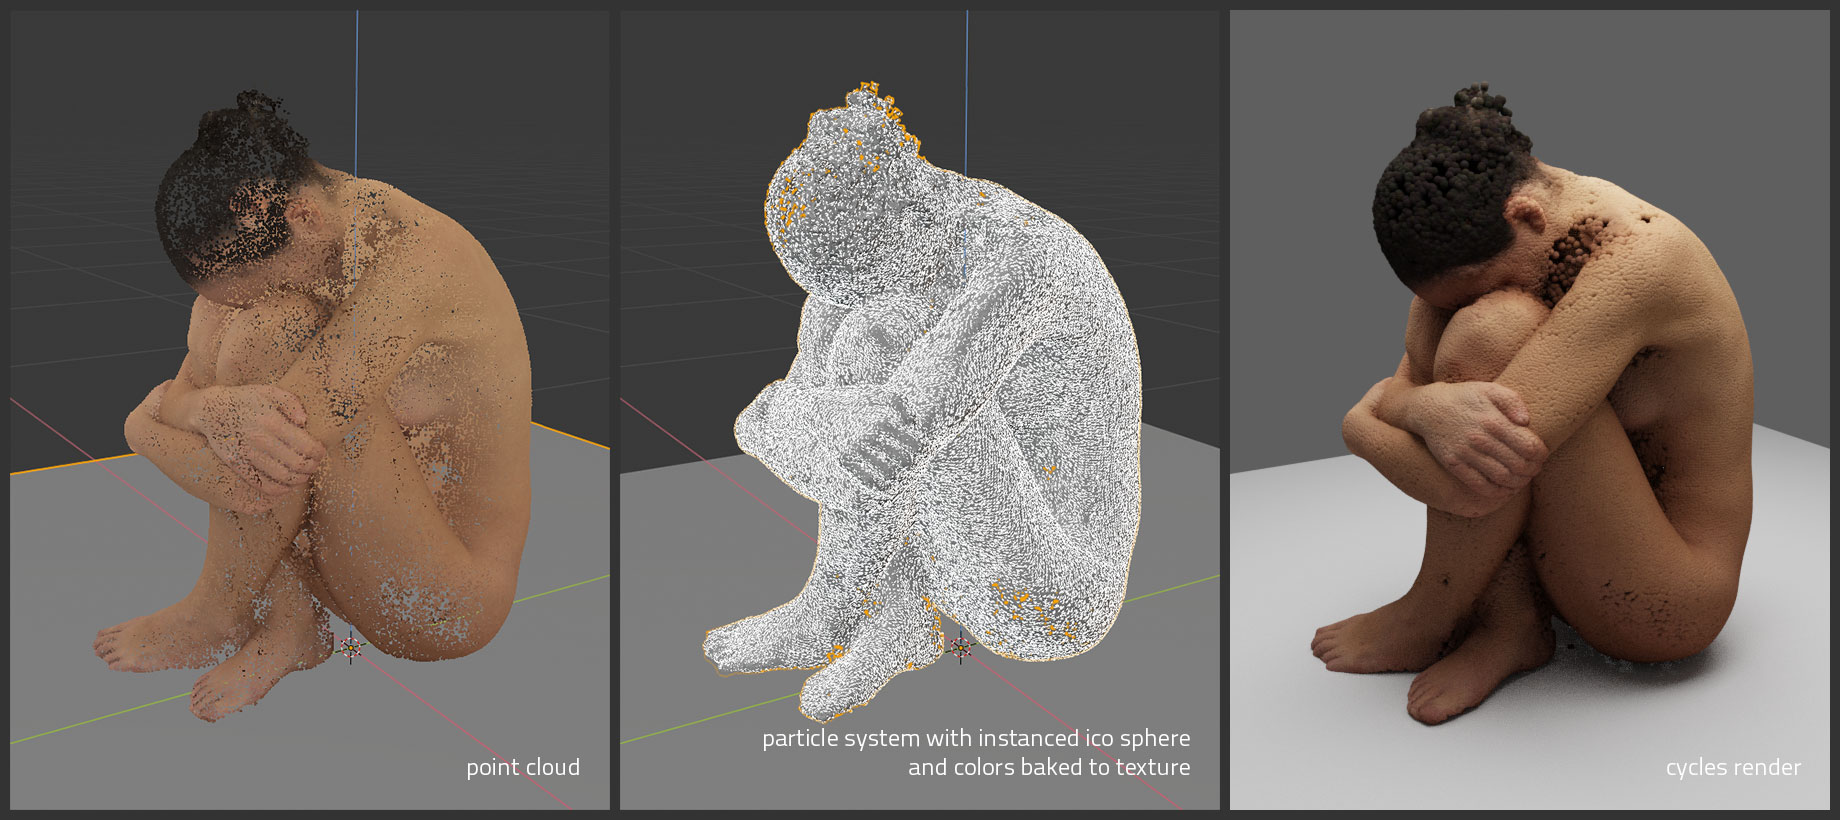
Conversion to instancer specifics: points are converted to triangle mesh object, vertex colors are baked to texture, extra instanced sphere object is added as child object of main mesh, material using baked colors is added to sphere and each instance inherits color of corresponding face it is instanced from.
Conversion to particles specifics: points are converted to triangle mesh object, vertex colors are baked to texture, particle system is added to mesh with one particle on each face, extra instanced sphere added as child object of main mesh and particle system is set to render that sphere, material using baked colors is added to sphere and each instance inherits color of corresponding face it emit from. Result is regular particle system which can be further edited, e.g. instance mesh changed, physics added etc.
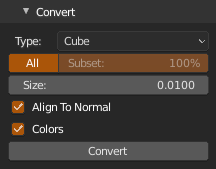
Type- Instance mesh type, Vertex, Equilateral Triangle, Tetrahedron, Cube or Ico SphereAll,Subset- Use all points or random subset of by given percentageSize- Mesh instance size, internal instanced mesh has size 1.0 so if you set size to 0.01, resulting instances will have actual size of 0.01 event when cloud is scaledAlign To Normal- Align instance to point normal, e.g. tetrahedron point will align to normal, triangle plane will align to normal etc.Colors- Assign point color to instance vertex colors, each instance will be colored by point color (except vertices)Sphere Subdivisions- Conversion to instancer / particles only, number of subdivisions of particle system instanced ico sphere
Generate
Generate point cloud from mesh (or object convertible to mesh). To store point cloud, use Export to save as ply file.


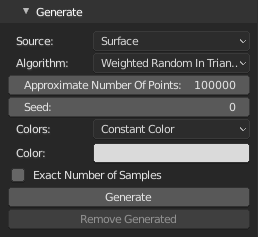
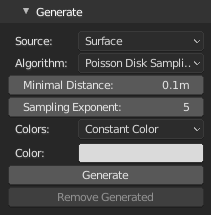
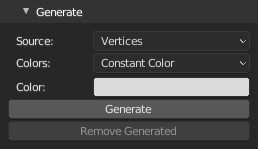
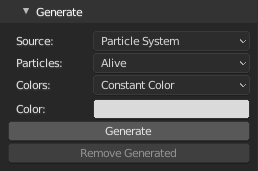
Source- Points generation sourceVertices- Use mesh verticesSurface- Use triangulated mesh surfaceParticles- Use active particle system
Particles(Source: Particles)- Particles source selectionAll(Source: Particles)- Use all particlesAlive(Source: Particles)- Use only alive particles
Algorithm(Source: Surface)- Point generating algorithmWeighted Random In Triangle- Average triangle areas to approximate number of random points in each to get even distribution of points. If some very small polygons are left without points, increase number of samples. Mesh is triangulated before processing, on non-planar polygons, points will not be exactly on original polygon surface.Poisson Disk Sampling- Warning: slow, very slow indeed.. Uses Weighted Random In Triangle algorithm to pregenerate samples with all its inconveniences.
Approximate Number Of Points(Source: Surface)- Number of points to generate, some algorithms may not generate exact number of points.Seed(Source: Surface)- Random number generator seedColors(Source: Vertices, Surface, Particles)- Color source for generated point cloudConstant Color- Use constant color valueVertex Colors- Use active vertex colorsUV Texture- Generate colors from active image texture node in active material using active UV layoutVertex Group Monochromatic- Use active vertex group, result will be shades of greyVertex Group Colorized- Use active vertex group, result will be colored from red (1.0) to blue (0.0) like in weight paint viewport
Color(Source: Vertices, Surface, Particles)- Constant colorExact Number of Samples(Source: Surface, Algorithm: Triangle)- Generate exact number of points, if selected algorithm result is less points, more points will be calculated on random polygons at the end, if result is more points, points will be shuffled and sliced to match exact valueMinimal Distance(Source: Surface, Algorithm: Poisson)- Poisson Disk minimal distance between points, the smaller value, the slower calculationSampling Exponent(Source: Surface, Algorithm: Poisson)- Poisson Disk presampling exponent, lower values are faster but less even, higher values are slower exponentially
When Source is Particles, for generating colors (apart from Constant color), non-overlapping UV layout is required (can be really bad, useless for real production).
Export
Export current point cloud as binary ply file with several options. If exporting modified (filtered) points, check Use Viewport Points, otherwise you will not get modified points. If exporting viewport points colors may slightly differ. Transformation and axis conversion can be applied on both loaded and viewport points.
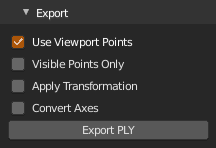
Use Viewport Points- When checked, export points currently displayed in viewport or when unchecked, export data loaded from original ply fileVisible Points Only- Export currently visible points only (controlled by 'Display' on main panel)Apply Transformation- Apply parent object transformation to pointsConvert Axes- Convert from blender (y forward, z up) to forward -z, up y axes
Sequence
Load sequence of ply files to play in viewport. Load first frame as regular file and when Preload Sequence is clicked it tries to load all ply files matching selected ply filename, e.g. you select sequence-001.ply and all sequence-###.ply will be loaded from directory. Only last number in filename is considered. Numbers should start at 1. All other features works when animation is not playing, but all changes are lost when you change frame to another.

Preload Sequence- Load all matching ply filesCycle Forever- Cycle frames if timeline is longer than number of loaded framesClear Sequence- Clear all loaded and return object to regular state i.e. you can load another ply, changes are kept etc.
External API
To display point cloud data from other addons/custom scripts.
import bpy
import numpy as np
from space_view3d_point_cloud_visualizer import PCVControl
o = bpy.context.active_object
c = PCVControl(o)
n = 100
vs = np.random.normal(0, 2, (n, 3))
ns = np.array([[0.0, 0.0, 1.0]] * n)
cs = np.random.random((n, 3))
# draw points
c.draw(vs, ns, cs)
# if some data like normals/colors are not available
c.draw(vs, None, None)
c.draw(vs, [], [])
c.draw(vs)
# it is also possible to pass nothing in which case nothing is drawn
c.draw()# to stop any drawing
c.erase()
# to return object control to user
c.reset()Addon Preferences:
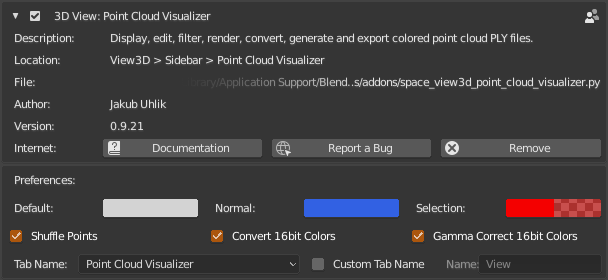
Default- Default color to be used upon loading PLY to cache when vertex colors are missingNormal- Display color for vertex normals linesSelection- Display color for selectionShuffle Points- Shuffle points upon loading, display percentage is more useable if points are shuffled, disabled if you plan to export ply and you need to keep point orderConvert 16bit Colors- Convert 16bit colors to 8bit, applied when Red channel has 'uint16' dtypeGamma Correct 16bit Colors- When 16bit colors are encountered apply gamma as 'c ** (1 / 2.2)'Tab Name- To have PCV in its own separate tab, choose oneCustom Tab Name- Check if you want to have PCV in custom named tab or in existing tabName- Custom PCV tab name, if you choose one from already existing tabs it will append to that tab
Changelog:
- 0.9.30 join filter, ui tweaks, fixes
- 0.9.29 fixes, render logging
- 0.9.28 clipping planes from object bounding box, faster all numpy export, many minor fixes
- 0.9.27 render supersampling and draw smooth circles
- 0.9.26 color adjustment fixes
- 0.9.25 color adjustment, faster boolean
- 0.9.24 project colors
- 0.9.23 fixes
- 0.9.22 extra debug shaders
- 0.9.21 preferences
- 0.9.20 ui changes, poisson disk sampling generation, size and alpha available in edit mode, various fixes, removed manual depth sorting during render
- 0.9.19 point cloud generation from vertices and particles
- 0.9.18 point cloud generation from mesh surface
- 0.9.17 fixes
- 0.9.16 boolean filters
- 0.9.15 selection preview for remove color filter
- 0.9.14 external api improvements
- 0.9.13 faster normals drawing
- 0.9.12 ply sequence, external api
- 0.9.11 merge filter
- 0.9.10 ui
- 0.9.9 point cloud global alpha
- 0.9.8 basic editing
- 0.9.7 project point cloud on mesh surface
- 0.9.6 ply exporting now uses original or viewport data
- 0.9.5 simplify and remove color filters
- 0.9.4 export ply
- 0.9.3 conversion to instancer
- 0.9.2 load ply with 16bit colors
- 0.9.1 all new render settings
- 0.9.0 conversion to particles
- 0.8.14 fixes
- 0.8.13 fixes
- 0.8.12 fixes
- 0.8.11 ui tweaks
- 0.8.10 fixes
- 0.8.9 ui tweaks, code cleanup
- 0.8.8 refactored convert to mesh
- 0.8.7 fixed vcols bug in convert
- 0.8.6 ui tweaks, a few minor optimizations
- 0.8.5 convert to mesh all or subset
- 0.8.4 preferences, ui tweaks
- 0.8.3 display normals
- 0.8.2 fixed shader unknown attribute name
- 0.8.1 fixed ply with alpha, fixed convert to mesh when normals or colors are missing
- 0.8.0 convert to mesh
- 0.7.2 ui tweaks
- 0.7.1 viewport performance fixes
- 0.7.0 ascii ply support
- 0.6.6 fixed drawing after undo/redo
- 0.6.5 point cloud illumination
- 0.6.4 refactored draw handlers, fixed occasional crash on erase
- 0.6.3 added percentage of rendered points, fixed render colors to look the same as in viewport
- 0.6.2 fixed point size display in viewport, separated view and render point size
- 0.6.1 single cloud rendering almost completely rewritten to be better and faster
- 0.6.0 single cloud rendering
- 0.5.2 refactored some logic, removed icons from buttons
- 0.5.1 load ply without vertex colors, uniform grey will be used
- 0.5.0 performance improvements using numpy for loading and processing data
- 0.4.6 fixed crash when parent object is deleted while drawing, fixed removal of loaded data when parent is deleted
- 0.4.5 added 'Display' percentage, better error handling during .ply loading
- 0.4.0 almost complete rewrite for blender 2.80, performance improvements using shaders, simplified ui
- 0.3.0 new ply loader, can be used with any binary ply file with vertex coordinates and colors
- 0.2.0 display percentage
- 0.1.0 first release
Known bugs:
- If you duplicate object with cloud, duplicate will still control the original one until you load a different one. Currently there is no reliable way (as far as i know) to get unique id of an object and therefore no way to tell to which object stored properties (e.g. path to ply) belong.
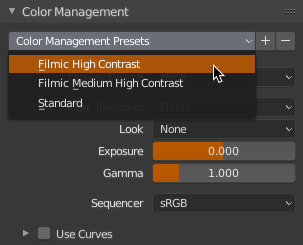
Color Management Presets (for blender 2.80)
Presets support for Render > Color Management panel, nothing more, nothing less.. Comes with a few presets i use which are created upon activation.
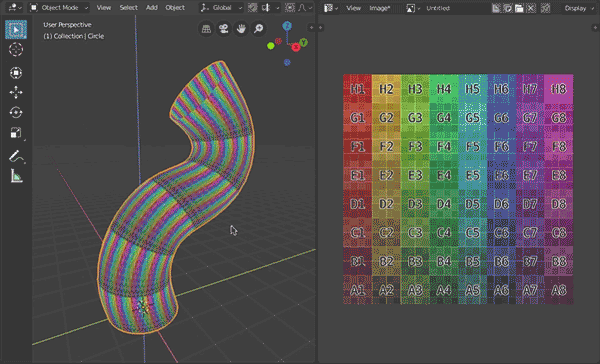
Tube UV Unwrap (for blender 2.80)
UV unwrap tube-like meshes (all quads, no caps, fixed number of vertices in each ring)
notes:
- Works only on tube-like parts of mesh defined by selection and active vertex (therefore you must be in vertex selection mode) and the selection must have a start and an end ring. Tube-like mesh is: all quads, no caps, fixed number of vertices in each ring. (Best example of such mesh is mesh circle extruded several times or beveled curve (not cyclic) converted to mesh.) There must be an active vertex on one of the boundary loops in selection. This active vertex define place where mesh will be 'cut' - where seam will be placed.
- Result is rectangular UV for easy texturing, scaled to fit square, horizontal and vertical distances between vertices are averaged and proportional to each other.
usage:
- tab to Edit mode
- select part of mesh you want to unwrap, tube type explained above
- make sure your selection has boundaries and there is an active vertex on one border of selection
- hit "U" and select "Tube UV Unwrap"
- optionally check/uncheck 'Mark Seams' or 'Flip' in operator properties
changelog:
- 0.3.0 blender 2.8 update
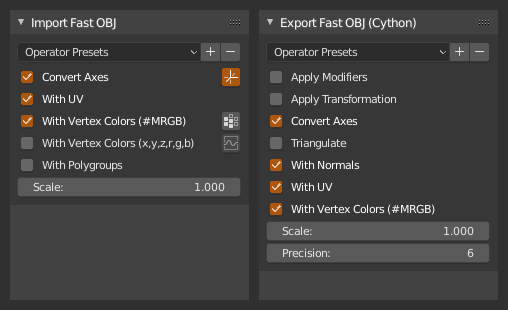
Fast Wavefront^2 (for blender 2.80)
Import/Export single mesh as Wavefront OBJ. Fast. Now with Cython. Binaries not included.
Only active mesh is exported. Only single mesh is expected on import. Supported obj features: UVs, normals, vertex colors using MRGB format (ZBrush) or 'Extended' format (import only) where vertex is defined as (x,y,z,r,g,b).
changelog:
- 0.3.6 fixed export with applied modifiers
- 0.3.5 api changes fixes
- 0.3.4 ui
- 0.3.3 fallback python export implementation in case cython module is not available
- 0.3.2 import 'extended' vertex colors (x,y,z,r,g,b), optionally apply gamma correction
- 0.3.1 import obj (python only)
- 0.3.0 export implemented in cython
- 0.2.0 ported to blender 2.80
installation on mac (win/linux should be similar) and blender 2.83.6 assuming you have blender in /Applications/Blender.app:
get pip and install cython using pip
cd /Applications/Blender.app/Contents/Resources/2.83/python/bin/
./python3.7m -m ensurepip
./python3.7m -m pip install -U pip
./pip3 install cython
clone blender source
cd ~/Library/Application Support/Blender/2.83/scripts/addons/io_mesh_fast_obj
git clone git://git.blender.org/blender.git
cd blender
git checkout v2.83.6
build cython extension
/Applications/Blender.app/Contents/Resources/2.83/python/bin/python3.7m setup.py build_ext --inplace
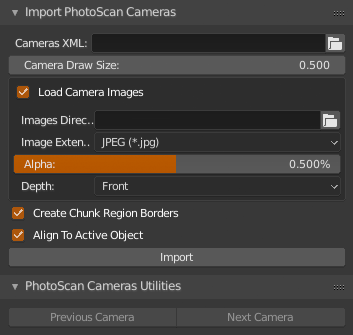
Import Agisoft PhotoScan Cameras
Import cameras from Agisoft PhotoScan xml. Works with xml version 1.4.0 which is exported from PhotoScan 1.4.x versions and xml versions 1.5.0 from Agisoft Metashape 1.5.x versions. If you want to have images actually aligned with model, undistort images first. This is done in PhotoScan by Export > Undistort Photos... Because you can't in Blender set resolution for cameras independently, xml with different cameras or image resolutions might not work well.
usage:
- go to
Properties > Scene > Import Agisoft PhotoScan Cameraspanel - Cameras XML: set path to xml
- set import options:
- Camera Display Size: size of imported cameras in viewport
- Load Camera Images: load images or not
- Images Directory: path to directory with undistorted images
- Image Extension: images extension, they all should be the same (currently)
- Alpha: camera image alpha, 0.0 - 1.0
- Depth: camera display depth, front / back
- there are some more optional properties:
- Create Chunk Region Borders
- Align to Active Object: if you import mesh from PhotoScan first, the transform it to correct size and orientation, this option will copy transformation from that mesh if it is active
- hit Import
- import done..
- now you can quickly swap cameras in alphabetical order in
PhotoScan Cameras Utilitiespanel
changelog:
- 0.1.3 ui
- 0.1.2 compatibility with Agisoft Metashape XML (1.5.x)
- 0.1.1 first release
Carbon Tools
Ever-evolving set of small tools, workflows and shortcuts focused mainly on processing photogrammetry scans.
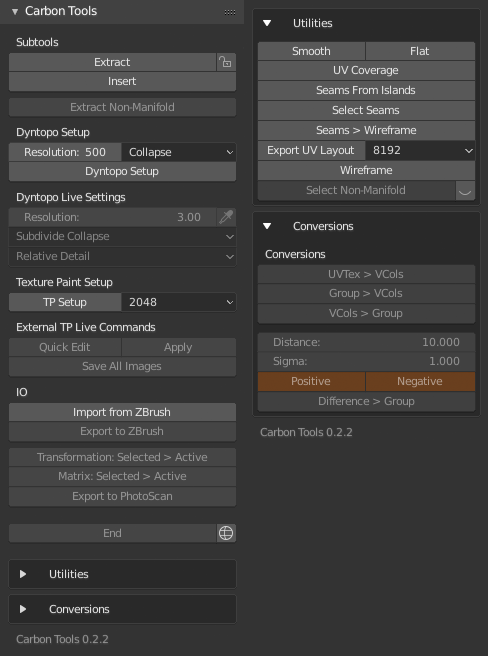
Subtools
- Extract selected part of mesh to a new object. If edges of extracted mesh are changed, it won't be able to merge back seamlessly - use option to hide edges (lock button) to protect them.
- Insert it back when finished editing.
- Extract Non-Manifold elements with part of mesh around them (10x expanded selection) as subtool
Dyntopo
- Dyntopo Setup - Quick setup for optimizing mesh resolution. Set desired Constant Resolution and Method and hit Dyntopo Setup Mode is switched to Sculpt with Dyntopo, brush is set to strength 0 - affecting only mesh resolution.
- Dyntopo Live Settings - current settings which can be changed during sculpting
Texture Paint
- Texture Paint Setup - Quick setup for retouching texture in Photoshop, set Resolution of exported images and hit TP Setup (Photoshop must be set in preferences as Image Editor)
- External TP Live Commands: Quick Edit - export image and open in PS, Apply - project image back to model, Save All Images - save all edited textures
IO
- Import from ZBrush (depends on other addon Fast Wavefront^2)
- Export to ZBrush (depends on other addon Fast Wavefront^2)
- Transformation: Selected > Active - Copy transformation from selected to active. Useful for setting correct scale and orientation after initial import from PhotoScan.
- Matrix: Selected > Active - Select matrix source object first and then target object. Matrix will be copied while keeping visual transformation intact.
- Export to PhotoScan (depends on other addon Fast Wavefront^2)
End
- End ends current procedure: Dyntopo and Texture Paint back to Object mode and reset all settings
Utilities
- Smooth / Flat shading, just shortcuts
- UV Coverage calculate and print how much percent covers active uv layout
- Seams From Islands mark seams from UV islands
- Select Seams select seam edges
- Seams > Wireframe copy seams edges to a new mesh object
- Export UV Layout
- Wireframe set display to shaded + wire + all edges and deselect object
- Select Non-Manifold select non-manifold elements and optionally focus camera on them (eye icon)
Conversions
- UVTex > VCols - Copy image colors from active image texture node in active material using active UV layout to new vertex colors
- Group > VCols - Active vertex group to new vertex colors, vertex weight to rgba(weight, weight, weight, 1.0)
- VCols > Group - Active vertex colors to new vertex group, vertex weight by color perceived luminance
- Difference > Group - Calculate difference between two selected meshes and write as vertex group to active mesh. Selected is considered to be original, active to be modified. Objects should have the same transformation.
changelog:
- 2.2.2 ui changes, mesh difference to group, calculate uv coverage
- 0.2.1 uvtex / vcols / group conversions
- 0.2.0 first release
Time Tracker (for blender 2.80)
Simple time tracker inside blender. After you install and enable it, it will log loaded and saved files and time spent of file until it is saved. All ui is inside addon preferences.
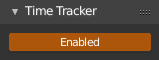
Here you can enable / disable logging, clear data collected so far, set custom data path (.csv) and see short summary of collected data and open individual project directories in file browser. The project name is determined by directory name where the blend is. For example if you have project in directory named "MyNewOutstandingProject" and all blends are inside subdirectory "models", set level number to 1 and you will see project name in results. 0 is directory directly above blend, 1 is one directory above blend, and so on. If you are like me and all your projects have the same subdirectory structure, sent directory level and you are good to go.
changelog:
- 0.2.0 updated for 2.80
- 0.1.0 added simple ui
- 0.0.8 ui tweaks, more advanced options, minor bugfixes
- 0.0.7 fixed performance and sorting, added tracking of files which were closed without saving once a minute (can be enabled in preferences: check Track Scene Update)
- 0.0.6 first release