Tello_ROS_ORBSLAM
In this project we provide a full and whole framework for using Drones in general, and the DJI Tello specifficaly.
In this project you will find a GUI that will allow you to control the Tello and command it to move in the x,y,z,pitch,roll,yaw plane.
Using this GUI will allow fast development of SLAM algorithms and integrate them with real Tello hardware.
The coordinates are derived from a pose that is published in one of the 2 slam algorithms (currently, orbslam and ccm slam, but you can easily add your own)
Inside the files, you will find a joystick/keyboard to control the tello from within ROS, instead of using your android phone.
ORBSLAM
<img src="http://img.youtube.com/vi/5tXE1TO7TC8/0.jpg" alt="IMAGE ALT TEXT HERE" width="480" height="360" border="10" />
In this video we can see a brief explenation about how the framework looks like when using the ORBSLAM. The Tello sends video stream to the ORBSLAM, the ORBSLAM provides position and orientation to the control, and the control controls the Tello to navigate it to the wanted location.
Tello UI (User Interface):
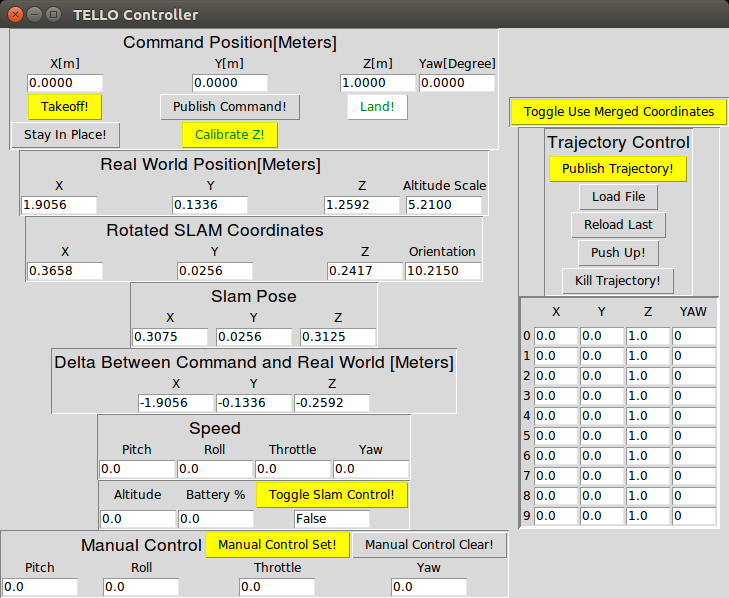
The Tello UI is conssited of multiple tools that allows you to control the Tello using a SLAM algorithm or using raw RPY (Roll, Pitch, Yaw).
Brief Explenation of the UI
Command Position Section

Takeoff, Land
Well, it goes without saying - this buttons will make the tello takeoff/land.
Calibrate Z!
Pressing this button will make the Tello elevate ~0.5 meters and then descent ~0.5 meters.
During this time the tello's internal height sensor will be sampled among with the height that is being published by the SLAM algorithm.
At the end of the movement the control calculates:
The control will be using that factor to go from the SLAM coordinate system to the real world coordinate system.
Publish Command!
Pushing this button will send the coordinates in the boxes (x, y, z, yaw) to the control, and the control will navigate the tello to those coordinates.
note that the control will control the Tello only if the "Toggle Slam Control!" Button is pressed!
Stay In Place!
This button will command the Tello to stay in the current place using the control.
Real World Position Section

In this section we can observe the tello's current coordinates in the real world coordinates. The Altitude Scale is the factor that was calculated during the Calibrate Z! process.
Rotated SLAM Coordinates Section

In this section we can observe the tello's current coordinates in the SLAM coordinates (after rotating the coordinate system to compensate for the angle of the camera of the Tello).
Delta Between Command and Real World Section

In this section we can observe the difference between the Tello's current pose, to the desired pose we commanded.
Speed Section
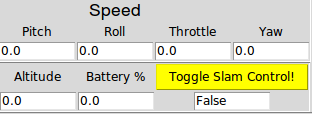
In this section we can observe the current speed in all the axes (pitch, roll, throttle, yaw) of the Tello. Also, we can see some side information about the Tello, likt the Altitude and the remaining Battery[%].
Toggle Slam Control!
This is a protection button. Pressing this button will allow the control to take over the Tello's speed control.
Manual Control Section

In this section we can manually control the speeds of the Tello in all axes. Just insert the wanted speed (0-1) in each axis and press Manual Control Set! To stop press the Manual Control Clear! button.
Trajectory Control Section
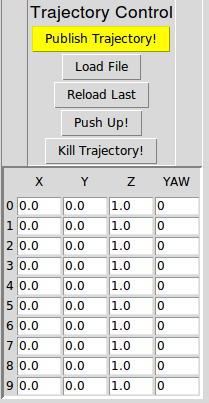
This section allows to command the Tello to go to many points one after the other. You can either insert the coordinates manually in the boxes, or load the using Load File button. Eventually press the Publish Trajectory! button to start the trajectory.
note that the control will control the Tello only if the "Toggle Slam Control!" Button is pressed!
Toggle Use Merged Coordinates
This button is used in the ccmslam algorithm. After the two drones have merged a map, our modification to ccmslam algorithm allows to control the drones using the same coordinate system. In other words, after the map was merged, pressing this button will make the controller of each drone to use the same coordinate system.
Tello Viewers:
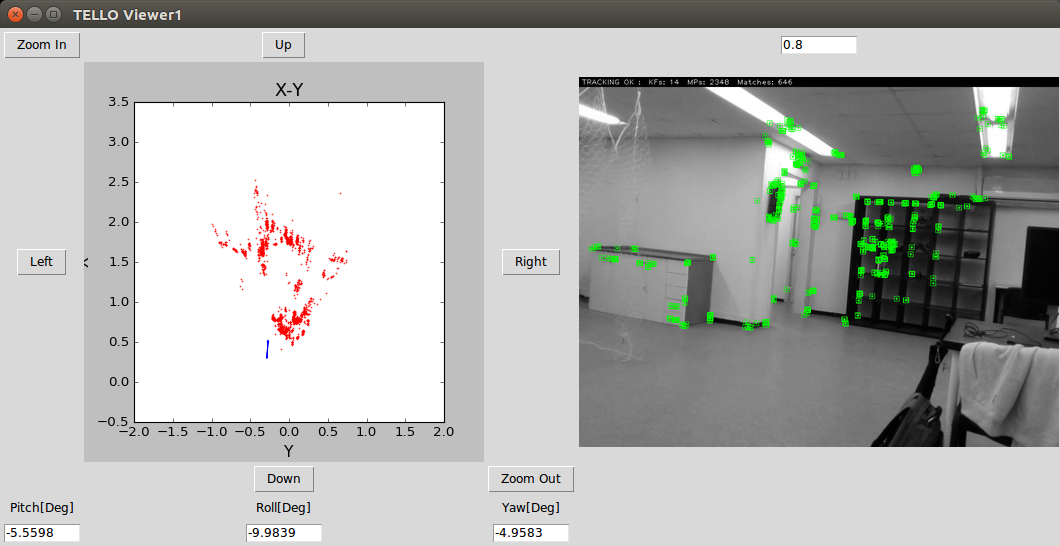
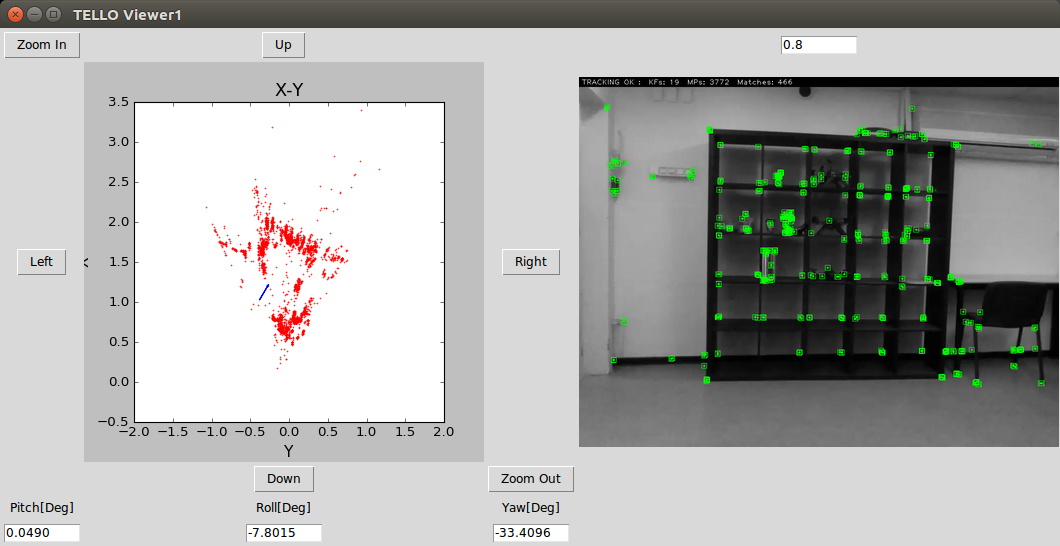
In the Viewer we can observe the video stream received from the SLAM algorithm, among with the cloud map in the X-Y plane.
Tello Client 0:
Tello Client 1:
Usage
orbslam2
roslaunch flock_driver orbslam2_with_cloud_map.launchccmslam
Server:
roslaunch ccmslam tello_Server.launch Client0:
roslaunch ccmslam tello_Client0.launchClient1:
roslaunch ccmslam tello_Client1.launchInstallation Guide
Installing ROS melodic
Following this page: http://wiki.ros.org/melodic/Installation/Ubuntu
Setup your computer to accept software from packages.ros.org. :
sudo sh -c 'echo "deb http://packages.ros.org/ros/ubuntu $(lsb_release -sc) main" > /etc/apt/sources.list.d/ros-latest.list'Set up your keys
sudo apt-key adv --keyserver 'hkp://keyserver.ubuntu.com:80' --recv-key C1CF6E31E6BADE8868B172B4F42ED6FBAB17C654Installation
First, make sure your Debian package index is up-to-date:
sudo apt updateDesktop-Full Install: (Recommended) : ROS, rqt, rviz, robot-generic libraries, 2D/3D simulators and 2D/3D perception
sudo apt install ros-melodic-desktop-fullInitialize rosdep
Before you can use ROS, you will need to initialize rosdep. rosdep enables you to easily install system dependencies for source you want to compile and is required to run some core components in ROS.
sudo rosdep init
rosdep update
Environment setup
It's convenient if the ROS environment variables are automatically added to your bash session every time a new shell is launched:
echo "source /opt/ros/melodic/setup.bash" >> ~/.bashrc
source ~/.bashrc
Dependencies for building packages
Up to now you have installed what you need to run the core ROS packages. To create and manage your own ROS workspaces, there are various tools and requirements that are distributed separately. For example, rosinstall is a frequently used command-line tool that enables you to easily download many source trees for ROS packages with one command. To install this tool and other dependencies for building ROS packages, run:
sudo apt install python-rosinstall python-rosinstall-generator python-wstool build-essentialInstall Prerequisites
Please install all the prerequisites, no matter which algorithm you want to use.
Easy Install Prerequisites
catking tools
First you must have the ROS repositories which contain the .deb for catkin_tools:
sudo sh -c 'echo "deb http://packages.ros.org/ros/ubuntu `lsb_release -sc` main" > /etc/apt/sources.list.d/ros-latest.list'
wget http://packages.ros.org/ros.key -O - | sudo apt-key add -
Once you have added that repository, run these commands to install catkin_tools:
sudo apt-get update
sudo apt-get install python-catkin-tools
Eigen3
Required by g2o. Download and install instructions can be found here. Otherwise Eigen can be installed as a binary with:
sudo apt install libeigen3-devffmpeg
sudo apt install ffmpegPython catkin tools (probably already installed)
sudo apt-get install python-catkin-toolsJoystick drivers
Tested it only on melodic.
sudo apt install ros-melodic-joystick-driversPython PIL
sudo apt-get install python-imaging-tkGithub based Prerequisites
Pangolin (used in orbslam2)
Based on https://github.com/stevenlovegrove/Pangolin
cd ~/ROS/
git clone https://github.com/stevenlovegrove/Pangolin.git
sudo apt install libgl1-mesa-dev
sudo apt install libglew-dev
sudo apt-get install libxkbcommon-dev
cd Pangolin
mkdir build
cd build
cmake ..
cmake --build
h264decoder
Baed on https://github.com/DaWelter/h264decoder
cd ~/ROS/
git clone https://github.com/DaWelter/h264decoder.git
Inside h264decoder.cpp replace PIX_FMT_RGB24 with AV_PIX_FMT_RGB24
mkdir build
cd build
cmake ..
make
now copy it to python path
sudo cp ~/ROS/h264decoder/libh264decoder.so /usr/local/lib/python2.7/dist-packagesInstalling Our Repository
Cloning Our repo from github
cd ~
mkdir ROS
cd ROS
git clone https://github.com/tau-adl/Tello_ROS_ORBSLAM.git
Installing our version of TelloPy
based on https://github.com/dji-sdk/Tello-Python and https://github.com/hanyazou/TelloPy
cd ~/ROS/Tello_ROS_ORBSLAM/TelloPy
sudo python setup.py install
Installing dependencies for ROS
cd ~/ROS/Tello_ROS_ORBSLAM/ROS/tello_catkin_ws/
sudo rosdep init
rosdep update
rosdep install --from-paths src --ignore-src -r -y
Installing orbslam2
based on https://github.com/appliedAI-Initiative/orb_slam_2_ros and https://github.com/rayvburn/ORB-SLAM2_ROS First - if using Melodic version of ROS, change the ~/ROS/Tello_ROS_ORBSLAM/ROS/tello_catkin_ws/src/orb_slam_2_ros/CMakeLists.txt To the CMakeLists_melodic.txt
Build the code:
cd ~/ROS/Tello_ROS_ORBSLAM/ROS/tello_catkin_ws/
catkin init
catkin clean
catkin build
If it doesn’t work, make sure you changed the makefile to the wanted version of ROS
Add the enviroment setup to bashrc
echo "source $PWD/devel/setup.bash" >> ~/.bashrc
source ~/.bashrc
Installing ccm_slam
based on https://github.com/VIS4ROB-lab/ccm_slam
Compile DBoW2:
cd ~/ROS/Tello_ROS_ORBSLAM/ROS/ccmslam_ws/src/ccm_slam/cslam/thirdparty/DBoW2/
mkdir build
cd build
cmake ..
make -j8
Compile g2o:
cd ~/ROS/Tello_ROS_ORBSLAM/ROS/ccmslam_ws/src/ccm_slam/cslam/thirdparty/g2o
mkdir build
cd build
cmake --cmake-args -DG2O_U14=0 ..
make -j8
Unzip Vocabulary:
cd ~/ROS/Tello_ROS_ORBSLAM/ROS/ccmslam_ws/src/ccm_slam/cslam/conf
unzip ORBvoc.txt.zip
Build the code:
cd ~/ROS/Tello_ROS_ORBSLAM/ROS/ccmslam_ws/
source /opt/ros/melodic/setup.bash
catkin init
catkin config --extend /opt/ros/melodic
catkin build ccmslam --cmake-args -DG2O_U14=0 -DCMAKE_BUILD_TYPE=Release
If Gives error - ROS distro neither indigo nor kinetic - change the makefile, use CmakeFile_changed2.
Add the enviroment setup to bashrc
echo "source $PWD/devel/setup.bash" >> ~/.bashrc
source ~/.bashrc
Notes
Flock
we have used code from https://github.com/clydemcqueen/flock